Create document from template in Power Automate and sign it using Adobe Sign
This article is a ready-to-use solution on how to create a PDF document from a template and sign it using Adobe Sign.
With the help of Processes, we will create a purchase agreement from a DOCX template, save in SharePoint document library and send for signing using the Adobe Sign connector for Power Automate (Flow).
Hint
There is an easier way to send generated documents to Adobe Sign for e-signing with our direct integration — Adobe Sign delivery.
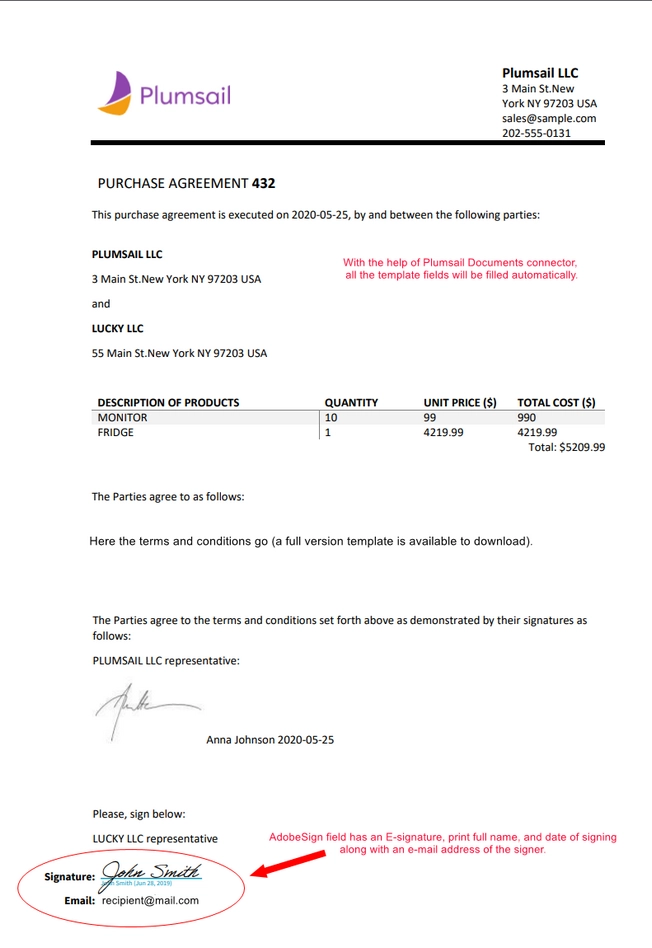
This is how the result document will look after signing:
Configure the Process
Before creating the Flow, we need to set a Process, which will create our purchase agreement in PDF format from a DOCX template.
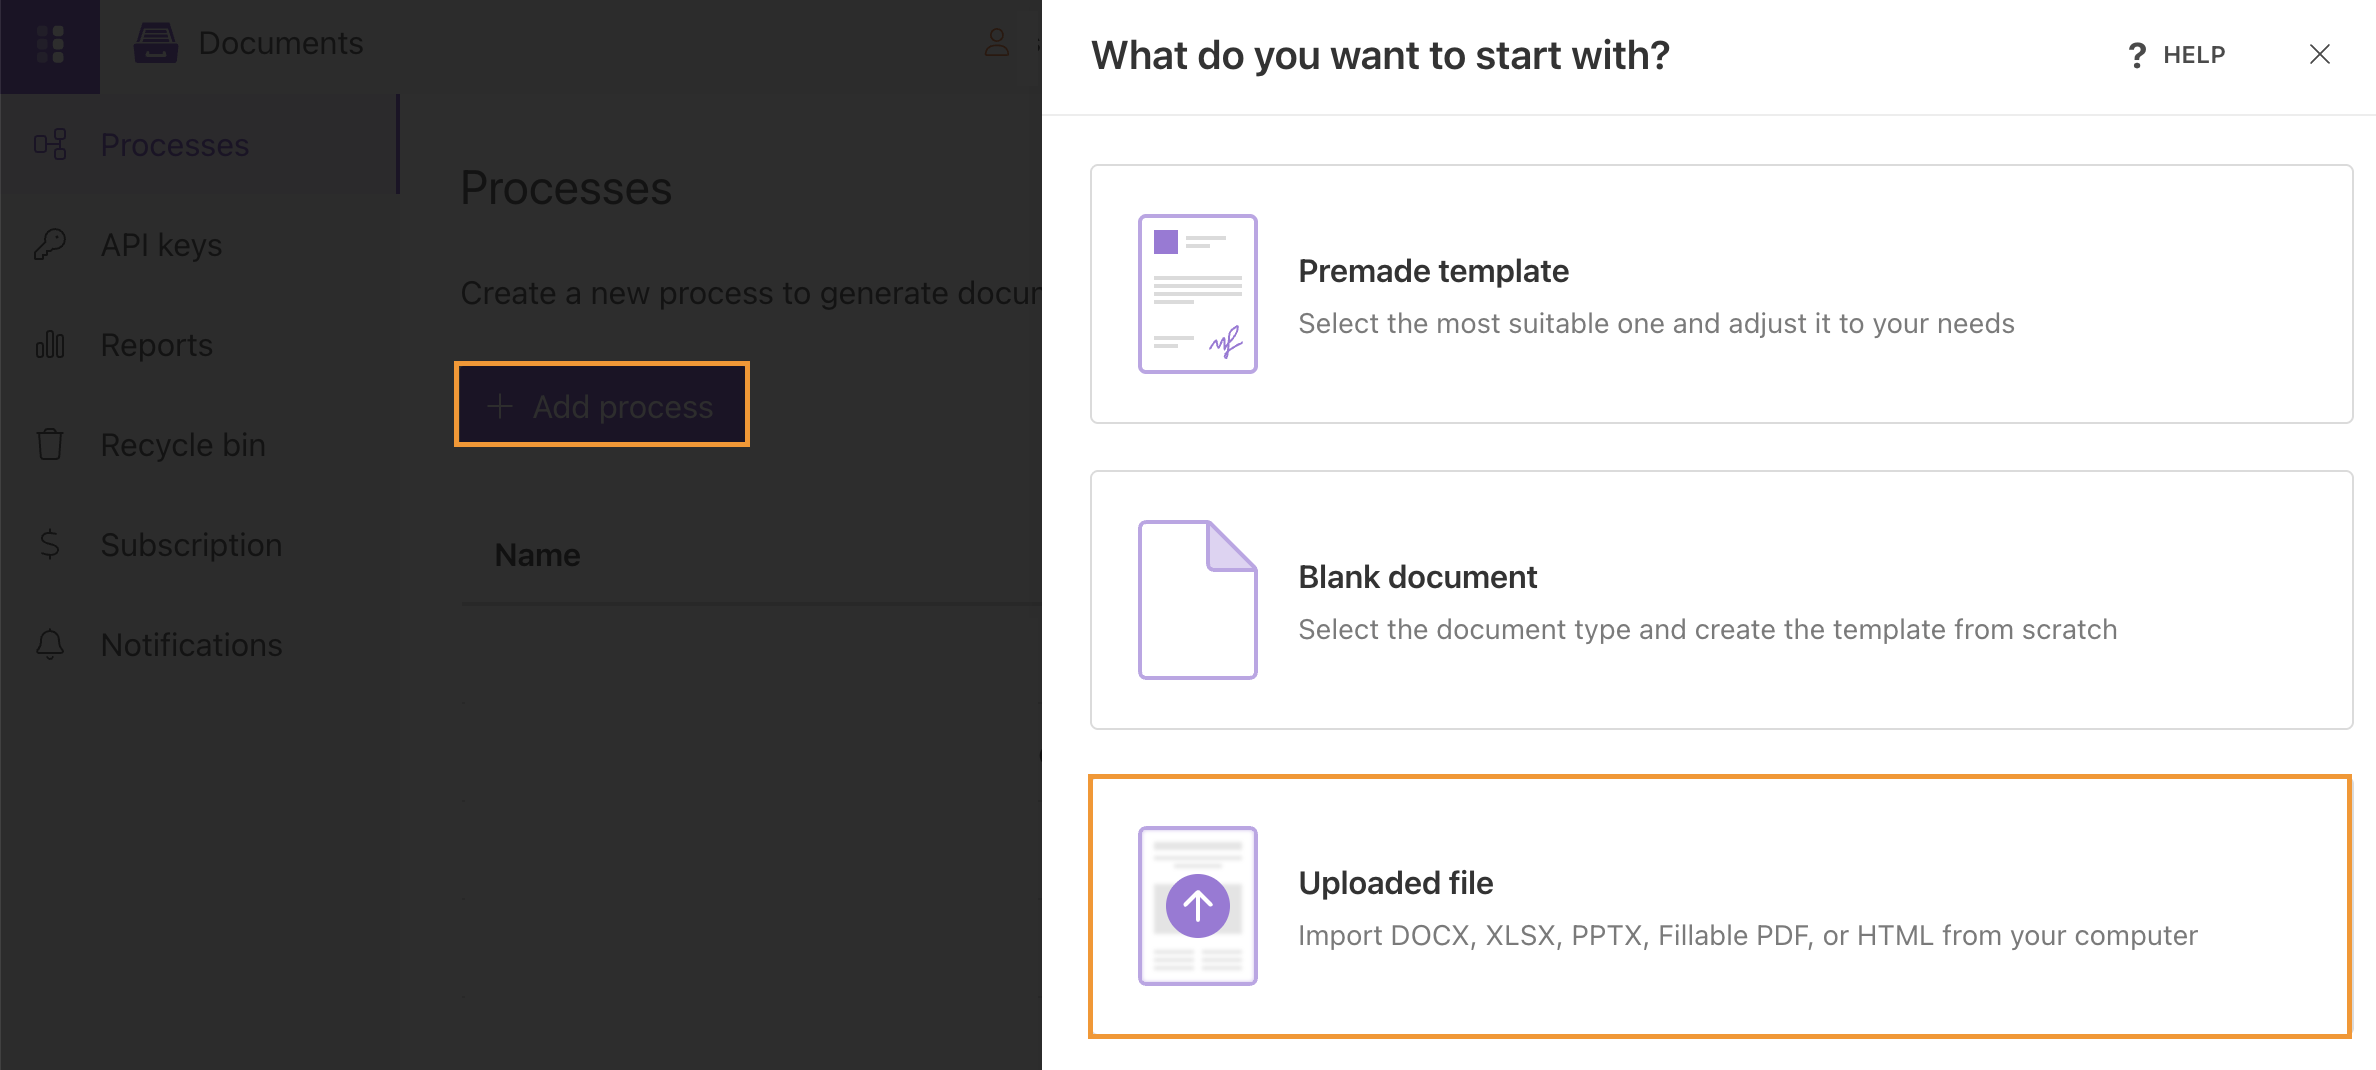
Create a new process
First, go to the Processes section in your Plumsail account.
Click on the Add process button.
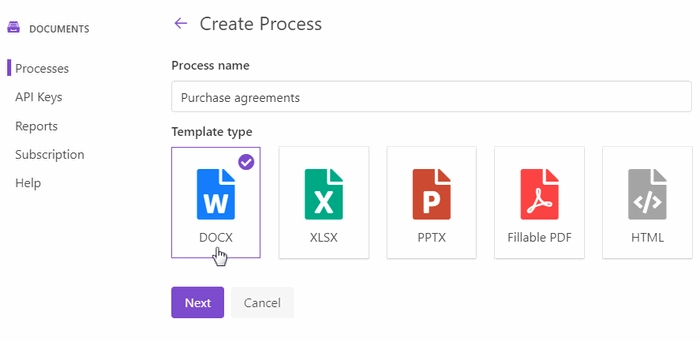
Set the Process name. As we’re going to create a PDF purchase agreement from a DOCX template, select DOCX for the template type.
Configure a template
Once you’re done with the first step Create Process, press the Next button, and you’ll jump to the next step – Configure Template.
There you’ll find two substeps:
Editor;
and Settings.
In Editor, you can work out the template online, or upload the pre-made template and modify it in case of need.
You can download a DOCX template for a purchase agreement that we have already prepared.
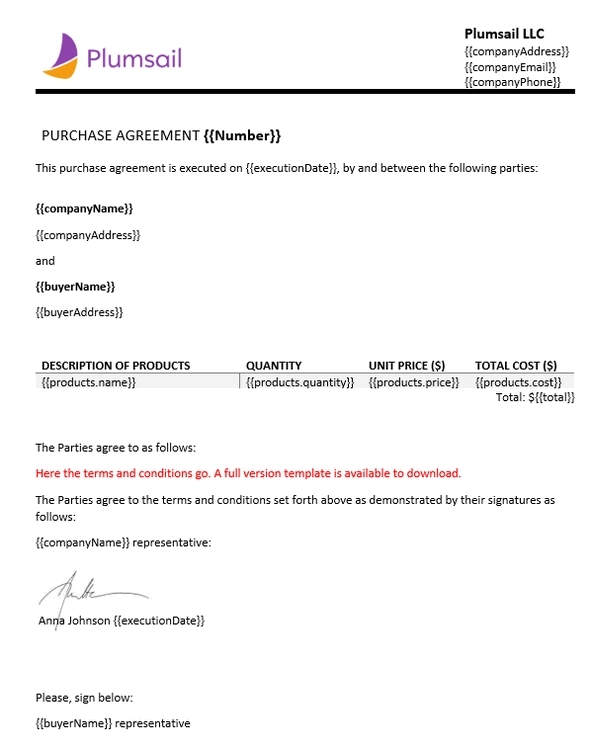
And then upload it to the process.
Templating syntax
When creating your own templates, mind the templating language. Plumsail Word DOCX templates use a different approach than most other templating solutions. It uses a minimal amount of syntax to make your work done.
In short, the templating engine thinks that everything between {{curly}} brackets is variables where it will apply your specified data.
Read this article to get familiar with the templating engine.
Test template
After you’ve uploaded the template to the process, you will see the template preview. To get a sight of the resulting document, click the Test template button. You will see the dialog where you can fill in the auto-generated testing form. Form fields are created based tokens from your document template. You can adjust the look of the testing form by changing token types.

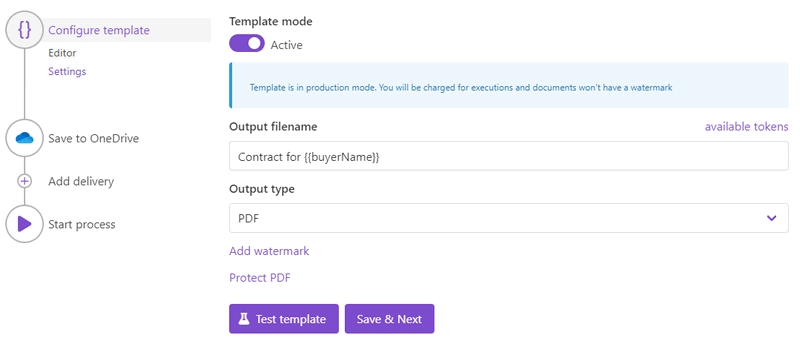
Once you’ve tested the template, press Save&Next to proceed further - to the Settings substep.
Fill in the name of the result file.
Select PDF format for the output file
Protect the result PDF if you wish
Delivery
The next step is delivery. For demonstrating purpose, we’ll store the result file in OneDrive. But there are other options.
Select the folder where the ready document will be saved.
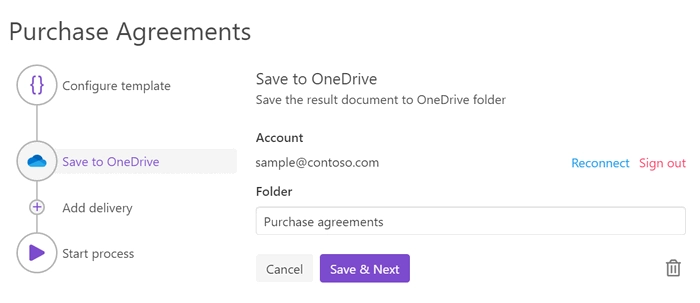
You can configure as many deliveries as you need.
Start the Process
We will start our Process from Power Automate (Flow).
Create a Flow
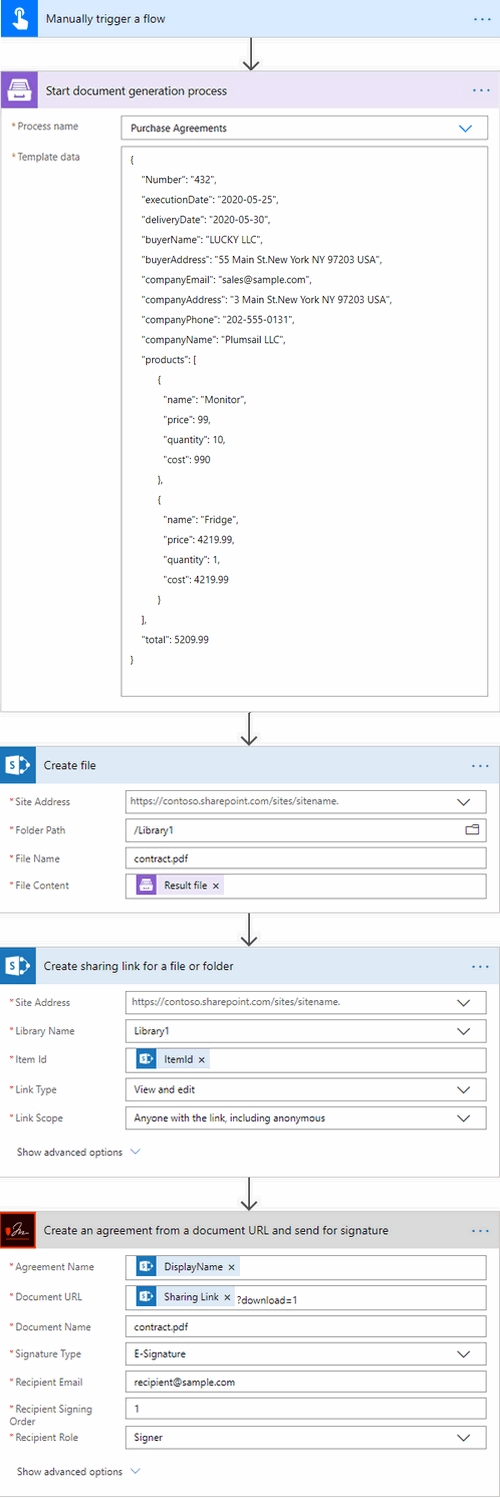
This is how our Flow looks:
Check out the Flow steps described below.
Flow trigger
After you’ve opened My Flows, create a new one, and select a trigger. You can pick any, for example, trigger a Flow when an opportunity in CRM is closed, or a new item is added to SharePoint list. We will pick ‘Manually trigger a Flow’ just for demonstration purposes.
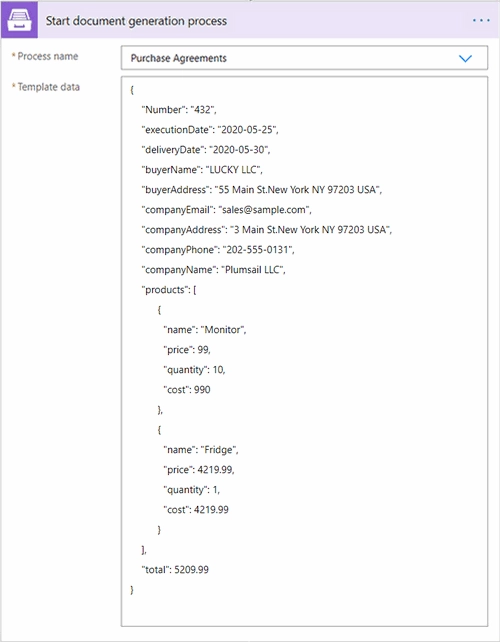
Start document generation process
This is the action from Plumsail Documents connector. This action is suitable for starting the Process of generating documents from a template. You can find more information about this action by visiting this page.
Mind, If you use the Plumsail documents action for the first time, you’ll be asked for ‘Connection Name’ and ‘Access Key’. You can type any name for the connection. For example, ‘Plumsail Documents’.
Then create an API key in your Plumsail Account page, copy and paste it to the ‘Access Key’ field.
The Start document generation process action has two parameters:
Process name. Select the process you need from available ones.
Template data. Specify source data in JSON format.
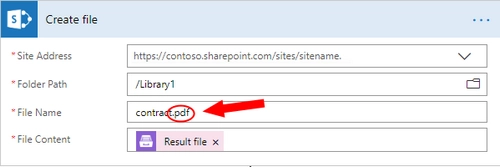
Create file
Use this action to store the completed agreement in SharePoint document library. Specify a SharePoint site URL, a library, the name of the document with .PDF extension, and for File content choose Result file – an output from the Start document generation step.
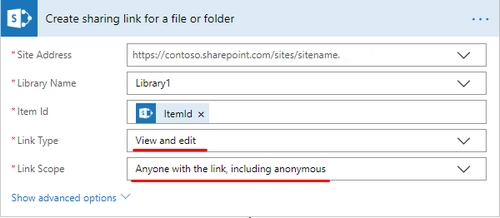
Create sharing link for a file or folder
We will need to share our contract with Adobe Sign, that’s why a sharing link is needed. Pay attention to choose the right link type and scope – they should be ‘View and edit’ and ‘Anyone with the link, including anonymous’ respectively.
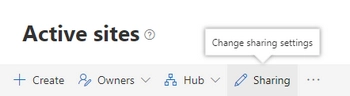
There is a tricky moment for SharePoint site collection – you may be not allowed to share files from libraries of your SP site. In the case of such a setting, the Flow will fail on this step. We need to change the settings.
For that, go to SharePoint Admin Center, navigate to Active sites, choose yours and click on the button ‘Sharing’ to edit the settings.
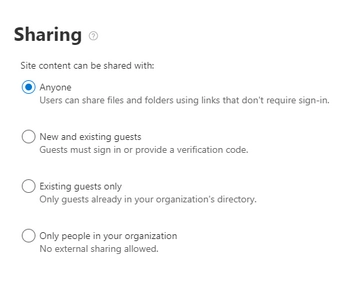
For our purpose, the site content can be shared with anyone.
You may be worried about sensitive information while sharing files, but there is no reason for it; nobody can use the link, but the Adobe Sign application for getting content to create an agreement for further usage in Adobe Sign.
Moreover, there is another action in Adobe Sign connector for Power Automate (Microsoft Flow) to upload documents directly, but unfortunately, it doesn’t work now because of a lack of code integration. We believe that it will be fixed in the future.
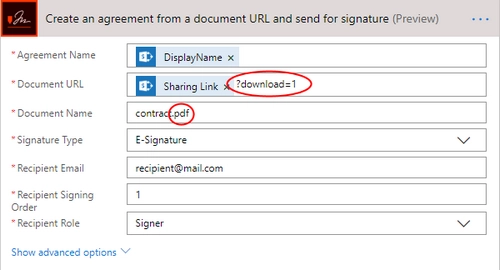
Create an agreement from a document URL, and send for signature
This action creates an agreement, saves it in the Adobe Sign account and sends it to your partner for signature.
You can put any name for ‘Agreement name’.
For Document URL field select an output from the previous step, and add ?download=1 to make the link direct. Otherwise, it won’t work.
Don’t forget to specify a file extension with .PDF
The Flow is ready. Now you know how to simplify your workflow processes with the help of Processes by Plumsail Documents and its connector for Power Automate (Flow). If you haven’t a Plumsail account yet, sign up to get started.