Object operations in DOCX templates
Object operations allow you to insert Word-specific objects into your document.
In this article, you’ll find a list of all the object operations you can use in DOCX templates. Each one comes with examples to help you see how you can use them in your documents.
barcode
Use the #barcode operation to generate barcodes in your template.
To see a full example, check how to create documents with barcodes from a template.
Syntax:
{{#barcode value "TYPE" width height}}
value — the token containing the barcode value
TYPE — barcode type (must be in quotes)
width — barcode width in pixels
height — barcode height in pixels
Example:
Template |
Data |
Result |
|---|---|---|
{{#barcode value "CODE128" 300 100}}
|
{
    "value": "test barcode"
}
|
the barcode |

This code generates a CODE128 barcode that is 300 pixels wide and 100 pixels high.
If you’d like to create a square barcode, you can leave out the height. This generates a barcode with a width and height of 300 pixels:
{{#barcode value "CODE128" 300}}
There are different types of the barcodes.
The following barcode types are supported:
Barcode type |
Template |
JSON data |
|---|---|---|
CODE128 |
|
{
    "value": "12345678"
}
|
CODE11 |
|
{
    "value": "01234567"
}
|
CODE39 |
|
{
    "value": "ABC1234"
}
|
UPCA |
|
{
    "value": "72527273070"
}
|
MSI |
|
{
    "value": "01234567"
}
|
ISBN |
|
{
    "value": "9781234567897"
}
|
EAN13 |
|
{
    "value": "978020137962"
}
|
ITF14 |
|
{
    "value": "01234567890123"
}
|
qrcode
The #qrcode operation allows you to insert a QR code into your template.
Syntax:
{{#qrcode value width}}
value — the token containing the QR code string value
width — QR code width in pixels (since QR codes are always square, the height will match the width automatically)
Example:
Template |
Data |
Result |
|---|---|---|
{{#qrcode value 150}}
|
{
    "value": "https://plumsail.com/"
}
|
the qrcode |

There are different types of QR codes, you can specify it in the JSON.
URL
To encode a URL, pass it as the text value in the JSON payload. Include the http:// or https:// protocol to ensure the value is recognized as a URL.
{
      "value": "https://plumsail.com/"
}
Phone Numbers
To encode a phone number, use the tel: URI scheme and include the country code to ensure the number is recognized correctly across different regions.
{
      "value": "tel:+1-234-555-6677"
}
Geolocations
To encode geographic coordinates, use the geo: URI scheme. Latitude and longitude are required, while altitude is optional.
{
      "value": "geo:42.65049,23.37925,100"
}
SMS
To encode an SMS recipient, use the sms: URI scheme. The value can be a phone number or a short code.
{
      "value": "sms:12345"
}
You can also use extended formats, such as smsto:number:message, to prefill the message text.
{
      "value": "smsto:+1234567890:Hello!"
}
WiFi Credentials
To encode WiFi credentials, use the WIFI: URI scheme.
The value consists of the WIFI: prefix followed by a series of key-value pairs in the format key:value, separated by semicolons.
Supported keys:
Key |
Description |
|---|---|
T |
Authentication type: |
S |
Network SSID (WiFi name) |
P |
Network password |
For example, the following value encodes a WiFi network named Office-Guest secured with WPA authentication and the password Welcome2024:
{
      "value": "WIFI:T:WPA;S:Office-Guest;P:Welcome2026;;"
}
vCard
To encode contact information, use the vCard format. The value starts with BEGIN:VCARD and ends with END:VCARD, with each contact property placed on a separate line.
The QR code value is treated as a plain text string. In the example below, line breaks between properties are represented by \r\n.
If you build the value dynamically, ensure that line breaks are included correctly. See vCard QR code examples.
{
      "value": "BEGIN:VCARD\r\nVERSION:3.0\r\nN:Doe;John;;;\r\nFN:John Doe\r\nORG:Plumsail\r\nTITLE:Sales Manager\r\nTEL;TYPE=WORK,VOICE:+41441234567\r\nEMAIL:john.doe@example.com\r\nURL:https://plumsail.com\r\nEND:VCARD"
}
The example above is equivalent to the following vCard structure:
Property |
Description |
|---|---|
|
vCard format version. |
|
Contact name in the format Last Name;First Name;Additional Names;Prefix;Suffix. |
|
Full name displayed to the user. |
|
Organization or company name. |
|
Job title. |
|
Phone number with type parameters indicating that it is a work number and a voice line. |
|
Email address. |
|
Website URL. |
MeCard
To encode contact information, use the MeCard format. The value starts with MECARD: followed by contact properties separated by semicolons. MeCard is a simplified alternative to vCard and is commonly used for sharing contact information through QR codes.
{
      "value": "MECARD:N:Wilson,Emily;ORG:Plumsail;TEL:+41441234567;EMAIL:jemily.wilson@example.com;URL:https://plumsail.com;;"
}
The example above uses the following MeCard properties:
Property |
Description |
|---|---|
|
Contact name in the format Last Name,First Name. |
|
Organization or company name. |
|
Phone number. |
|
Email address. |
|
Website URL. |
Calendar Event (vEvent)
To encode calendar events, use the vEvent format. The value starts with BEGIN:VEVENT and ends with END:VEVENT, with each event property placed on a separate line.
The QR code value is treated as a plain text string. In the example below, line breaks between properties are represented by \r\n.
If you build the value dynamically, ensure that line breaks are included correctly. See Build data dynamically for an example of generating QR code values from data sources such as SharePoint and Power Automate.
{
    "value": "BEGIN:VEVENT\r\nSUMMARY:Annual Partner Meeting\r\nDESCRIPTION:Review business goals and roadmap\r\nLOCATION:Plumsail HQ, Helsinki\r\nDTSTART:20261112T090000Z\r\nDTEND:20261112T103000Z\r\nEND:VEVENT"
}
The example above uses the following vEvent properties:
Property |
Description |
|---|---|
|
Event title displayed to the user. |
|
Additional information about the event. |
|
Event location. |
|
Event start date and time in UTC format. |
|
Event end date and time in UTC format. |
The DTSTART and DTEND values use the iCalendar date-time format YYYYMMDDTHHMMSSZ, where Z indicates UTC time. For example, 20261112T090000Z represents 12 November 2026, 09:00 UTC.
Girocode
To share payment contact information or bank transfer data in Eurozone countries, use the Girocode format. Girocode is a European standard that supports SEPA Credit Transfer (SCT) payments. It is commonly used on invoices, allowing customers to scan the code and make payments directly from their banking app.
This QR code type differs from other QR code types because it has a predefined structure and requires specific properties to be included in the input data.
Syntax:
{{#qrcode type:girocode value 300}}
type:girocode — specifies that a Girocode should be generated and is required for this QR code type.
value — a token pointing to the data to encode in JSON format.
300 — the width and height of the generated QR code in pixels. This parameter is optional.
JSON example for type:girocode:
{
    "value": {
      "iban": "DE89370400440532013000",
      "bic": "COBADEFFXXX",
      "name": "Plumsail GmbH",
      "amount": 99.95,
      "remittanceInformation": "Invoice 2026-0002",
      "remittanceType": "Unstructured",
      "purposeCode": "GDDS",
      "messageToPayer": "Thank you for your business",
      "version": "Version2",
      "encoding": "ISO_8859_1"
    }
}
Note
Girocode supports only EUR payments. The amount must be provided in euros.
The example above uses the following properties:
Property |
Required/Optional |
Description |
|---|---|---|
iban |
required |
The International Bank Account Number (IBAN) of the recipient. |
bic |
optional |
The Bank Identifier Code (BIC) of the recipient’s bank.
|
name |
required |
The name of the recipient. |
amount |
required |
The amount to be transferred (in EUR). Must contain exactly two decimal places. Do not include a currency symbol. Open-amount Girocodes are not supported. |
remittanceInformation |
optional |
Information about the payment, such as a payment reference or purpose text. The expected format depends on the selected remittanceType (see below). Use structured remittances only if you already use structured payment references with your bank. |
remittanceType |
optional |
The type of the remittance. Either Structured (for example, ISO 11649 RF Creditor Reference, maximum 35 characters) or Unstructured (maximum 140 characters). |
purposeCode |
optional |
The purpose code for the payment (ISO 20022 purpose code). |
messageToPayer |
optional |
A message to the payer. |
version |
optional |
The version of the Girocode format: |
encoding |
optional |
The encoding for the Girocode format. The default value is If your company name or payment description contains characters outside the Western European character set (for example, Polish ł, Czech ř, or Cyrillic characters), use an encoding that supports those characters. ISO_8859_1 is sufficient for most German, Austrian, French, Spanish, Italian, and Dutch customers. |
Swiss QR
To share payment information in Switzerland and Liechtenstein, use the Swiss QR format. This format is based on the Swiss Implementation Guidelines of the EPC QR Code for Payment Standard.
This QR code has a predefined structure and requires specific properties to be included in the input data.
Syntax:
{{#qrcode type:swiss value 300}}
type:swiss — specifies that a Swiss QR code should be generated and is required for this QR code type.
value — a token pointing to the data to encode in JSON format.
300 — the width and height of the generated QR code in pixels. This parameter is optional.
JSON example for type:swiss:
{
    "value": {
      "iban": "CH5830000000000000000",
      "ibanType": "QrIban",
      "currency": "CHF",
      "amount": 199.95,
      "creditor": {
        "name": "Robert Schneider AG",
        "street": "Rue du Lac",
        "houseNumber": "1268/2/22",
        "zipCode": "2501",
        "city": "Biel",
        "country": "CH"
      },
      "reference": {
        "type": "QRR",
        "value": "990005000000000320071012303"
      },
      "debtor": {
        "name": "Pia-Maria Rutschmann-Schnyder",
        "street": "Grosse Marktgasse",
        "houseNumber": "28",
        "zipCode": "9400",
        "city": "Rorschach",
        "country": "CH"
      },
      "unstructuredMessage": "Invoice 2024-001",
      "billingInformation": ""
    }
}
The example above uses the following properties:
Property |
Required/Optional |
Description |
|---|---|---|
iban |
required |
The International Bank Account Number (IBAN) of the recipient depending on the ibanType (see below). |
ibanType |
required |
|
currency |
required |
The currency of the payment. Two options: CHF or EUR. |
amount |
optional |
The amount of the payment. Can be omitted for an open-amount slip. |
creditor |
required |
The details of the creditor, including name and structured address fields. Provide street, house number, zip code, city, and country as separate fields. The country must use an ISO 3166-1 code, such as |
reference |
required |
The payment reference type and value.
|
debtor |
optional |
The details of the debtor, including name and address. Can be omitted to produce an open-recipient slip where the payer fills in their details by hand. |
unstructuredMessage |
optional |
Additional information to the payer, such as a payment description or invoice number. |
billingInformation |
optional |
Additional information for the biller, not shown to the payer. |
Note
For official standard reference, please refer to the SIX Group implementation guidelines.
Note
Read this article for practical examples of using different QR code types in document templates.
checkbox
#checkbox - activates checkboxes in a DOCX template.
For example, a user fills out some online form and the #checkbox operation activates checkboxes in a DOCX template depending on the forms’ values.
The result DOCX document could be an application or questionnaire.
Find more information about using the operation in the article How to populate Word with checkboxes using Power Automate.
Template |
Data |
Result |
|---|---|---|
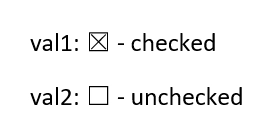
{{#checkbox prop1}}
{{#checkbox prop2}}
|
{
    "prop1": true,
    "prop2": false
}
|
DOCX file with activated checkboxes |
picture
The #picture operation resolves URL or base64 string and converts it to an image. This operation doesn’t compress the source picture and keeps its original quality.
There are several parameters that you can use to customize how the image comes out in the final document:
Parameter |
Description |
Examples |
|---|---|---|
|
Default sizing options. |
For example, to fit your picture into a 300x300 square, use the operation as follows:
To calculate the height automatically, feel free to just leave out the height parameter like so:
|
|
Allows you to rotate your picture by 90, 180, 270, or 360 degrees. Only those values are supported. |
|
|
Flips the image horizontally (X), vertically (Y), or both (XY). |
|
|
Picture proportions are preserved and fit into the specified size. |
|
|
This is the default behavior. The picture will be stretched according to the specified sizes. |
|
Feel free to mix and match these parameters. For example, if you want to fit the image to a 400x350 resolution, rotated it by 90 degrees and flip it both ways, you’d write it like this:
{{#picture imageData 400 350 Fit rotate:90 flip:XY}}
Refer to this article for more information on how to add pictures.
Examples
Template |
Data |
Result |
|---|---|---|
{{#picture imageData}},

{{#picture imageData 300}},

{{#picture imageData 150 200}},

{{#picture imageData 200 300 flip:Y}},

{{#picture imageData 300 rotate:270}},

{{#picture imageData 100 50 flip:XY rotate:90}}

{{#picture imageData 100 50 Fit flip:XY rotate:90}}
|
{
    "imageData": "https://picturesite.com/pics/picture.png"
}


{
    "imageData": "iVBORw0KGgoAAAANSUhEUgAAAIAAAAA9CAYAAABlamFgAA"
}
|
the image
|
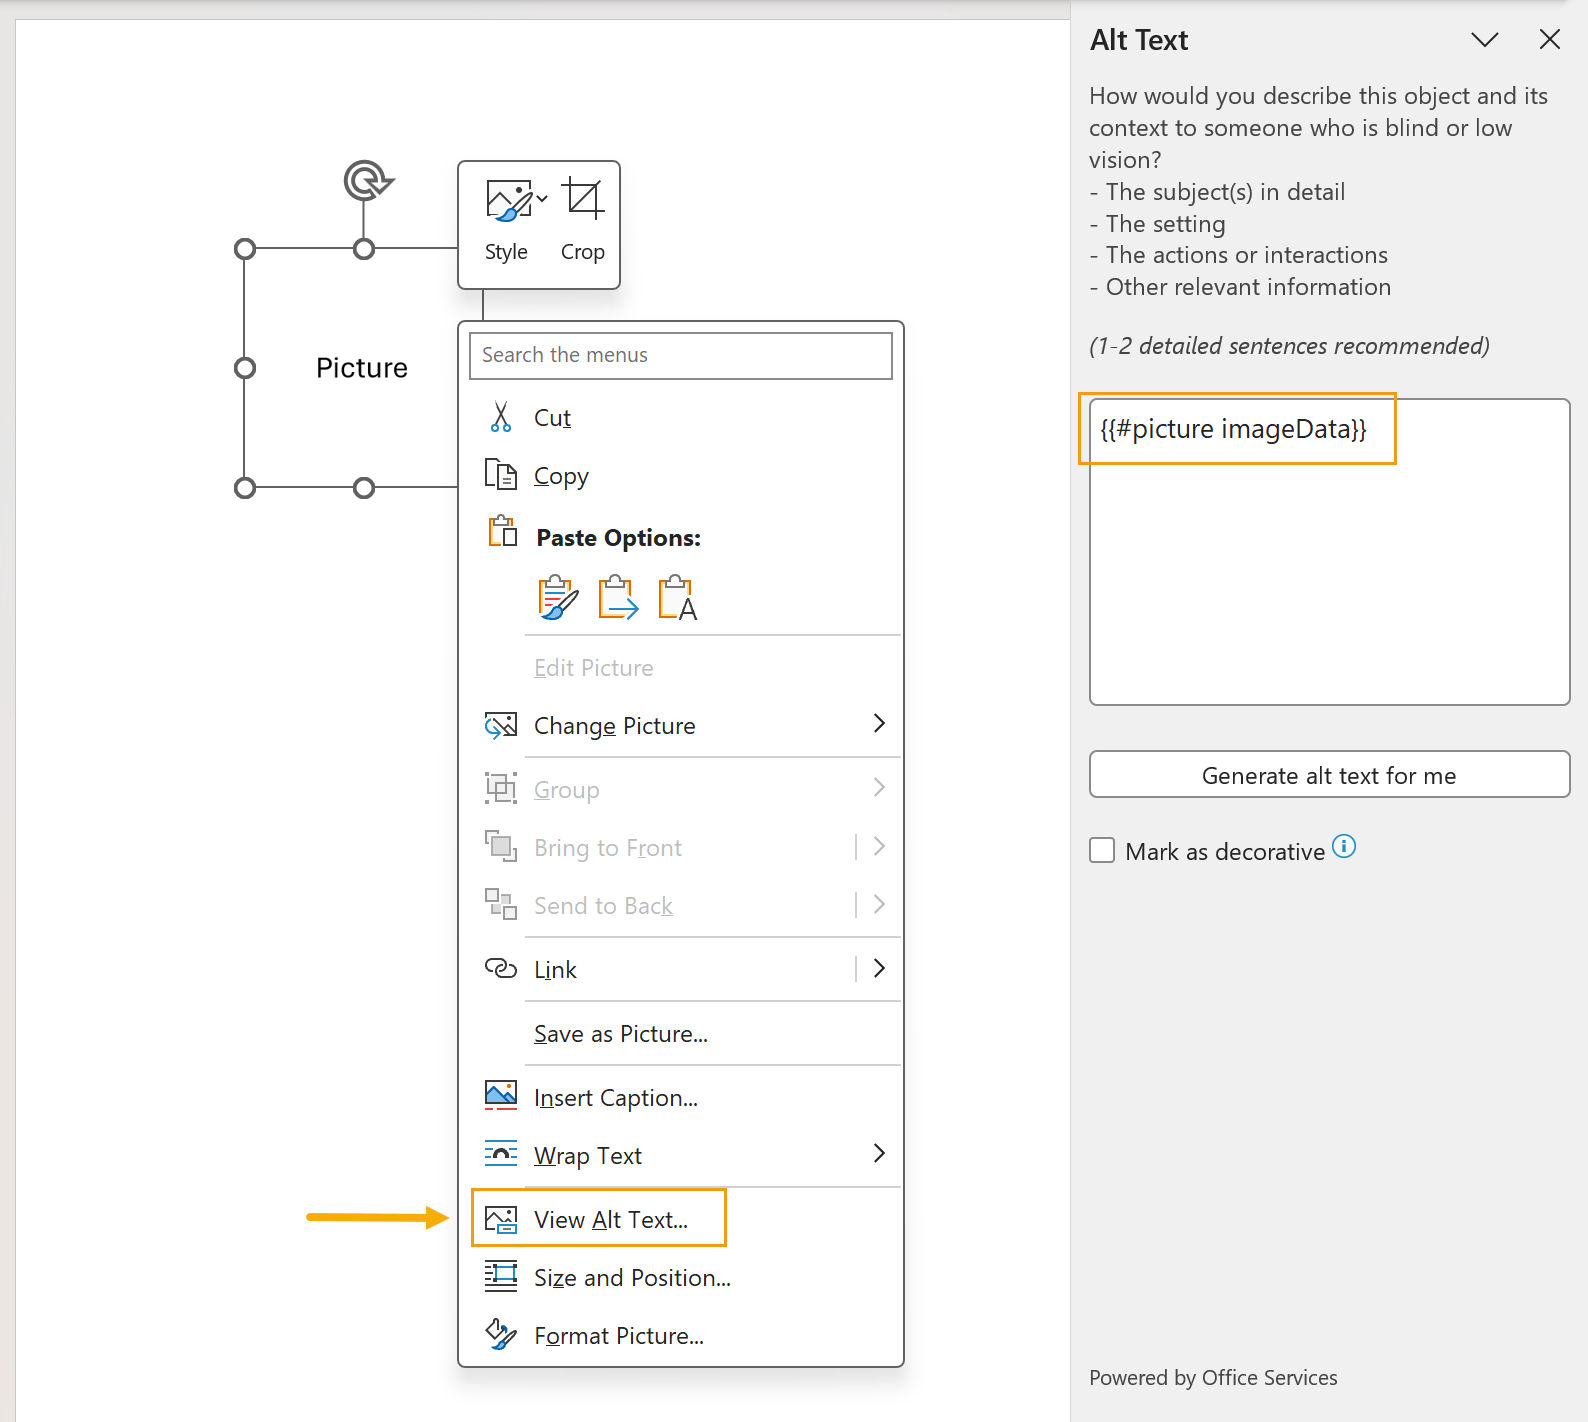
You can use the #picture operation in the Alt Text of your image. This lets you adjust the size of the inserted picture, too.
pictureCompress
The #pictureCompress operation resolves URL or base64 string and converts it to an image. This operation compresses the source picture.
There are several parameters that you can use to customize how the image comes out in the final document:
Parameter |
Description |
Examples |
|---|---|---|
|
Default sizing options. |
For example, to fit your picture into a 300x300 square, use the operation as follows:
To calculate the height automatically, feel free to just leave out the height parameter like so:
|
|
Allows you to rotate your picture by 90, 180, 270, or 360 degrees. Only those values are supported. |
|
|
Flips the image horizontally (X), vertically (Y), or both (XY). |
|
|
Picture proportions are preserved and fit into the specified size. |
|
|
This is the default behavior. The picture will be stretched according to the specified sizes. |
|
Feel free to mix and match these parameters. For example, if you want to fit the image to a 400x350 resolution, rotated it by 90 degrees and flip it both ways, you’d write it like this:
{{#pictureCompress imageData 400 350 Fit rotate:90 flip:XY}}
Refer to this article for more information on how to add pictures.
Examples
Template |
Data |
Result |
|---|---|---|
{{#pictureCompress imageData}},

{{#pictureCompress imageData 300}},

{{#pictureCompress imageData 150 200}},

{{#pictureCompress imageData 200 300 flip:Y}},

{{#pictureCompress imageData 300 rotate:270}},

{{#pictureCompress imageData 100 50 flip:XY rotate:90}}

{{#pictureCompress imageData 100 50 Fit flip:XY rotate:90}}
|
{
    "imageData": "https://picturesite.com/pics/picture.png"
}


{
    "imageData": "iVBORw0KGgoAAAANSUhEUgAAAIAAAAA9CAYAAABlamFgAA"
}
|
the image
|
link
The #link operation creates a hyperlink in your document.
Here’s an example of its usage:
{{#link "https://google.com" "Link text"}}
It takes two parameters:
Link URL- the URL that will open when the text is clicked.Link text- the text that will be displayed for the hyperlink.
Both parameters can be dynamic.
Examples
Template |
Data |
Result |
|---|---|---|
{{#link url title}}

{{#link url "Link text"}}

{{#link "https://google.com" title}}
|
{
    "url": "https://google.com",
    "title": "Link text"
}
|
html
The #html operation converts provided HTML code into DOCX text and elements.
When no parameter is passed or when the MixStyle parameter is explicitly used:
Document styles: Applied.
Inline HTML styles: Applied, and take precedence over document styles where properties overlap.
When DocumentStyle parameter is used:
Document styles: Applied.
Inline HTML styles: Ignored.
Note
Only styles saved under the Normal text formatting are applied.
You can refer to the following examples for a clear understanding of the differences.
Template |
Data |
Result |
|---|---|---|
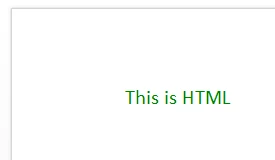
{{#html text}}
|
{
    "text": "<html><head><title></title></head>
    <body><p style=\"color: green; font-size: 20px\">
    This is HTML</p></body></html>"
}
|
DOCX file with converted HTML elements. Inline styles are applied. |
{{#html text MixStyle}}
|
{
    "text": "<html><head><title></title></head>
    <body><p style=\"color: green; font-size: 20px\">
    This is HTML</p></body></html>"
}
|
DOCX file with converted HTML elements. Inline styles are applied. |
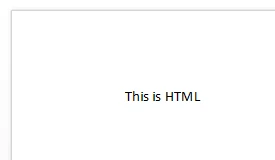
{{#html text DocumentStyle}}
|
{
    "text": "<html><head><title></title></head>
    <body><p style=\"color: green; font-size: 20px\">
    This is HTML</p></body></html>"
}
|
DOCX file with converted HTML elements. Inline styles are ignored. |
Here are the supported HTML tags:
<a><h1-h6><abbr>and<acronym><b>,<i>,<u>,<s>,<del>,<ins>,<em>,<strike>,<strong><br>and<hr><table>,<td>,<tr>,<th>,<tbody>,<thead>,<tfoot>and<caption><cite><div>,<span>,<font>and<p><pre><sub>and<sup><ul>,<ol>and<li><dd>and<dt><q>and<blockquote><article>,<aside>,<section>are considered like<div><img>: use either a URL or a Base64-encoded string for the image source.
Template |
Data |
Result |
|---|---|---|
{{#html text}}
|
{
    "text": "<html><head><title></title></head>
    <body><p>This is HTML</p>
    <img width='300' src='https://picturesite.com/pics/picture.png'>
    </body></html>"
}
|

|
Note
Images in DOCX documents won’t appear until you enable editing.
Javascript (<script>), CSS <style>, <meta> and other not supported tags does not generate an error but are ignored.
You can upload the source HTML file from any connector: SharePoint, OneDrive, etc, and use the dynamic content in Plumsail processes. Here’s an example in Power Automate:
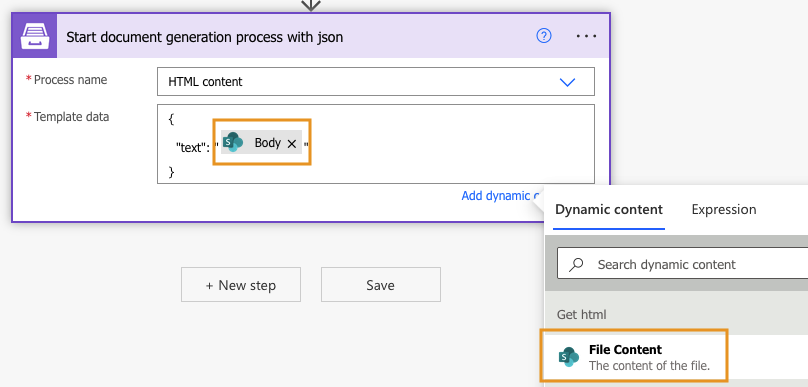
See this article for an example of inserting HTML into document templates.
markdown
The #markdown operation converts provided Markdown code into DOCX text and elements.
Template |
Data |
Result |
|---|---|---|
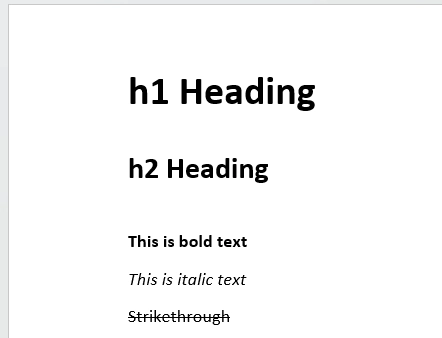
{{#markdown text1}}
{{#markdown text2}}
{{#markdown text3}}
{{#markdown text4}}
{{#markdown text5}}
|
{
    "text1": "# h1 Heading",
    "text2": "## h2 Heading",
    "text3": "**This is bold text**",
    "text4": "*This is italic text*",
    "text5": "~~Strikethrough~~"
}
|
DOCX file with the markdown text |
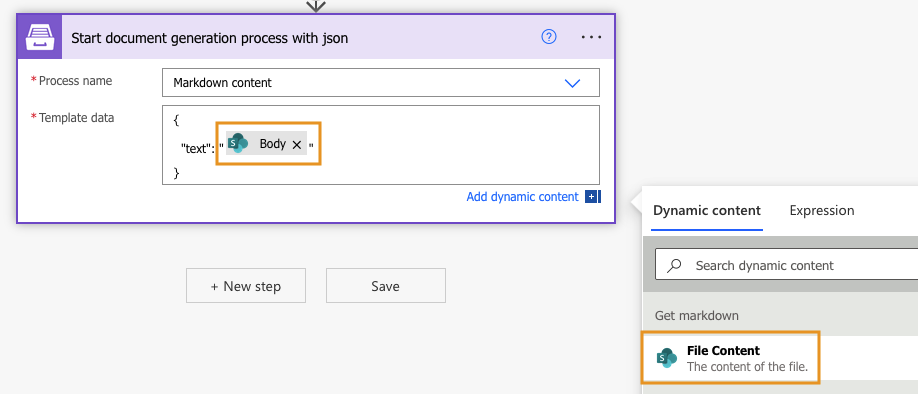
You can upload the source markdown file from any connector: SharePoint, OneDrive, etc, and use the dynamic content in Plumsail processes. Here’s an example in Power Automate:
merge
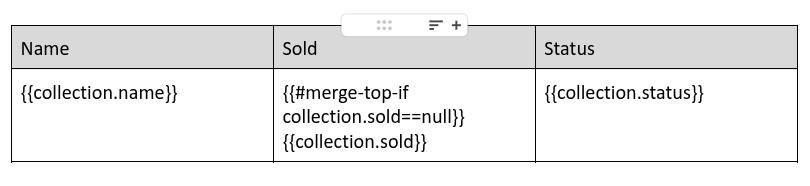
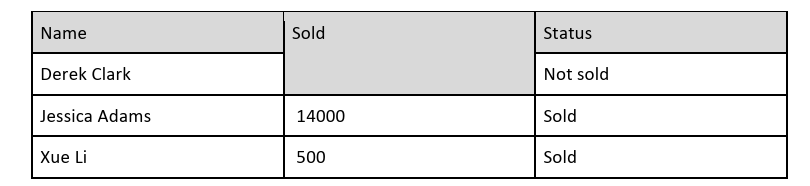
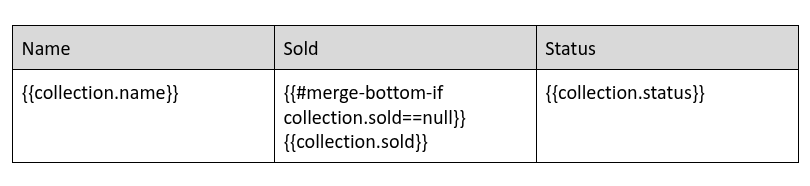
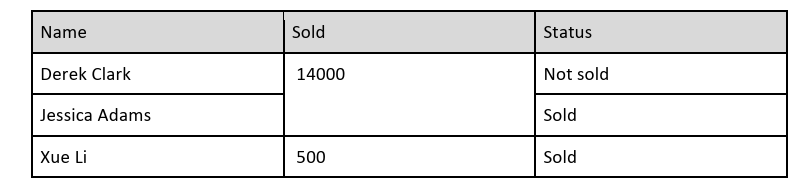
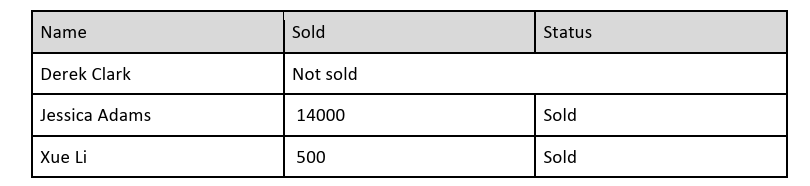
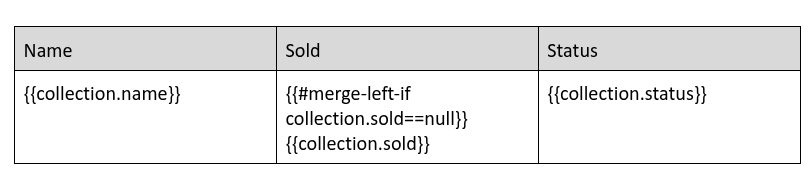
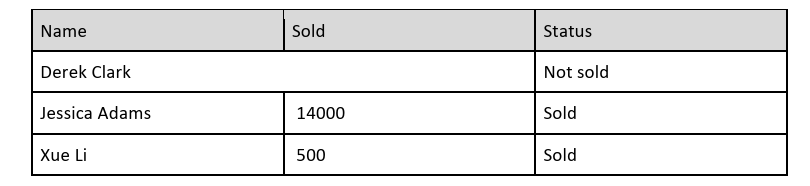
This operation merges a table cell with an adjacent cell in the specified direction if the given condition is met. To control the merge direction use:
{{#merge-left-if condition}}{{#merge-right-if condition}}{{#merge-top-if condition}}{{#merge-bottom-if condition}}
Examples
Template |
Result |
|---|---|
|
|
|
|

|
|
|
|
Data
{
  "collection": [
    {
      "name": "Derek Clark",
      "sold": null,
      "status": "Not sold"
    },
    {
      "name": "Jessica Adams",
      "sold": 14000,
      "status": "Sold"
    },
    {
      "name": "Xue Li",
      "sold": 500,
      "status": "Sold"
    }
  ]
}
line-break-if
The line-break-if object operation inserts a line break at the specified position when the condition evaluates to true.
Example
Template |
Data |
Result |
|---|---|---|
Before the break. {{#line-break-if isActive}} After the break.
|
{
  "isActive" : true
}
|
Before the break.
After the break.
|