How to use Power Automate to create an invoice after payment in Stripe
Basically, an invoice is something you send to a customer to ask for payment (before payment), and after payment, you and your customer get a receipt as proof of successful payment. However, there are times when you’ll need to generate an invoice after a payment. For instance, your customer may request an invoice because the receipt is lacking a lot of information. You might also need to email the invoice to your coworkers, storage, CRM system, or another location after successful payment.
From this article, you will learn how to automatically generate a Stripe invoice after a successful payment with the help of Plumsail Documents and Power Automate.
Systems involved:
Below we propose to consider a step-by-step process:
Create a payment in Stripe
Let’s imagine you have a payment from a customer in your Stripe account for selling services or products (an example below). When a customer pays, you want to create an invoice and deliver it to them via email.

All Stripe data will be sent to Plumsail Documents via Power Automate to make this happen automatically. To do so, we are going to set up a Plumsail Documents process.
Set up the invoice generation in Plumsail Documents
In this step, we need to create the process in Plumsail Documents. Go to Processes in your Plumsail account and add a new process.

We’ll use our invoice template as an example. To accomplish this, we choose “Start from template” and name the process. If you don’t want to build your invoice, you can choose one of the invoice templates from the list. After that, press the “Next” button.
Note: To keep the look of your bills consistent, utilize the Stripe invoice template in Plumsail Documents. To do so, you can upload and convert your document into a template. In this step, choose “Start from blank” when creating a process. Other steps will be the same.

As you can see in the screenshot above, our document has special {{placeholders}} marked with double curly brackets. We can turn a document into a template by inserting placeholders, also known as tokens, into it. You can mark the placeholders where the Stripe payment information should be filled in. We highlighted {{tokens}} in our template document to demonstrate the point. In other words, everything between curly {{ }} brackets is treated as a placeholder for the data we supply by the templating engine. Read this article to get familiar with the templating engine.
Next, click on the “Save & Next” button to go to the set up output settings.
Document output settings
The output file’s settings are set here. You can use {{tokens}} to make it dynamic; set the format - PDF, choose a locale, and additionally, you can protect PDF by watermark and other restrictions.

After you have done this, click on the “Save & Next” button to go to the delivery settings.
Delivery settings
In this phase, we add deliveries—where the document will be stored and sent. You may include as many as you desire. CRMs, chats, and other software can be found there. We included an email distribution option to send the document to a manager and a customer for demonstration purposes. Read the article to learn more about delivery options.

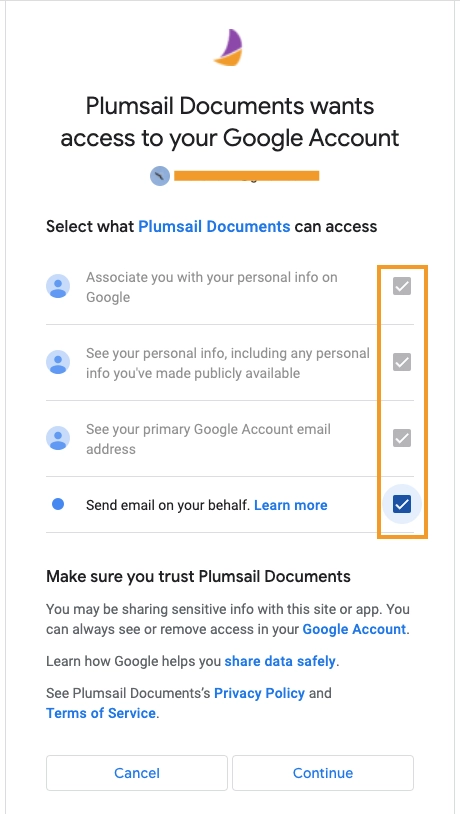
If you’re using Gmail for delivery, make sure you check all of the boxes when you connect your account.
Then, press the button “Save & Next” to go to set up Power Automate connection.
Set up Power Automate connection
First, create a new automated workflow in Power Automate by Microsoft.

Next, you have to select a trigger and name it. There are a few triggers that Power Automate connector use with Stripe. For our example, we found and selected the trigger “When a charge is added”.

In the next step, we have to connect our Stripe account to Power Automate with the help of an API key. You will see the window where you have to put an API key from Stripe.

Then, go to your Stripe account in the developers section and find the API keys in the menu. Find the “Secret key” and copy it.

Then, go back to Power Automate, paste the “Secret key” from Stripe, and name the connection. Here is what we did in this step.

Then, add a new step. Find the “Get a customer” action from the Stripe connector. Then, select the Customer ID to put it in the field of Action.

After that, we go to the next step. Essentially, Stripe “Amount” output data is in cents. It means, that when you set, for example, $10.00 in payment price, the data going through the connector will be 1000 cents. Because of that, to make the amount in dollars back in the resulting invoice, we have to add a few steps before the data will be sent in Plumsail Documents. To do so, find the “Compose” for the Data Operation action.

Next, change Stripe “Amount” data from a string into integer format. To accomplish this, you have to use the expression in condition. Click in the Inputs field and go to “Expression”. Find and select the int(value).

Then, without pressing the “OK” button, go to the “Dynamic content”. Find and select “Amount” output data. In the result, you will see the formula int(triggerOutputs()?['body/amount']). If everything is right, as in the screenshot, press the “OK” button.

Then, add a new step. In this step, we are going to set the Composed data as a variable with the math expression. To do this, find and select the “Initialize variable” action. Then, name Variable, select Type integer, and find math expression div(dividend, divisor). Read the article to learn more about how to store and manage variables in values.

After that, we go to the “Dynamic content” folder and select our composed “Amount” data from the previous step. Then put a hundred as a divisor in the formula. In this way, we made the formula div(outputs('Compose'), 100) in the expression condition.

This way, we did our formatting from cents to dollars. The next step is the last!
Add a new step, find and select Plumsail Documents as a connector. In the next substep, you have to find and select the “Start document generation process” action.

Then, find the process you have created in the Plumsail Documents account. In our example, it’s “Invoice from Stripe payment”. Then, go to set up “Template data” in the same window.

In this substep, we must configure our process to combine our tokens with the payment data from Stripe. To do this correctly, you must use JSON format, as shown in the screenshot below. It looks a bit complicated at first sight, but it isn’t if you try it. Write all your tokens and select dynamic data outputs from Stripe in front of each token. To learn the details read the article “Start document generation process” in Power Automate actions. To show you what it may look like, we highlighted our tokens from the document template and selected particular dynamic data outputs in front of each token. Try to write something like that.

Our connection is done! Don’t forget to save and test your connection. You can do tests to fine—tune the flow and get the correct document at the output. Here is what we get from the flow after payment in Stripe
