Value formatters in DOCX templates
You can use formatters to add complex logic to values rendered in your templates. For example, you can change value format, hide content, join arrays, etc.
This article covers formatters for DOCX, XLSX and PPTX templates.
List of formatters
Note
Please follow the link to review a page with deprecated formatters.
format
It formats a tag value. You can use it with or without parameters:
format- if encountered on date value it will format it as short date string.format(val)- formats current value using specified format string. For example, you can useN2for a numbers with two decimals.format(val, locale)- formats current value using specified format string and Locale. For example, you can useformat(C, fr-FR)to apply a specific currency to the tag.
Note
If you want to use colon character : with the formatter then it must be escaped with a backslash
{{date}:format(hh\:mm)}
It uses standard format strings and supports different Locales. For example, you can place tags with different locales in a docx template
{{num1}:format(C, ru-RU)}{{num2}:format(C, fr-FR)}
Please find more information about using Locale in the Microsoft documentation:
Examples
Template |
Data |
Result |
|---|---|---|
Date: {{date}:format(dd MMM yyyy)}
Date: {{date}:format(MM/dd)}
Date: {{date}:format(U)}
Number: {{num}:format(C)}
Number: {{num}:format(C, fr-FR)}
Number: {{num}:format(P)}
Number: {{num}:format(N2)}
|
{
    "date": "2012-04-21T18:25:43-05:00",
    "num": 8
}
|
Date: 21 Apr 2012
Date: 04/21
Date: Saturday, April 21, 2012 11:25:43 PM
Number: $8.00
Number: 8.00 €
Number: 800.00%
Number: 8.00
|
map
map accepts an unlimited number of values and maps a specific value to a specific output.
For example, we have some property that stores delivery types and has values:
EmailShipping
ElectronicalShipping
And we want to display them in a readable format
Email shipping
Electronic shipping
Template |
Data |
Result |
|---|---|---|
{{DeliveryType}:map(“EmailShipping” = “Email shipping”, “ElectronicShipping” = “Electronic shipping”)}
|
{
    "DeliveryType": "EmailShipping"
}
|
Email shipping
|
Note
All values in double quotes are recognised as strings. If you want to map numbers, you don’t need to use double quotes in the condition.
For example, {{tag}:map("Yes" = 1, "No" = 0)}.
if
if accepts a condition and values to output for positive and negative outcomes.
For example, this formatter can be used to make inclusion of specific information optional:
Template |
Data |
Result |
|---|---|---|
{{includeCoupon}:if(value == “Yes”, “Use the code DISCOUNT10 for your next order”, “Thank you for your business”)}
|
{
    "includeCoupon": "Yes"
}
|
Use the code DISCOUNT10 for your next order
|
It can also be used to mark whether a value has being specified for a property. As demonstrated in this example, output expressions may reference the property value.
Template |
Data |
Result |
|---|---|---|
{{address}:if(value != “”, “Specified as ” + value, “Unspecified”)}
|
{
    "address": "81 Avenue Road, Phoenix, AZ"
}
|
Specified as 81 Avenue Road, Phoenix, AZ
|
It is also possible to check the property against multiple values and reference nested property values:
Template |
Data |
Result |
|---|---|---|
{{staffMember}:if(value.title == “Doctor” || value.title == “Dr.” || value.title == “Dr”, “Dr. ” + value.lastName, value.firstName + ” ” + value.lastName)}
|
{
    "staffMember": {
        "firstName": "Derek",
        "lastName": "Clark",
        "title": "Doctor"
    }
}
|
Dr. Clark
|
barcode
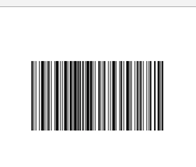
{{value}:barcode(type, width, height)} inserts a barcode with a certain type, width and height into template. Please review this how-to .
Note
To use the formatter with PowerPoint templates you need to prepare your pptx template. Please check out the article QR Codes and barcodes in PPTX templates .
Template |
Data |
Result |
|---|---|---|
{{value}:barcode(CODE128, 301, 100)}
|
{
    "value": "test barcode"
}
|
the barcode |
You need to specify the barcode type in the tag.
There are different types of the barcodes .
CODE128
Template:
{{value}:barcode(CODE128, 200, 100)}
JSON:
{
      "value": "12345678"
}
CODE11
Template:
{{value}:barcode(CODE11, 200, 100)}
JSON:
{
      "value": "01234567"
}
CODE39
Template:
{{value}:barcode(CODE39, 200, 100)}
JSON:
{
      "value": "ABC1234"
}
UPCA
Template:
{{value}:barcode(UPCA, 200, 100)}
JSON:
{
      "value": "72527273070"
}
MSI
Template:
{{value}:barcode(MSI, 200, 100)}
JSON:
{
      "value": "01234567"
}
ISBN
Template:
{{value}:barcode(ISBN, 200, 100)}
JSON:
{
      "value": "9781234567897"
}
EAN13
Template:
{{value}:barcode(EAN13, 200, 100)}
JSON:
{
      "value": "978020137962"
}
ITF14
Template:
{{value}:barcode(ITF14, 200, 100)}
JSON:
{
      "value": "01234567890123"
}
qrcode
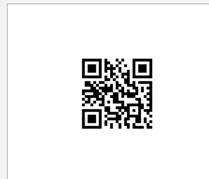
qrcode(size) inserts a QR code into template. You can specify only one dimension since width = height for QR codes.
Note
To use the formatter with PowerPoint templates you need to prepare your ppts template. Please check out the article QR Codes and barcodes in PPTX templates .
Template |
Data |
Result |
|---|---|---|
{{value}:qrcode(5)}
|
{
    "value": "https://plumsail.com/"
}
|
the qrcode |
There are different types of QR codes, you can specify it in the JSON.
URL
To encode the text of a URL, for example, https://plumsail.com/, encode the https://plumsail.com/ URL text in the JSON. Include the http:// protocol to ensure it is recognized as a URL.
{
      "value": "https://plumsail.com/"
}
Telephone Numbers
To encode a telephone number, use a telephone URI to ensure that the digits are recognized as a telephone number and include prefixes which make the number internationally accessible.
{
      "value": "tel:+1-234-555-6677"
}
SMS
To encode an SMS short code or number, create an SMS URI. For example, to create a link to the 12345 number, encode sms:12345. You may use other URI forms, such as sms:number:subject, and other prefixes, such as smsto:.
{
      "value": "sms:12345"
}
Geolocations
To encode a point on the earth, including altitude, use a geo URI.
{
      "value": "geo:42.65049,23.37925,100"
}
Hint
Read this article to get inspired on how to enrich your documents with various QR codes.
replace
replace(pattern, replacement) - returns a new string with all matches of a string pattern replaced by a replacement.
regex
regex(pattern, replacement) - returns a new string with all matches of a RegExp pattern replaced by a replacement.
substring
Returns substring. You can use the formatter with one or two parameters:
substring(index)- returns substring of provided values afterindexcharssubstring(index,length)- returns substring of provided values afterindexwithlength.
sum
It calculates a sum of the values in an array:
{{items}:sum()}for items in the array,{{items}:sum(value.property)}for a property in the array of objects,{{items}:sum(value.property1 * value.property2)}for arithmetical actions with the properties in the array of objects.
The following operators are available:
+addition,-subtraction,*multiplication,/division,%remainder of division.
Examples
Template |
Data |
Result |
|---|---|---|
Total:
{{items}:sum()}
|
{
  "items": [3, 2, 7]
}
|
Total:
12
|
Total quantity:
{{sales}:sum(value.quantity)}

Total amount:
${{sales}:sum(value.quantity * value.price)}
|
{
  "sales": [
    {
      "price": 3,
      "quantity": 90
    },
    {
      "price": 4,
      "quantity": 60
    },
    {
      "price": 5,
      "quantity": 30
    }
  ]
}
|
Total quantity:
180

Total amount:
$660
|
avg
It calculates an average of the values in an array:
{{items}:avg()}for items in the array,{{items}:avg(value.property)}for a property in the array of objects,{{items}:avg(value.property1 * value.property2)}for arithmetical actions with the properties in the array of objects.
The following operators are available:
+addition,-subtraction,*multiplication,/division,%remainder of division.
Examples
Template |
Data |
Result |
|---|---|---|
Average:
{{items}:avg()}
|
{
  "items": [3, 2, 7]
}
|
Average:
4
|
Average quantity:
{{sales}:avg(value.quantity)}

Average amount:
${{sales}:avg(value.quantity * value.price)}
|
{
  "sales": [
    {
      "price": 3,
      "quantity": 90
    },
    {
      "price": 4,
      "quantity": 60
    },
    {
      "price": 5,
      "quantity": 30
    }
  ]
}
|
Average quantity:
60

Average amount:
$220
|
count
It counts the number of values in an array, total or only those that meet a condition:
{{items}:count()}or{{items}:count(value > 10)}for items in the array,{{items}:count(value.property)}or{{items}:count(value.property > 10)}for a property in the array of objects,{{items}:count(value.property1 > value.property2)}for several properties in the array of objects.
The following operators are available:
>greater than,>=greater than or equal to,<less than,<=less than or equal to,==equal to,!=not equal to,&&logical AND,||logical OR.
Examples
Template |
Data |
Result |
|---|---|---|
Items:
{{items}:count()}

Items greater than 3:
{{items}:count(value > 3)}
|
{
  "items": [3, 2, 7]
}
|
Items:
3

Items greater than 3:
1
|
Sales reports:
{{sales}:count()}

Quantity greater than 40:
{{sales}:count(value.quantity > 40)}

Amount greater than $200 and less than $250:
{{sales}:count(value.quantity * value.price > 200
&& value.quantity * value.price < 250)}
|
{
  "sales": [
    {
      "price": 3,
      "quantity": 90
    },
    {
      "price": 4,
      "quantity": 60
    },
    {
      "price": 5,
      "quantity": 30
    }
  ]
}
|
Sales reports:
3

Quantity greater than 40:
2

Amount greater than $200 and less than $250:
1
|
join
join(separator, order, property) - joins array values with a separator (required) and sorts them in a specific order (optional). property (optional) can be used to access properties in a nested structure.
Examples
Template |
Data |
Result |
|---|---|---|
{{arr}:join(", ")}
{{arr}:join(", ", value)}

{{arr}:join(", ", ASC)}
{{arr}:join("-", DESC)}

{{arr}:join(; )}
{{arr}:join( : )}
|
{
    "arr": [2, 1, 3]
}
|
2, 1, 3
2, 1, 3

1, 2, 3
3-2-1

2; 1; 3
2 : 1 : 3
|
{{reports}:join(", ", value.year)}
{{reports}:join(", ", ASC, value.year)}
{{reports}:join(", ", DESC, value.year)}
|
{
    "reports": [
        {
            "year": "1992"
        },
        {
            "year": "1987"
        },
        {
            "year": "2005"
        }
    ]
}
|
1992, 1987, 2005
1987, 1992, 2005
2005, 1992, 1987
|
offset
offset(d) - date and time value will be offset by d days.
offset(d.hh\:mm\:ss) - advanced approach for offsetting d days, hh hours, mm minutes, ss seconds.
Note
If you want to use colon character : with the formatter then it must be escaped with a backslash
Just replace d, hh, mm and ss by the required number of days, hours, minutes and seconds in this string pattern d.hh\:mm\:ss.
Examples
Template |
Data |
Result |
|---|---|---|
Without offset:
{{date}}

Plus 10 days
{{date}:offset(10)}

Minus 10 days:
{{date}:offset(-10)}

Plus 10 days, 1 hour,
5 minutes, 10 seconds:
{{date}:offset(10.1\:5\:10)}

Minus 10 days, 1 hour,
5 minutes, 10 seconds:
{{date}:offset(-10.1\:5\:10)}
|
{
    "date": "2012-04-21T18:25:43-05:00"
}
|
Without offset:
4/22/2012 3:25:43 AM

Plus 10 days
5/2/2012 3:25:43 AM

Minus 10 days:
4/12/2012 3:25:43 AM

Plus 10 days, 1 hour,
5 minutes, 10 seconds:
5/2/2012 4:30:53 AM

Minus 10 days, 1 hour,
5 minutes, 10 seconds:
4/12/2012 2:20:33 AM
|
hide
hide - replaces current tag value with an empty string. It can be used to hide the content of a specific tag.
hide-block-if
It can be used to conditionally hide a single block of the document.
The formatter works in the rich text content control or repeatable sections such as list items or table rows.
Thus, if you need to hide some atbitrary block, it is necessary to put it in a list item or table cell with invisible borders.
The argument may contain either a value or a logical expression that returns true or false.
In the first case, if a value in the token is equal to a value of the parameter, it will be applied.
{{items.property}:hide-block-if(val)}
In the second case, if a value in the token makes the expression in the parameter true, it only hides the current block.
Additionally, you need to repeat the token without the formatter to render a value.
When building the expression, refer to the current token value as value and if it contains nested objects, refer to them through a period like value.property.
{{items}:hide-block-if(value.property == "red")} {{items.property}}
The following operators are available:
>greater than,>=greater than or equal to,<less than,<=less than or equal to,==equal to,!=not equal to,&&logical AND,||logical OR.
Note
To hide items from an array, we recommend to use the filter operation instead of the current formatter. The latter should be used only for hiding arbitrary blocks.
Examples
The formatter can be used in DOCX, XLSX, and PPTX templates. However, in XLSX templates, it behaves differently. Read the articles below for more information:
Template |
Data |
|---|---|
{{count}:hide-block-if(value == 1)}
{{count}}

or

{{count}:hide-block-if(1)}
|
{
    "count": 1
}
|
{{employee}:hide-block-if(value.name == "Jessica")}
{{employee.name}}

or

{{employee.name}:hide-block-if(Jessica)}
|
{
    "employee": {
        "name": "Jessica"
    }
}
|
hide-block-if-nothing
It is applied if a value in the tag is null, an empty string or array. The formatter can be used to conditionally hide a single block of the document. It works in the rich text content control or repeatable sections such as list items or table rows. Thus, if you need to hide some arbitrary block, it is necessary to put it in a list item or table cell with invisible borders.
{{property}:hide-block-if-nothing}
If a value in the token is not empty and you want to add a value of the token to the block, you need to repeat the token without the formatter to render a value.
{{property}:hide-block-if-nothing}
{{property}}
Note
To hide items from an array, we recommend to use the filter operation instead of the current formatter. The latter should be used only for hiding arbitrary blocks.
Examples
The formatter can be used in DOCX, XLSX, and PPTX templates. However, in XLSX templates, it behaves differently. Read the articles below for more information:
Template |
Data |
|---|---|
{{property}:hide-block-if-nothing}
{{property}}

or

{{property}:hide-block-if-nothing}
|
{
    "property": null
}

{
    "property": ""
}

{
    "property": []
}
|
bool
bool(yes,no,maybe) - boolean value will be converted to yes, no or maybe. You can specify your own value for each state. The last parameter is optional. You can use it if your bool value can be null.
empty
empty(val) - if a value in a tag is null, empty or empty array it will replace the value with val. You can use this formatter to display default value. For example, “N/A”.
merge-nulls
merge-nulls - use this formatter to merge table cells horizontally if there is null value.
Note
This formatter can be used in both DOCX and XLSX templates. However, Excel doesn’t support merging cells in table ranges. Thus, if you want to use this formatter, apply it to regular Excel cells instead. See the example below.
Examples
Template |
Data |
Result |
|---|---|---|
DOCX template: 
XLSX template (download): 
|
{
    "collection": [
        {
            "name": "Derek Clark",
            "sold": null
        },
        {
            "name": "Jessica Adams",
            "sold": 14000
        },
        {
            "name": "Xue Li",
            "sold": null
        },
        {
            "name": "Martin Huston",
            "sold": 9400
        },
        {
            "name": "Anton Frolov",
            "sold": null
        }
    ]
}
|
Cells with null values were merged. DOCX result: 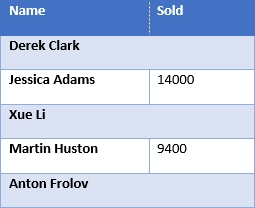
XLSX result (download result): 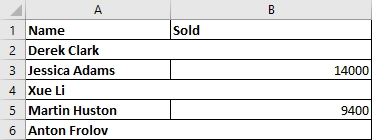
|
span-nulls
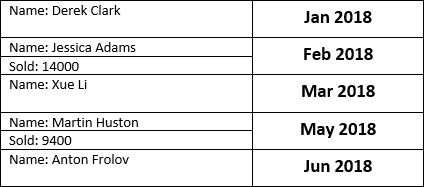
span-nulls - use this formatter to merge table cells vertically if there is null value.
Important
This formatter can be used in DOCX templates only.
Examples
Template |
Data |
Result |
|---|---|---|

|
{
    "collection": [
        {
            "name": "Derek Clark",
            "sold": null,
            "period": "Jan 2018"
        },
        {
            "name": "Jessica Adams",
            "sold": 14000,
            "period": "Feb 2018"
        },
        {
            "name": "Xue Li",
            "sold": null,
            "period": "Mar 2018"
        },
        {
            "name": "Martin Huston",
            "sold": 9400,
            "period": "May 2018"
        },
        {
            "name": "Anton Frolov",
            "sold": null,
            "period": "Jun 2018"
        }
    ]
}
|
|
horizontal-resize
horizontal-resize - it can be used to repeat collections horizontally instead of vertically in Excel. See the example below.
Important
This formatter can be used in XLSX templates only.
page
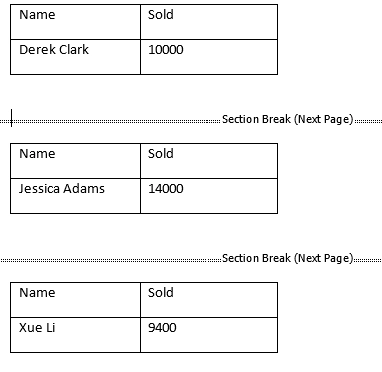
page - it can be used for changing the logic of repeating collections. When a tag is placed inside the table and you want to repeat entire page instead of a table row, use page to override default repeating logic.
Important
This formatter can be used in DOCX templates only.
sheet
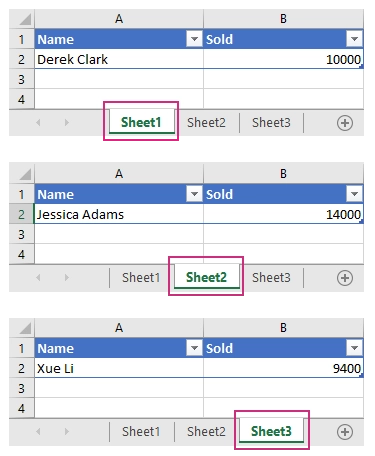
sheet - it can be used for changing the logic of repeating collections. When a tag is placed inside the table and you want to create a separate sheet for each collection item instead of a table row, use sheet to override default repeating logic.
Important
This formatter can be used in XLSX templates only.
picture
picture - it resolves URL or base64 string and converts it to an image.
The formatter doesn’t compress the source picture and keeps its quality.
picture formatter can be used with resizing options.
These are the available options. Use one, two, or three parameters in combination with the formatter to get the best results.
Fit. If the Fit option is specified, the picture formatter maintains the proportions of the image and fits it into the specified size.
For example, to place a picture into a 300x300 square, add the token {{imageData}:picture(300, 300, Fit)}.
Auto. With this option, you can specify only one dimension: either width or height.
The other dimension will be calculated automatically: {{imageData}:picture(450, Auto)}.
This option can be also used with Fit: {{imageData}:picture(Auto, 300, Fit)}, {{imageData}:picture(300, Auto, Fit)}.
Stretch. This is the default behavior. If you specify the width and height without Fit or Auto, the image will be stretched according to the specified sizes.
The formatter can be used in DOCX, PPTX and XLSX templates. Read the articles below for more information:
Note
The picture formatter supports SVG images but Fit option doesn’t work with them. Also, the result is visible only in the Office desktop version starting from Office 2017.
Examples
Template |
Data |
Result |
|---|---|---|
{{imageData}:picture},

{{imageData}:picture(300)},

{{imageData}:picture(Auto, 300)},

{{imageData}:picture(300, Auto)},

{{imageData}:picture(300, 300, Fit)},

{{imageData}:picture(Auto, 300, Fit)},

{{imageData}:picture(300, Auto, Fit)}
|
{
    "imageData": "https://picturesite.com/pics/picture.png"
}


{
    "imageData": "iVBORw0KGgoAAAANSUhEUgAAAIAAAAA9CAYAAABlamFgAA"
}
|
the image
|
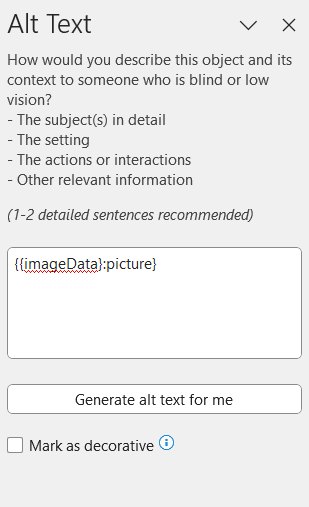
You can also place the picture formatter into Alt text of a picture. This way you can control the inserted picture size as well.
rotate, flip
You can rotate and/or flip a picture using rotate and flip formatters with the picture formatter.
Examples
Template |
Data |
Result |
|---|---|---|
{{imageData}:picture(100):flip(X):rotate(90)}
{{imageData}:picture(100):rotate(90):flip(X)}
{{imageData}:picture(100):rotate(90):flip(Y)}
{{imageData}:picture(100):rotate(90):flip(XY)}
|
{
    "imageData": "https://picturesite.com/pics/picture.png"
}


{
    "imageData": "iVBORw0KGgoAAAANSUhEUgAAAIAAAAA9CAYAAABl"
}
|
the image
|
Note
Rotation supports only the following values: 90, 180, 270, 360
pictureCompress
pictureCompress - it resolves URL or base64 string and converts it to an image. This formatter compresses the source picture.
pictureCompress formatter can be used with resizing options.
These are the available options. Use one, two, or three parameters in combination with the formatter to get the best results.
Fit. If the Fit option is specified, the picture formatter maintains the proportions of the image and fits it into the specified size.
For example, to place a picture into a 300x300 square, add the token {{imageData}:pictureCompress(300, 300, Fit)}.
Auto. With this option, you can specify only one dimension: either width or height.
The other dimension will be calculated automatically: {{imageData}:pictureCompress(450, Auto)}.
This option can be also used with Fit: {{imageData}:pictureCompress(Auto, 300, Fit)}, {{imageData}:pictureCompress(300, Auto, Fit)}.
Stretch. This is the default behavior. If you specify the width and height without Fit or Auto, the image will be stretched according to the specified sizes.
The formatter can be used in DOCX, PPTX and XLSX templates. Read the articles below for more information:
Note
The pictureCompress formatter supports SVG images but Fit option doesn’t work with them. Also, the result is visible only in the Office desktop version starting from Office 2017.
Examples
Template |
Data |
Result |
|---|---|---|
{{imageData}:pictureCompress},

{{imageData}:pictureCompress(300)},

{{imageData}:pictureCompress(Auto, 300)},

{{imageData}:pictureCompress(300, Auto)},

{{imageData}:pictureCompress(300, 300, Fit)},

{{imageData}:pictureCompress(Auto, 300, Fit)},

{{imageData}:pictureCompress(300, Auto, Fit)}
|
{
    "imageData": "https://picturesite.com/pics/picture.png"
}


{
    "imageData": "iVBORw0KGgoAAAANSUhEUgAAAIAAAAA9CAYAAABl"
}
|
the image
|
url
url - it corrects an url to full qualified with HTTP scheme or checks correctness when a scheme is existing. When result URL is not correct - removes it from the document
Template |
Data |
Result |
|---|---|---|
{{value}:url}
|
{
    "value": "picturesite.com/pics/picture.png"
}

{
    "value": "google.com"
}

{
    "value": ".net"
}
|
https://picturesite.com/pics/picture.png

https://google.com
|
keep-token
keep-token keeps tokens as they are.
It can be useful in case you have other system tags in double curly brackets (for instance, Adobe Sign text tags).
Or you have some text enclosed with double curly brackets as a part of a document.
Template |
Result |
|---|---|
{{value}:keep-token}
{{Sig_es_:signer1:signature}:keep-token}
|
{{value}}
{{Sig_es_:signer1:signature}}
|
html
html formatter converts provided HTML code into DOCX text and elements. You can use it with or without an optional parameter to choose how styles are applied:
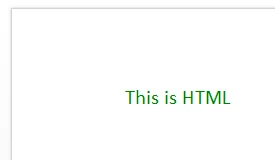
htmlorhtml(MixStyle)- the document’s default style is applied, and inline HTML styles override the default style partially or fully, depending on the style properties specified. Text alignment, font, size, and color are taken from the HTML style if they are specified there. Here is an example of how inline styles may be used:
<p style="color: #40e255; font-size: 20px; font-family: Times; text-align: right">Example text</p>
html(DocumentStyle)- the document’s default style is applied, and all inline HTML styles are ignored.
Note
html formatter is only supported in DOCX documents.
Template |
Data |
Result |
|---|---|---|
{{text}:html}
|
{
    "text": "<html><head><title></title></head>
    <body><p style=\"color: green; font-size: 20px\">
    This is HTML</p></body></html>"
}
|
DOCX file with converted HTML elements. Inline styles are applied. |
{{text}:html(MixStyle)}
|
{
    "text": "<html><head><title></title></head>
    <body><p style=\"color: green; font-size: 20px\">
    This is HTML</p></body></html>"
}
|
DOCX file with converted HTML elements. Inline styles are applied. |
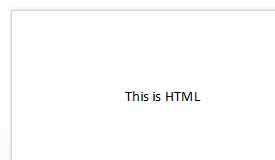
{{text}:html(DocumentStyle)}
|
{
    "text": "<html><head><title></title></head>
    <body><p style=\"color: green; font-size: 20px\">
    This is HTML</p></body></html>"
}
|
DOCX file with converted HTML elements. Inline styles are ignored. |
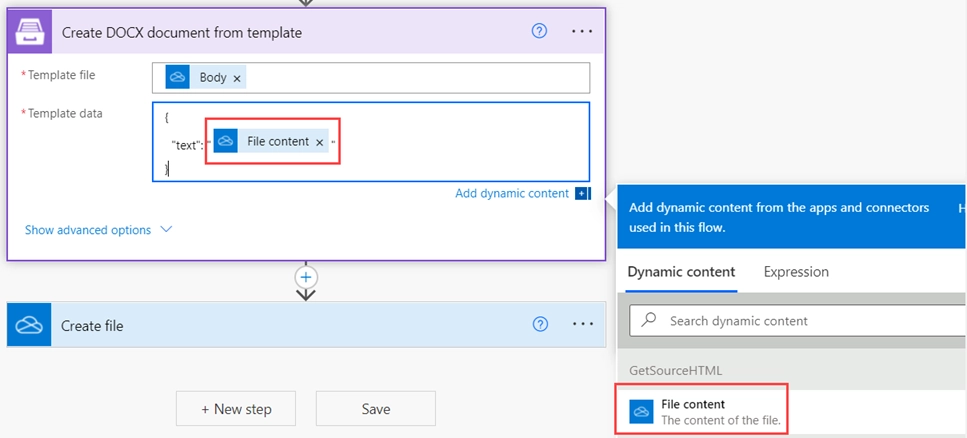
You can also upload a source HTML from any connector: SharePoint, OneDrive, etc, and use the dynamic content in Plumsail actions.
markdown
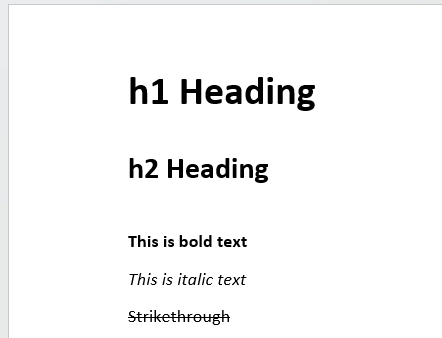
markdown formatter converts provided markdown code into docx text and elements.
Note
markdown formatter is only supported in DOCX documents.
Template |
Data |
Result |
|---|---|---|
{{text1}:md}
{{text2}:md}
{{text3}:md}
{{text4}:md}
{{text5}:md}
|
{
    "text1": "# h1 Heading",
    "text2": "## h2 Heading",
    "text3": "**This is bold text**",
    "text4": "*This is italic text*",
    "text5": "~~Strikethrough~~"
}
|
docx file with the markdown text |
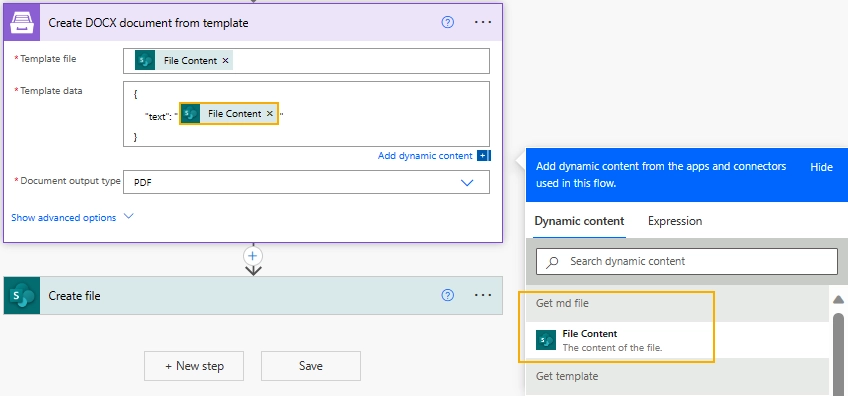
You can also upload a source markdown file from any connector: SharePoint, OneDrive, etc, and use the dynamic content in Plumsail actions.
checkbox
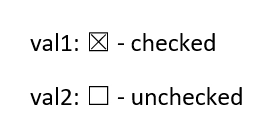
checkbox - activates checkboxes in a DOCX template.
For example, a user fills out some online form and the formatter activates checkboxes in a DOCX template depending on the forms’ values.
The result DOCX document could be an application or questionnaire.
Find more information about using the formatter in the article How to populate Word with checkboxes using Power Automate.
Template |
Data |
Result |
|---|---|---|
{{prop1}:checkbox}
{{prop2}:checkbox}
|
{
    "prop1": true,
    "prop2": false
}
|
DOCX file with activated checkboxes |
titleCase
titleCase - converts a string to title case.
Template |
Data |
Result |
|---|---|---|
{{text}:titleCase}
|
{
    "text":"test string"
}
|
Test String
|
lineBreakIf
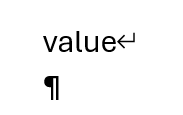
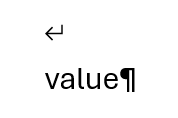
lineBreakIf - Adds a line break before or after a value inserted from a token.
Available options:
after. A line break character will be added to the end of the value.
For example, {{text}:lineBreakIf(value != "", after)}.
before. A line break character will be added to the beginning of the value.
Note
If you don’t specify the parameter, it uses before by default.
For example:
{{text}:lineBreakIf(value != "", before)}{{text}:lineBreakIf(value != "")}{{text}:lineBreakIf(value == "some value")}{{text}:lineBreakIf(value > 3 && value <= 8)}
The following operators are available:
>greater than,>=greater than or equal to,<less than,<=less than or equal to,==equal to,!=not equal to,&&logical AND,||logical OR.
Template |
Data |
Result |
|---|---|---|
{{text}:lineBreakIf(value != "", after)}
|
{
  "text": "value"
}
|
A line break character is added to the end of the value. |
{{text}:lineBreakIf(value != "", before)}
|
{
  "text": "value"
}
|
A line break character is added to the beginning of the value. |
