Convert CSV files to Excel in Power Automate Flow
In this tutorial, we’ll show how to convert CSV files to Excel XLSX in Power Automate Flow (Microsoft Flow) using the Convert Csv to Excel action from the Plumsail Documents connector.
Content of the article:
What Is CSV?
CSV, short for Comma-Separated Values, is a basic file format used for storing table-like data, such as spreadsheets, in plain text. Each line in a CSV file represents a row of data, with values separated by commas. Its simplicity and compatibility with different software make it easy to create, read, and work with. When handling CSV files, it’s crucial to ensure proper comma separation to avoid data errors.
CSV is widely used across various industries for tasks like exchanging data between different programs or platforms, managing inventory, or organizing financial records.
What Is Excel?
Excel, created by Microsoft, is a widely-used spreadsheet program known for its ease of use and versatility. It helps users organize, analyze, and manipulate data effortlessly. With Excel, you can create tables, charts, and graphs to visualize data and perform calculations using formulas and functions. It also offers features like conditional formatting and pivot tables for more advanced data analysis.
How to Convert CSV to Excel in Power Automate: Tutorial
Now let’s take a step-by-step look at how convert CSV to Excel in Power Automate. Say we have a folder with CSV files and want to convert newly added CSV files to XLSX and store them in another folder.
Our source CSV files have to be stored somewhere. Power Automate (Microsoft Flow) has a lot of connectors for different systems.
Here are just a few of them:
SharePoint
Salesforce
Box
OneDrive
Google Drive
Dropbox
SFTP
File System
You can store your files anywhere. In this example, we will store our source CSV files and the resulting Excel files in SharePoint folders, but you can get data from any other sources.
You can download the CSV demo file.
This is how our flow looks:
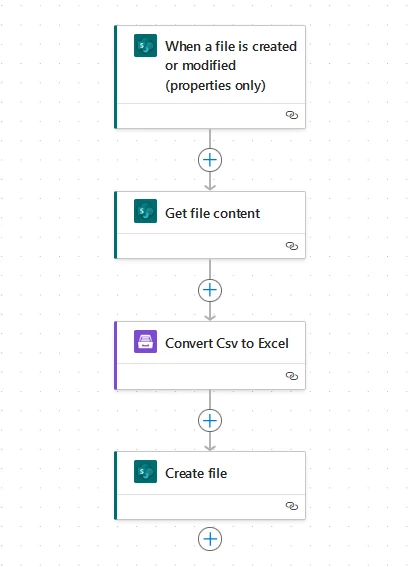
Below is a step-by-step description of the flow.
Flow trigger
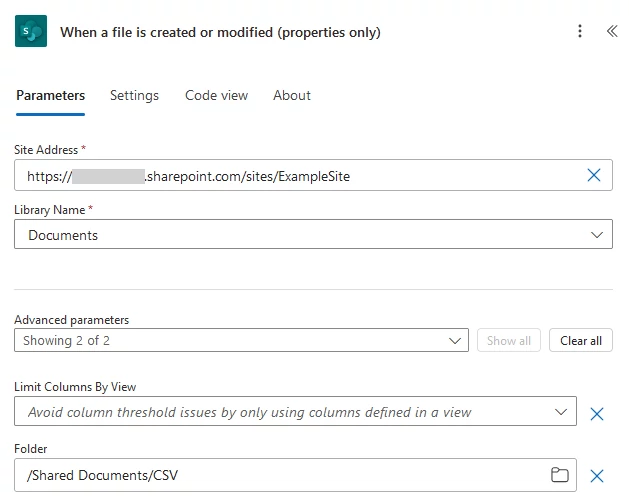
The flow starts when a new CSV file is uploaded to a CSV folder on the SharePoint site.
Obtain file content
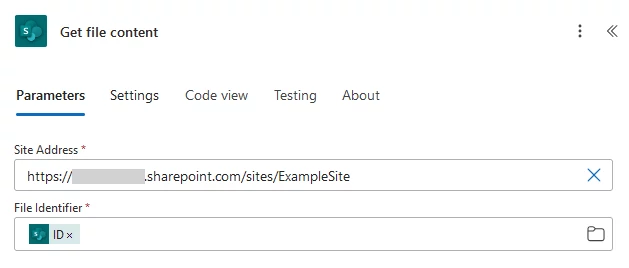
Obtain the CSV file content using the “Get file content” action from the SharePoint connector.
Convert CSV to Excel XLSX
Convert CSV to Excel is an action from the Plumsail Documents connector.
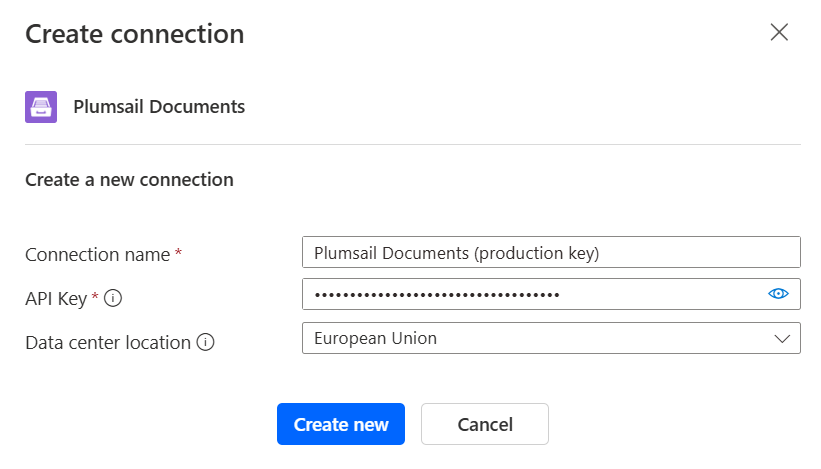
If this is your first time using the Plumsail Documents connector, Power Automate will request you to create a new connection. Provide the following details and then click Create new:
Connection name - you can type any name for the connection, for example Plumsail Documents (production key);
API Key - create an API key in your Plumsail Account, copy it, and paste it into the API Key field;
Data center location - make sure the selected data center location matches one of your account.
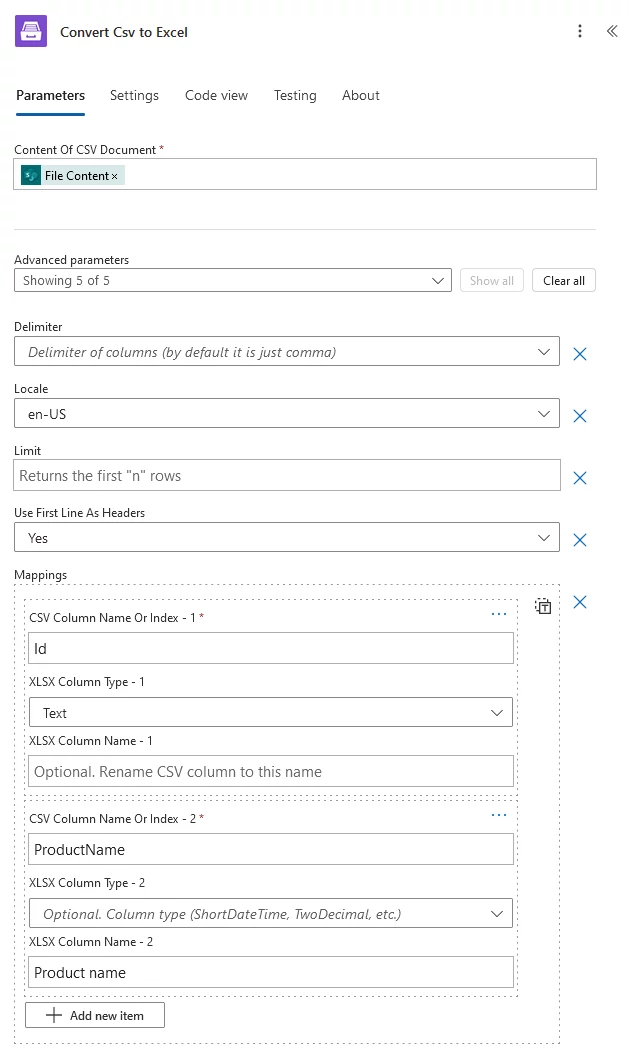
The action Convert Csv to Excel has one required field - the content of the CSV file you’d like to convert to Excel. We inserted the trigger output into this field. You can change the advanced options Delimiter, Locale, Limit and Use first line as headers if necessary.
Optionally, you can add Mappings to rename columns and specify the Excel column type. In this example, we set a more user-friendly name for the “ProductName” column and specified type “Text” for the “Id” column. If some identifiers in the “Id” column start with 0, this setting ensures that they will not be truncated (“000123” will not become “123”). Additional applications for setting column type include date and number formatting (e.g., scientific notation, percentage formatting).
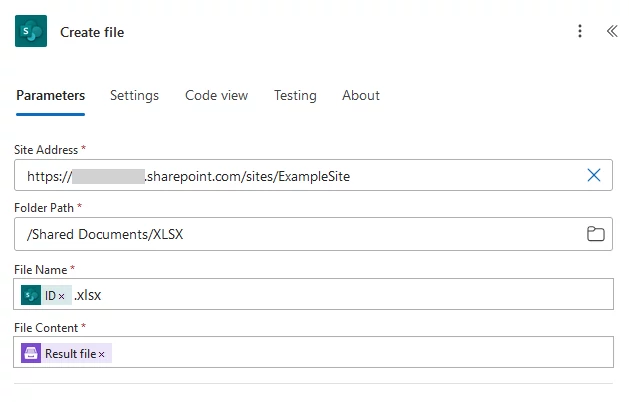
Create file
Finally, We save the resulting Excel spreadsheet to another SharePoint folder.
What advantages does Power Automate offer for converting CSV to Excel
Power Automate is a valuable tool for simplifying tasks, including converting CSV files to Excel format. Let’s explore the advantages of using Power Automate for this process.
1. Streamlined Automation
With Power Automate, converting CSV files to Excel is automated, saving time and effort. Setting up the conversion flow is easy:
Input the CSV file.
Add Get file content action.
Add Convert CSV to Excel action.
Save the result file.
Validate and test the flow for smooth operation.
2. Easy Integration
Power Automate seamlessly integrates with various applications, enhancing efficiency further. By connecting with other platforms, data transfers become effortless. Integration involves:
Selecting desired apps for integration.
Configuring settings for data exchange.
Testing and activating the integrated flow for automated conversions.
3. User-Friendly Interface
Power Automate has an intuitive interface, making the CSV to Excel conversion process simple. The straightforward steps include:
Creating the flow within Power Automate.
Adding Get file content action.
Adding CSV to Excel action.
Saving the result file.
Testing the flow for successful conversion.
What are the restrictions when converting CSV to Excel using Power Automate
Power Automate makes converting CSV files to Excel easy, but there are important rules to remember. These rules can affect how well the conversion works. Let’s look at the main restrictions when using Power Automate to convert CSV to Excel.
1. Premium plan required for additional features
If you require integration of the CSV to Excel action with custom systems in Power Automate, you might find that some connectors require a Premium plan. Here are the steps to consider:
Check the available pricing plans for Power Automate.
Choose a premium plan that suits your needs and budget.
Activate the premium plan for your Power Automate account to access additional features.
2. Potential compatibility issues with complex data
Converting CSV to Excel in Power Automate may encounter compatibility issues with complex data. To address this, consider the following steps:
Check for special characters and remove or replace them if necessary.
Ensure data types in the CSV file align with Excel columns to avoid errors.
Manage large files by splitting data or using batch processing.
Standardize formatting inconsistencies before conversion.
Test the conversion process with sample data to identify and resolve compatibility issues beforehand.
By understanding these restrictions and taking appropriate measures, you can maximize the benefits of CSV to Excel conversion using Power Automate.
Conclusion
Now you’ve learned how to convert CSV files to Excel XLSX format using Power Automate Flow. Understanding the benefits and limitations involved, you’re now equipped to streamline your data management tasks effectively. With Power Automate’s automation and integration capabilities, you can optimize workflows and boost productivity in various scenarios.