Multiple worksheets
With help of the templating engine, you can create multiple worksheets in one file.
You can download the source document and the result document for the example described below in multiple worksheets demo.
Let us take an object containing information about employees working in a company. Each employee has a list of properties. We want to display information about each employee in a separate worksheet. The resulting document will look like this:
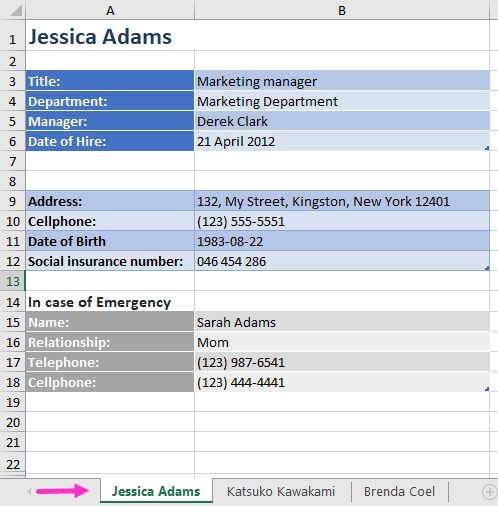
Each worksheet has a name and a title with an employee’s name.
JSON representation of the object:
[
    {
        "sheetName": "Jessica Adams",
        "name": "Jessica Adams",
        "jobInfo": {
            "title": "Marketing manager",
            "department": "Marketing Department",
            "manager": "Derek Clark",
            "telephone": "(206) 789-1598",
            "dateOfHire": "2012-04-21T00:00:00"
        },
        "personalInfo": {
            "address": "132, My Street, Kingston, New York 12401",
            "cell": "(123) 555-5551",
            "dateOfBirth": "1983-08-22",
            "SIN": "046 454 286"
        },
        "inCaseOfEmergency": {
            "name": "Sarah Adams",
            "relationship": "Mom",
            "telephone": "(123) 987-6541",
            "cell": "(123) 444-4441"
        }
    },
    {
        "sheetName": "Katsuko Kawakami",
        "name": "Katsuko Kawakami",
        "jobInfo": {
            "title": "Analyst",
            "department": "Financial Department",
            "manager": "Xue Li",
            "telephone": "(206) 784-1258",
            "dateOfHire": "2016-03-06T00:00:00"
        },
        "personalInfo": {
            "address": "257, My Street, East Village, New York 12401",
            "cell": "(123) 555-5552",
            "dateOfBirth": "1979-09-19",
            "SIN": "073 454 287"
        },
        "inCaseOfEmergency": {
            "name": "Jane Smith",
            "relationship": "Friend",
            "telephone": "(123) 987-6542",
            "cell": "(123) 333-3332"
        }
    },
    {
        "sheetName": "Brenda Coel",
        "name": "Brenda Coel",
        "jobInfo": {
            "title": "Marketing director",
            "department": "Marketing Department",
            "manager": "Derek Clark",
            "telephone": "(206) 854-9798",
            "dateOfHire": "2011-11-05T00:00:00"
        },
        "personalInfo": {
            "address": "87, My Street, Lower East Side, New York 12401",
            "cell": "(123) 555-5553",
            "dateOfBirth": "1975-12-01",
            "SIN": "051 454 288"
        },
        "inCaseOfEmergency": {
            "name": "John Smith",
            "relationship": "Husband",
            "telephone": "(123) 987-6543",
            "cell": "(123) 222-2223"
        }
    }
]
Now, let us take a look at the source template for this structure:
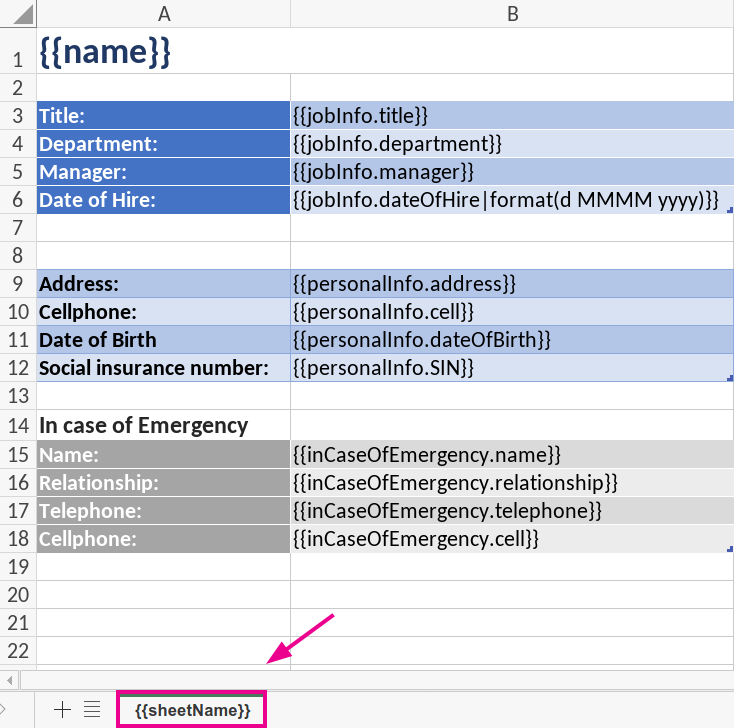
Just type the {{sheetName}} tag into the tab name field. The templating engine is smart enough to understand that it needs to render a separate sheet for each employee.
Note
Multiple worksheets template work if the Sheet name tag is used only for the Sheet name and not used anywhere else in the sheet. In the example below, we use a tag “sheetName” to name the sheets.
To display employees information we refer objects properties using the dot operator:
The
{{name}}tag shows the employees’ names.The
{{jobInfo.title}}tag lets the engine know that we want to render the title property of the jobInfo object.The
{{jobInfo.dateOfHire|format(d MMMM yyyy)}}tag lets the engine know that we want to render the Date of Hire property and change its format. For more information about value formatting please have a look at the value function section of the documentation.The
{{personalInfo.address}},{{inCaseOfEmergency.name}}tags let the engine know that we want to render the employee address and the emergency contact name properties of the personalInfo and inCaseOfEmergency objects.