Getting started
- Design forms
- Share forms
- Manage users
- Collect form data
- Configure notifications
- Handle form data in Power Automate
- Handle form data in Make
- Handle form data in Zapier
- Handle form data with REST API
- Connect to Airtable
- Connect to SharePoint
User guide
General
- YouTube
- Licensing
- Manage subscription
- Billing and payments
- Privacy policy
- Data protection and security
- Version history
Integrations
- Save and share
- Document generation
- Collaboration
- CRM
- Social Networks
Multilingual support
Provisioning public forms with NuGet package
How to create SharePoint list items from Data Table rows with Power Automate
We’ve discussed how a form with DataTable can be converted into PDF and sent via email, now we’ll use DataTable to add items to SharePoint.
We’ll create an Office Supplies Request form which when submitted will create items in two SharePoint lists: Orders and Ordered Items. As you might have guessed, general information from the form will go into Orders, while specific information about each record in the Data Table will create items in the Ordered Items list. Ordered Items will have a lookup to tie them to the Order.
Form and Form’s Logic
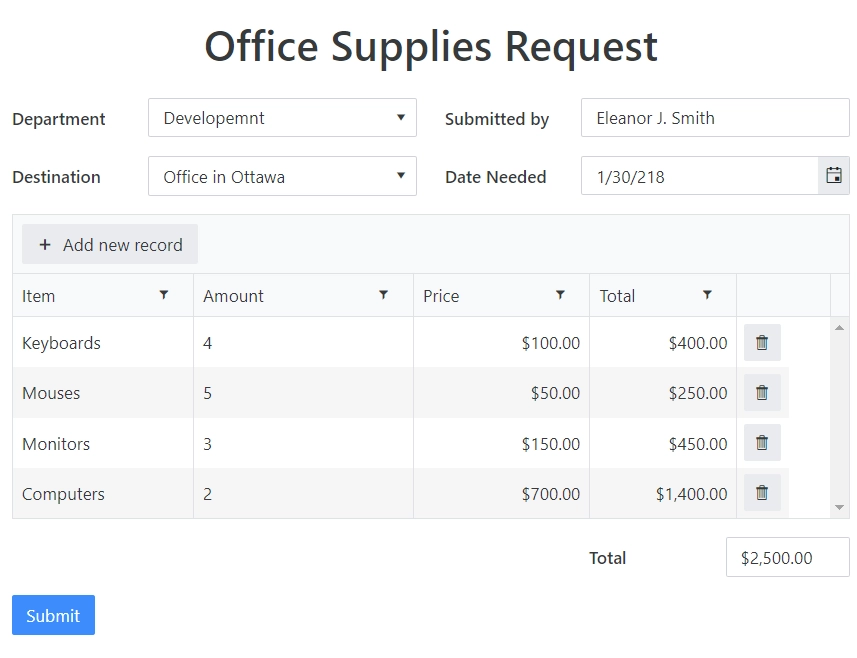
The form is straightforward. It collects contact information, delivery address, and a Data Table control with a list of ordered items.
It also includes an Order Total field to calculate the total value of the order. Here’s our form:

Note
If you want to find out how to add Line total and Overall total calculation to this form, please visit Data Table control page.
SharePoint Lists
In order to save data to SharePoint, we need two SharePoint Lists: Orders and Ordered Items.
Orders should have Title, Destination, Requester, Date Needed, and Order Total columns:

Order Items List on the other hand has to have Title, Amount, Price, Total, Destination and Order columns:

Now, that the form and lists are ready, it is time to create custom Flow and let it populate lists with data.
Flow
We will use Flow to first create an Order and then add each record as an item to Order Items.
If you haven’t read our introduction to using Power Automate (MS Flow) with Plumsail Forms, you can find information on how to add our custom connector here.
You can also find information about how to subscribe to Form submission in the Handle submissions section.
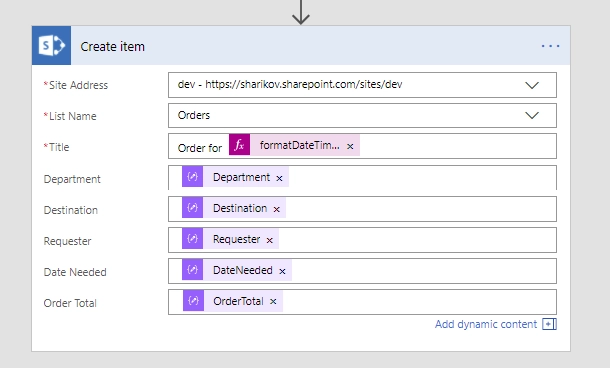
Once you’ve subscribed and parsed JSON from the Form, click Add an action and search for SharePoint. We’ll need to add SharePoint - Create Item, select our Orders list and fill in all the columns with Form fields, like this:

To make Title unique I’ve added Date Needed to it, with formatting:
formatDateTime(body('Parse_JSON')?['DateNeeded'], 'MM/dd/yyyy')
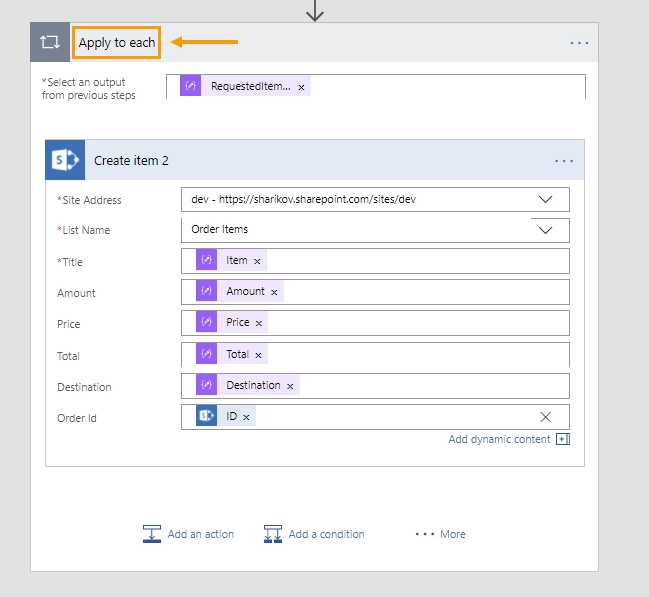
Next, we search and select SharePoint - Create Item once again, this time we choose Order Items list and start filling in all the columns. Once we add any column from our DataTable, the action will automatically be transformed to run as many times as there are records in the DataTable:

Everything else is fairly straightforward, when filling in Order lookup column, we need to select to add custom value and fill in the ID from our previous Item created.
That’s pretty much it, now we can click Save Flow and run some tests.
Result
So, here’s my form in the browser, filled in with the test data:

I press submit, then the Flow processes the request. There are no errors, so everything went smoothly.
Here’s an item created in SharePoint Order List:

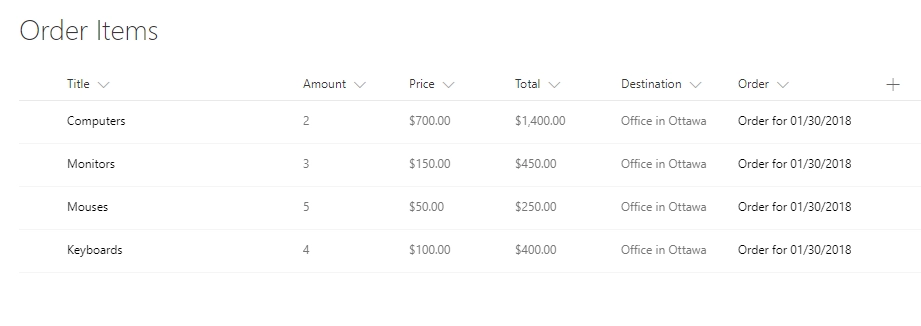
And here are all the items added to the Order Items List, all tied to the Order itself with a Lookup:
