 Attachments
The Attachments field allows users to upload files to SharePoint. They can open the file picker via the Select files… button or drag and drop files into the field.
This page contains the detailed description of the field properties and JavaScript samples which you can use with this field.

Common properties
Attachments properties
Learn about properties specifically related to the Attachments field.
Allow downloads
Allow form users to download attachments when editing an existing SharePoint item.
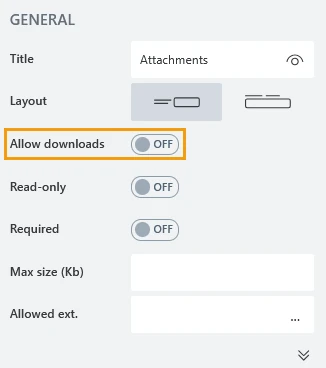
Max size (Kb)
Select the max possible size of an individual attached file.
Note
Maximum file size is also limited by your Public Web Forms subscription plan.

Allowed ext.
Choose which file types users can upload. Each file extension must start with a dot and appear on its own line. If empty, all extensions are allowed.

JavaScript framework
In this section, you can find basic examples of how to work with SharePoint fields in Forms using JavaScript.
For more examples, check out Working with form fields in JavaScript article. Follow this guide to connect a web form to a SharePoint list or library. If you are not familiar with the JavaScript framework, get started with the JavaScript basics.
Note
The field is only accessible once the form is rendered, so all calls to the field must be inside fd.rendered event:
fd.rendered(() => {
    // make field required
    fd.field('Field1').required = true;
});
Get field value
Access uploaded files with the following properties:
// get field value
let uploads = fd.field('Field1').value;

// get first file name
let filename = fd.field('Field1').value[0].file;
// get first file size
let filesize = fd.field('Field1').value[0].size;
// get first file URL
let fileurl = fd.field('Field1').value[0].url;

// loop through all files
fd.field('Field1').value.forEach(item => {
    console.log(item.file);
    console.log(item.url);
});
Upload status
The property indicates whether the field is uploading files.
fd.field('Field1').isUploading;
Handle change event
Execute a function when a field value has been changed:
fd.field('Field1').$on('change', value => {
    // log new value to browser's console
    console.log(value);
});
Make field required
Make a field required or optional:
// make field required
fd.field('Field1').required = true;

// make field not required
fd.field('Field1').required = false;
Disable field
Make a field non-editable. The field value can still be changed with JavaScript and saved:
// disabled field
fd.field('Field1').disabled = true;

// enable field
fd.field('Field1').disabled = false;
Get HTML element
Access HTML element inside the field in order to modify it, hide it, or do something else.
// access field's control
let htmlElement = fd.field('Field1').$el;

// access field's block, which includes title and control
let htmlParentElement = fd.field('Field1').$parent.$el;
Hide field
Hide a field from a user. The field value can still be accessed and changed with JavaScript.
// hide field
fd.field('Field1').hidden = true;

// show field
fd.field('Field1').hidden = false;
Clear field
Clear field value.
fd.field('Field1').clear();
Configure widget
Access the widget used by the field. The widget is based on Kendo UI Upload.
// get the widget
fd.field('Field1').widget

// change the widget's configuration
fd.field('Field1').widget.setOptions({
    multiple: false
});