Merge PDF files in Power Automate
This article demonstrates how to merge PDF files with the help of Power Automate (Microsoft Flow).
In this example, we will read three PDF files from a specific folder and combine them into one and send the resulting PDF file by email.
For instance, it may be useful in a situation when a few employees prepare different sections of a contract at the same time. They load the parts of the contract to a folder, then all files from this folder are merged to form the final document.
So, our source PDF files have to be stored somewhere. Power Automate (Microsoft Flow) has a lot of connectors for different systems. Here are just a few of them:
SharePoint
Salesforce
Box
OneDrive
Google Drive
Dropbox
SFTP
File System
In this example, we will store our source PDF files in a SharePoint library that we named Source Files Library, but you can get data from other sources. You may use these links to download three sample PDF files: the first, the second, the third. Here is an overview of the complete flow:

The step-by-step configuration is described in further sections of this article.
Flow trigger
You can actually pick any trigger. For example, you can start flow on file creation in a SharePoint document library. We use Manually trigger a flow trigger here to simplify the flow.

Get files (properties only)
We start with getting properties of all our PDF files stored in a specific folder - Source Files Library. At the next step, we will iterate through the output from this action to get those files contents.
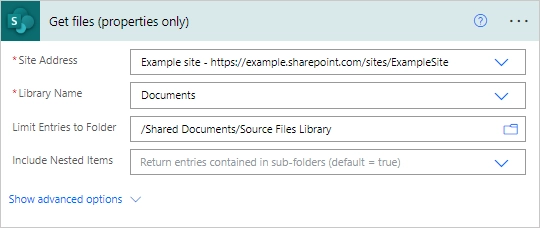
You can use any other connector to get files from your system.
Initialize variable
We need to prepare an array of files that we will put in Plumsail Documents - Merge PDF action when composing the final document.
Add a new action and search for Variables - Initialize variable action. Enter a name for the variable and choose the Array type for it.

Get file content using path
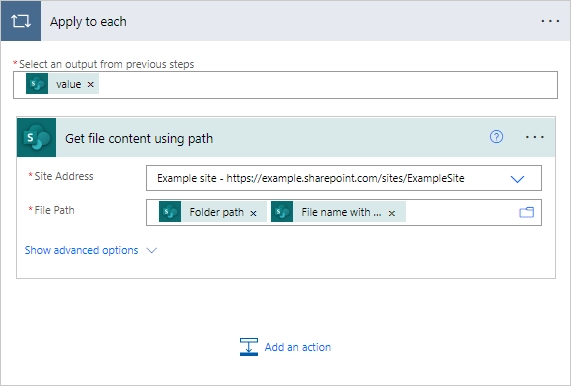
Now, you need to add the Get file content using path action to get source PDF files contents.
Click File Path field and add there Folder Path and File name with extension from a menu on the right. This will automatically transform this action into repeating one which will be performed for each file from the source folder.
Append to array variable
Now, add the Variables - Append to array variable action. Into the Value field, put File content from the output of the previous operation:
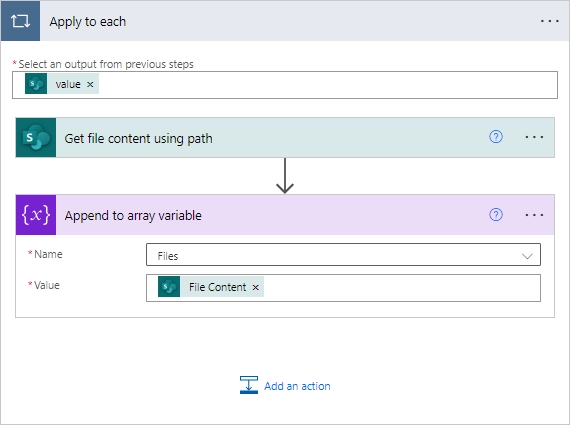
The array of PDF files is ready, now we can move to the main step - merging PDFs into the final document.
Merge PDF
This is an action from Plumsail Documents connector. Add it outside the Apply to each control.
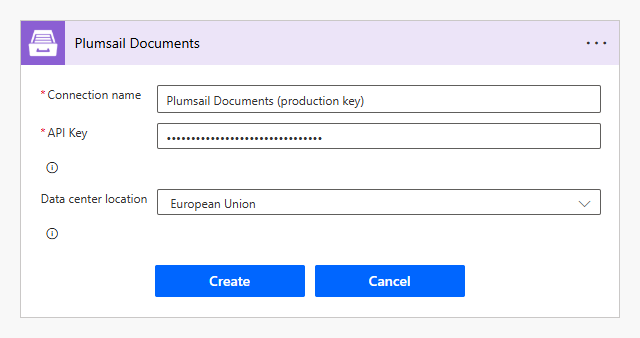
If this is your first time using the Plumsail Documents connector, Power Automate will request a Connection name, an API key, and Data center location. You can type any name for the connection, for example Plumsail Documents (production key). Ensure that the selected data center location matches one of your account. Then, create an API key in your Plumsail Account, copy and paste it into the API key field, and click Create.
Click a small array icon on the right to switch to the view where you can input an entire array.

Note
If you do not switch the input mode, you can add the contents of individual files separately.
Add the array of the PDF files to the Content of PDF documents field:

Send email
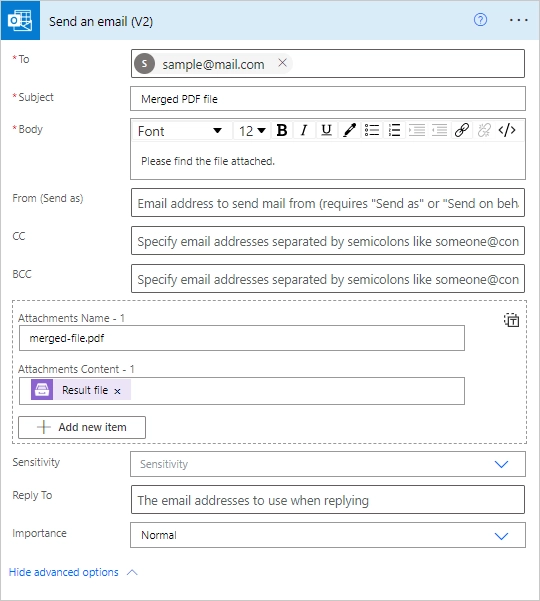
Once the result file is generated, we send an email using the Office 365 Outlook - Send an email action. In the Attachments section, we add a name and extension for the merged PDF file and choose the Result file output from the previous Merge PDF action.
That is all, the flow is configured. Hope, these steps will help to ease the work with documents.