Provisioning SharePoint forms designed in Plumsail Forms
From this article, you’ll learn how to programmatically provision forms between lists using Visual Studio and Plumsail’s NuGet package.
Important
The original and target lists must have identical structures for this method to work.
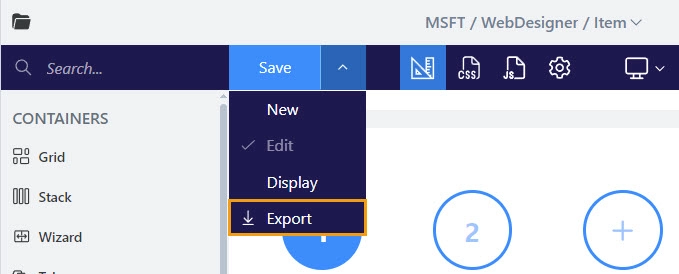
Export the form
First action that you need to do is export the form. Open the form in the designer and click the Export button:
Tip
You can use the GetLayout() method to retrieve the layout of a specific form from the list instead of exporting the form.
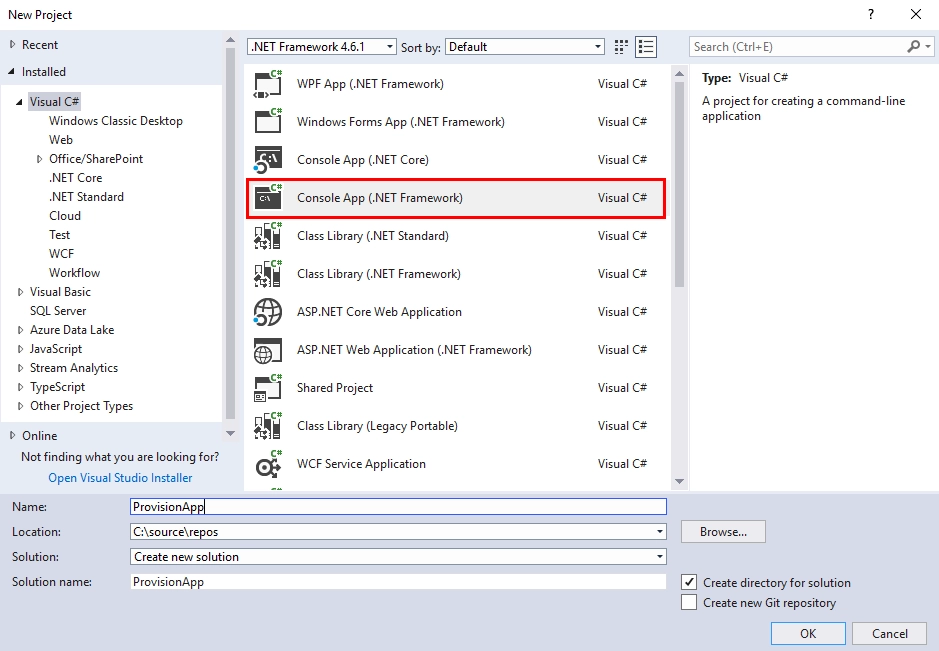
Create application and install NuGet package
Now, run the Visual Studio. Make sure your project is Compatible with .NET Standard 2.0. In the Visual Studio, create a new Project and select Console App:
In the newly created project, open Tools, find NuGet Package Manager and select Manage NuGet Packages for Solution…
Open the Browse tab, search for ‘plumsail’, and install Plumsail.Forms.O365 (or Plumsail.Forms.SP2019 for SharePoint 2019) package:

Adjust the code
Once the package and its dependencies have installed, go to Program.cs and replace all the code there with the following
using System;
using System.Linq;
using System.Security;
using Microsoft.SharePoint.Client;
using Plumsail.Forms.Designer.Data.SharePoint;
using Plumsail.Forms.SharePoint;
using PnP.Framework;

namespace ProvisionApp;

class Program {

    public static void Main(string[] args) {

        // Application (client) ID
        // https://learn.microsoft.com/en-us/sharepoint/dev/solution-guidance/security-apponly-azuread
        const string azureAppId = "00000000-0000-0000-0000-000000000000";
        // Directory (tenant) ID
        const string tenantId = "your-domain.onmicrosoft.com";
        // Path to the app certificate
        const string certificatePath = @"c:\provision\cert.pfx";
        // Certificate password
        const string certificatePassword = "password";
        // Path to the exported form
        const string layoutFilePath = @"c:\provision\Item (New).json";
        // URL of the site
        const string siteUrl = "https://your-domain.sharepoint.com/sites/your-site";
        // List title
        const string listTitle = "List";
        // Content type name
        const string contentTypeName = "Item";

        var authManager = AuthenticationManager.CreateWithCertificate(azureAppId, certificatePath, certificatePassword, tenantId);
        using var ctx = authManager.GetContext(siteUrl);

        ctx.Load(ctx.Web);
        ctx.ExecuteQuery();

        // Specify a list which form you want to replace
        var list = ctx.Web.Lists.GetByTitle(listTitle);
        var contentTypes = list.ContentTypes;
        ctx.Load(list);
        ctx.Load(contentTypes);
        ctx.ExecuteQuery();

        // Specify a content type which form you want to replace
        var contentType = contentTypes.FirstOrDefault(ct => ct.Name == contentTypeName);
        var forms = new FormsManager(ctx, list.Id, contentType.Id.ToString());
        var layout = System.IO.File.ReadAllText(layoutFilePath);

        // The form will replace a default new form in the target list
        forms.GenerateForms(Guid.Empty, FormTypes.New, layout);
    }
}
Run the app
After saving the file, run the app. Congratulations, you’ve successfully provisioned your first form!
The example shown in this article is very basic and requires you to export the form first, while technically you can retrieve form’s layouts and Form sets settings from the original site. To learn more about various methods available to FormsManager in this article.