 Org ChartSharePointMicrosoft Teams
Nov 11, 2024
Create an Org Chart from Active Directory
Learn how to create an org chart from Active Directory for Microsoft Teams and SharePoint with this step-by-step guide for easy setup and configuration.
 Org ChartMicrosoft 365SharePoint
A SharePoint employee directory gives employees a central place to find colleagues, browse teams, and discover who works in another department.
With Plumsail Org Chart, you can create a searchable staff directory for your Microsoft 365 intranet. Display employees as cards or a list, and create separate views for departments and offices. Employee Directory can be used on its own or alongside organizational chart views in the same web part.
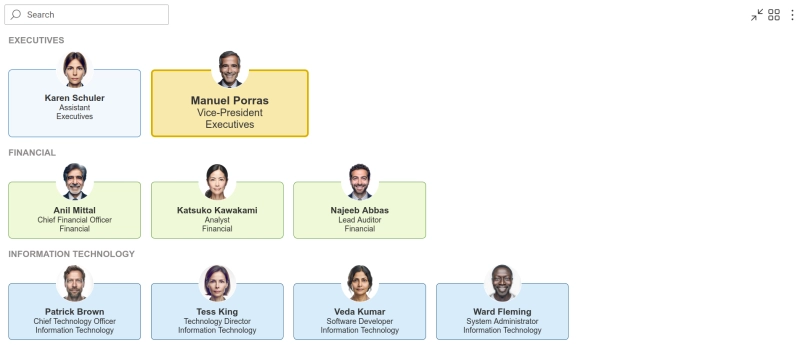
In this article, we'll walk through the basic steps to create an Employee Directory and show you a few ways to make it more useful for your team.
A SharePoint employee directory gives your team a central place to browse and search employee information. Instead of opening a plain diagram or navigating through different pages to find someone, employees can use this visual directory to quickly locate people by name, department, job title, or other available information in your existing data source.
It can be especially useful for onboarding, helping employees discover other teams, or simply giving everyone an easy way to find colleagues across the company.
Create an Employee Directory using employee data from Entra ID, a SharePoint list, or an Excel / CSV file. Configure separate views for the whole company, departments, and offices, each with its own layout, sorting, grouping, and filtering settings.
You can also use the search box to quickly locate employees and customize the appearance of your views with templates and conditional styles.
Once you have created a new Employee Directory view, you can customize how employees are displayed by using one of the available layouts. Choose the format that works best for your use case:
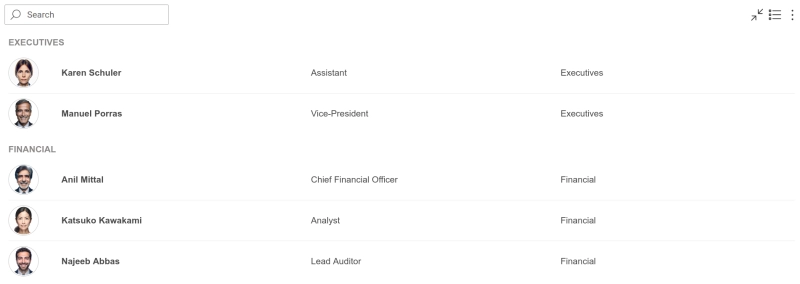
The layout you select in the view configuration is used by default. Users can also switch between the available layouts directly in the web part.
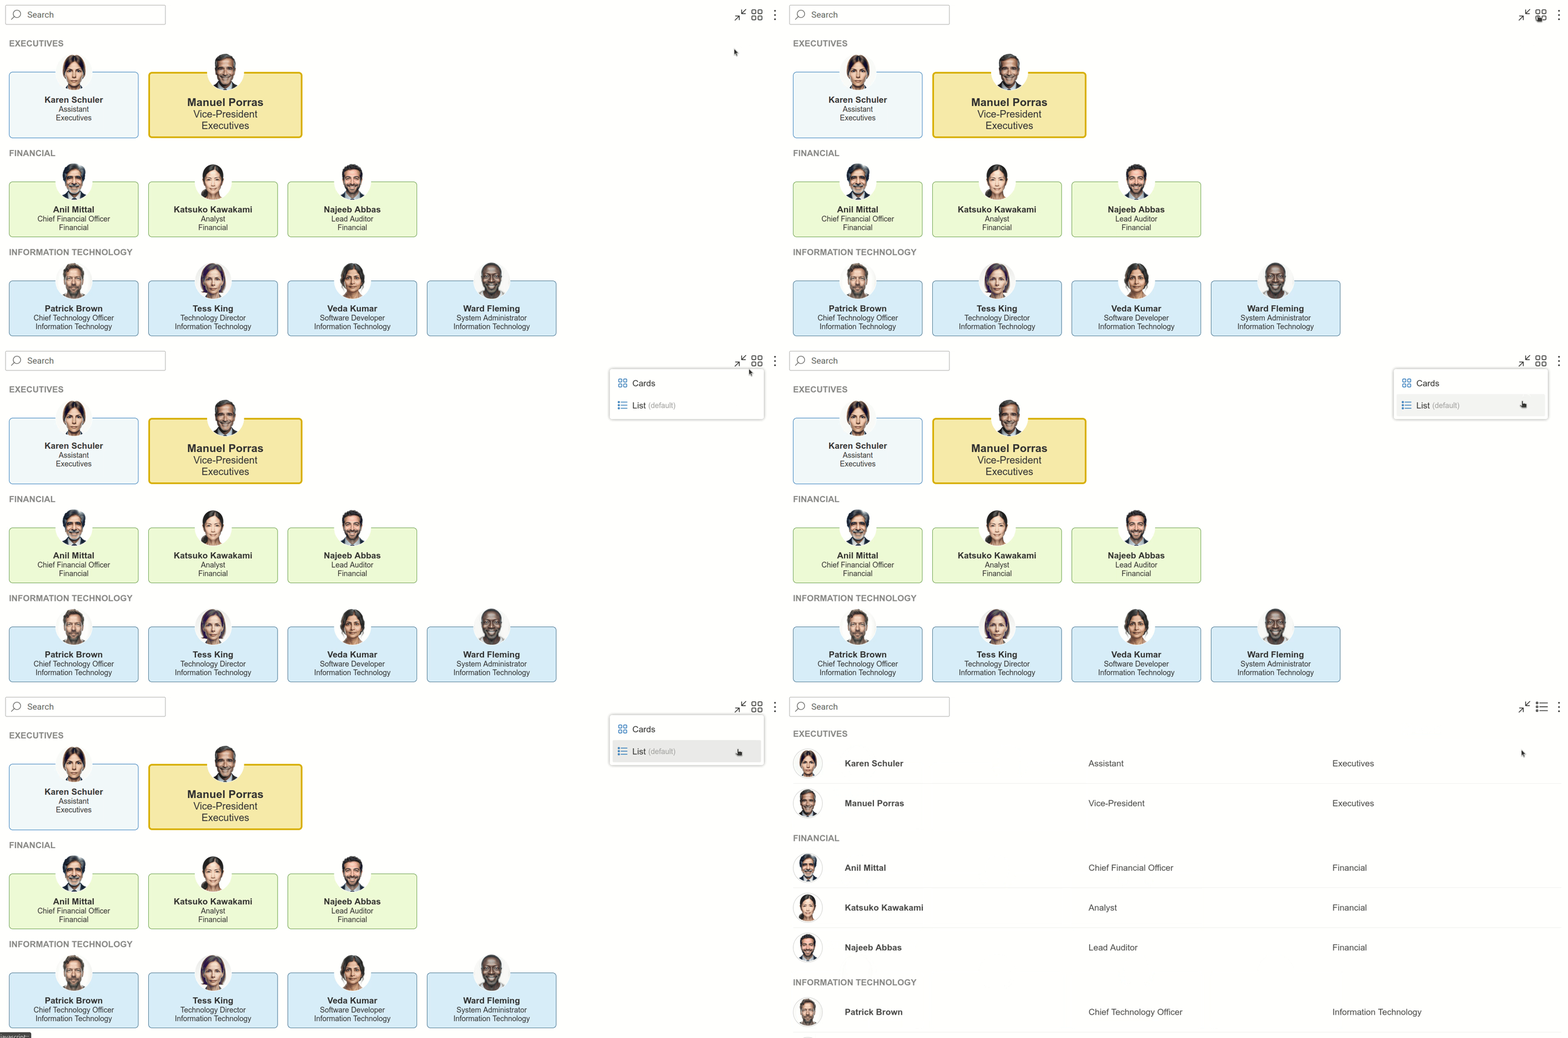
This gives your team the flexibility to use a more visual card-based directory or a compact list, depending on how they prefer to browse employee information.
Showing everyone in one place is a great start, but in day-to-day work, you often need to find a specific person quickly.
All views, including Employee Directory ones, have a search box that lets users quickly find employees by the information available in your data source, such as their name, department, or job title.
Simply start typing in the search box to narrow down the list and find the employee you're looking for.
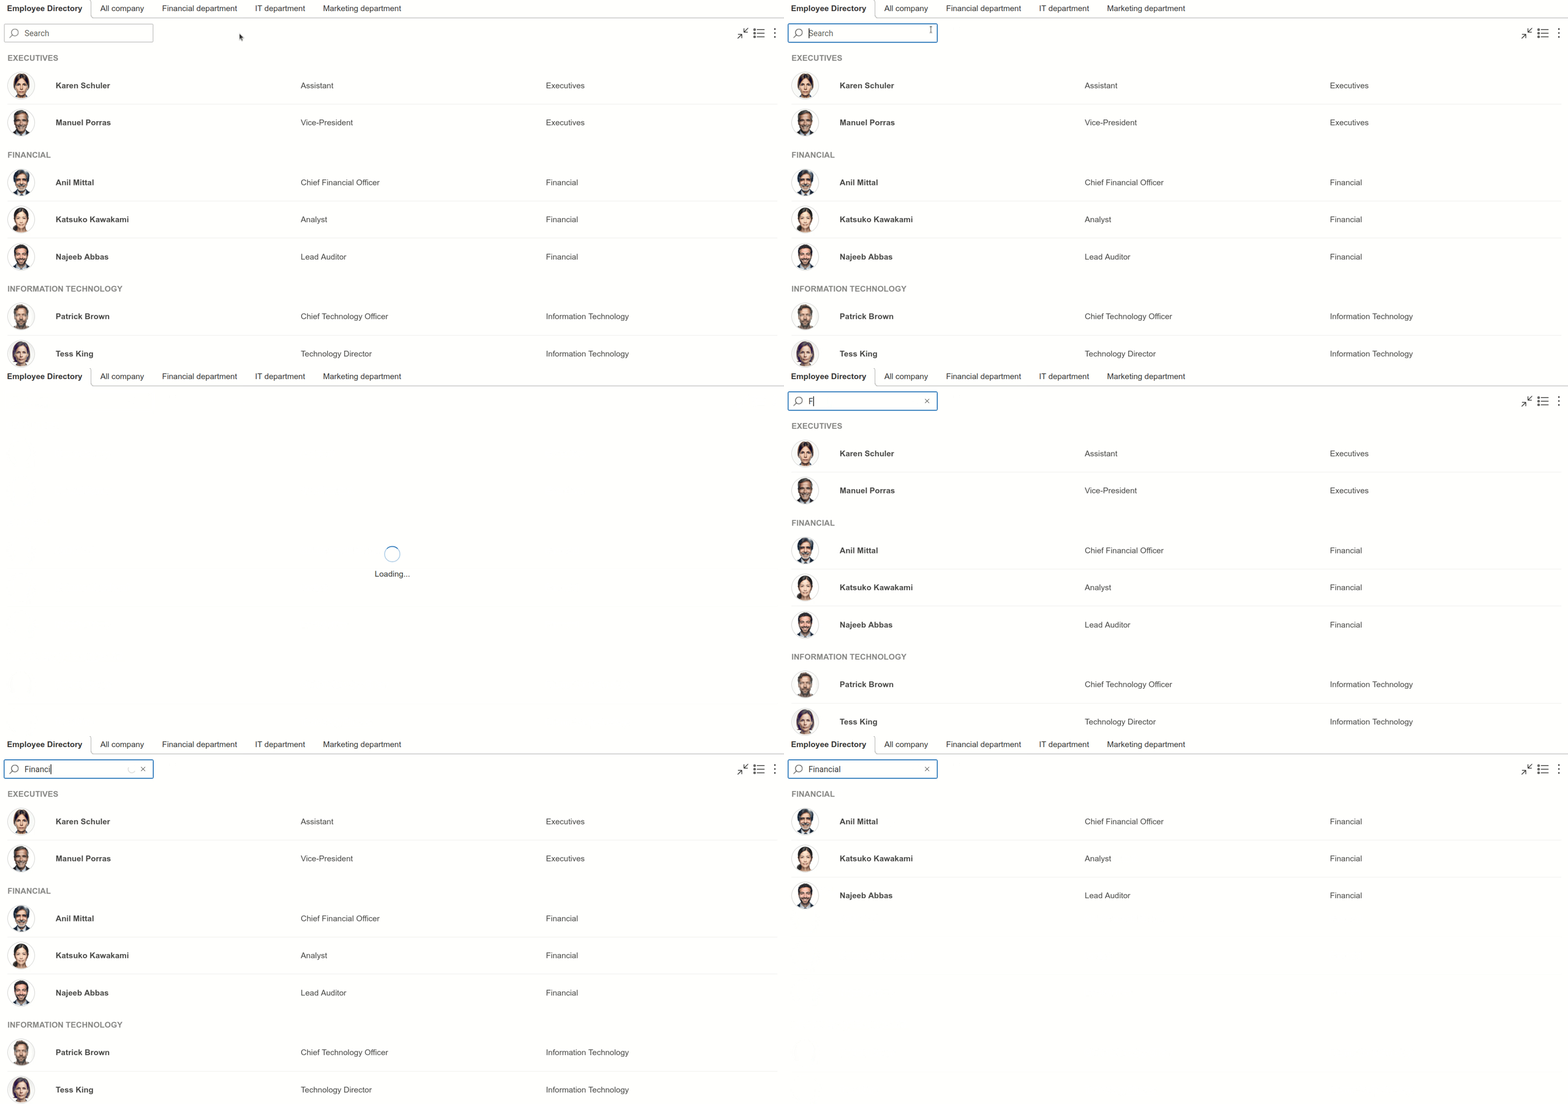
This makes the directory a handy everyday reference for your organization. Whether someone needs to find a colleague's department, check who works on a particular team, or simply put a name to a face, all this information is only a few clicks away.
You can customize each Employee Directory view independently to control which employees are displayed and how they're organized.
Use sorting to arrange employees by fields such as name or job title, grouping to organize them into categories such as departments or teams, and filtering to show only employees who meet specific conditions.
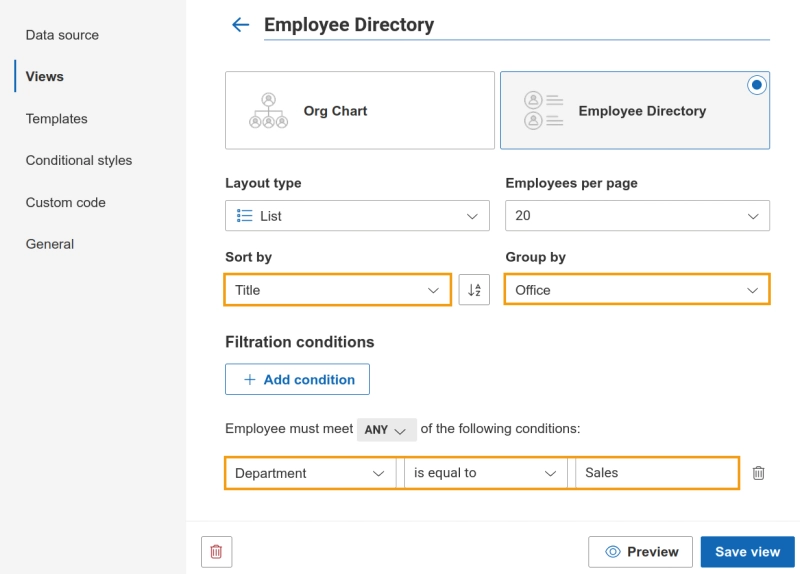
The resulting view will display only the employees that match your conditions, while keeping the layout and organization you've configured.
You can use these options together to create targeted directories for different purposes. For example, you can filter the directory to show the Sales department, group employees by office, and sort them alphabetically by name within each group.
You don't have to create a separate web part for every directory you need. Instead, you can create multiple views using the same employee data and configure each one for a different purpose.
For example, you could create:
Create and configure these views from the configuration wizard:
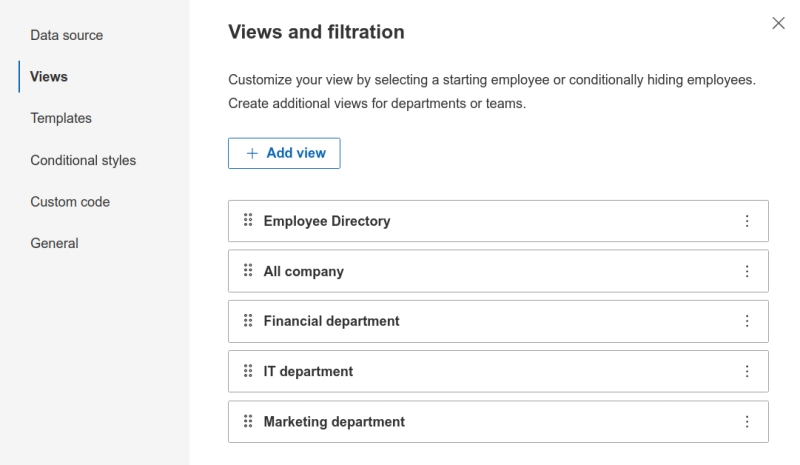
Once the views are configured, they become available in the web part as separate tabs. Users can switch between them to explore the information that's relevant to them.
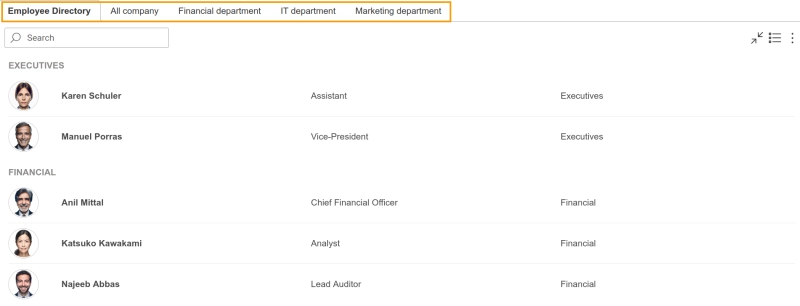
This approach gives you different ways to browse the same employee data without maintaining separate web parts or duplicating your employee information.
You can further customize how employee information looks across your web part using template customization and conditional styles.
For example, you could use conditional styles to highlight your Vice-president, based on information from your data source. The same customization will be applied across your views, so important employees remain visually identifiable whether someone is browsing the Employee Directory or viewing the organization in an Org Chart.
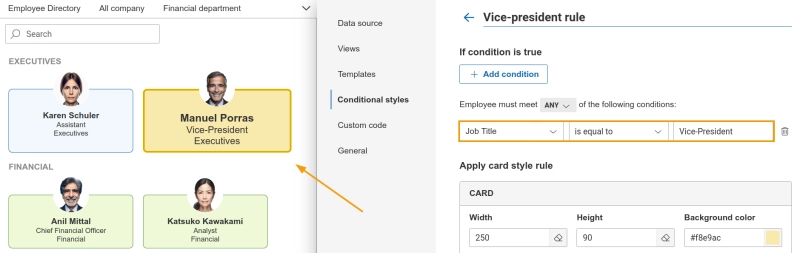
If you need more advanced customization, you can also use custom code.
Plumsail Org Chart lets you present the same employee data in different ways, depending on what users need to do.
If you want to visualize reporting relationships, select Org Chart. This displays your employees as a hierarchy tree, making managers, teams, and reporting lines easy to understand.
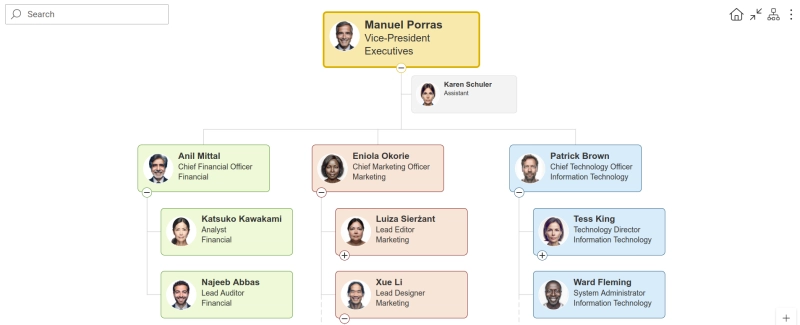
If your main goal is to help people find and browse employee information, choose Employee Directory instead.
The two view types serve different purposes, but you don't necessarily have to choose one over the other. You can include both in the same web part and let users switch between them.
If you only need a searchable company directory, you can use Employee Directory as your main view without adding an Org Chart view.
Add the web part to your SharePoint page, configure your employee data source, and set the view type to Employee Directory.
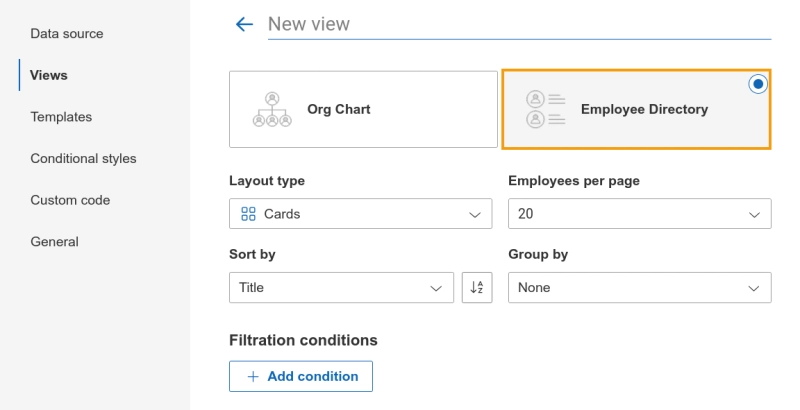
After you save the configuration, employees can use the page as a central directory to browse and search for colleagues.
And if you need more flexibility, you don't have to choose between an organizational chart and an employee directory. You can use both view types on the same chart and give employees different ways to explore your organization.
Create as many views as you need and let users switch between them depending on what they're looking for. For example, you could have:
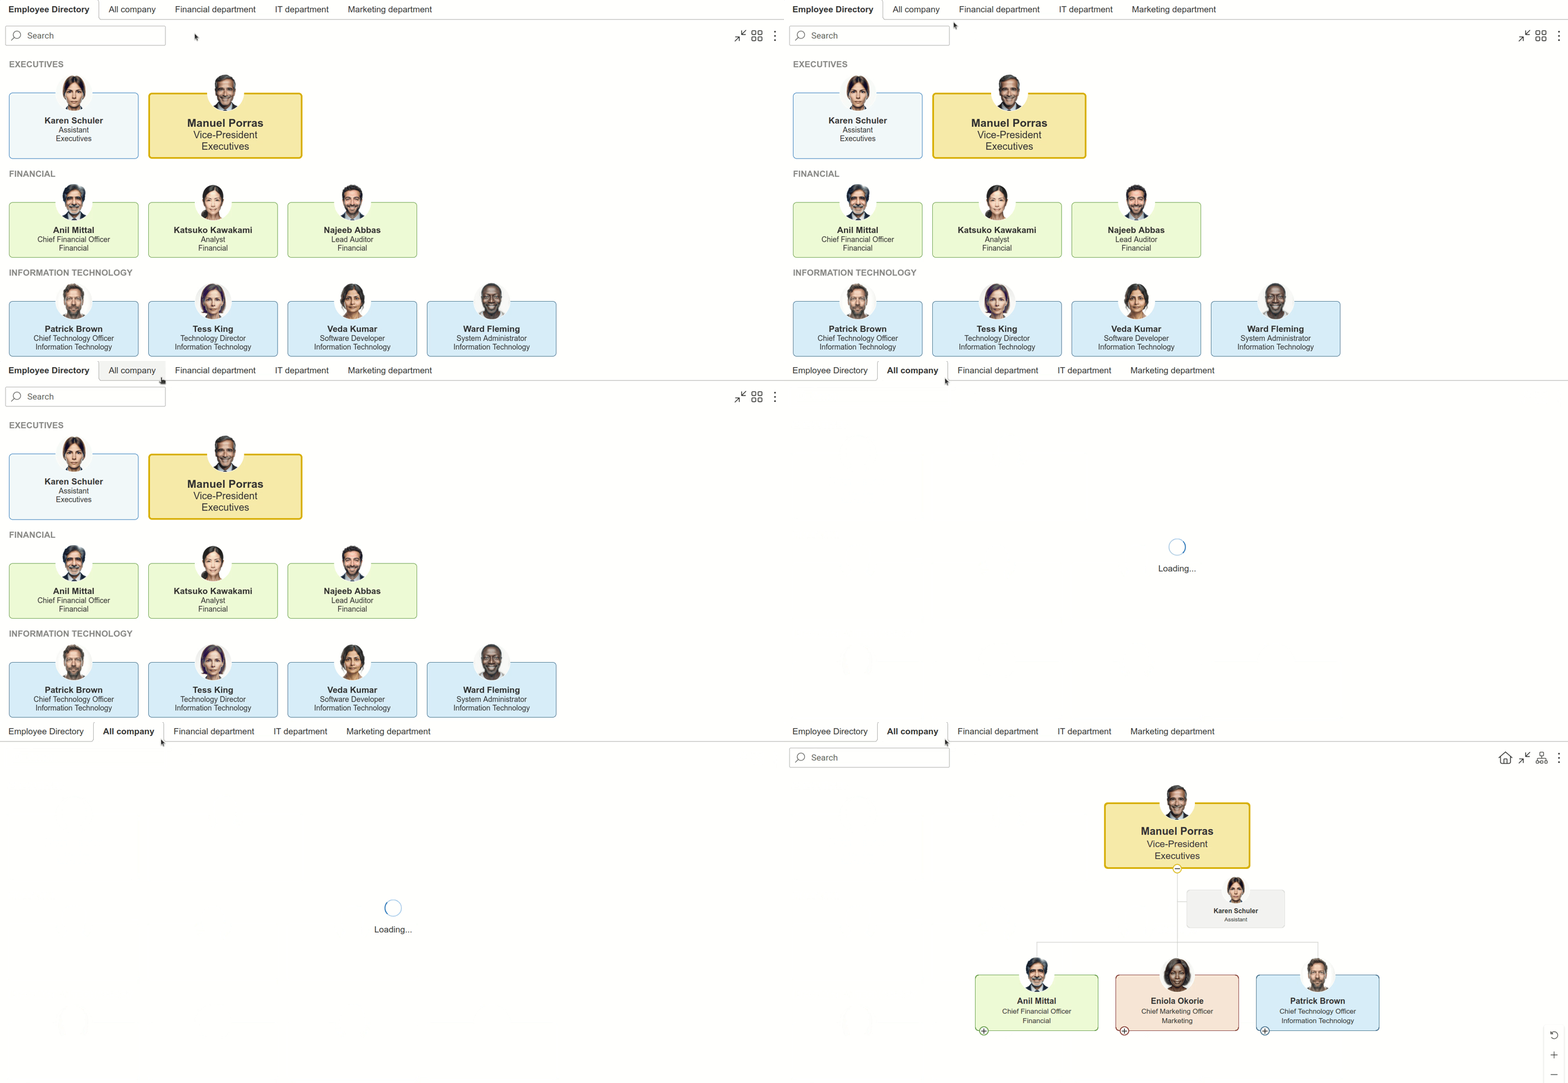
You can name, reorder, and manage your views directly from the configuration wizard, so it's easy to keep them organized as your needs change.
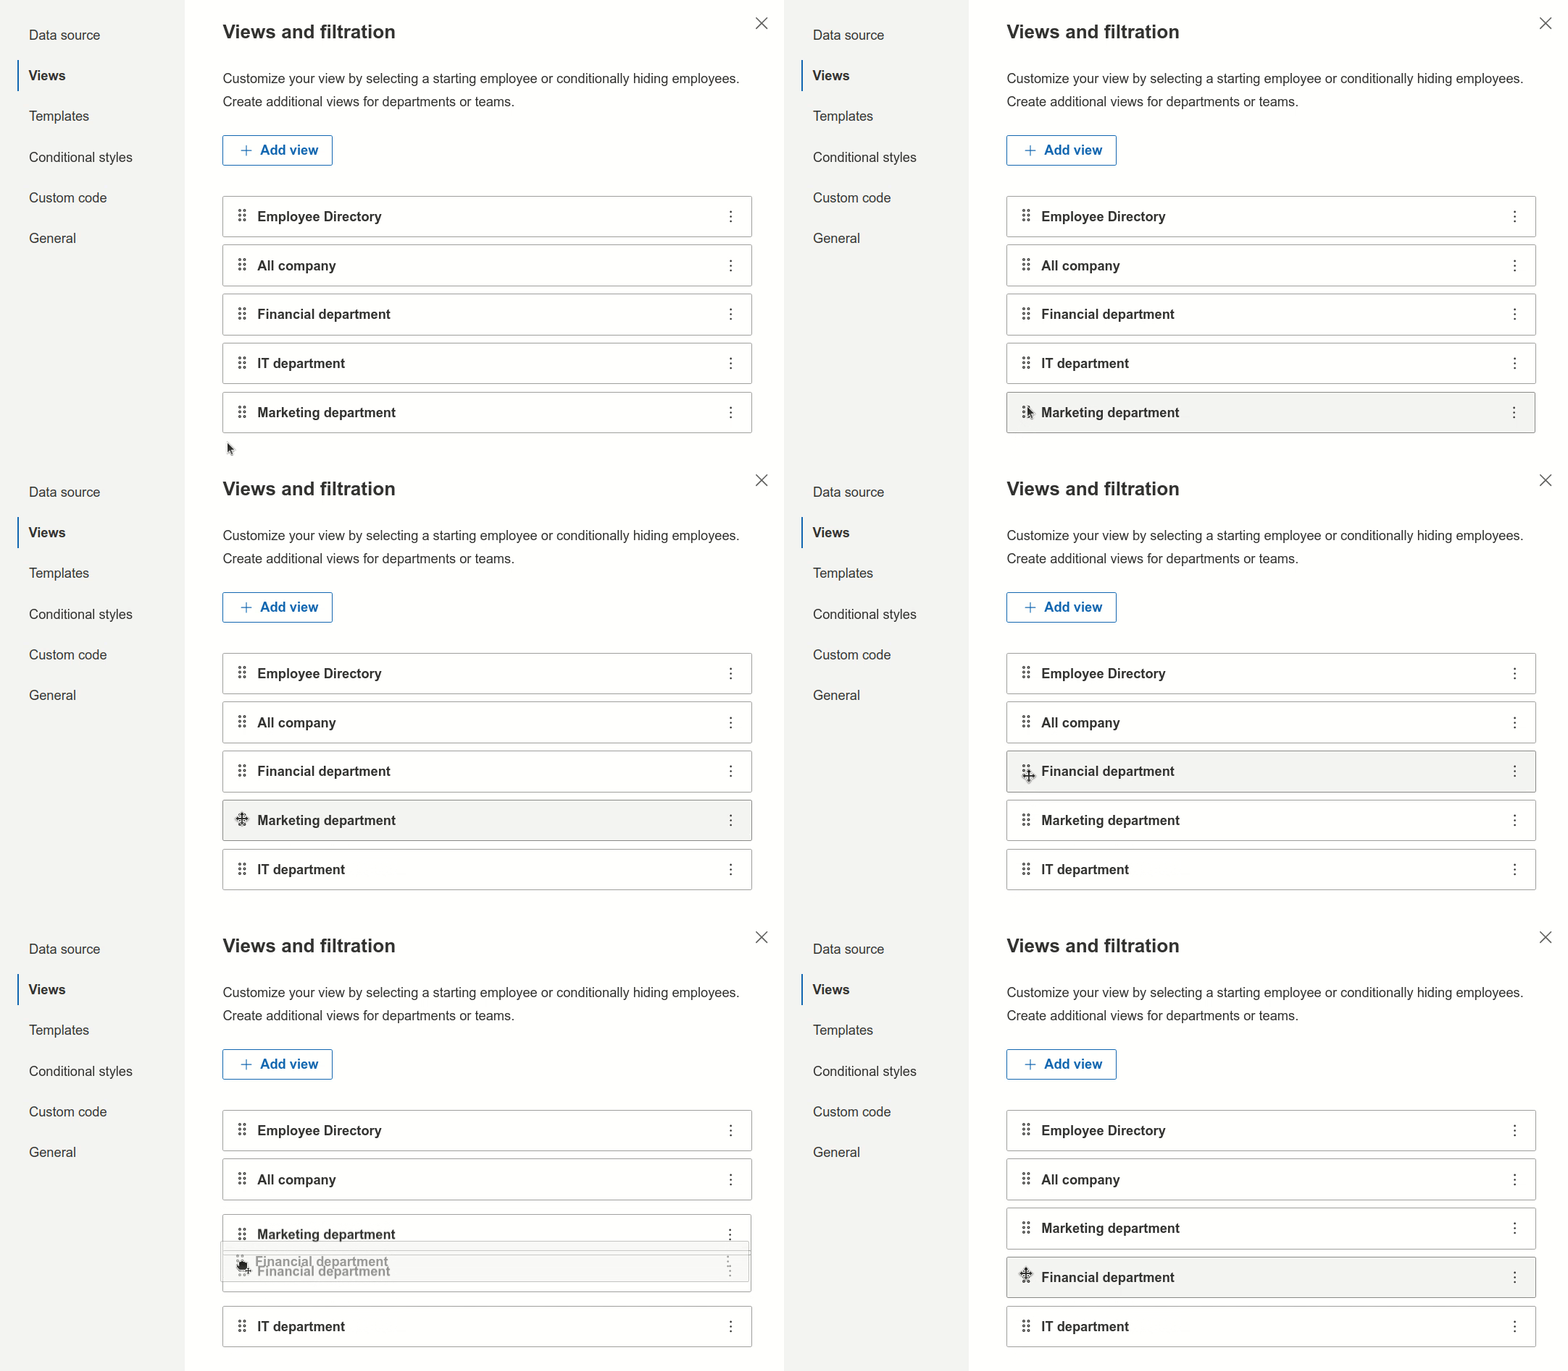
This also makes it easy to adapt the chart as your organization grows. Instead of creating a separate chart every time you have a different requirement, simply add another view using the same employee data.
Add the Org Chart web part to your SharePoint page and connect your employee data source. Then, create an Employee Directory view from the configuration wizard.
Select Views and click Add a view:
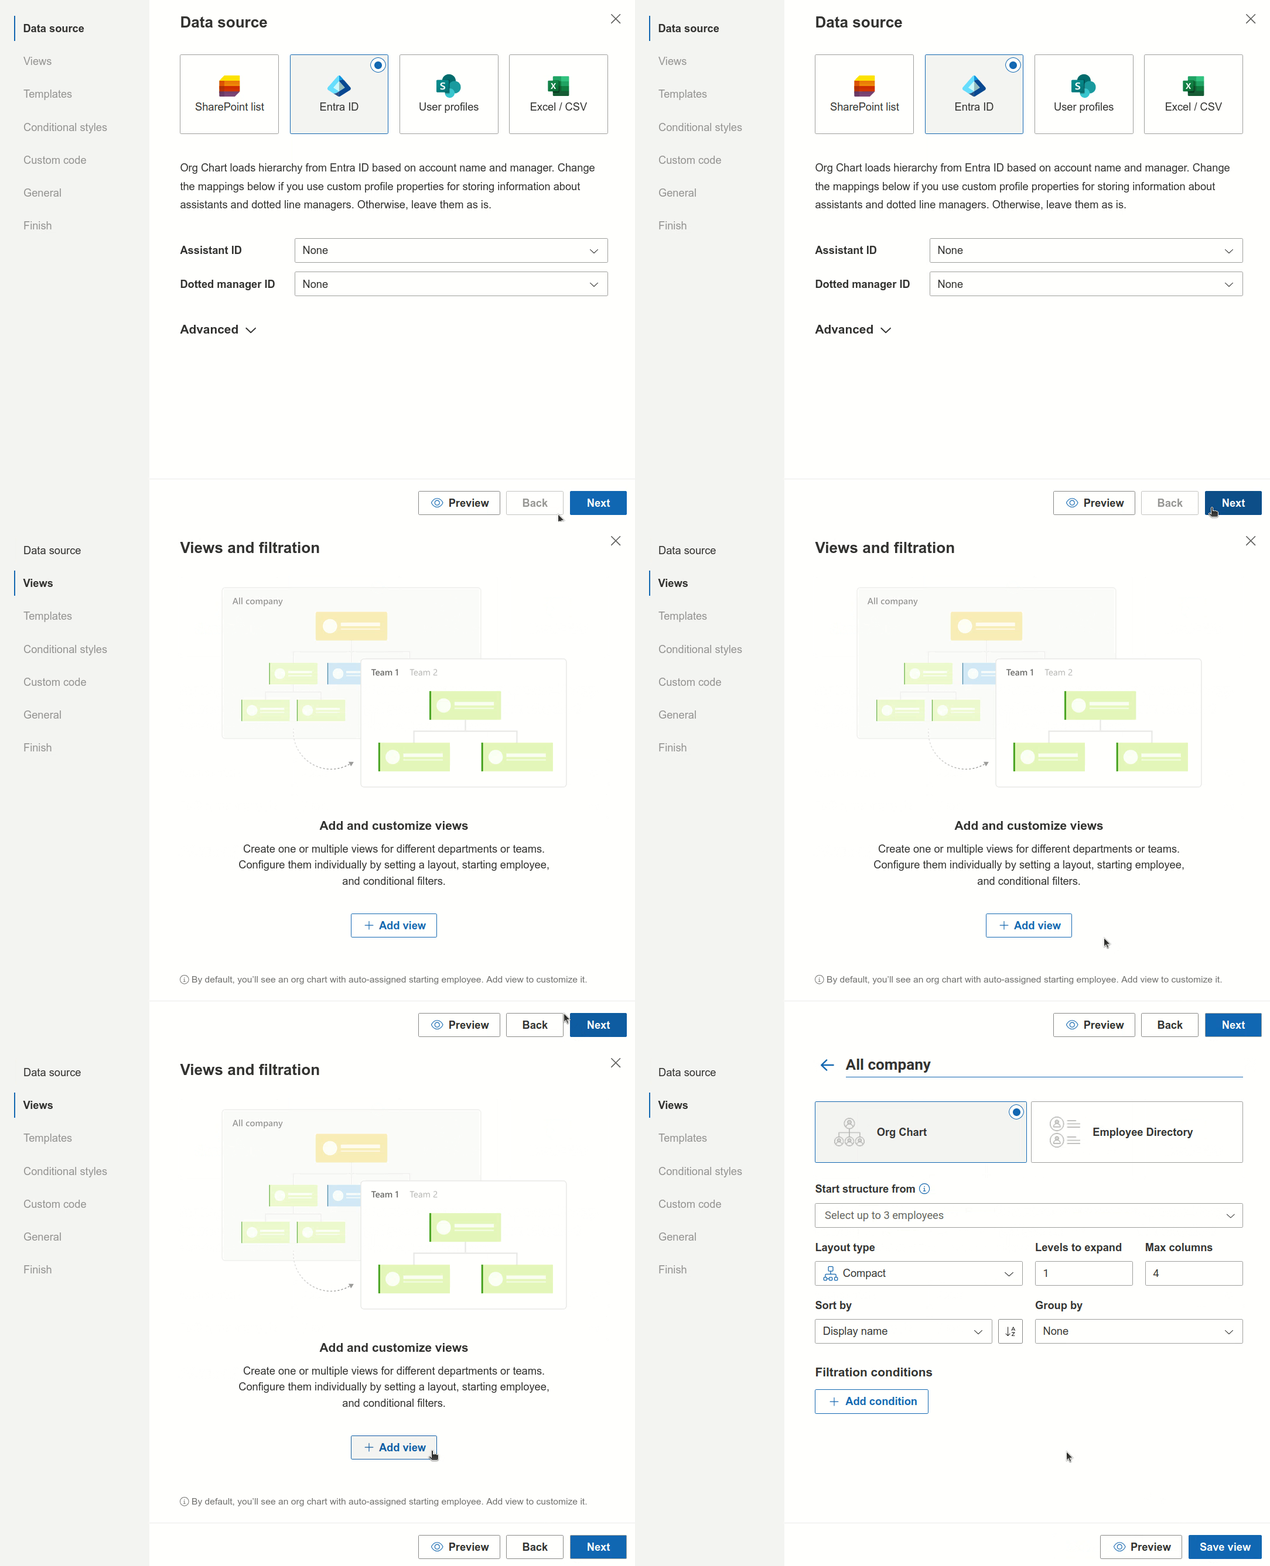
Select Employee Directory as the view type and configure the view according to your needs. You can choose the layout, control which employees are included, and organize the information using the available view settings.
Once you've finished configuring the view, save it to make it available in the web part.
The result is a clean, focused directory containing only the employees you want to display:
Ready to turn employee information into a simple, searchable company directory?
Start your 30-day free trial of Plumsail Org Chart and give your team a common place to find colleagues, explore teams, and get a better picture of the company.
You can also visit our community for announcements and updates, or explore the documentation for more ways to customize your Org Chart.
Org ChartMicrosoft 365SharePointOrg ChartSharePointMicrosoft TeamsLearn how to create an org chart from Active Directory for Microsoft Teams and SharePoint with this step-by-step guide for easy setup and configuration.
Org ChartSharePointLearn how to replace manual Microsoft Visio org charts with a live SharePoint Org Chart that syncs automatically with Entra ID, SharePoint, or Excel.
Org ChartMicrosoft TeamsLearn how to create and customize a Microsoft Teams Org Chart with step-by-step instructions. Add it to Microsoft Teams as a tab and share with employees.