In this article, you'll learn how to seamlessly achieve an Airtable DocuSign integration to automate your document workflow. We'll guide you through generating documents from Airtable using Plumsail Documents, sending them for signatures with DocuSign, and attaching the signed documents back to Airtable using a Make scenario. With just one click, your document is filled with Airtable data, sent to DocuSign, and attached back to the record—all automatically! This DocuSign Airtable integration ensures a smooth and efficient process.
This is one of the popular requests in the Airtable Community and from our partners. Sometimes, other e-signature applications like Zoho Sign or Adobe Sign are requested as alternatives.
I want to send a document (attachment field in Airtable) for digital signing and then have the returned document saved in Airtable also. Effectively the unsigned document will be loaded into Airtable via a form and once certain conditions are met it will be sent to another recipient for digital signing. Is this possible through integromat or zapier? I don’t have a preference on signing platforms as of yet - just whatever will work really.
Looking to be able to: Upload PDF in an attachment field in Airtable. Click on a button in Airtable which: Properly tags the document with signature/initial fields in Docusign. Sends to two recipients (names and emails of which are in that record in Airtable). Once signed by all parties, the completed PDF automatically appears in an attachment field in Airtable. I want to be guided how to do it so I can learn how to do as well.
In this scenario, a school uses Airtable to track student data and needs to send Training Agreements to students for digital signing. Once signed, the documents are automatically attached back to the respective Airtable records. This process involves:
Generating the document with data from Airtable using the Plumsail Documents extension;
Sending the document for e-signature in DocuSign;
Attaching the signed document back to the corresponding Airtable record with the help of Make.
This approach leverages the capabilities of integrating DocuSign with Airtable and ensures efficient student tracking. A successful Airtable DocuSign integration helps schools streamline student data tracking workflows.
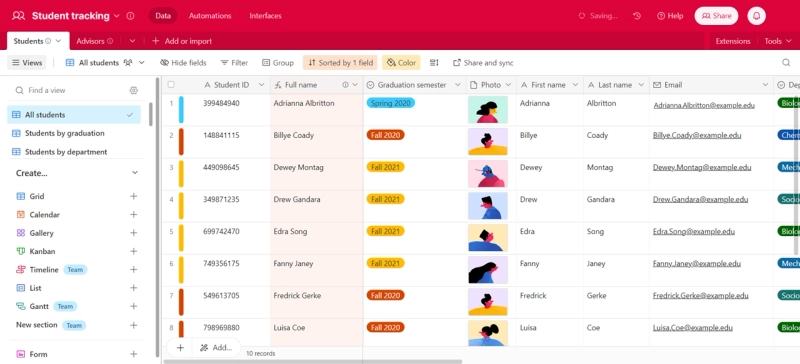
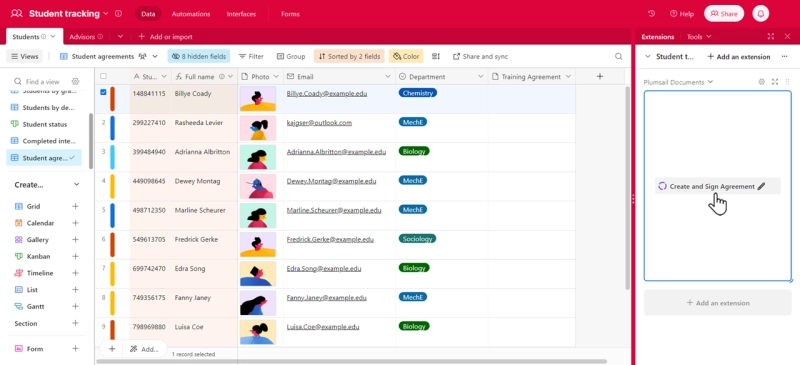
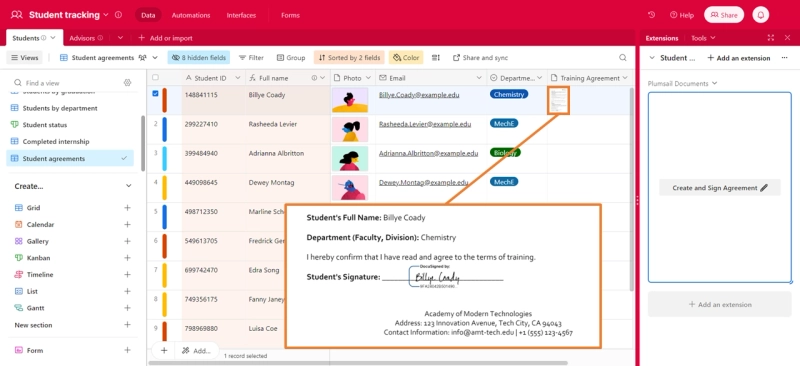
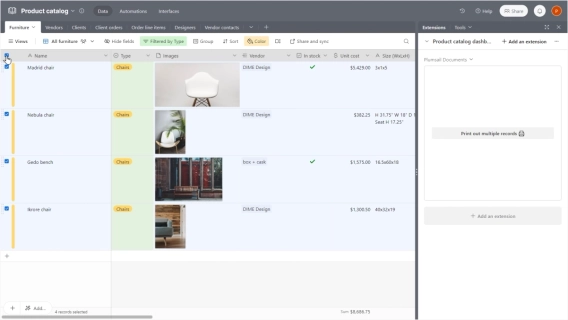
We added a new view and selected the fields that might be needed for document generation:
Student ID
Full Name
Photo
Email
Department
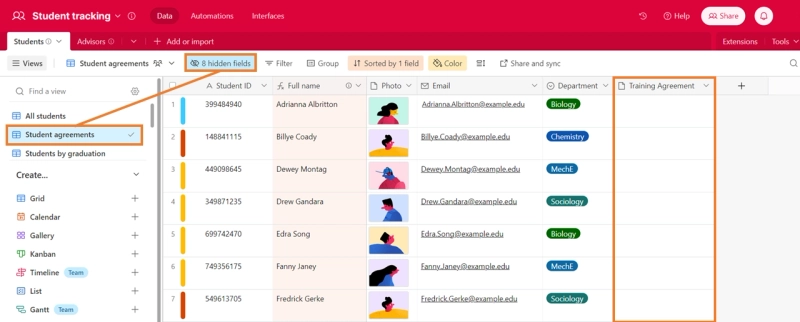
We also added a new field for attaching the generated and signed document, "Training Agreement".
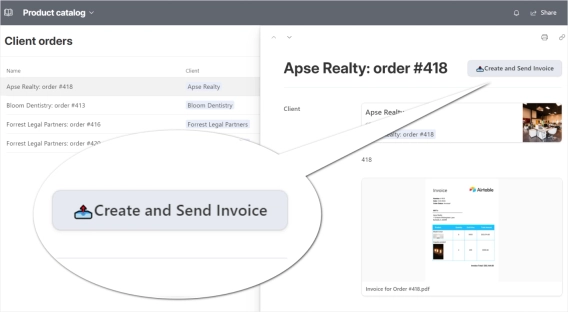
Add extension for document creation from Airtable
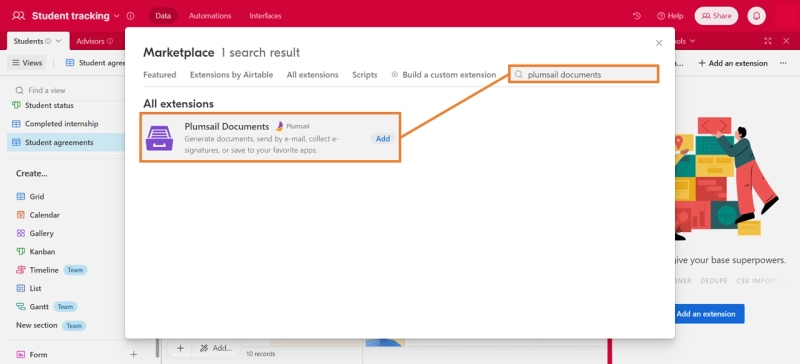
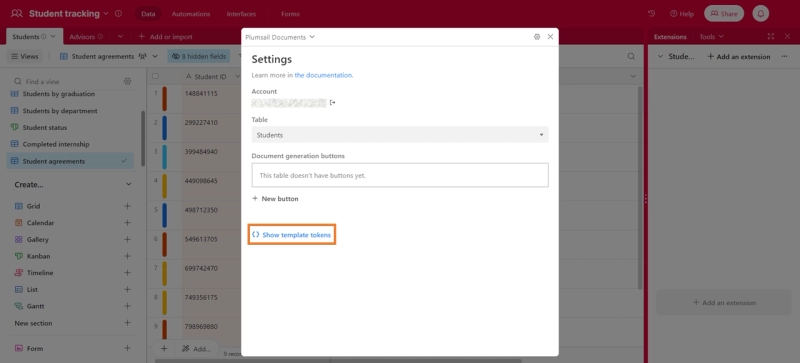
The first thing we need to do is add the Plumsail Documents extension button to generate documents directly from Airtable.
Click on the Extensions button.
Enter "Plumsail Documents" in the search bar and press the Add button.
Enter your Plumsail account login and password.
If you don't have a Plumsail account yet, you can sign up for a 30-day trial to explore all the features.
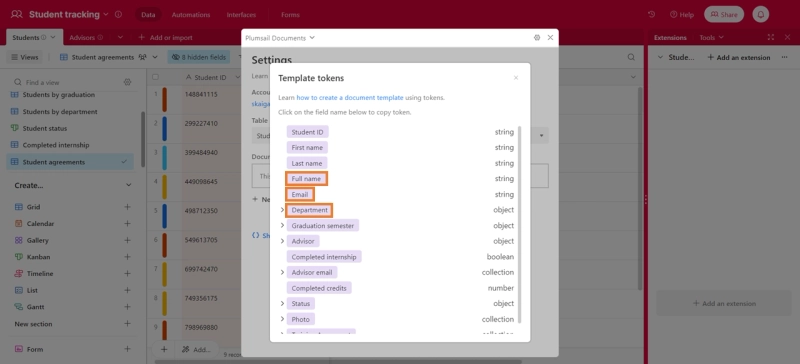
Once added and connected, you'll have access to tokens for this table. These tokens represent all the data in the table and will be used to set up the document template.
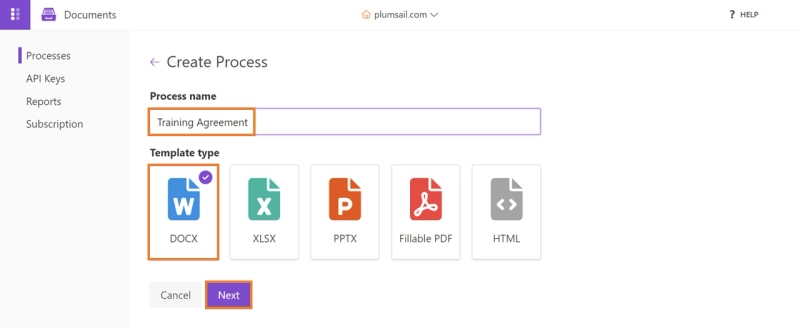
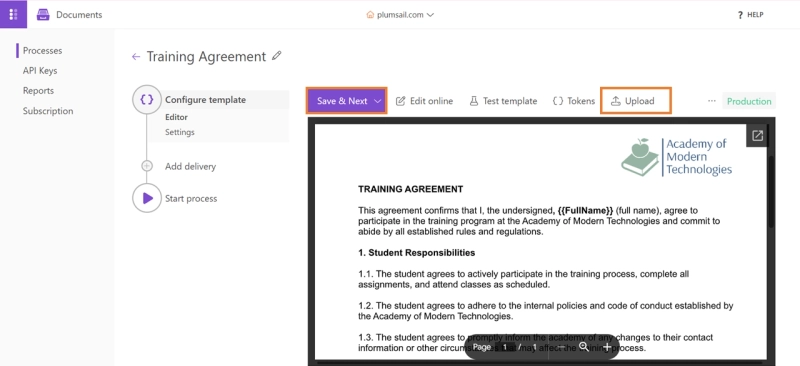
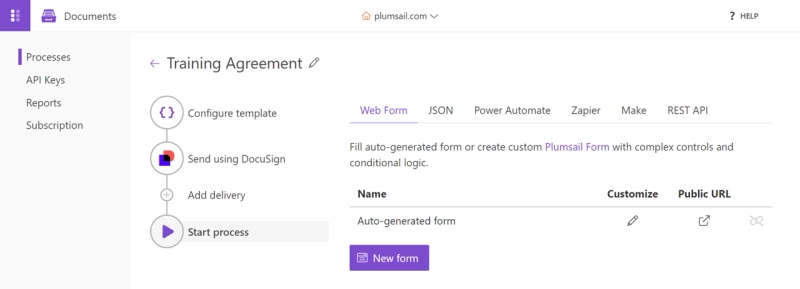
Now all we have to do is create a new process in Plumsail Documents for our button.
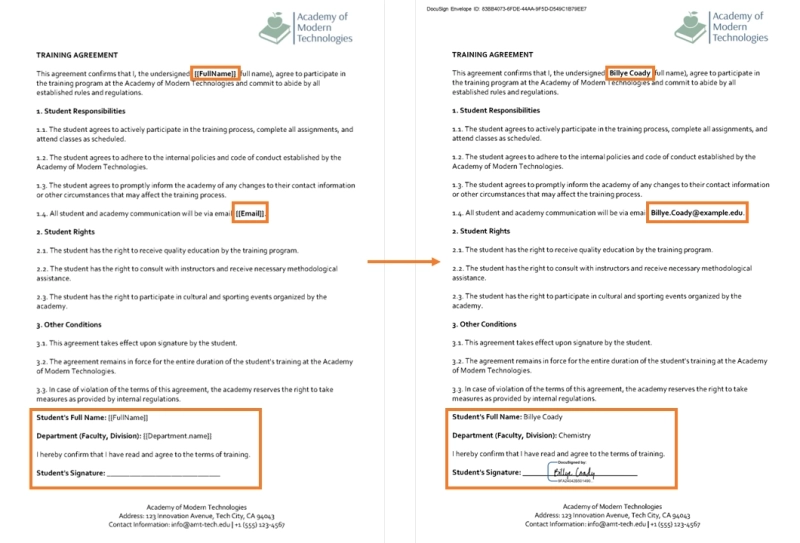
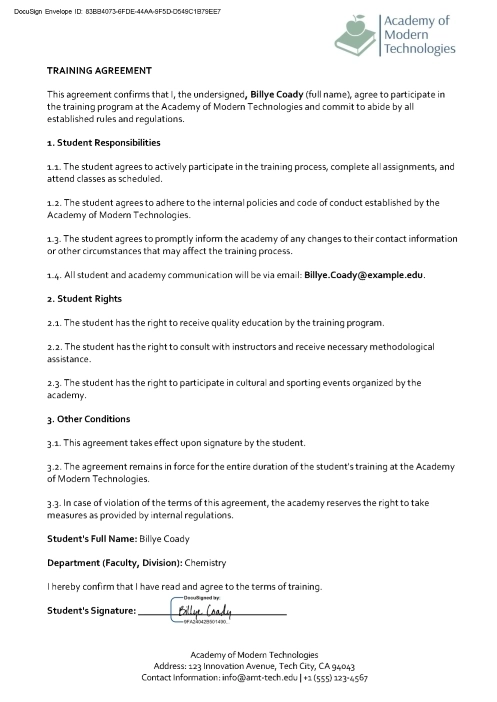
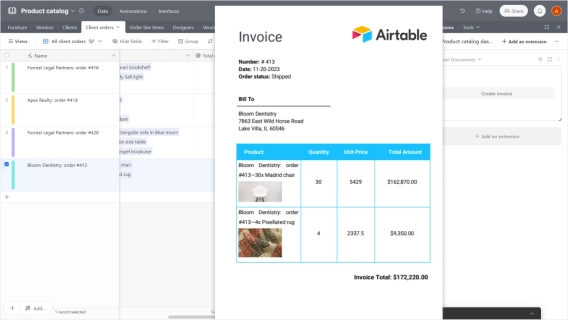
We created a simple Training Agreement template in Word (DOCX) format, and inserted tokens, which are placeholders that will later be replaced with data from our Airtable base during the document generation process. These tokens were taken from the extension settings mentioned above. To understand the process of creating templates, we recommend reading the article Create a document template for Airtable.
The tokens in the template are:
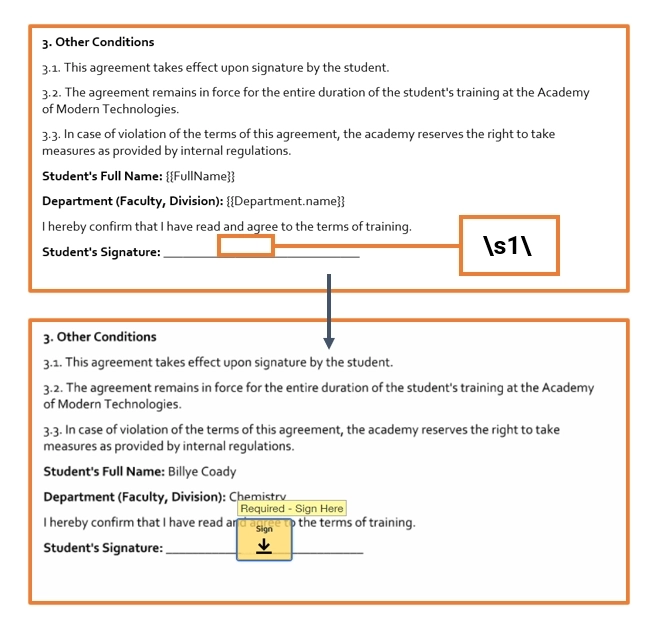
{{FullName}}: The full name of the student.
{{Email}}: The email address of the student.
{{Department}}: The department or faculty division of the student.
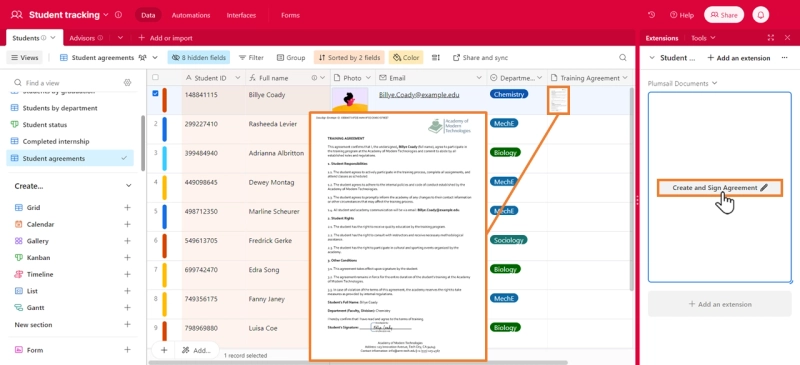
The template also includes a place for the student's electronic signature via DocuSign using special tag.
We added a text block into our template containing the tag \s1\. To prevent the tag from being displayed during the signing process, we used a white font to hide it in our template. After the template was filled in and the document was generated, it was sent to DocuSign, where our tag was recognized as a signature field.
In more complex documents that require multiple signers, you can use tags like \s2\, \s3\, and so on to designate specific signature fields for each signer. This ensures that each signer knows exactly where to sign, making the process even smoother.
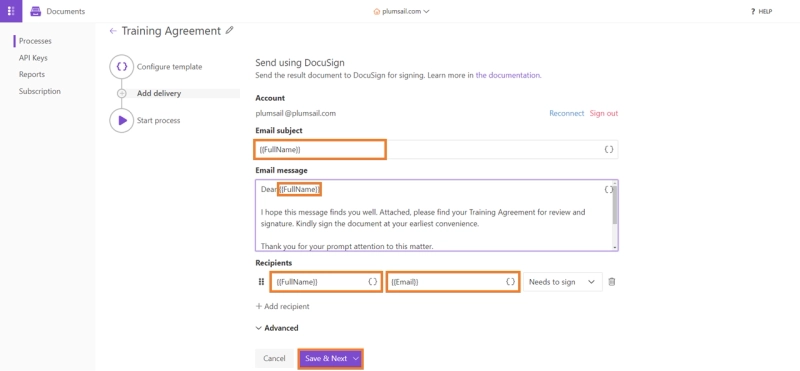
Click on the DocuSign option to connect. Select "Production", as the environment.
If required, log in to your DocuSign account.
Fill in the required fields, such as recipient details, email subject, and body. Map the recipient email to the {{Email}} field from Airtable. Define the signature fields on the document, ensuring the placeholder for the signature matches the position in the template.
Proceed to the next step by clicking Save & Next.
NOTE For the subject field of our email, we use the token {{FullName}}. This will help us later to match the signed document with the Airtable record.
4. Start Process
In this section, we don’t need to configure anything, since the process will be launched from Airtable.
Let's return to Airtable.
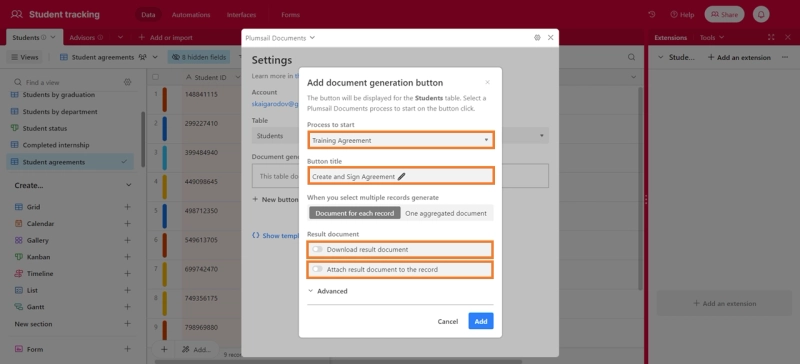
Configure the button
Back in Airtable, the final step is to set up the button:
Select the process we just created.
Give the button a name.
Make all the toggles inactive, as their functionality will not be needed.
Press the Add button.
The setup for the extension button to generate a document from Airtable is done. Now, with one click, data from Airtable will be transferred to the template in Plumsail Documents, where the document will be created and sent to DocuSign for signature.
Attach a signed document using DocuSign Airtable integration in Make
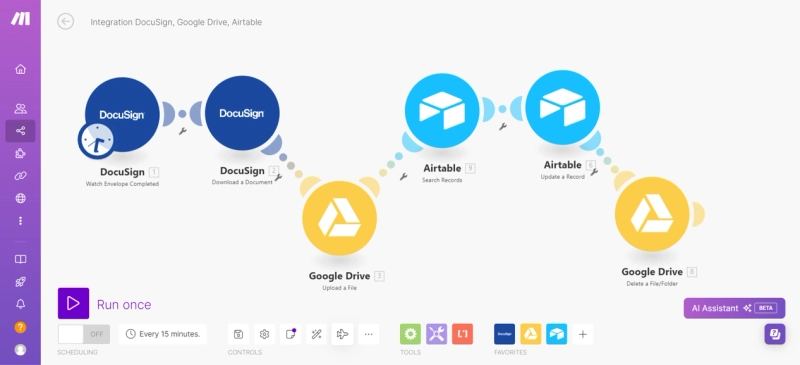
In this section, we will set up a Make scenario to complete the DocuSign Airtable integration. Once a document is signed by a student, we want it to be attached back to the corresponding record in Airtable. Make will automate the linking of the document signing process with Airtable. We'll configure it to watch for signed documents and attach them to the relevant Airtable records. Here's what the final workflow will look like:
Now, let's go through the setup step by step.
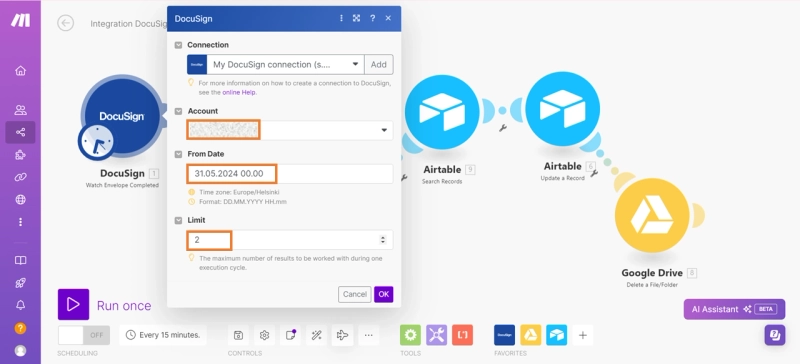
1. DocuSign Watch Envelope Completed
Our first module will launch the scenario. Every 15 minutes, Make will check the status of signed documents in DocuSign; you can set any frequency you need. All envelopes marked as completed will be extracted for processing in the next module.
Connect DocuSign Account to Make: If you haven't connected your DocuSign account to Make yet, do so now.
Choose Start Date for Monitoring Envelope Status Changes: Select the date from which you want to start monitoring the status changes of the envelopes.
Set Maximum Number of Results per Execution Cycle: Set the maximum number of results to be processed during one execution cycle. For this scenario, it will be 2.
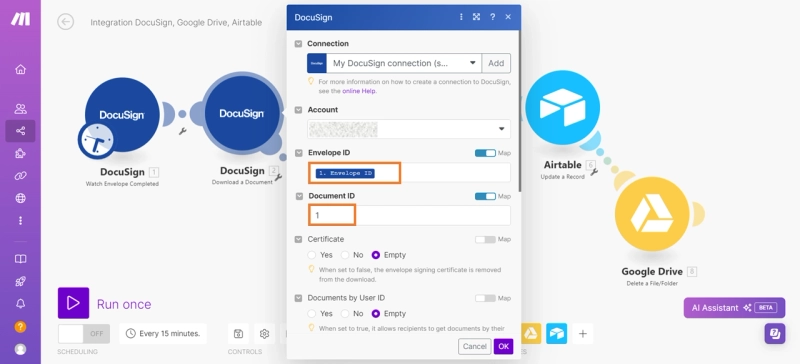
2. DocuSign Download a Document
This module will extract a signed PDF file from an envelope received using a trigger.
Select DocuSign Account: Choose your DocuSign account.
Set Envelope ID: Reference the data from the DocuSign Watch Envelope Completed step.
Set Document ID: Enter 1. When generating the envelope, DocuSign assigns the ID 1 to the first attached document.
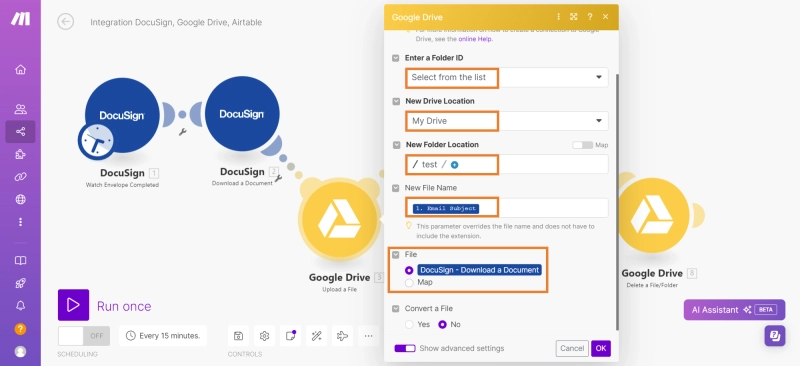
3. Google Drive Upload a File
Since we cannot directly attach a PDF file to our Airtable table, we need a URL from which the file will be uploaded. For this, we will save it to Google Drive. It is important that the folder where we save the file is shared.
Set Folder ID: Enter "Select from the list".
Set New Drive Location: Choose "My drive".
Set New Folder Location: Specify the path where the file will be saved.
Set New File Name: Reference the data from the DocuSign Watch Envelope Completed step.
Set File: Choose "DocuSign - Download a Document".
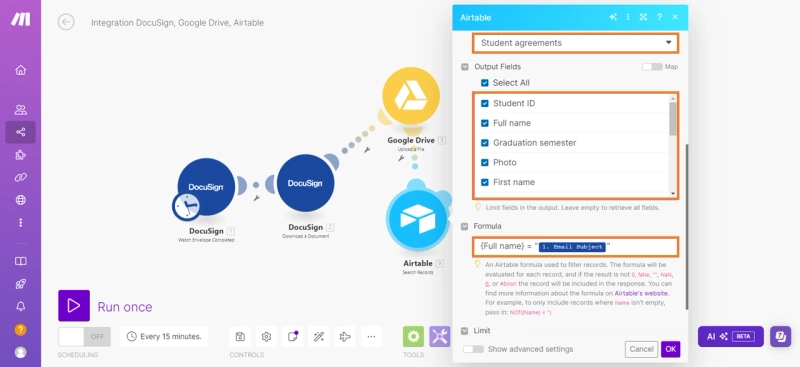
4. Airtable Search Records
Here, we need to find the row to which we will attach the received document. To find the row, we will use the Full Name column that matches the subject of our email.
Connect to Airtable Database: Connect to your Airtable database.
Select Database and Table: Choose the database and table from which you will retrieve the data.
Select View and Fields: Select the view and outgoing fields.
Set Formula: Enter the formula: {Full name} = "{{email_subject}}".
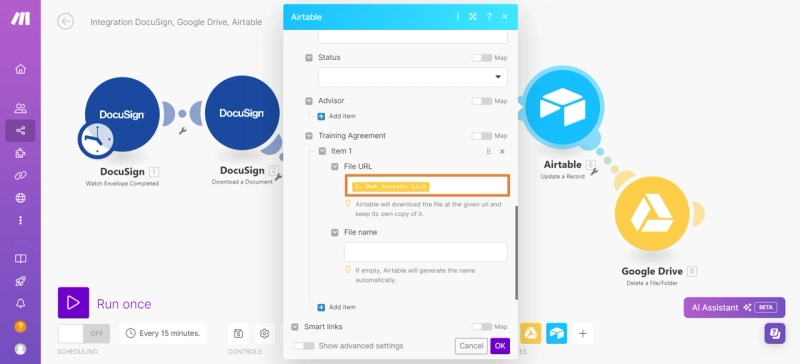
5. Airtable Update a Record
This step involves attaching the signed file to the appropriate row.
Select Database and Table: Choose the database and table.
Specify Record ID: Use the record ID obtained from the previous Airtable Search Records module.
Set Training Agreement Field: In the File URL field, reference the URL from the Google Drive Upload a File - Web Content Link module.
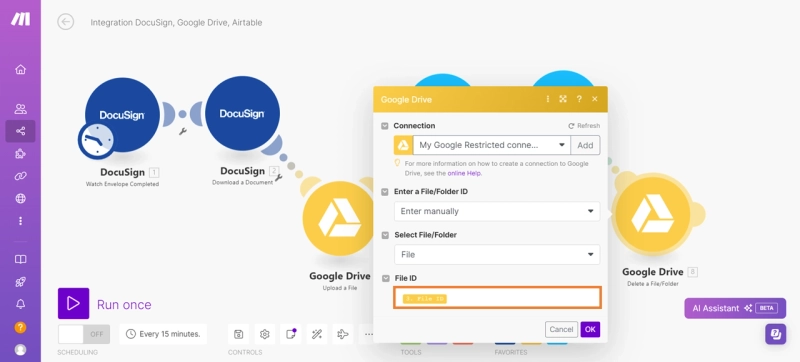
6. Google Drive Delete a File (Optional)
If the file saved on Google Drive is no longer needed, we can delete it. This step is optional if you want to keep a backup of your files.
Set File/Folder ID: Choose "Enter manually".
Select File/Folder: Choose "File".
Specify File ID: Use the File ID from the Google Drive Upload a File action.
A scenario for DocuSign Airtable integration in Make is complete. Now Make monitors the status of signed documents according to settings. When a status change is detected, the document will be uploaded to Google Drive and then attached to the record found by Full Name using the email subject.
If setting up workflows like the ones above feels too complex, we recommend Flows Systems. As a Make Gold Partner, they specialize in creating reliable solutions and can help you get everything set up quickly and efficiently.
Streamline document signing with Airtable and DocuSign integration
DocuSign Airtable integration using Make and the Plumsail Documents extension simplifies managing and signing documents. This setup enhances efficiency, reduces errors, and ensures signed documents are securely attached to Airtable records.
By automating your document workflows, you can save time and focus on more important tasks. Plumsail Documents adds value by helping generate and manage documents within Airtable. Whether you use DocuSign or alternatives like Zoho Sign, HelloSign, or Adobe Sign, Plumsail Documents has corresponding deliveries for these platforms. Integrating these tools with Airtable and Plumsail Documents will improve your document handling and workflow efficiency.
Frequently asked questions about Airtable DocuSign integration
Below are short answers to the most frequently asked questions. If you have any others, you're more than welcome to leave a reply under the post.
Does DocuSign integrate with Airtable?
Yes, DocuSign integrates with Airtable using tools like Zapier, Make, or Power Automate to automate sending documents for e-signature.
What is Airtable DocuSign integration?
Airtable DocuSign integration connects Airtable with DocuSign to send documents for e-signature and update Airtable records with the status of signed documents.
How can I set up Airtable to DocuSign integration?
Use Zapier, Make, or Power Automate to create a workflow: connect your Airtable and DocuSign accounts, set a trigger in Airtable, and define an action in DocuSign. Test and activate the integration.
What are common use cases for Airtable and DocuSign integration?
Common use cases include contract management, employee onboarding, sales agreements, real estate transactions, and project approvals.
Can I pre-fill fields in DocuSign using Airtable data?
Yes, you can pre-fill DocuSign fields using Airtable data by mapping fields in Zapier, Make, or Power Automate.
Are there any limitations to the integration between Airtable and DocuSign?
Limitations include complex workflows, API rate limits, customization limits, cost of third-party tools, and ongoing maintenance requirements.
Get started with Airtable DocuSign integration
To begin with this Airtable DocuSign integration, start your free 30-day trial in Plumsail Documents and follow the steps in the guide. If you have any questions, feel free to book a call.
How to print multiple Airtable records on one page and include them in one document
Learn how to include multiple Airtable records on one page and fit them into one document. This guide will help you overcome the limitations of Airtable Page Designer.
Angelika Cherina
Lead Marketing Specialist
Documents
Feb 27, 2024
Create and manage documents in Airtable Interfaces and Automations
Plumsail Documents extension for Airtable got new feature for document creation and management in Airtable Interfaces and Automations.
Angelika Cherina
Lead Marketing Specialist
Documents
Nov 21, 2023
Airtable extension for seamless document creation
Introducing a Plumsail Documents extension for Airtable. Create documents from Airtable records with just one click.