 FormsSharePointAirtable
May 26
Build dynamic Plumsail Forms with no-code conditional logic
Show, hide, or disable form fields with no-code conditional logic rules in Plumsail Forms for SharePoint, Airtable, and web forms.
 FormsMicrosoft 365SharePoint
Sometimes forms can get unnecessarily verbose: duplicate billing and shipping addresses, employee details already stored somewhere else, questions that have the same answer 90 percent of the time. These details are still important to have, but wouldn't it be nice if these fields were already magically filled in?
Unfortunately, built-in SharePoint list forms are not up to the task here, but don't fret—it's totally possible to pre-fill a SharePoint form if you use custom form builders like Plumsail Forms for SharePoint.
Table of Contents:
If you're still not convinced that you need form pre-filling, consider these benefits:
For simple scenarios, SharePoint offers a way to pre-fill list fields out-of-the-box, but you can quickly hit its limits:
A lot of column types can be configured to have a sensible default value.
But: You cannot add a default value for Lookup and Person or Group columns.
You can use a calculated column with the value derived from other fields.
But: It is read-only and the calculated field can only access its own row.
So, for simple cases where the value to pre-fill is known in advance, or when you need to auto-calculate some value like VAT-included price or a deadline, native list options are enough.
However, often you might want to pre-fill a person field, perhaps based on a current user. Or, you need to give an option to modify the pre-calculated field. Or, the pre-filled field is dependent on the lookup list. In any of these cases native SharePoint doesn't hold up.
Thankfully, SharePoint lets you extend its capabilities with third-party apps, and you can use form builders with scripting capabilities like Plumsail Forms for SharePoint to achieve dynamic form pre-filling.
If you want to stick to the Microsoft ecosystem, you can take a look at Power Apps. This is a Microsoft low-code app builder that has a direct integration with SharePoint lists. When making a form with Power Apps, you can assign formulas to field properties, making dynamic pre-filling possible.
We won't be covering Power Apps in the upcoming examples, but if you want to learn more, check out April's video on pre-populating fields in Power Apps. It covers the basics you can use to implement most of the scenarios we'll talk about.
Unlike Power Apps, Plumsail Forms for SharePoint are wholly dedicated to form building, replacing the standard forms for your lists and libraries with custom ones. With a dedicated form designer and lots of form elements covering a variety of use cases, it is a simple way to get complex forms for your SharePoint site.
Plumsail Forms desktop designer is split into several editors:
Let's cover several scenarios to see how to add and use form pre-filling in Plumsail Forms for SharePoint!
Let's start with a simpler example. Although you need to store remittance address separately for your vendors, often it can be the same one as the business address itself. So let's provide an option to pre-fill the remittance address based on the business one in the vendor setup form.
First, we need to build the form itself. We'll use the drag-and-drop editor in the Plumsail Forms designer to place the necessary fields:
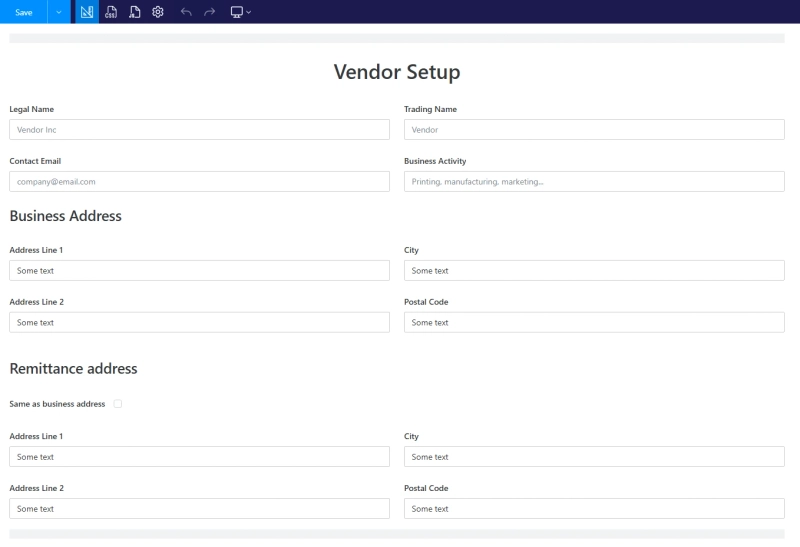
In the remittance address section, we placed a toggle field to let users choose if they want to pre-fill it with the business address.
Now that we have the fields ready, let's add a short snippet that will check the toggle state and pre-fill the remittance address.
fd.spRendered(() => {
    const sameAsBusinessAddress = fd.field("SameAsBusinessAddress");
    sameAsBusinessAddress.$on("change", (value) => {
        if (value) {
            fd.field("RemittanceAddressLine1").value = fd.field("AddressLine1").value;
            fd.field("RemittanceAddressLine2").value = fd.field("AddressLine2").value;
            fd.field("RemittanceAddressCity").value = fd.field("AddressCity").value;
            fd.field("RemittanceAddressPostalCode").value = fd.field("AddressPostalCode").value;
        }
    })
});
One last detail: let's disable the fields while the toggle is on for better clarity. It's possible to disable fields conditionally without any code using rules, but since we already use JavaScript, we'll stick to that:
fd.spRendered(() => {
    const sameAsBusinessAddress = fd.field("SameAsBusinessAddress");
    sameAsBusinessAddress.$on("change", (value) => {
        if (value) {
            fd.field("RemittanceAddressLine1").value = fd.field("AddressLine1").value;
            fd.field("RemittanceAddressLine2").value = fd.field("AddressLine2").value;
            fd.field("RemittanceAddressCity").value = fd.field("AddressCity").value;
            fd.field("RemittanceAddressPostalCode").value = fd.field("AddressPostalCode").value;
        }

        fd.field("RemittanceAddressLine1").disabled = value;
        fd.field("RemittanceAddressLine2").disabled = value;
        fd.field("RemittanceAddressCity").disabled = value;
        fd.field("RemittanceAddressPostalCode").disabled = value;
    })
});
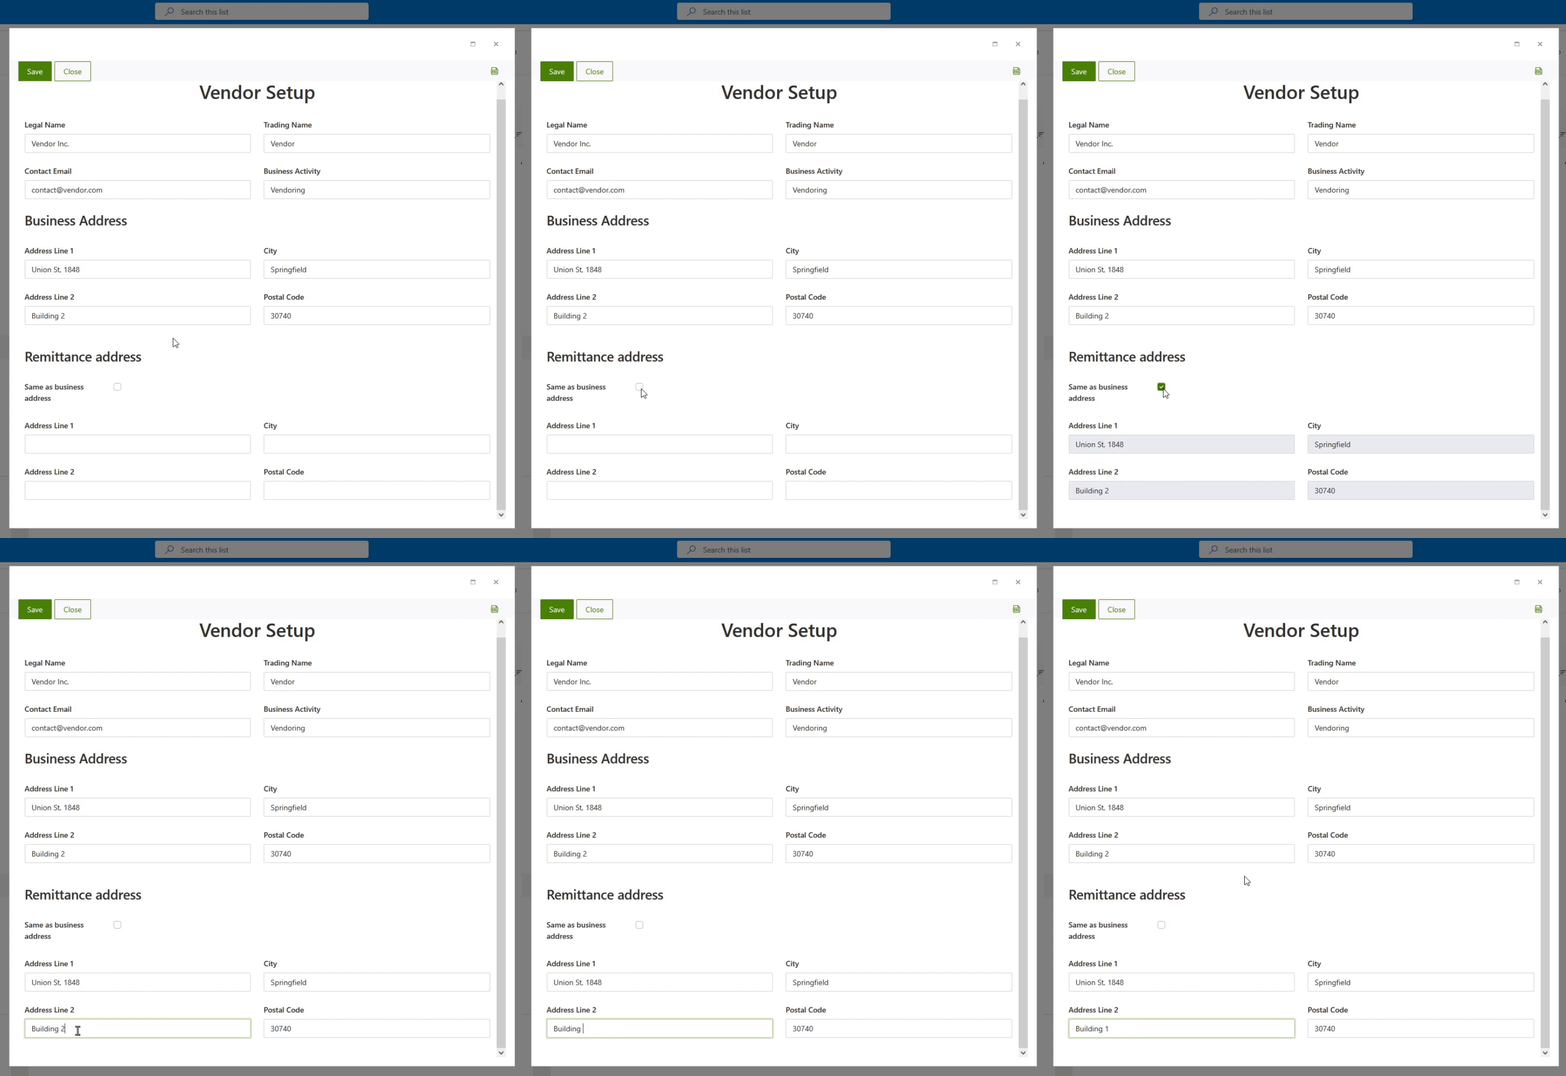
Now, when the user fills in the first address, they can automatically pre-fill the second one:
Sometimes we need to move data from one SharePoint list to another. For example, you can have separate lists for leads and clients. If your lead becomes a proper client, you can still use the contact information from the lead entry.
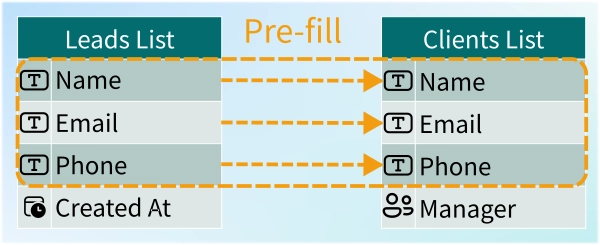
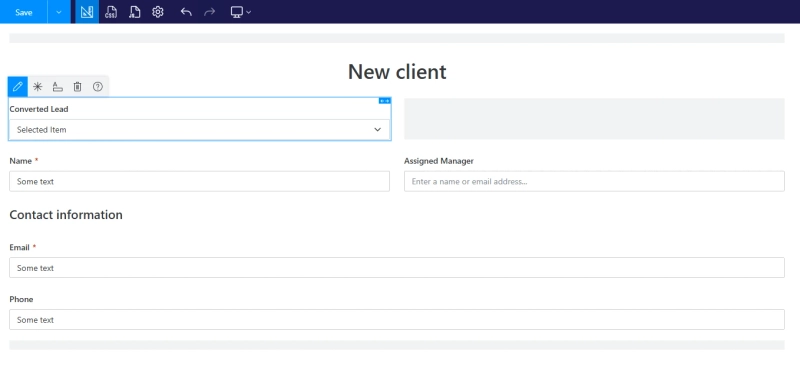
Again, let's make a simple form for adding a new client. We'll use a lookup control named Converted lead to let the form user select the lead we are converting:
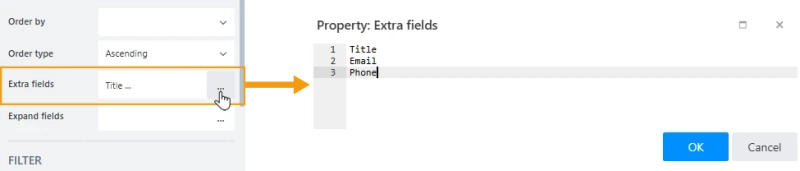
By default, a lookup control only gets the information it displays in the form, but we also need to use the other data from the leads item. To do that, we can use the Extra fields property and list all the additional columns we need:
All that's left is to use this data in our custom JavaScript:
fd.spRendered(() => {
    // ConvertedLead is the value of the Name property for our lookup
    fd.control('ConvertedLead').$on('change', (value) => {
        if (value !== null) {
            fd.field('Title').value = value.Title; // using SharePoint's title column for names
            fd.field('Email').value = value.Email;
            fd.field('Phone').value = value.Phone;
        }
    });
})
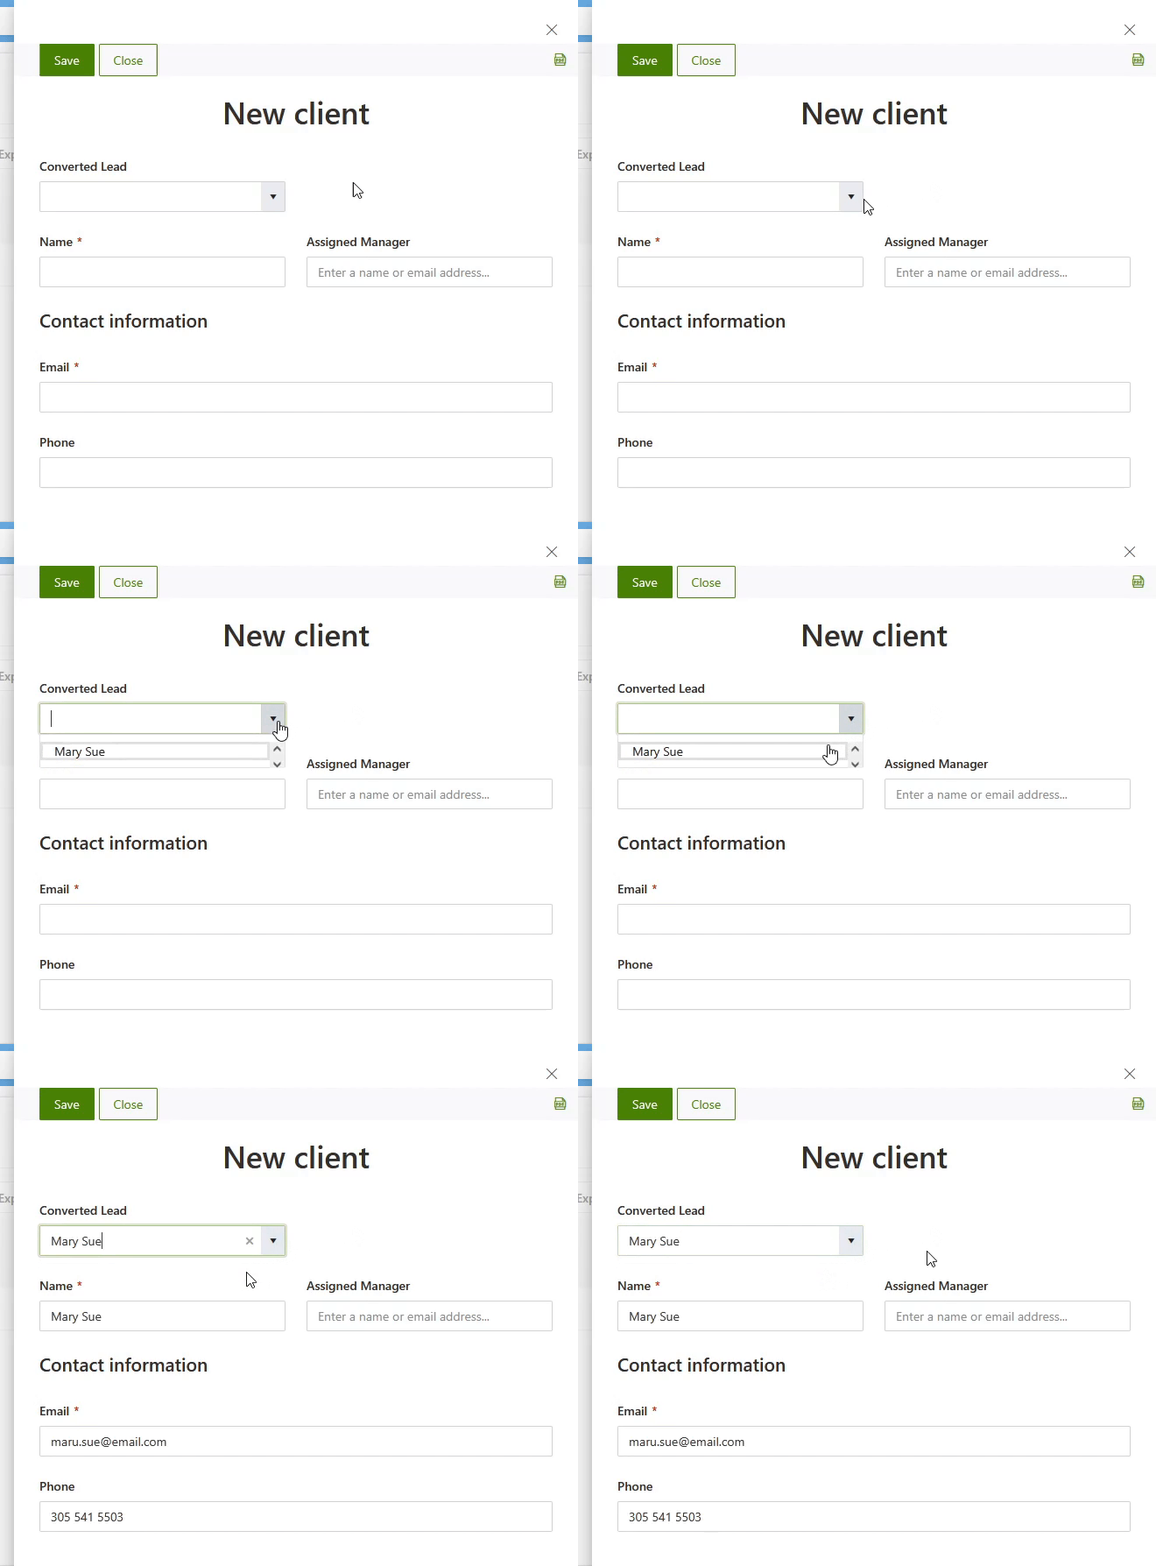
Now, when we select the lead we get name, email, and phone number filled in automatically:
As a bonus, we can use the powerful pnpjs framework
and spBeforeSave event
to automatically delete the lead item after we create a new client:
// append this at the end of your code
fd.spBeforeSave(async (result) => {
    const lookupId = fd.control('ConvertedLead').value.LookupId;
    await sp.web.lists.getByTitle('Leads').items.getById(lookupId).delete();
})
To expand on the previous scenario, we might also want to use list data from another SharePoint site.
If you use a ticketing system like Plumsail HelpDesk, chances are it's contained in a separate site. Some tickets, however, can be related to other sites, for example, tickets requesting to book a demo can be redirected to the Sales department.
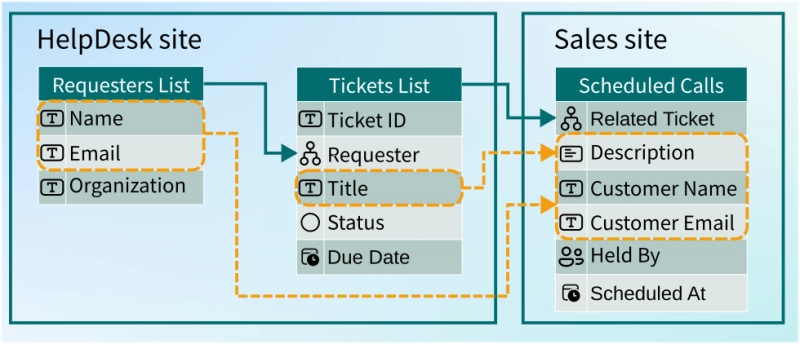
As always, we'll make a simple form with all the necessary fields and controls first:
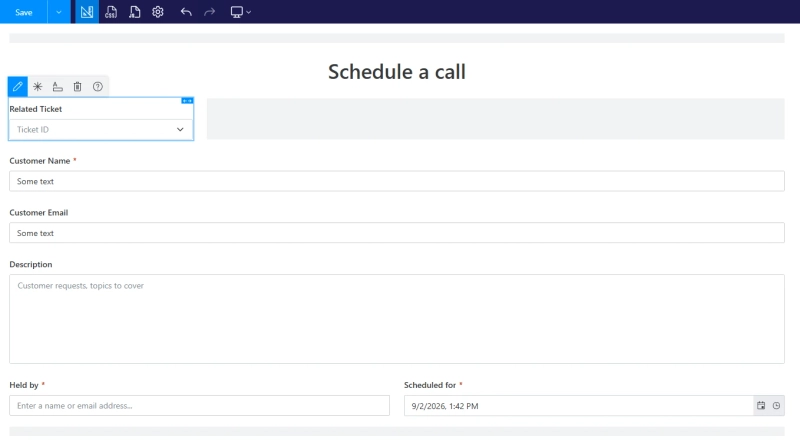
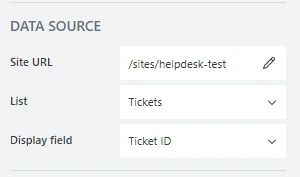
Plumsail Forms supports cross-site lookups using the Lookup control. Let's move to property inspector of our Related Ticket lookup and change the Site URL property to reference the site used by your help desk. Now you can select the correct list and the field to display:
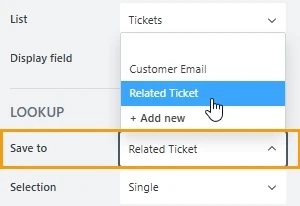
Lookup controls can use regular text columns to save the list item reference using the Save to property:
When a form user chooses the ticket, we can fetch some additional data like ticket title and ticket creator. In our scenario, requester details are stored in another help desk list, so in the lookup's Extra fields we need to reference the requester columns as well. Overall we'll list the following:
Title
Requester/Email
Requester/Title
We also need to add Requester to Expand fields property. After that, we only need to add a few lines of JavaScript to pre-fill customer details and call description:
fd.spRendered(() => {
    // RelatedTicketLookup is the value of the Name property for our lookup
    fd.control('RelatedTicketLookup').$on('change', (value) => {
        if (value !== null) {
            fd.field('Title').value = value.Requester.Title; // using SharePoint's title column for names
            fd.field('CustomerEmail').value = value.Requester.Email;
            fd.field('Description').value = value.Title;
        }
    });
})
Now as soon as our user selects a ticket, they get additional context that they can then modify or leave as is:
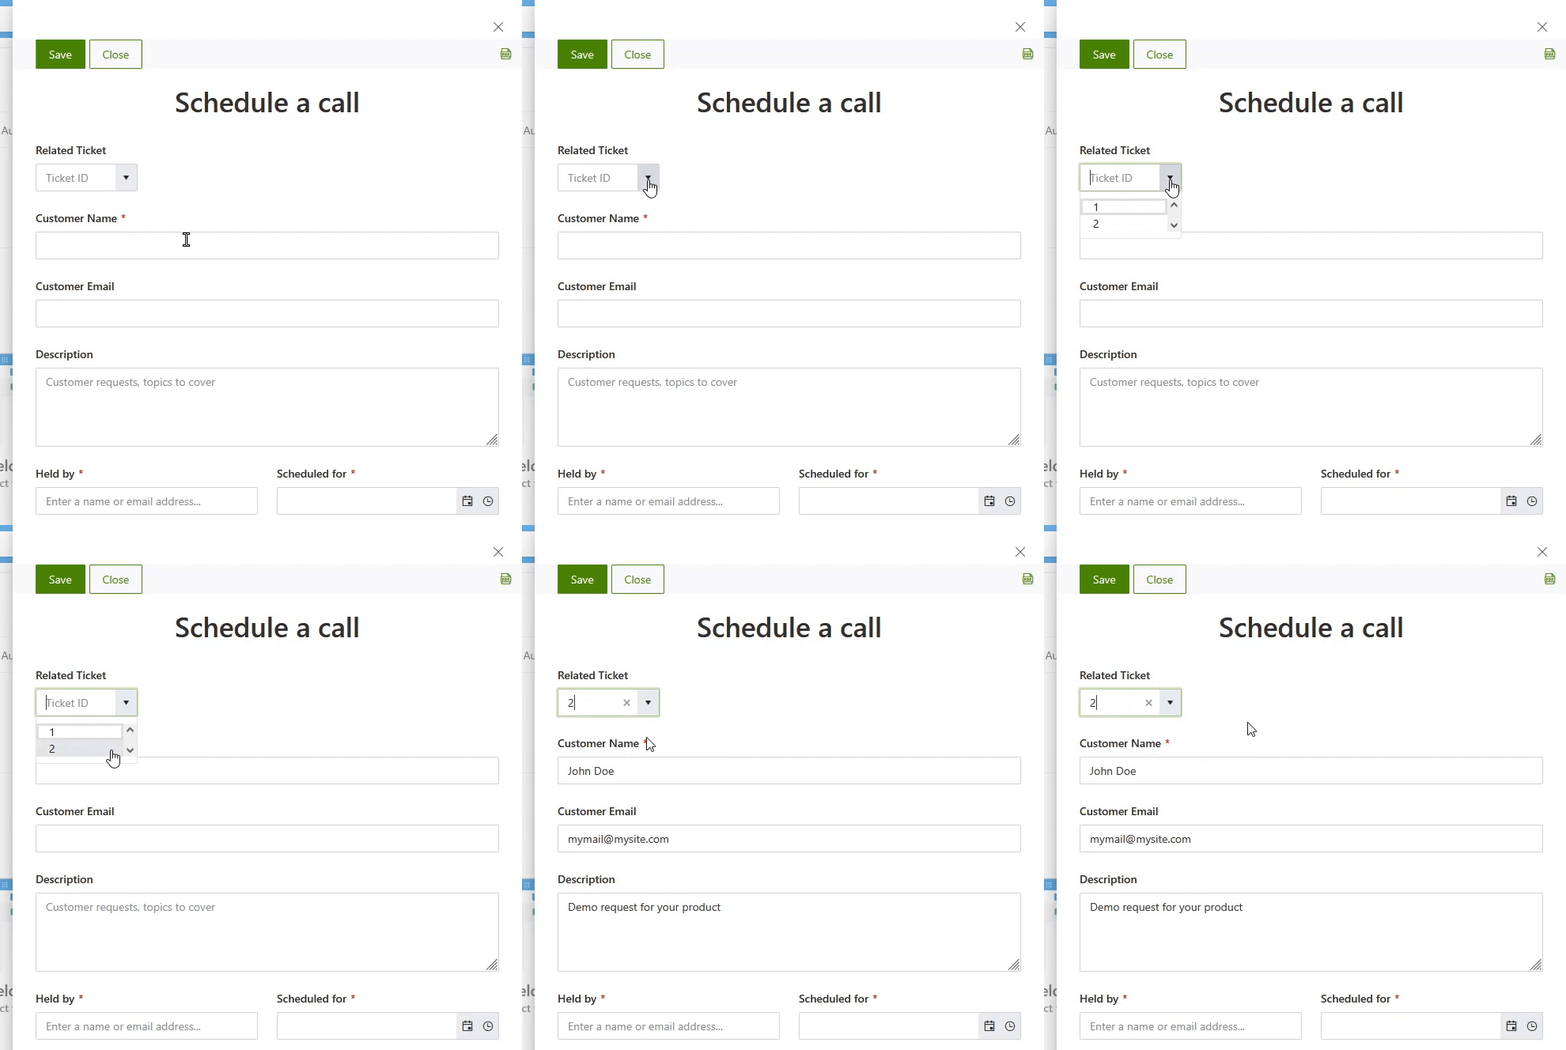
So far we focused on taking data from other lists, but what about using an item from the same list? This can be very useful if new items refer to the same event, vendor, or request, and differ only in a couple of fields.
Take travel requests for example. If an employee regularly travels to the same location, chances are new requests only need a couple of tweaks compared to the previous one.
First, let's build a simple travel request form:
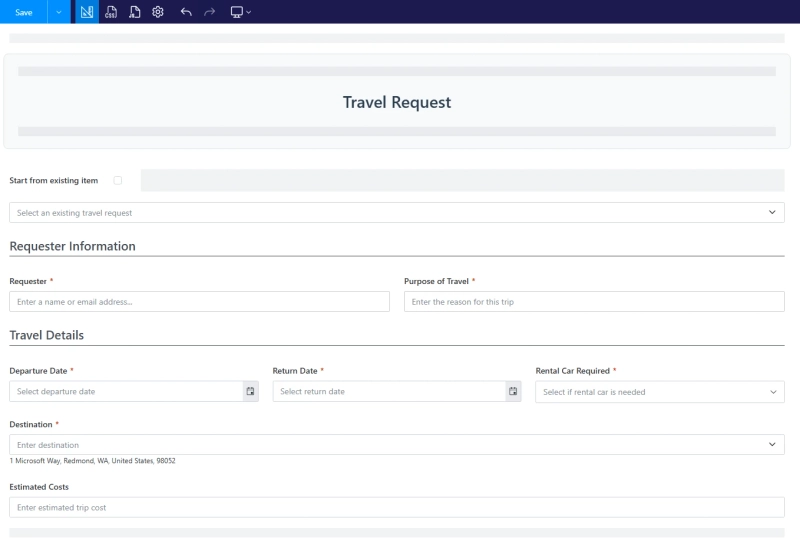
We'll use the Start from existing item Toggle control to determine if we need to take data from another list item. Right below it we placed a Lookup control, which references the same list.
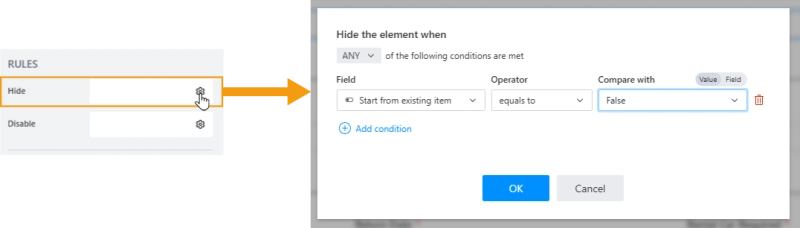
This Lookup control should only be shown when the user checks the checkbox above. This time, let's use the no-code rule to conditionally hide our control. To do so, open the Hide property and add the following rule:
Don't forget to add the needed fields in Extra fields property:
Title
Requester/EMail
DepartureDate
ReturnDate
RentalCarRequired
Destination
EstimatedCosts
To get the necessary data from our Person or Group column, we also need to add Requester field to Expand fields property.
The last thing to do is to add the pre-filling logic to the custom JavaScript:
fd.spRendered(() => {
    fd.control('ExistingItemLookup').$on('change', (value) => { // ExistingItemLookup is the value of the Name property for our lookup
        if (value !== null) {
            fd.field('Requester').value = value.Requester.EMail;
            fd.field('Title').value = value.Title; // Using Title to set the purpose
            fd.field('DepartureDate').value = value.DepartureDate;
            fd.field('ReturnDate').value = value.ReturnDate;
            fd.field('RentalCarRequired').value = value.RentalCarRequired;
            fd.field('Destination').value = JSON.parse(value.Destination); // Note that we need to parse the string in value.Destination
            fd.field('EstimatedCosts').value = value.EstimatedCosts;
        }
    });
});
Now, users can use existing list items as a template for new items:
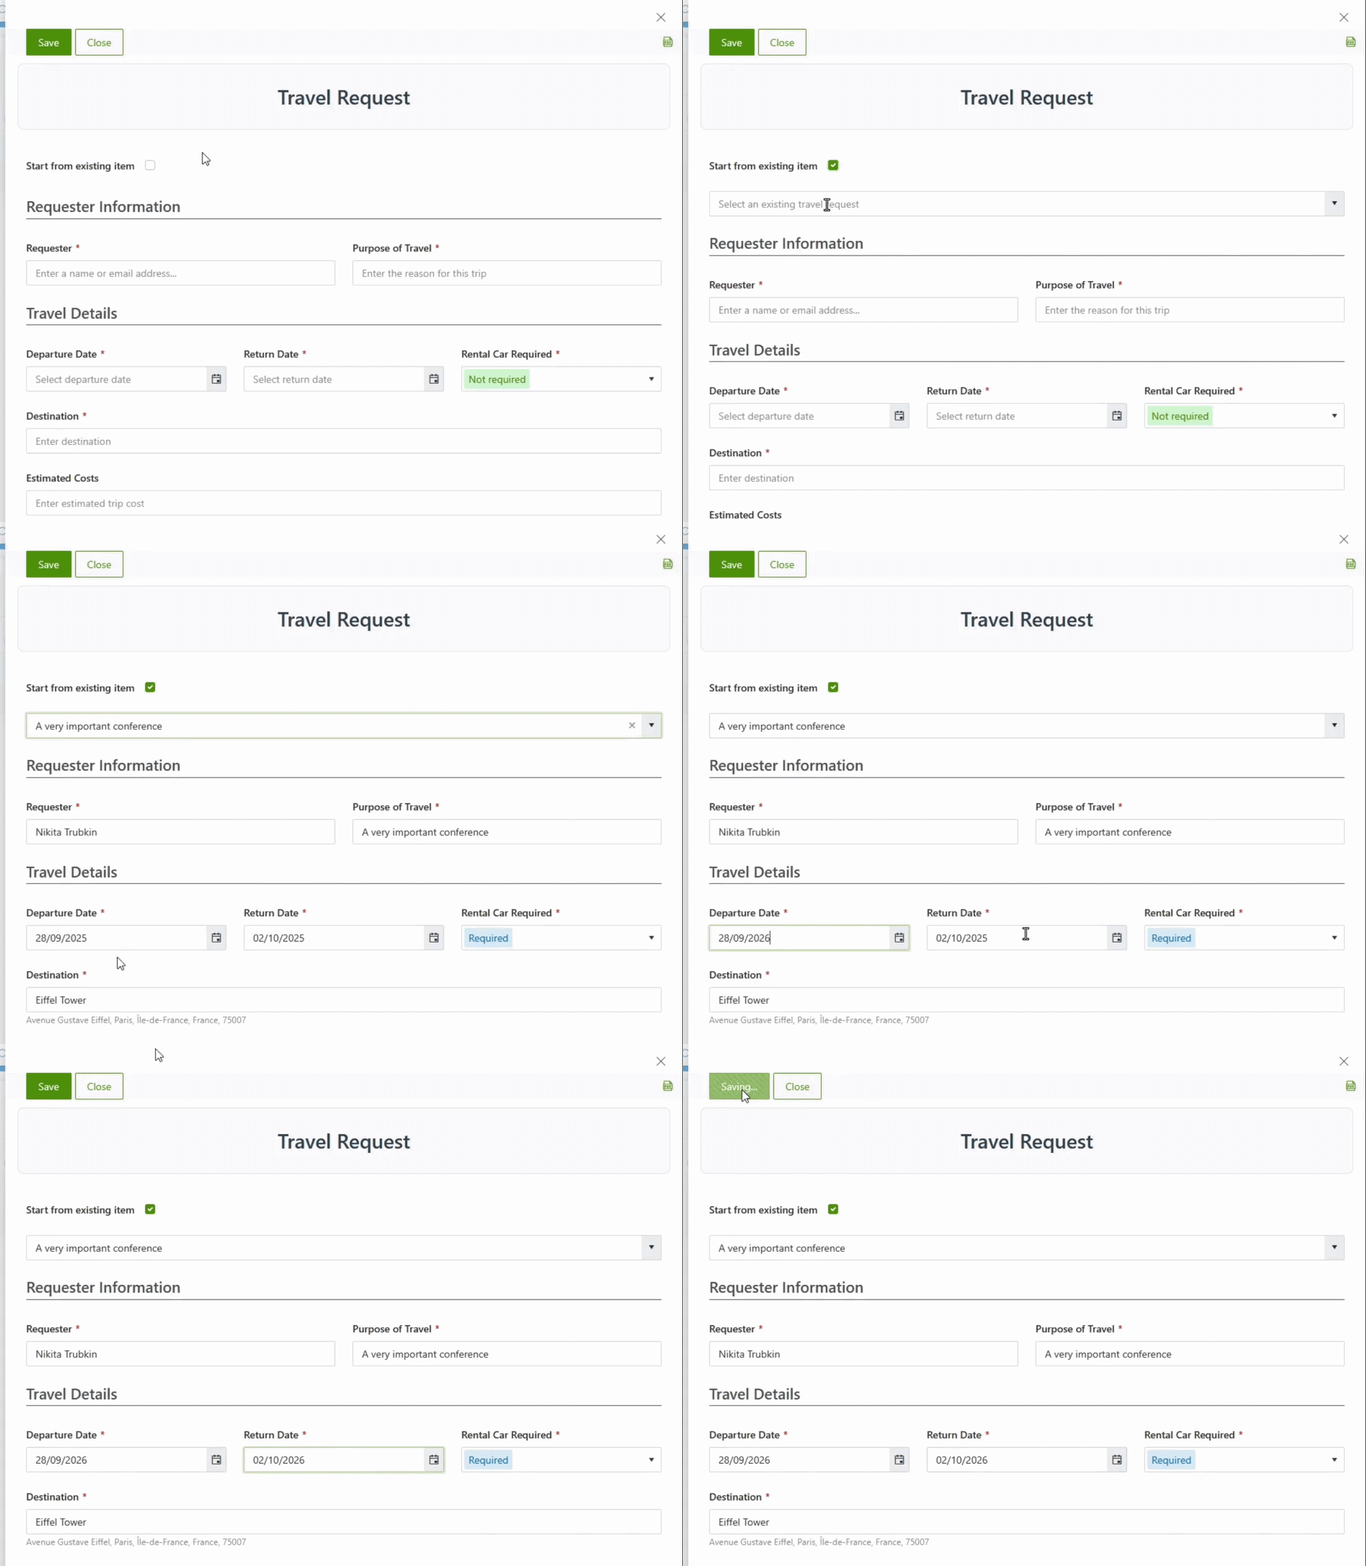
Lastly, let's talk about taking user data to pre-fill form fields. Any form that needs employee data can simply access the SharePoint user profile properties to pre-fill information like department, contact email, job title, and so on.
Let's take an inventory request form for example. We'll make a simple version that looks like this:
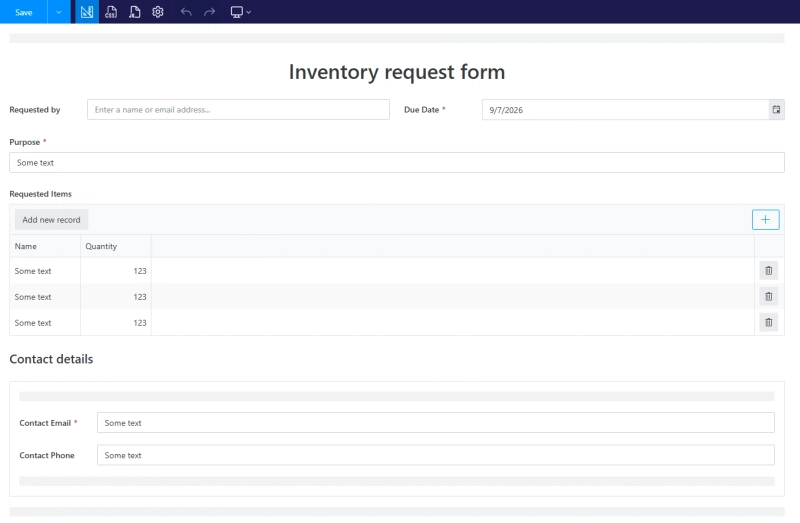
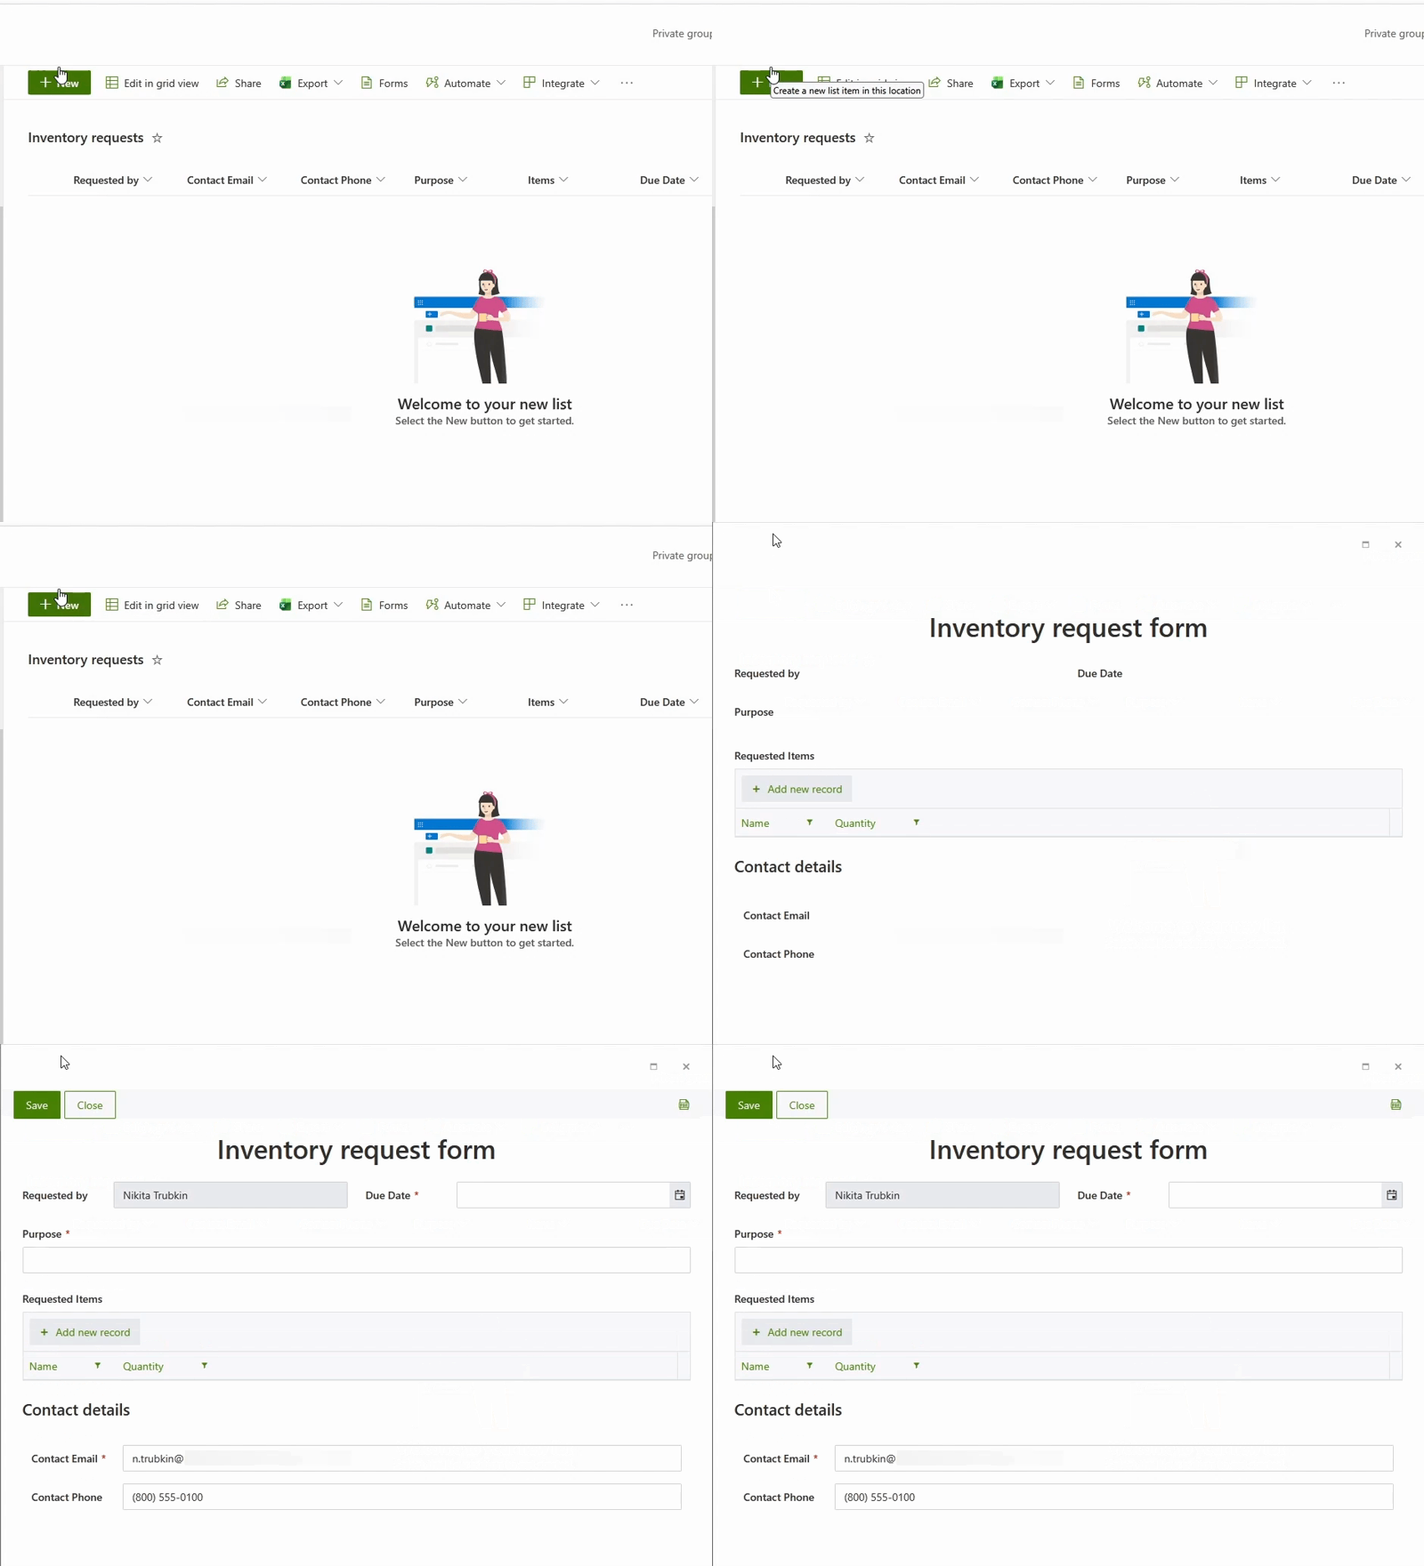
Here, we can pre-fill contact details based on the user profile from the Requested By field. Plumsail documentation actually covers different scenarios for receiving user profiles, but we'll stick to automatically filling the Requested By field with the current user. To do all of this, we'll once again use the helpful pnpjs framework:
fd.spRendered(async () => {
    let user = await pnp.sp.profiles.myProperties.get();

    fd.field('RequestedBy').value = user.Email;
    fd.field('RequestedBy').disabled = true; // prevent user from overwriting this field

    let props = {};
    for (const keyvalue of user.UserProfileProperties) {
        props[keyvalue.Key] = keyvalue.Value;
    }
    fd.field('ContactEmail').value = props.WorkEmail;
    fd.field('ContactPhone').value = props.WorkPhone;
})
Now, when a user opens the form, they immediately get their personal info filled in:
Pre-filling forms is already a big step up for user experience, but you don't have to stop here. With Plumsail Forms for SharePoint, you can do much more:
Split the form into tabs or wizard steps
Install Plumsail Forms for SharePoint right now to get a free 30-day trial and make your forms quick and pleasant to work with!
Install Plumsail Forms for SharePoint and use custom JavaScript to define your pre-filling logic.
You cannot set the default value for Person or Group field in list settings. However, you can use Plumsail Forms for SharePoint and use custom JavaScript to pre-fill this field when creating a new item.
Yes, as long as you use an advanced form builder like Plumsail Forms for SharePoint, you can use the pnpjs framework to retrieve user profile and its properties from the Person or Group field.
With Plumsail Forms for SharePoint, you can use custom Lookup logic to easily reference records from other lists and even sites. After that you can add a few lines of custom JavaScript to use the Lookup data to pre-fill other fields.
FormsMicrosoft 365SharePointFormsSharePointAirtableShow, hide, or disable form fields with no-code conditional logic rules in Plumsail Forms for SharePoint, Airtable, and web forms.
 DocumentsFormsSharePoint
 Power Automate
See how FileBank Inc. built a four-stage timesheet approval workflow in SharePoint Online — with auto-calculated hours, signature capture, and final PDF generation — with Plumsail and Power Automate.
DocumentsFormsSharePointPower AutomateBuild a SharePoint timesheet system with weekly hour entry, project totals, e-signatures, approvals, and automatic PDF generation. Full setup with code.