Time tracking is one of the few processes that touches payroll, invoicing, and HR at once. Regular hours, overtime, sick days, and holiday all get recorded the same way and then read by different people for different reasons.
At scale, even a simple timesheet becomes a high-volume recordkeeping process, and the usual answer — a spreadsheet per person — stops holding up. A thread in Microsoft Learn Q&A describes moving data into a SharePoint list with Power Automate, then getting stuck on the timesheet itself:
In reality, a timesheet is just a parent-child structure: one record per employee per week, with multiple hour lines. SharePoint stores that shape fine — two lists and a lookup — but the default list form can't present it. You get one item at a time, no way to enter a week on a single screen, no signature, and no printable output.
This article builds that missing layer with Plumsail Forms for SharePoint: a form that edits both lists at once, a Power Automate flow that totals and routes it, and a generated PDF for payroll.
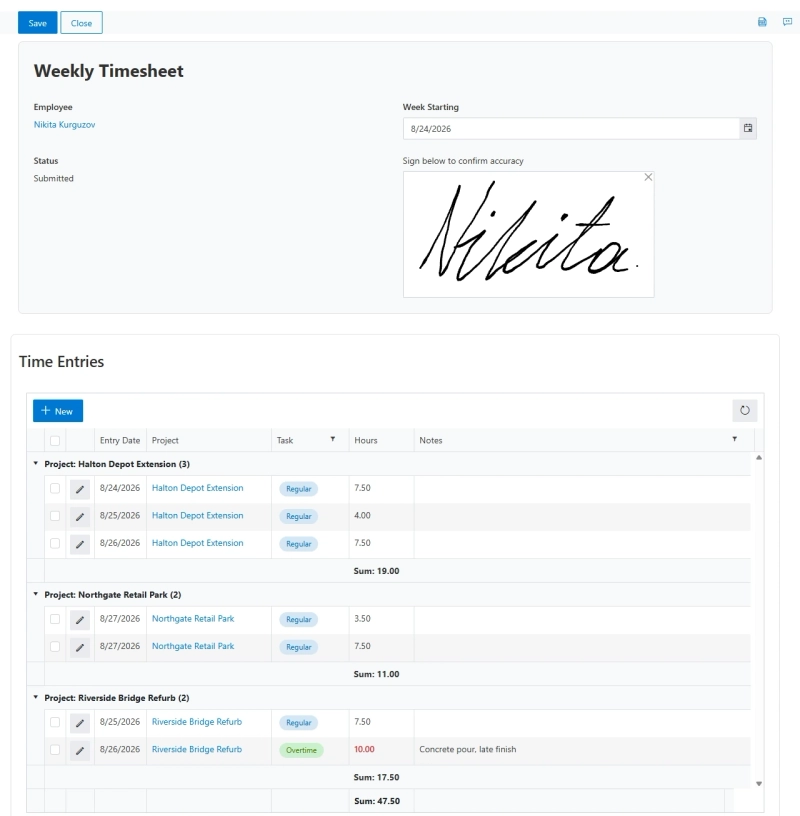
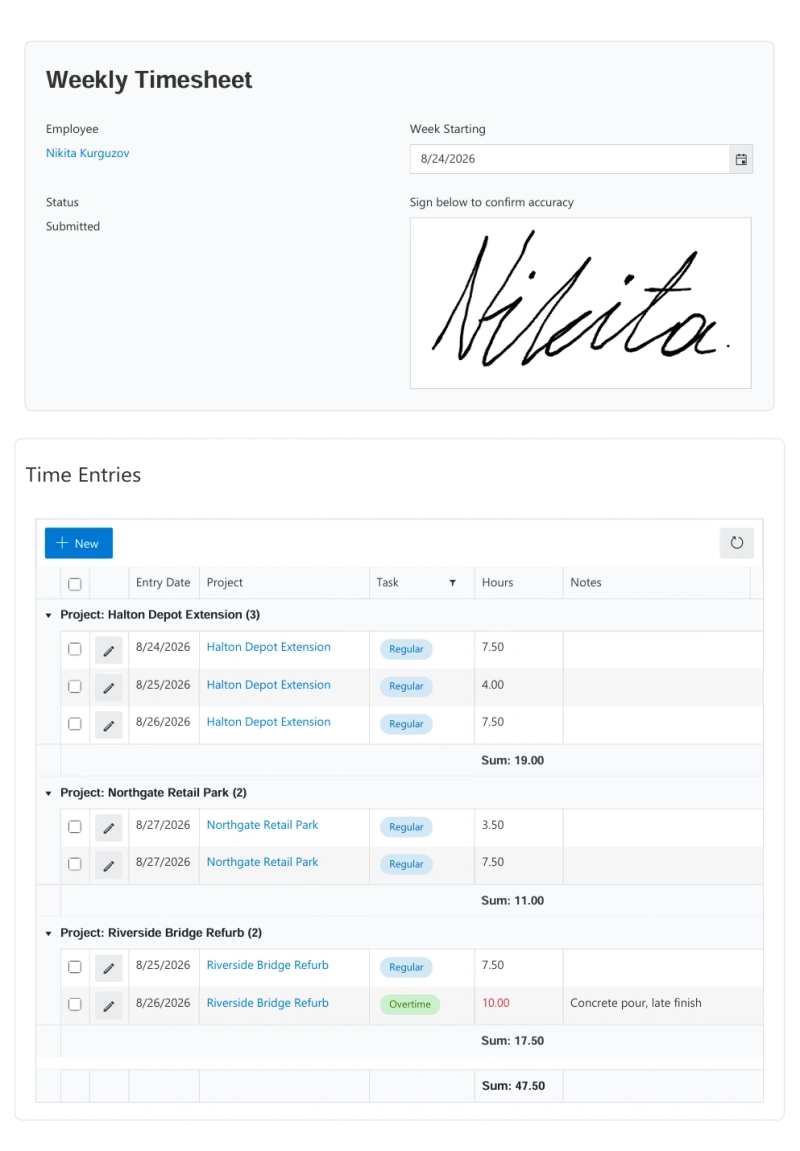
Weekly timesheet form with per-project totals
It takes about an hour or two to build. Everything below runs on the 30-day trial, and the code is included in full.
Projects — what people book time against. Title, ProjectCode, and an Active yes/no column.
Timesheets — one item per employee per week. WeekStarting (date), Status (choice: Draft, Submitted, Approved, Rejected), TotalHours (number), and a plain text multi-line column called Signature. Rich text will mangle the signature data, so make sure it's plain.
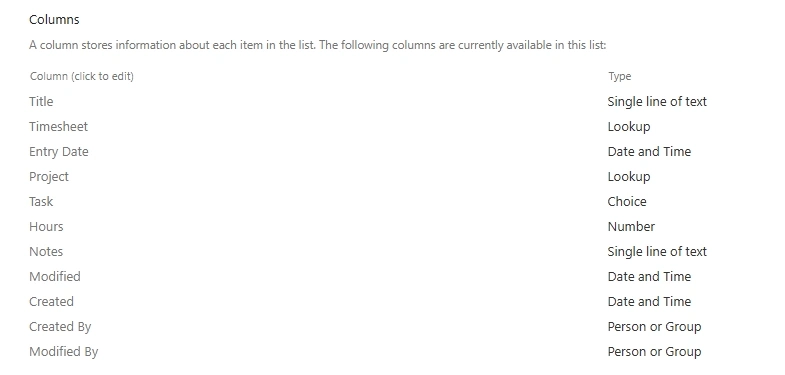
Timesheet Lines — one item per day per project. EntryDate, Hours, Notes, a Task choice column, and two lookups: one to Projects, one to Timesheets.
This is something commonly done to manage time sheets in SharePoint:
I am building a time-capturing application, this is being constructed on SharePoint Lists.
Power Platform community, describing a similar system with Clients, Projects, Timesheets and Timesheet Lines
The data model is the straightforward part. The rest of that thread is spent debugging why hours weren't writing back through the form layer — which is the part this article covers.
Timesheet Lines list with lookups to Projects and Timesheets
Hour lines are separate list items, not serialised text in a column on the parent. That distinction determines what you can do later: individual rows can be filtered by CAML or OData, aggregated in Power BI, and pushed to an accounting system one at a time. Store them as JSON in a multiline field and none of that works.
Index the Timesheet lookup now, under Timesheet Lines → List settings → Indexed columns. Indexing a list that has already passed 5,000 items is significantly harder, and this list grows quickly — see Scaling to payroll volumes.
Configure the view that supplies the totals
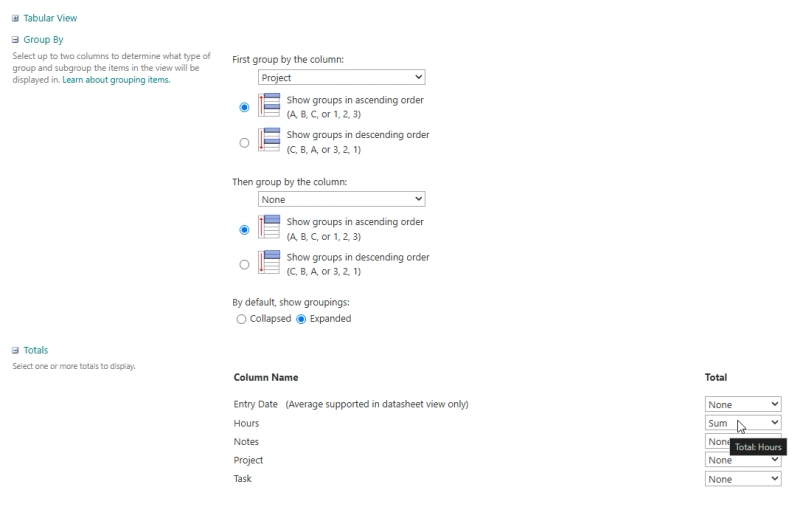
Create a view on Timesheet Lines called Timesheet Form View. Show EntryDate, Project, Task, Hours, Notes. Group by Project. Set Totals on Hours to Sum.
Group by Project and set Hours to Sum
Choose the right tool for the job
In many SharePoint timesheet tutorials, this is the point where the interface moves to Power Apps. It's a legitimate route, and a Microsoft community Super User recommending it in a timesheet thread is candid about the cost — quick if someone in the organisation already knows the platform:
It shouldn't take too long to build if you have someone in your organisation who know Power Apps. If not there is naturally a learning curve.
Power Apps also does things a regular SharePoint form cannot. Offline capture on a mobile device is the clearest example: a canvas app stores entries locally and uploads them when the connection returns, which matters for field work. If that's a requirement, Power Apps is the right answer.
If the requirement is a form rather than an app, Plumsail Forms for SharePoint covers this case with controls that exist for it already. List or Library connects a parent form to its child list without code. Lookup reaches lists on other sites and site collections. Ink Sketch captures signatures. Anyone who used InfoPath will recognise the model.
That's the tool used here. The lists, the flow, and the document template in the rest of this article work regardless of how you build the form.
Design the timesheet form
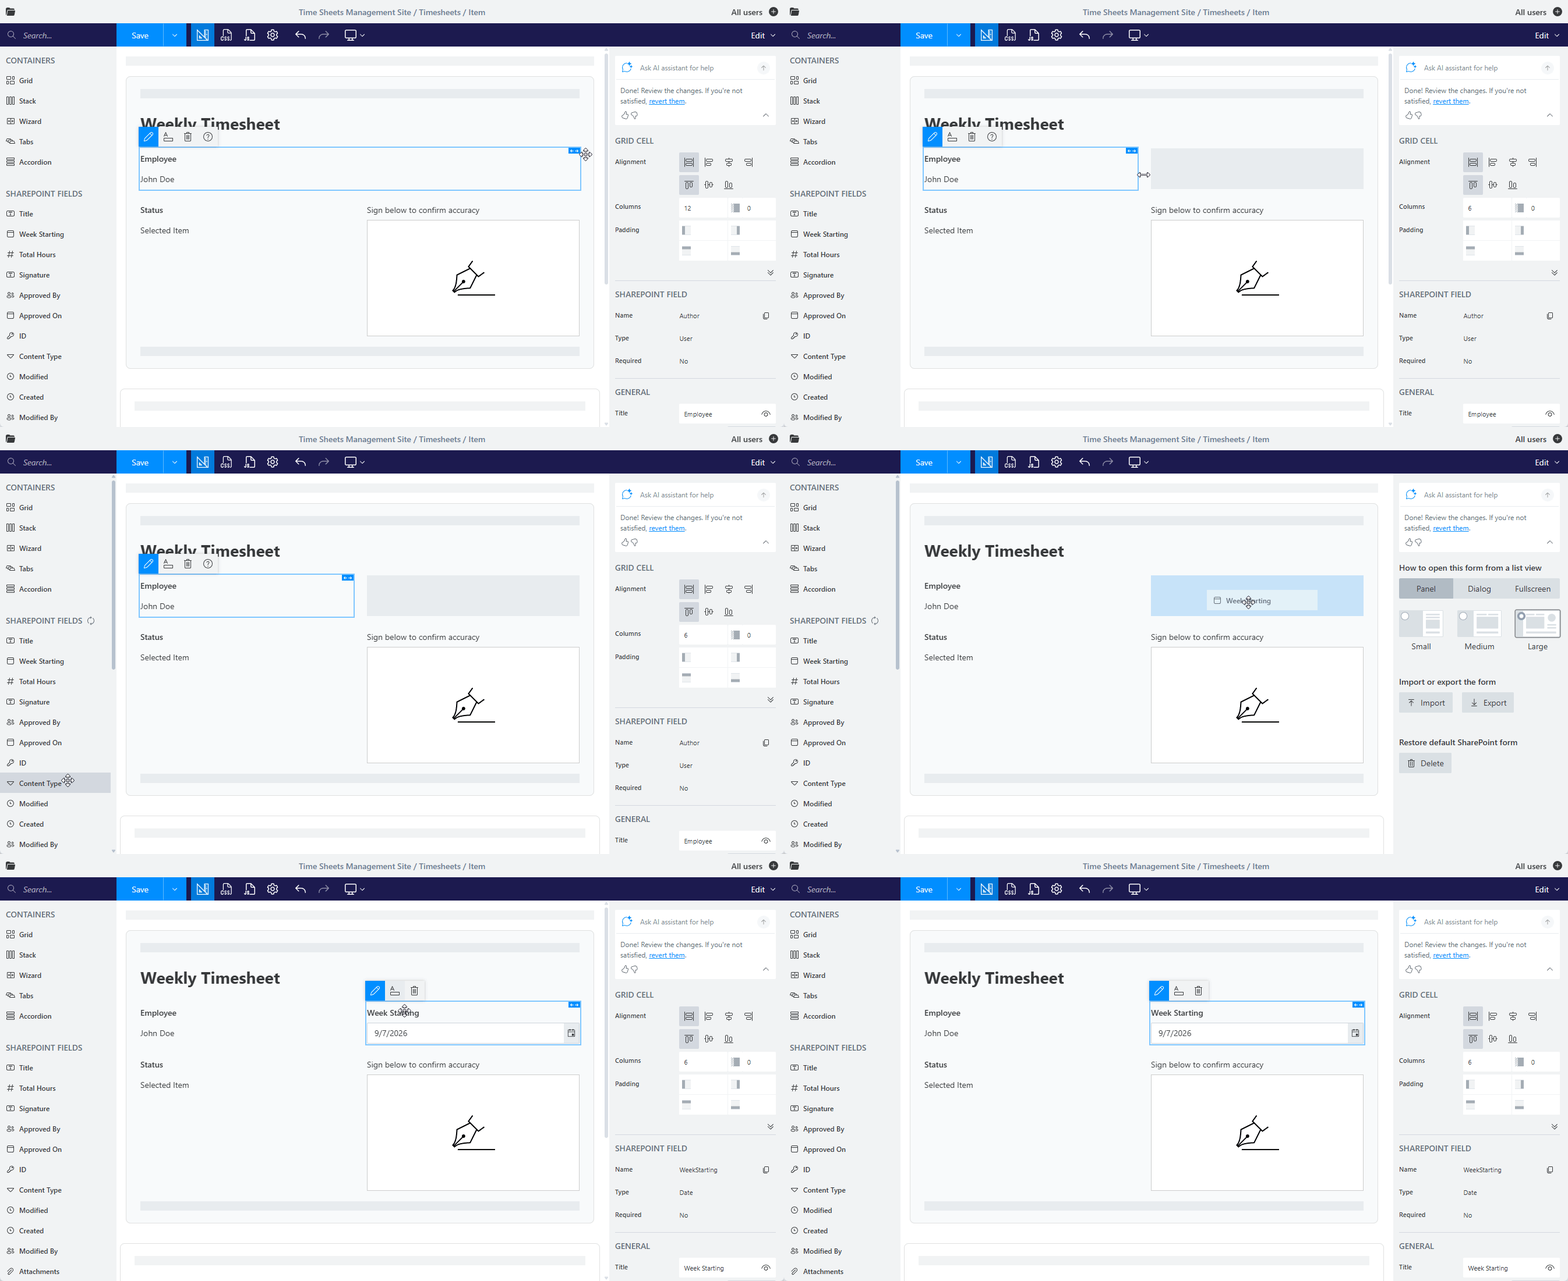
Open the Timesheets list, click Edit form, and design it in the form designer.
Forms are easy to create with drag and drop editor
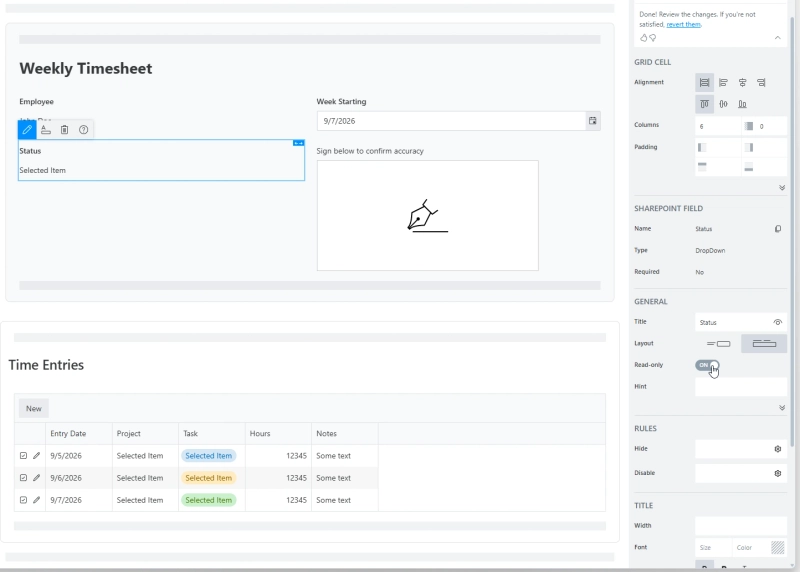
Add Created By as read-only to identify the employee, plus WeekStarting, and Status as read-only — Status is written by the flow, not the user.
Setting Status as read-only
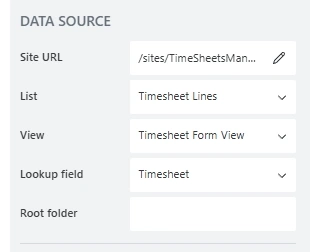
Then drag in a List or Library control pointing at Timesheet Lines, using the view you just built, with the Lookup field set to Timesheet and editing set to Inline.
Point the control at Timesheet Lines and set the lookup field
The List or Library control renders grouping and totals from its source view, so per-project subtotals and a grand total appear on the form without any code.
That lookup setting does two jobs: it filters the control to show only lines belonging to this timesheet, and it stamps that link onto every new row automatically. Full setup detail is in the List or Library documentation.
Three mechanisms handle data entry:
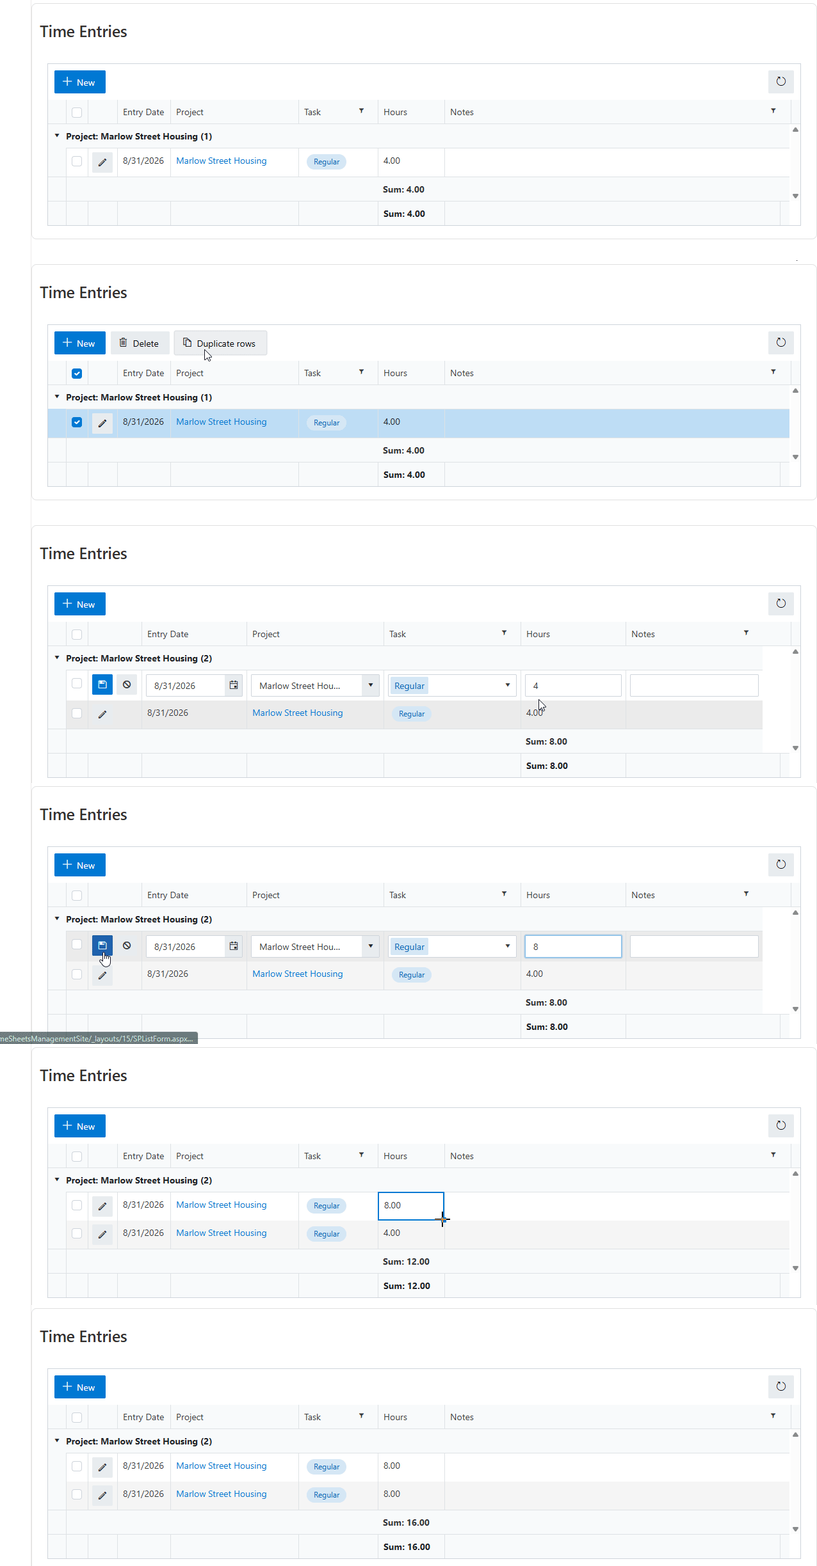
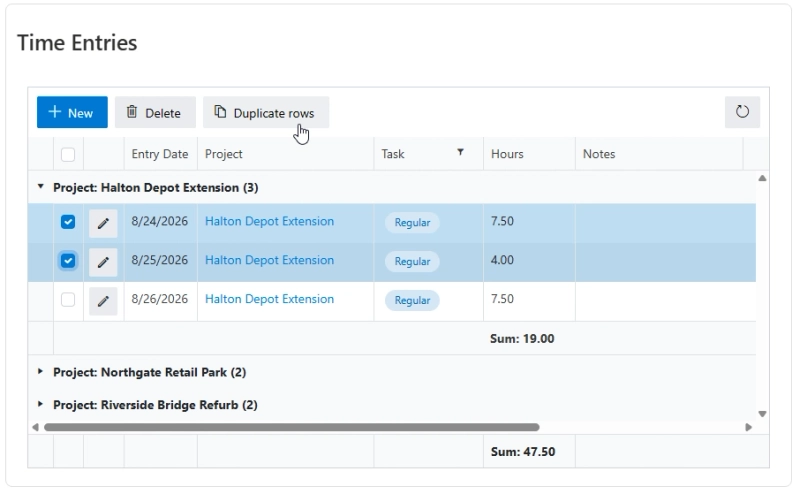
Duplicate a day, adjust the hours, then fill a column down
Inline editing writes values directly in the grid rather than opening a dialog per row, and subtotals recalculate as you type. Drag to fill copies a value down a column. Duplicate creates new rows from selected ones.
Drag-to-fill operates on one column across rows that already exist — it does not create rows. Row creation is what the duplicate button handles.
The button appears as soon as rows are selected
The duplicate button is not enabled by default. The duplicate button example in the docs adds it to the toolbar; these modifications adapt it to a timesheet:
// Internal names of the fields to carry overconst fieldsToCopy =['Title','EntryDate','Task','Hours','Notes','Project','Timesheet'];asyncfunctioncopySelectedItems(selectedItems, items){returnawait Promise.all(
selectedItems.map(asyncselected=>{const item =await items.getById(selected.ID).get();const copy ={};
fieldsToCopy.forEach(field=>{// != null keeps zeros — a 0-hour sick day is real dataif(item[field]!=null){
copy[field]= item[field];}// Lookup and Person columns come back as <Name>Idelseif(item[field +'Id']!=null){
copy[field +'Id']= item[field +'Id'];}});return copy;}));}
Timesheet must be in the field list. The control sets that lookup automatically on rows created through its New button, but duplicates are written through PnPjs and bypass that. Omit it and the copies are created as orphans — present in Timesheet Lines, attached to no parent, and invisible in the control.
The != null check replaces the truthy test in the docs example. A 0-hour row is valid data — a sick day, for instance — and a truthy check drops it, copying Hours as empty.
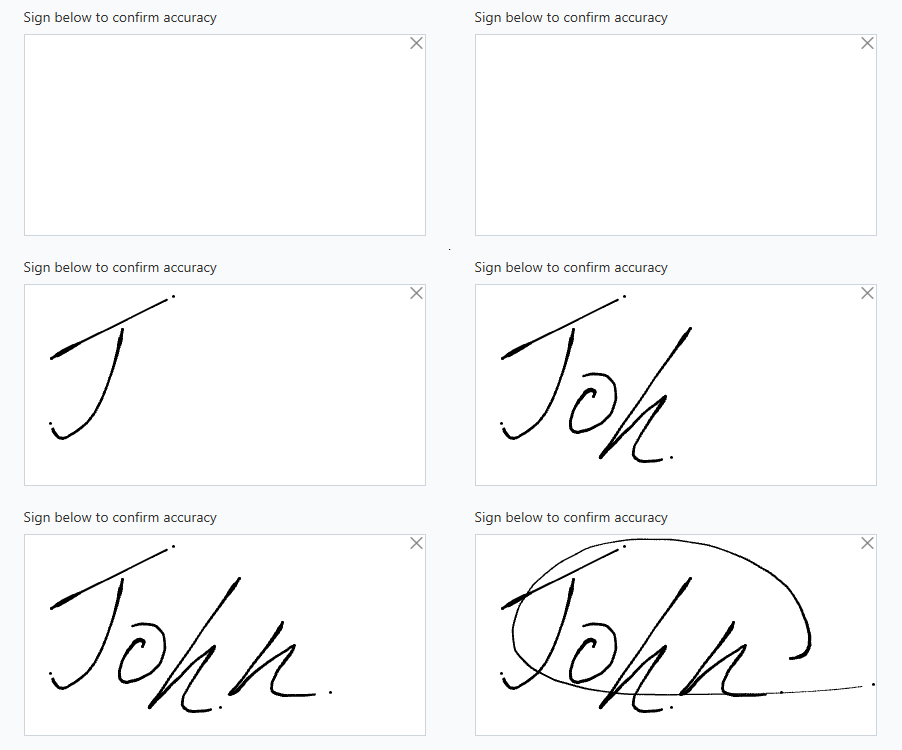
Capture a signature
Add an Ink Sketch control and set its Save To property to the Signature column. It writes a base64 PNG data URI to the column, which is why that column has to be plain text.
Ink Sketch captures a signature straight into a SharePoint column
Add smart defaults and highlighting
The form is functional at this point. Four JavaScript snippets in the designer handle defaults, formatting, and locking.
Default WeekStarting to the current Monday, and prefill EntryDate on each new line from it:
fd.spRendered(()=>{if(fd.formType ==='New'&&!fd.field('WeekStarting').value){const today =newDate();const day = today.getDay();const offset = day ===0?-6:1- day;// Sunday ends the weekconst monday =newDate(today);
monday.setDate(today.getDate()+ offset);
fd.field('WeekStarting').value = monday;}
fd.control('Lines').$on('edit',editData=>{if(editData.formType ==='New'){
editData.field('EntryDate').value = fd.field('WeekStarting').value;}});});
Colour hours above eight, and make the control read-only once Status is Approved:
Anything over eight hours is flagged automatically
readonly locks the whole control. To lock individual rows instead — approved lines while the rest of the week stays editable — use readonlyRow. Both, along with toolbar buttons and dynamic filtering, are documented in the List or Library reference.
Route timesheets for approval
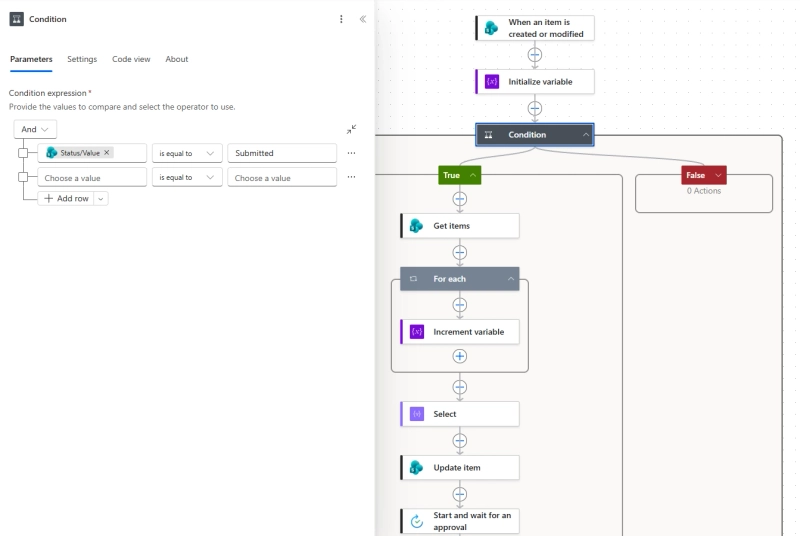
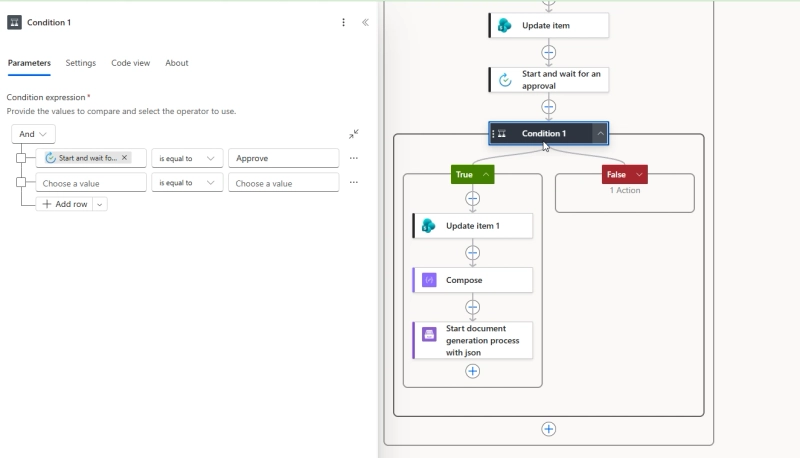
Create a flow on the Timesheets list triggered by When an item is created or modified, with a condition that Status equals Submitted.
The flow totals the lines, then routes for approval
The condition is required. The trigger fires on every modification including the flow's own writes, so without it the flow recurses. Because it finishes by setting Status to Approved or Rejected, the re-trigger fails the condition and terminates.
Inside the If yes branch:
1. Get items from Timesheet Lines, with the filter query TimesheetId eq @{triggerOutputs()?['body/ID']}. It's the internal name plus Id, not Timesheet. This is also the query that relies on the index you created earlier.
2. Total the hours. Power Automate has no sum() expression, so initialize a Float variable and increment it inside an Apply to each. Note that Initialize variable must sit at the top level of the flow — put it inside a condition and the flow won't save.
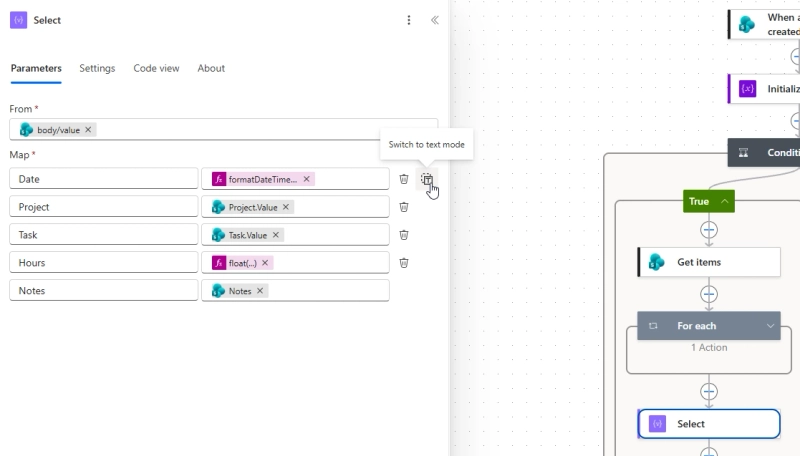
3. Shape the lines into an array. The hour lines are items in a different list, so nothing downstream can read them from the timesheet item — they have to be queried and flattened. A Select action maps the rows returned by step 1 into a plain array.
Lookup and Choice columns return objects rather than strings, so Project and Task require ?['Value']; without it the output contains [object Object]. Leave Hours unquoted so it stays a number — quoted, it becomes a string and later arithmetic on it fails silently.
4. Update the parent with the total, then Start and wait for an approval, and set Status based on the outcome.
Status, approver, and date written back on approval
The total is calculated in the flow rather than the browser deliberately. View totals on the form are display only; TotalHours on the item is written server-side, where the user cannot alter it.
Print and generate payroll PDFs
Plumsail Forms exports any form to PDF out of the box — there's a button on the right of the form toolbar, and you can trigger it yourself with fd.exportToPDF(). See Save SharePoint form as PDF.
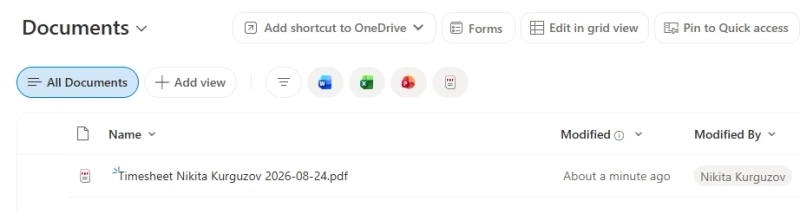
The exported PDF keeps grouping, totals, and the signature — download the sample
Long timesheets export in full. The grid scrolls on screen once there are more rows than fit the viewport, but every line reaches the PDF along with the subtotals and grand total.
The export renders the form as displayed, which includes its interactive elements — the New button, row checkboxes, edit icons, and the column filter arrow all appear in the output.
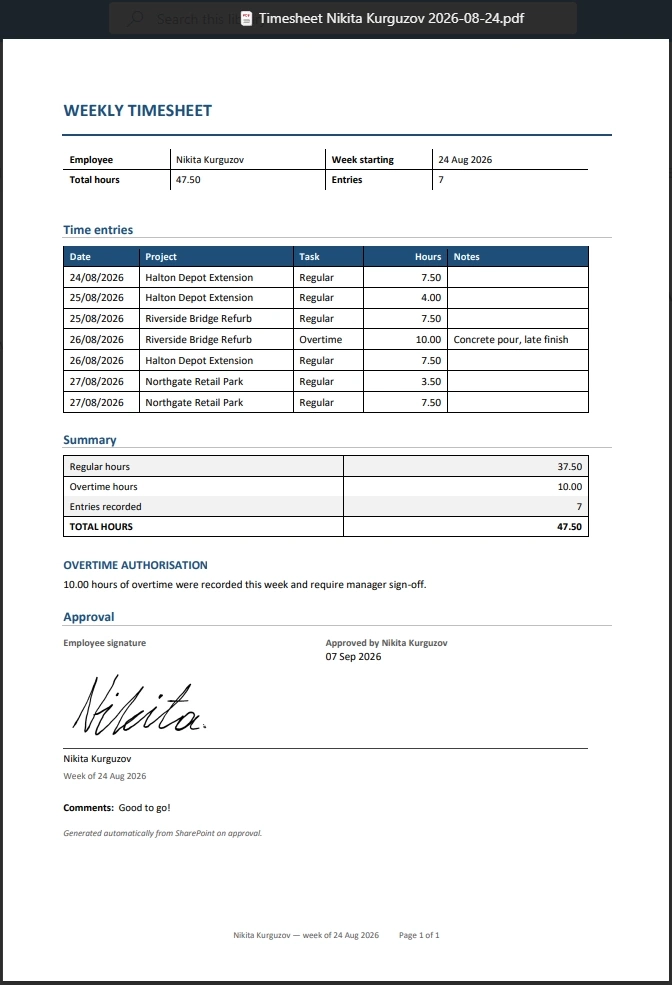
That makes the built-in export a quick snapshot of what was submitted. A payroll document usually needs more: a layout independent of the form, derived figures such as the regular and overtime split, and the approval trail — approver, date, and comments, which are written by the flow after submission and so cannot appear in anything exported at submission time. Plumsail Documents generates that from a Word template.
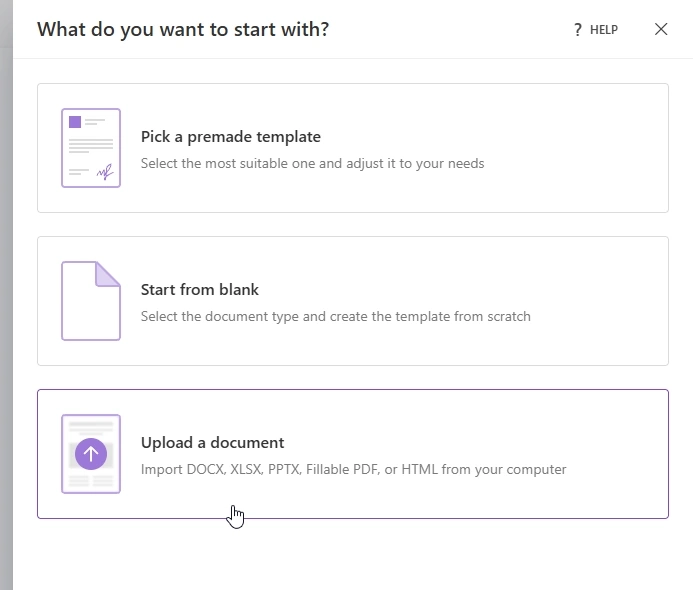
Build the timesheet document template
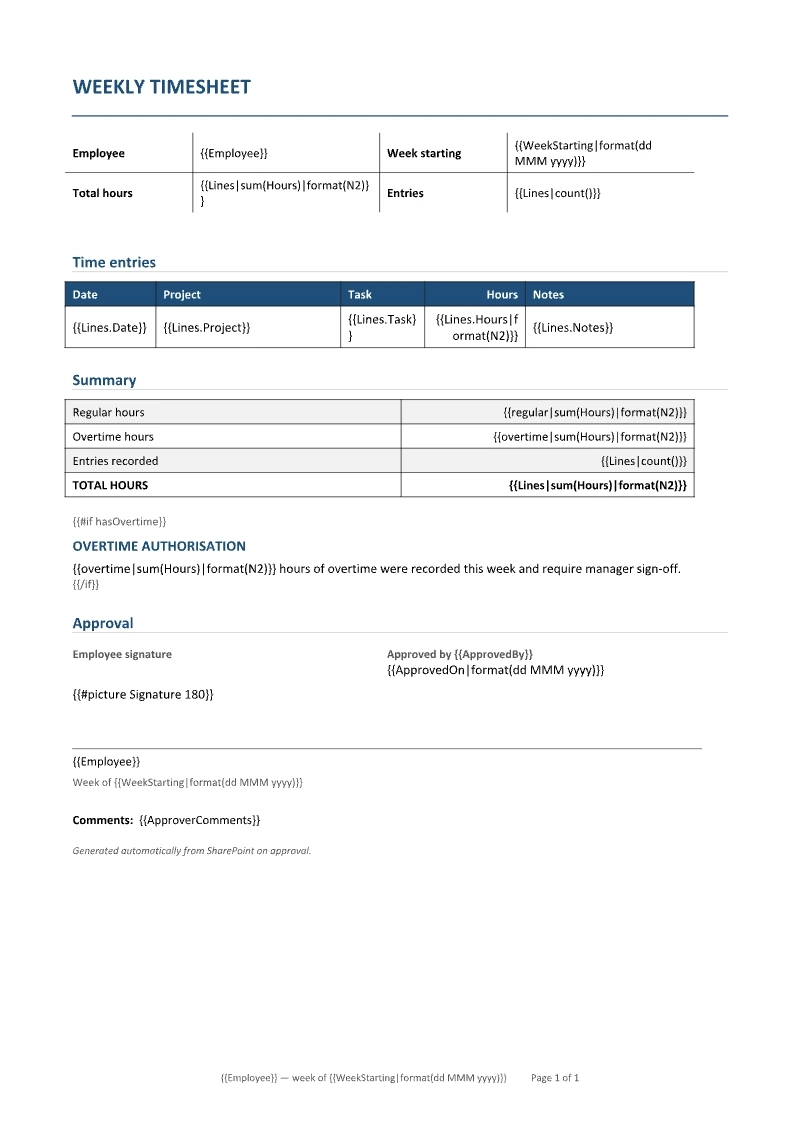
Build a Word file with your letterhead. For the hour lines, add a table with a header row and one body row of tokens. There is no loop to declare — the engine detects the collection and repeats the row per entry.
One row of tokens repeats for every hour line
The summary and the conditional both come from calculated properties placed anywhere above them:
{{regular|sum(Hours)|format(N2)}} returns the Regular total. The authorisation block goes inside {{#if hasOvertime}} … {{/if}}. Use #if for multi-paragraph blocks: #hide-if is inline only, takes no closing tag, and errors if given one.
{{#picture Signature 180}} renders the signature. The operation accepts a base64 data URI, which is what Ink Sketch writes. The second argument is width in pixels; height is calculated from the aspect ratio.
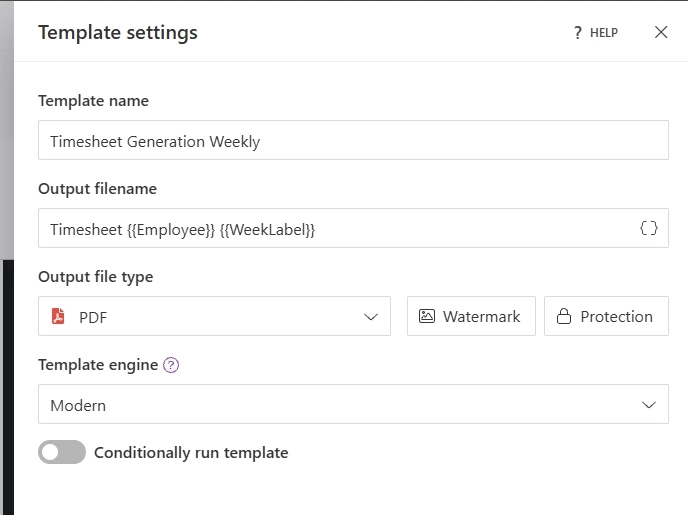
Set the output type to PDF and give the file a name built from tokens.
Output type and filename
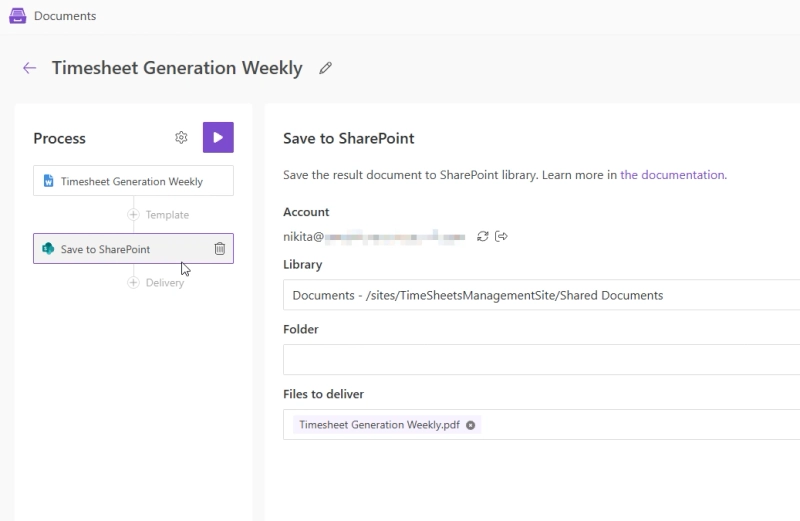
Then add a SharePoint delivery pointing at a document library:
Deliver the finished PDF to a library
Wire it to the flow
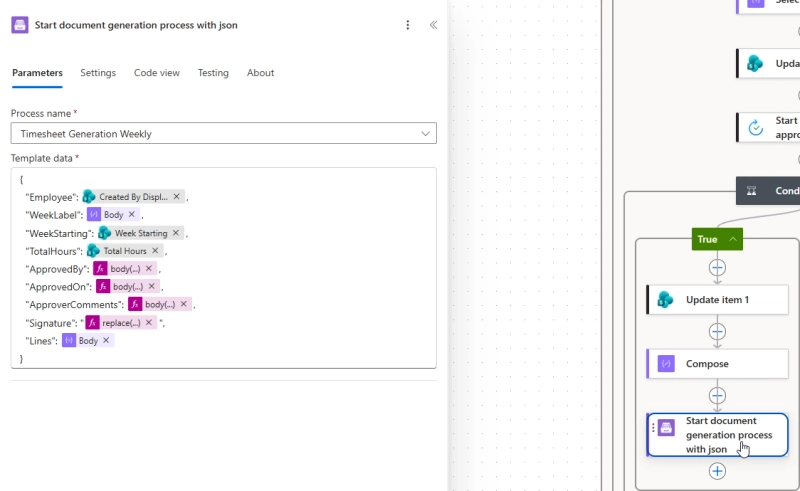
Add Start document generation process with json to the If yes branch, after the approval.
Pass the timesheet fields and the lines array
Pass the header fields plus Lines from the Select action, unquoted — it is already an array.
Two failure modes here produce no error message. Person columns bind as objects: selecting Created By from the dynamic content list inserts the full SPListExpandedUser record, not a display name. Use triggerOutputs()?['body/Author/DisplayName']. If the output filename references that property, the object's slashes and colons also fail filename validation and the delivery fails with an unhelpful message.
Ink Sketch writes its base64 wrapped in literal quote characters. The picture operation cannot parse the result and renders nothing, silently. Strip them:
That thread finds documentation citing both a 5,000-item limit and a 30-million one. Both are correct, and the distinction is the one that matters here.
The 5,000 item list view threshold. SharePoint refuses queries that would examine more than 5,000 items. Timesheet Lines accumulates quickly: 200 employees at 10 entries a week produces roughly 100,000 rows a year. The index on the Timesheet lookup is what keeps this working — SharePoint filters on the index and only reads the rows belonging to one parent, so list size stops affecting form load time.
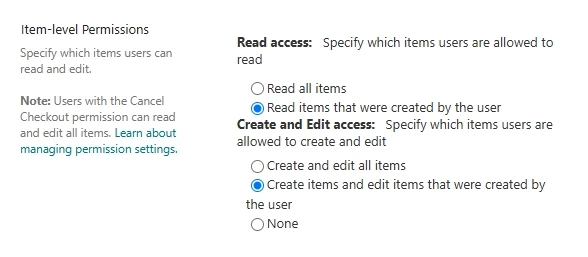
Item-level permissions. By default every employee can read every other employee's hours. Open List settings → Advanced settings on Timesheet Lines and set Item-level Permissions to Read items that were created by the user and Create items and edit items that were created by the user.
Restrict employees to their own hour lines
Apply the same two settings to the Timesheets list, or employees will still see each other's weekly headers.
Item-level permissions do not apply to users holding the Manage Lists permission, so a site owner sees no difference when testing — verification requires a restricted account. Contribute does not include Manage Lists, which means granting managers Contribute is insufficient: they would be limited to their own rows and would open an employee's timesheet to an empty grid. Managers and payroll need Design or Full Control on the list.
The architecture holds at scale. Consult2.Cloud built a payroll system on this pattern for a scaffolding contractor with roughly 1,800 employees.
With Plumsail Forms, we created a user-friendly system that includes signature controls, PDF generation, and real-time data retrieval. This has streamlined their payroll process, reducing manual effort and increasing accuracy.
That system holds around a million rows of line data without degradation, and extends the duplicate pattern to whole timesheets so employees start a week from the previous one. Read the full Consult2.Cloud story or watch our live interview on YouTube:
Ease of use
Best part of using Plumsail tools is that you don't need to be a professional developer to build and maintain such a complex system. If you're a developer, you can save time and achieve more with the help of our tools.
I have been using Plumsail Forms for our organization, and it has completely transformed the way we handle forms and workflows. The platform is incredibly user-friendly, yet powerful enough to handle complex business processes without requiring deep technical expertise.
The result records hours against projects, totals them server-side, captures a signature, routes for approval, and produces a PDF per approved week. The data stays in standard SharePoint lists, so Power BI, an accounting connector, or a scheduled export can read it without going through any intermediate layer.
Migrate to the cloud with SharePoint Forms and Consult2.Cloud expertise
Explore how Consult2.Cloud delivers cloud migration services with Plumsail Forms for SharePoint in large-scale applications such as sales and payroll processing.
How to automate multi-step approval process in SharePoint with PDF timesheet result
See how FileBank Inc. built a four-stage timesheet approval workflow in SharePoint Online — with auto-calculated hours, signature capture, and final PDF generation — with Plumsail and Power Automate.
Farook Golam
IT Director at FileBank Inc.
FormsSharePointPower Automate
Sep 23, 2025
Set up SharePoint approval flows in Power Automate with multiple approvers, sequential approvals, and external users
Learn how to create approval workflows in Power Automate for SharePoint lists, with sequential approvals, multiple approvers, and submissions from external users.







 FormsSharePoint