SharePoint lists often store more than text — logos, employee photos, graphics, and signatures can all end up in image columns or as file attachments. When you want to include those images in a document, Power Automate doesn't give you a direct path. Instead, you need to fetch each file's content explicitly before it can be embedded.
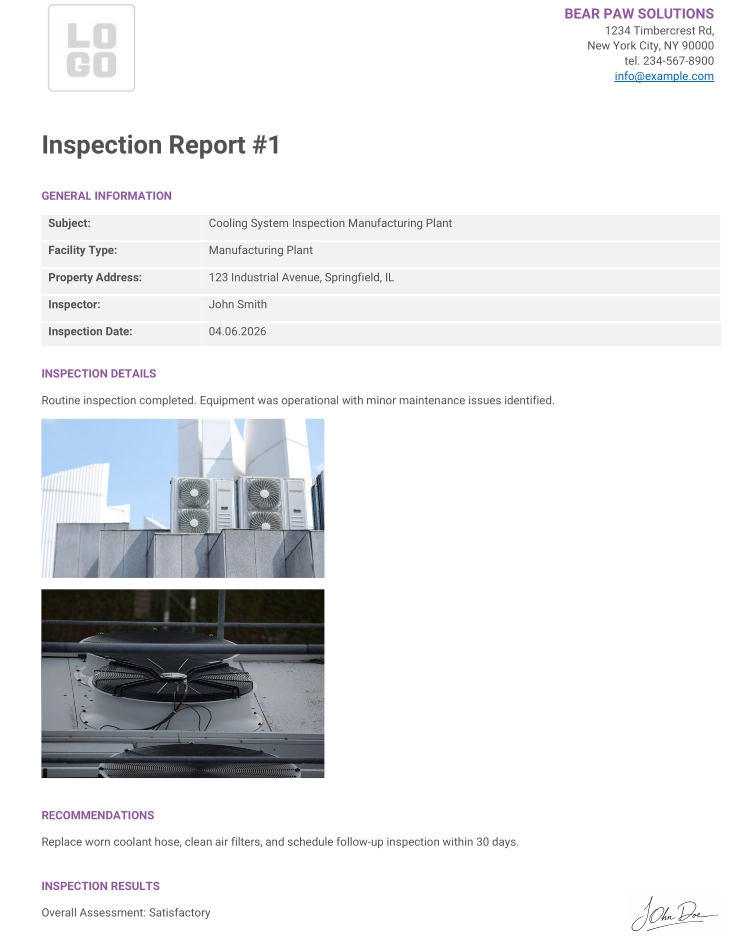
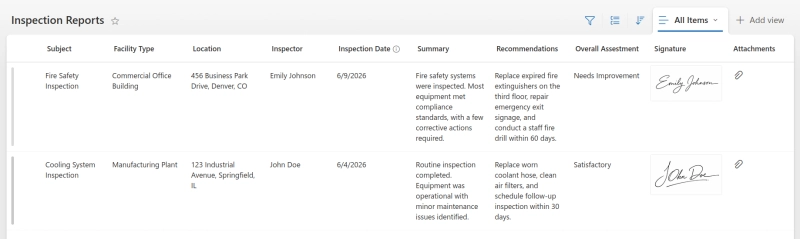
This guide shows you how to retrieve SharePoint images in Power Automate and use them to automatically generate a branded document with Plumsail Documents. We'll use an inspection report as the example. A SharePoint list stores the inspector's signature in an image column and evidence photos as attachments, producing a finished report like this:
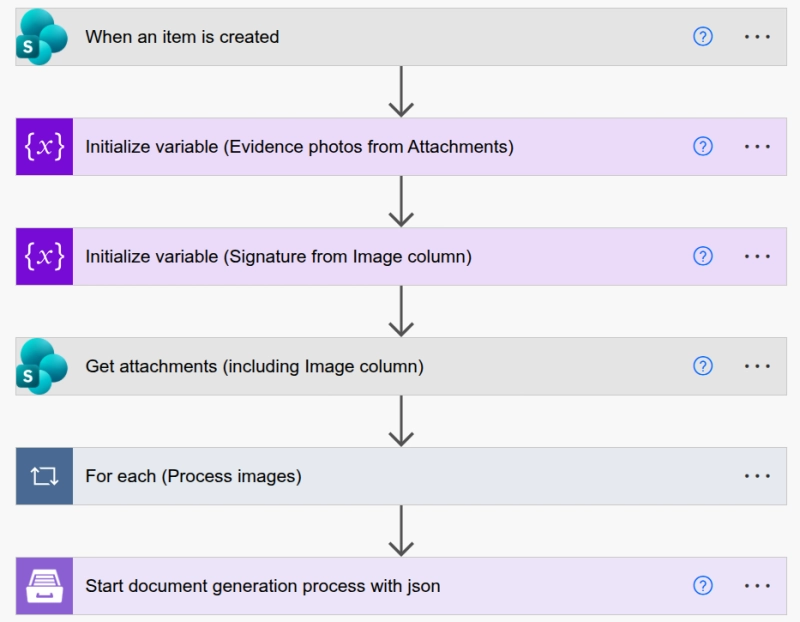
The flow itself is fairly simple. First, we retrieve the images from the SharePoint item and store them in variables. Then, we use those variables to populate our document template.
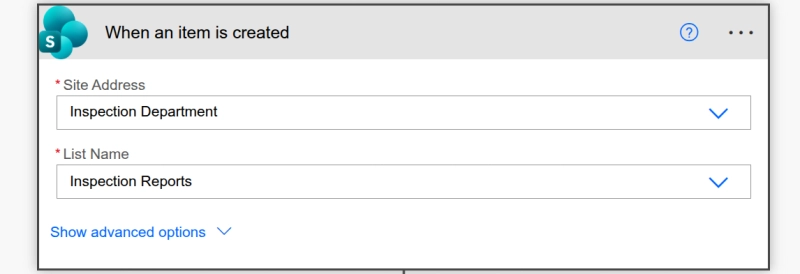
We start with a simple flow that runs whenever a new item is created in your SharePoint list.
First, create a new automated cloud flow in Power Automate. Since we want to generate a report whenever a new inspection is submitted, select the When an item is created trigger from the SharePoint connector.
Then configure it by selecting your SharePoint site and inspection list.
At this point, the flow is connected to your SharePoint list and will start whenever a new inspection item is added to your list. Next, we'll prepare the variables that will hold our images.
Next, we need a place to store the image content we pull from SharePoint.
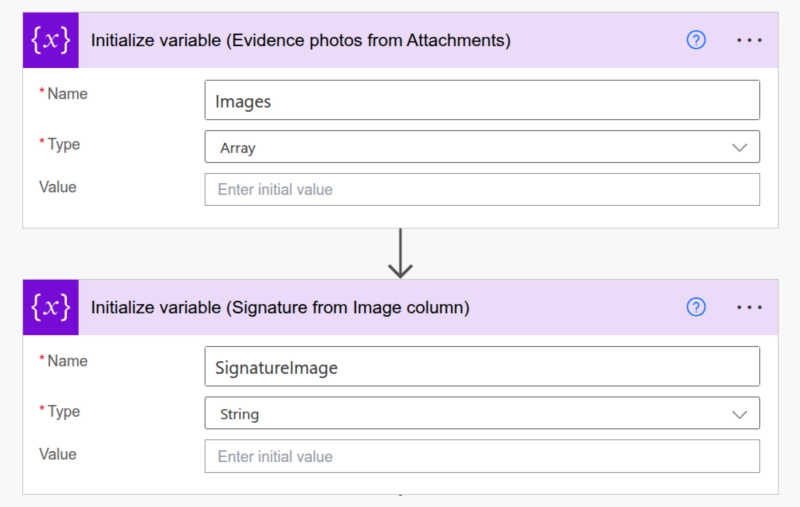
Click + to add a new step, search for Initialize variable, and add the action twice. The first variable, Images, should be an Array to collect all evidence photos. The second, SignatureImage, should be a String, since each report only contains one signature.
This difference is important. We can expect several evidence images, so they go into an array. The signature, however, is only one image per report, so a string is enough.
Once the variables are ready, we can retrieve the files stored with the SharePoint item.
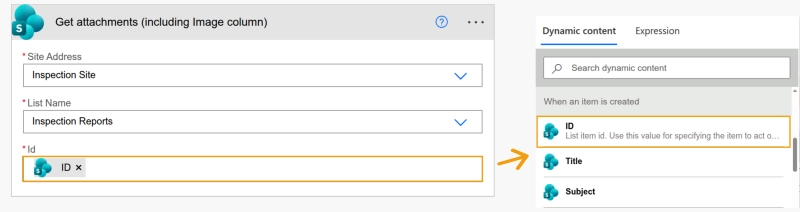
Add a Get attachments action and use the ID from the trigger to retrieve all files associated with the current SharePoint item. This includes attachments and any image column you decide to create.
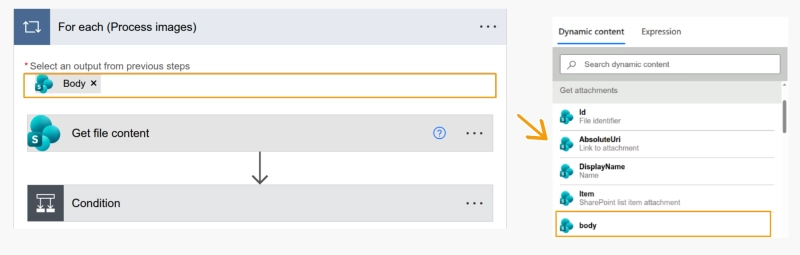
Next, add a For each component using the output of Get attachments. Inside the loop, add a Get file content action to retrieve the actual file content that we'll later pass to the document template.
With the attachments retrieved, the only thing left is to classify them and store them in the appropriate variable.
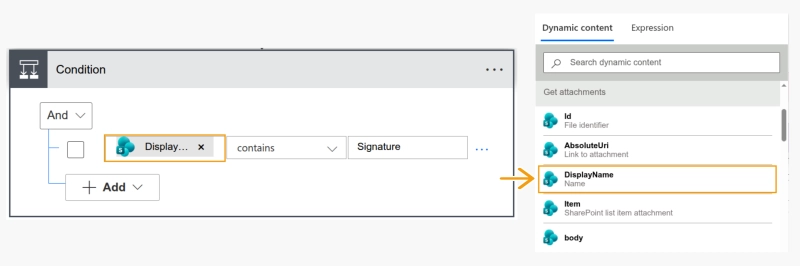
Since Get attachments returns every file attached to the item, we still need a way to distinguish the signature from the inspection images. In our example, we use a conditional as the signature file always starts with the prefix signature_, but you can use any naming convention or logic that fits your case.
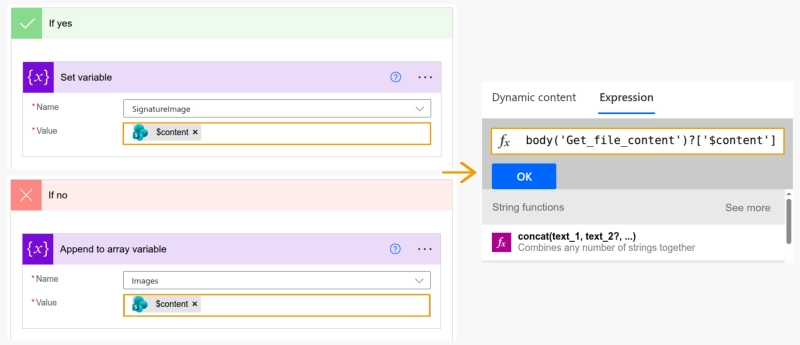
Add a Condition to distinguish the signature from the inspection images. If the file matches the signature rule, we store it in the SignatureImage variable. Otherwise, we append it to the Images array.
Once we know which file is which, we append the content to the right variable using the expression: body('Get_file_content')?['$content']
This is the last step needed to pull the images from SharePoint. From here, they are ready to be used in any document or process.
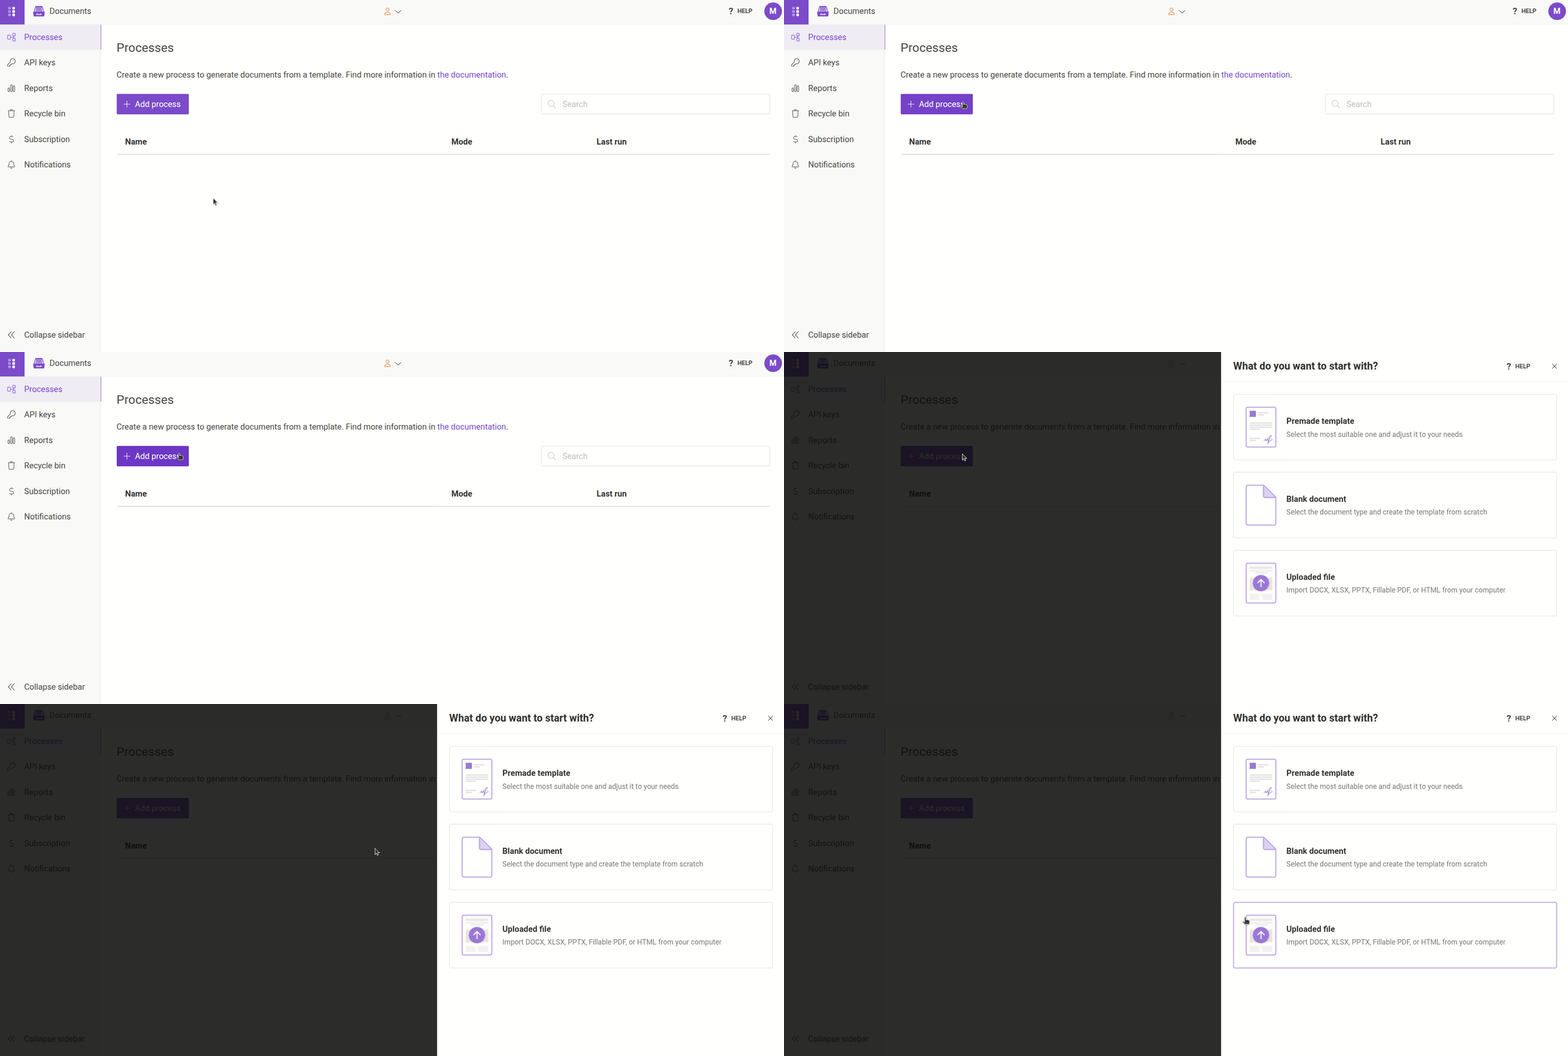
Start by creating a new process in your Plumsail account, and upload our inspection report template. Alternatively, you can start with a blank template to create your own layout, or choose one of our premade templates to get started faster.
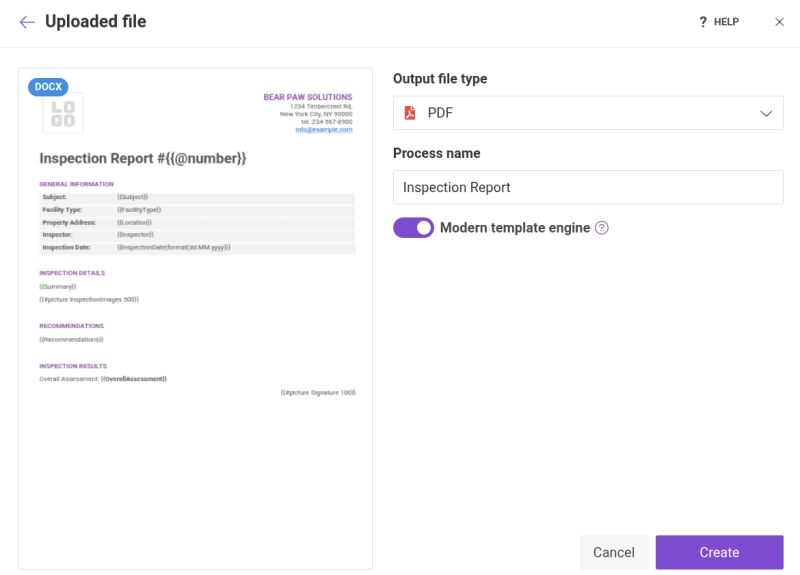
Name the process, configure the output format you want to generate, and click Create.
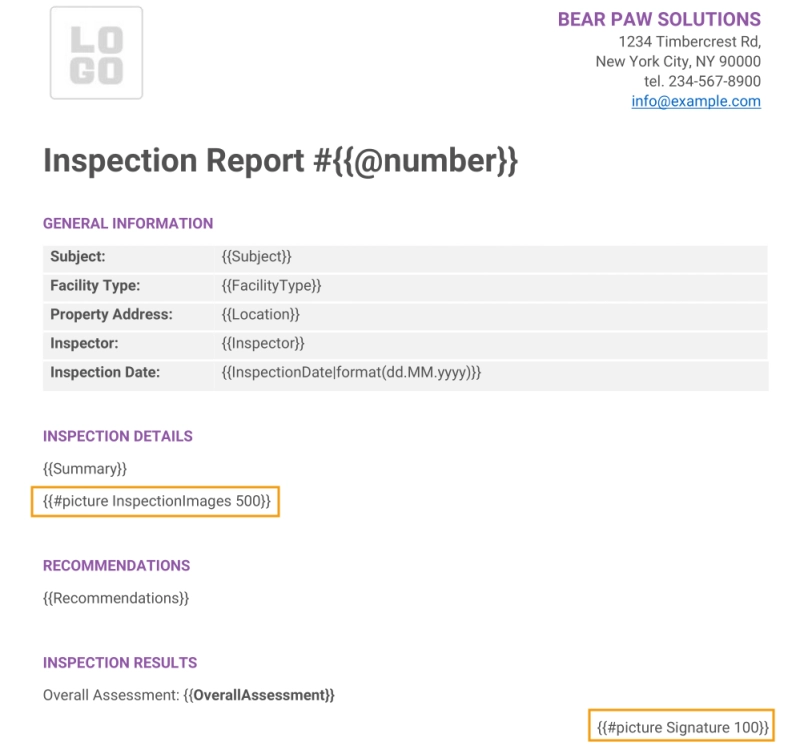
After the process is created, the editor opens with your uploaded template, and you will see that it includes two tokens for images:
InspectionImages for the evidence photos.
Signature for the inspector's signature.
Both use the #picture operation so the images are rendered correctly when the document is generated. You can also add width and height parameters to keep the layout consistent regardless of the original image size.
Tip: Besides width and height, you can also use it with other parameters such as rotate and flip to adjust the orientation directly in the template.
Once you are happy with your template, save it. The only thing left is to send it the data from Power Automate.
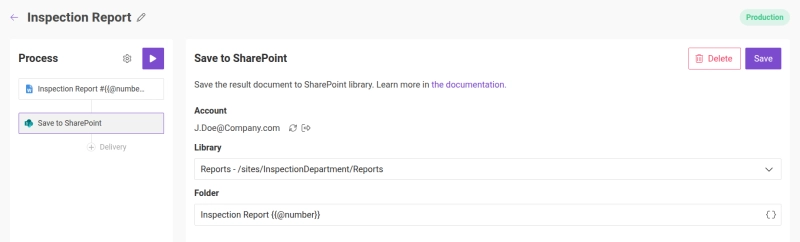
The process will now generate a report every time a new item is created, with the images populated automatically, and save it to your SharePoint library.
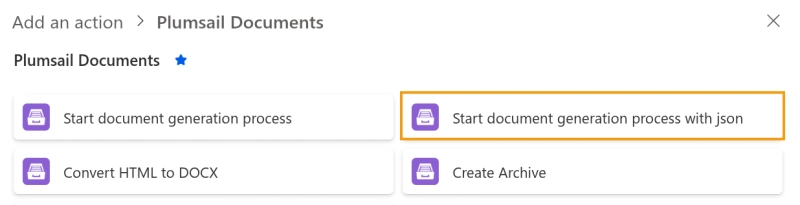
After getting your process and template ready, return to your flow and add the Start document generation process with JSON action from the Plumsail Documents connector.
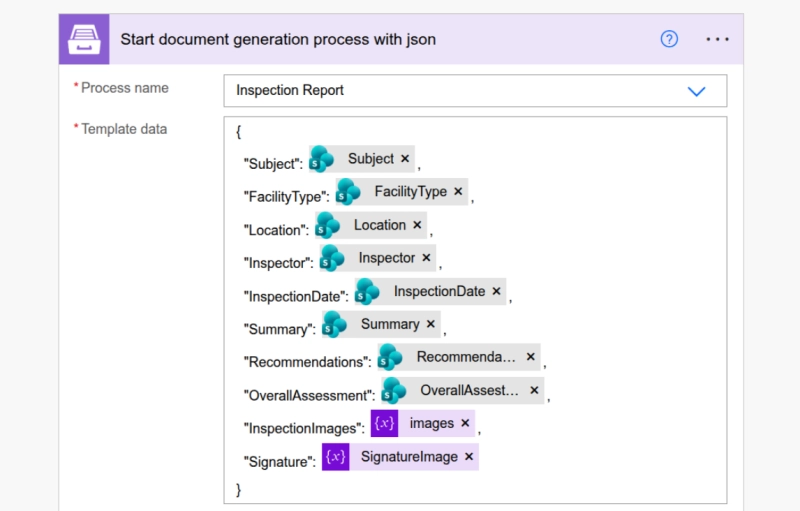
If this is your first time using the connector, you'll be prompted to sign in and connect your Plumsail Documents account. Once connected, select the process you created in the previous step and map all the fields to your process.
We use Subject, FacilityType, Location, Inspector, InspectionDate, Summary, Recommendations and OverallAssessment from the trigger, and pass Images and SignatureImage from the variables you set up earlier.
Your flow is now complete. Every new inspection added to the SharePoint list will generate a document with all the corresponding images already populated. Here's what the final report looks like:
Retrieving images from SharePoint takes a few additional steps compared to other fields, but once the flow is in place, it becomes a reusable template for any document generation process.
Whether you're building inspection reports, proposals, employee records, or other business documents, you can combine Plumsail Documents, SharePoint and Power Automate to generate Word, Excel and PDF files that include images, signatures, and other visual content automatically.
Register an account to start your 30-day free trial. You'll get full access to document generation features and actions in Power Automate. And if you'd like a quick walkthrough, you can book a free intro call with our team. We'll help you set up your first automation and answer any questions along the way.
How to use SharePoint images in Power Automate FAQ
How to get an image from a SharePoint Image column in Power Automate?
Use the Get attachments action with the item ID, then a Get file content action inside a For each loop to retrieve the file content. Since an image column only holds one file, you can identify it with a condition and store it in a variable. Alternatively, since an image column exposes a file URL, you can skip the attachments loop entirely and use Get file content using path with that URL to retrieve the image directly.
How to get images from SharePoint attachments in Power Automate?
Add a Get attachments action using the item's ID, then loop through the results with a For each and add a Get file content action inside it. Since attachments can include multiple files, append each file's content to an array variable using the expression body('Get_file_content')?['$content'].
Can Power Automate retrieve multiple images from a SharePoint item?
Yes. Get attachments returns every file linked to the item, and looping through them with For each lets you retrieve each one's content and append it to an array variable, so you can later pass multiple images to your document template at once.
What is the difference between a SharePoint Image column and Attachments?
An Image column supports a single image, shows a preview, and is best for logos or profile photos. Attachments support multiple files of different formats and are better suited for supporting documents or several images tied to the same item.
Can I retrieve a SharePoint image without using the "Get attachments" action?
Yes, if the image is stored in an image column rather than as an attachment, you can use Get file content using path action with the file's URL instead of looping through attachments.
How can I use images in a Plumsail Documents template?
Plumsail Documents uses the the #picture operation, and supports Base64 code strings and accessible URLs.
Can I resize, rotate, or crop images automatically when generating the document?
Yes, the #picture operation accepts parameters like width, height, rotate, and flip, so images are adjusted automatically without editing them beforehand.
Does this approach work for Excel templates?
Yes, the same #picture operation and flow structure work for XLSX templates, and any DOCX or XLSX output can be converted to PDF as part of the process.
Can I trigger this flow when an item is updated instead of created?
Yes, just switch the trigger to When an item is created or modified, but we recommend adding some logic to avoid regenerating the report on every minor edit, for example by checking a column value.
Related posts
DocumentsPower Automate
Last updated: Jun 11
Power Automate: populate a Microsoft Word template action step by step
Learn how to use the Populate a Microsoft Word Template action in Power Automate. Follow a step-by-step guide, understand its limitations, and explore options for advanced document generation.
Anton Cox
Customer Support Engineer
DocumentsPower Automate
Jun 26, 2024
Top Power Automate flow templates for document creation, conversion, and PDF processing
Discover the most popular Power Automate flow templates for document creation, conversion, and comprehensive PDF processing. Enhance your workflow with these powerful automation tools.
Evgeniy Evseychik
Customer Support Engineer
DocumentsAirtable
Last updated: Jun 22
Create PDF from Airtable records with image attachments. Step-by-step guide
Discover how to create and generate PDFs from Airtable records, including images, using Plumsail Documents. Follow our step-by-step guide.



 Documents
 Power Automate