


Documents
Nov 21, 2022
Create documents from template and convert to PDF with one action in Power Automate
Plumsail Documents "Create document from template" actions got a new parameter for PDF conversion.

How to export SharePoint list items to PDF file is frequently discussed in the Power Automate community. Suggested solutions often require using OneDrive for Business connector for Microsoft Power Automate and some knowledge of HTML. Otherwise, you may be surprised by how the resulting PDF file looks, as the only way to control its layout is to apply custom HTML. In short, it’s very complicated.
Do you want to generate a PDF file from SharePoint list items? Please consider using the OneDrive for Business action Convert file to convert an HTML file to PDF.
But I'm not really happy with the output yet as you can see on the attached screenshot. Do you have further suggestions of how to change the layout of the pdf?
If you'd like more control over the resulting PDF file or need to process SharePoint list data in an advanced way, we recommend considering the approach described in this article. We'll explore the use of Plumsail Documents connector in Power Automate, which allows you to generate PDF from SharePoint list item automatically and to have full control over the outcome PDF file look.
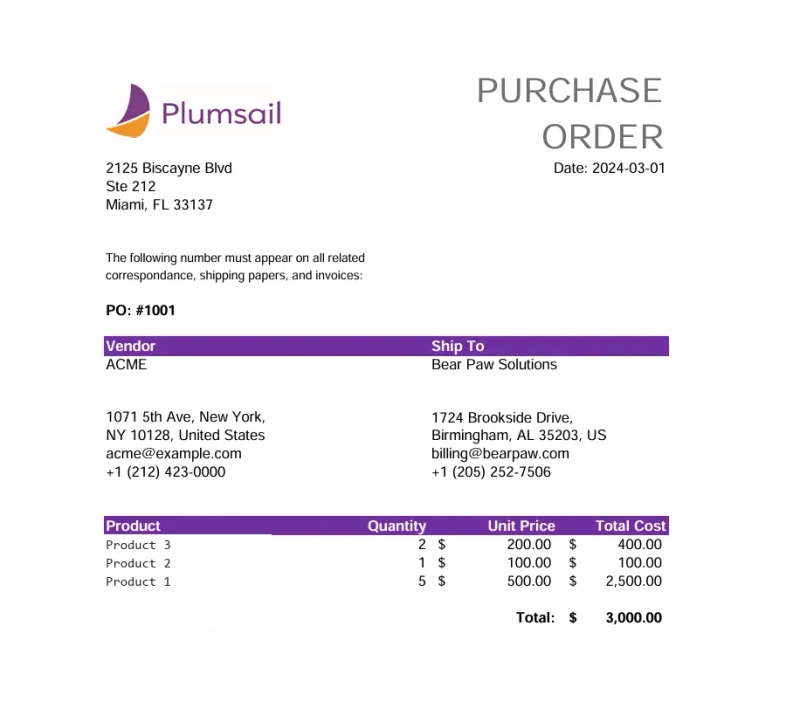
In our case, we will create a PDF from SharePoint list item for each purchase order. Here is an overview of how our SharePoint list looks:
A quick note: in the Products column we use the DataTable control from Plumsail Forms for SharePoint tool. It allows you to visualize an array of data.
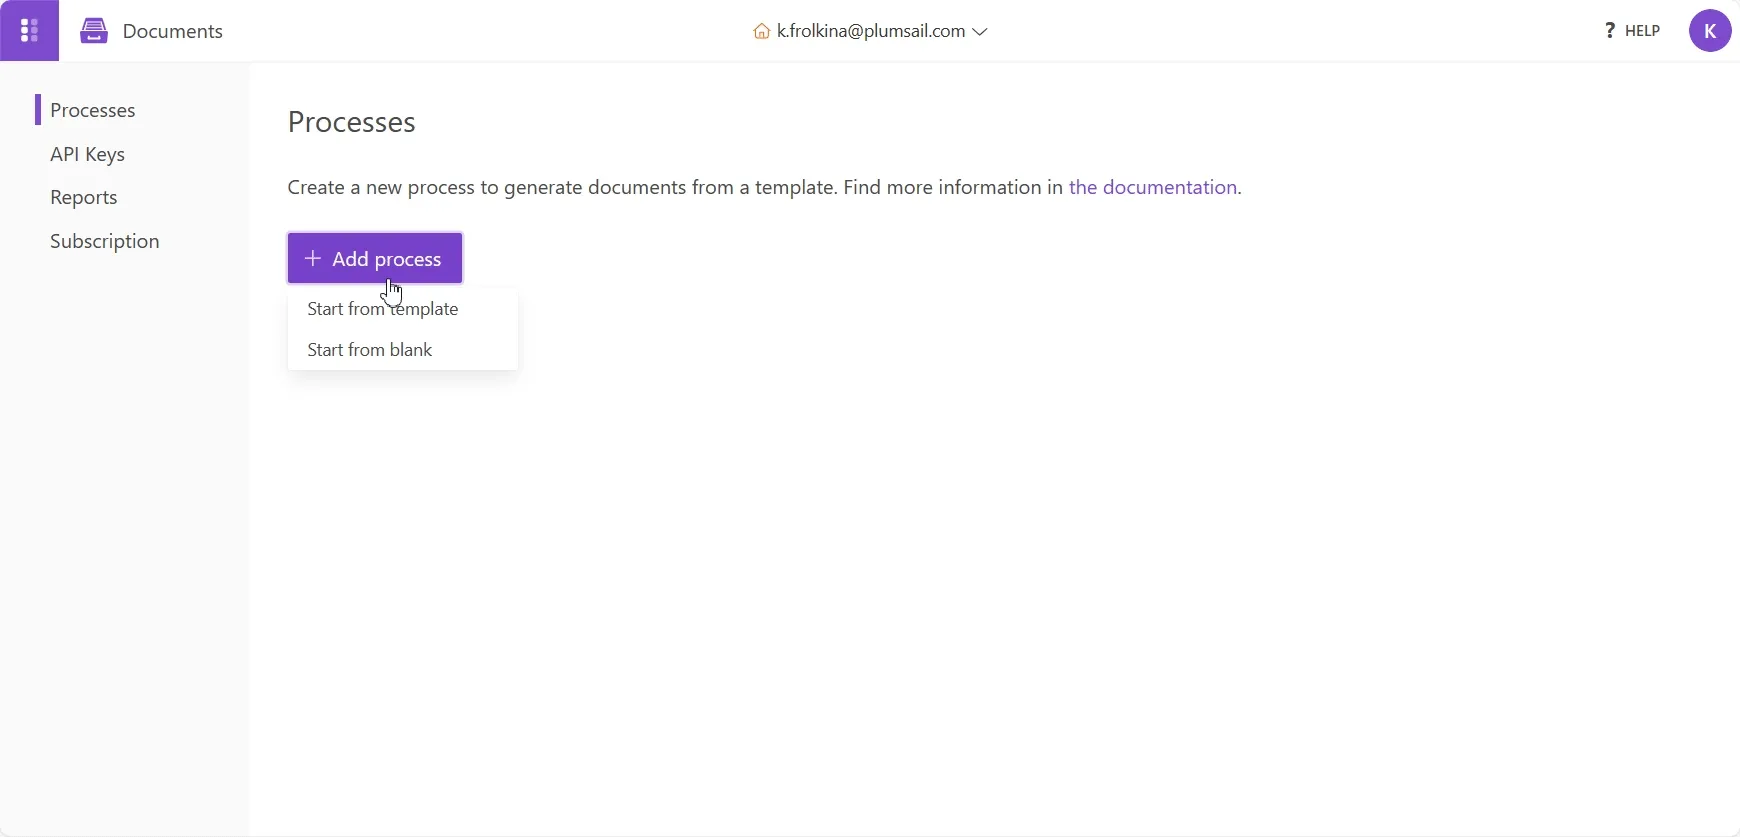
The first step is to register or log in to your Plumsail account. Once logged in, navigate to the Processes page. Here, you can choose from a variety of templates available in our extensive library, as well as upload your own template, or create one from scratch.
For this example, we'll utilize a pre-made Purchase Order template and dynamically populate it with data from the SharePoint list, then use a Power Automate flow to export this date to PDF.
Follow the instructions below to create the process:
As mentioned above, you have the flexibility to create and use your own templates. Simply add tokens, also known as placeholders, enclosed in double curly brackets, to your existing document template or build one from scratch. Each token enclosed in double curly brackets will dynamically be replaced by SharePoint list data. The Plumsail Documents templating engine supports a variety of features, including:
To customize a template from scratch or upload your own, select Start from blank in the Add process menu. In our case, the template is in Excel format, but you can choose Word, PowerPoint, fillable PDF, and other formats.
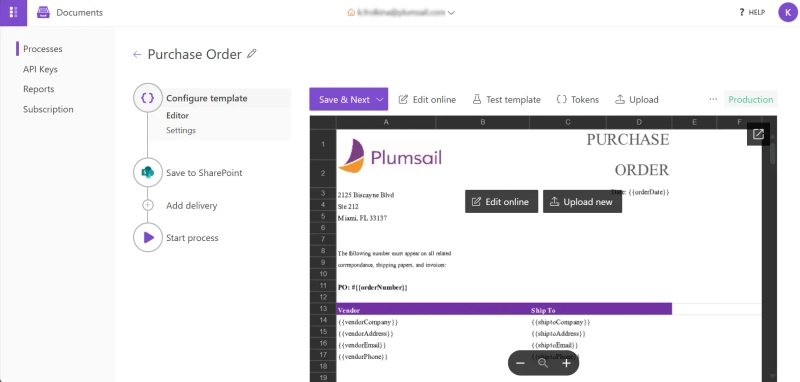
After clicking Next, you will be directed to the process Editor. In this editor, you have the flexibility to edit the template as you see fit, test it, download it, upload a different one and adjust the tokens. We have already pre-filled the template with our company data:
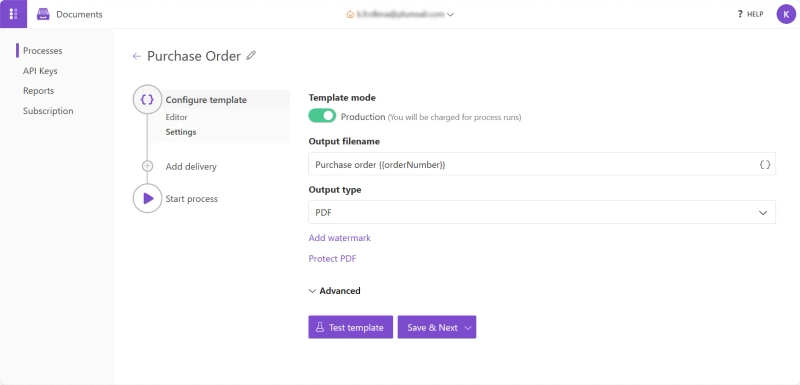
After finishing the customization of the template, click Save & Next. In the process Settings menu, switch the template mode to Active to remove Plumsail watermarks from resulting documents. If you are still in the process of figuring it out, you can keep the Testing mode.
Next, specify the Output filename. We'll include the Order Number token, and it will be filled in automatically. Add as many tokens as needed to customize the filename.
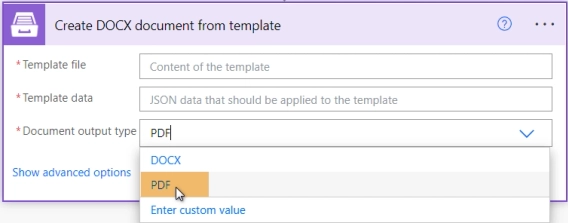
Afterwards, choose PDF as the Output type. You can also keep the file in the original Excel format.
You can add a watermark to your PDF file and, if needed, protect it with a password, especially if it includes sensitive information. More advanced settings are available.
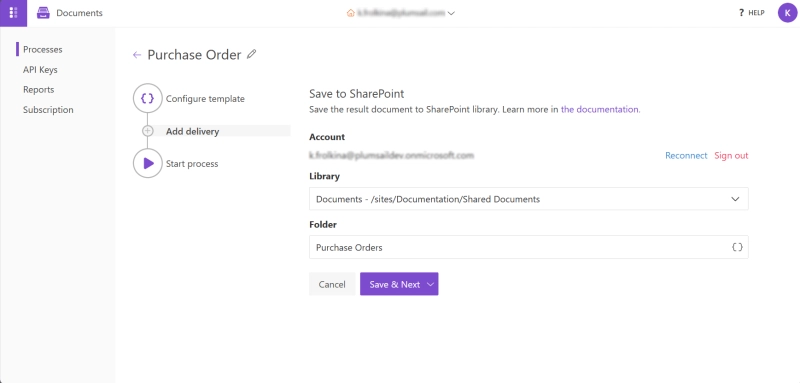
Click Save & Next to proceed to setting up Delivery. We will utilize SharePoint delivery to store all output documents in the designated SharePoint document library. However, you have the flexibility to choose a different or additional delivery method. For instance, the generated Purchase Order PDF can be automatically emailed to both the customer and your purchasing department.
In this step, paste your SharePoint site address and click Connect. If this is your first time, you will need to add your login and password. Next, choose the Library you want to store the generated PDF files in, and create the Folder name. Feel free to customize it using tokens from your file to add personalization.
Excellent! Click Save & Next to save the delivery settings. Our process configuration is now complete.
We can create a Power Automate flow and select different triggers to export SharePoint list items to PDF automatically or manually, one by one or in bulk. It all depends on our needs. An example of a Power Automate flow which is triggered manually, and which will export all items in SharePoint list to PDF and bulk create documents:
There are many ways to trigger the flow, but in our case, we will create a manual flow to efficiently convert all SharePoint list items to purchase order PDF files at once. Navigate to Power Automate, and follow these steps:
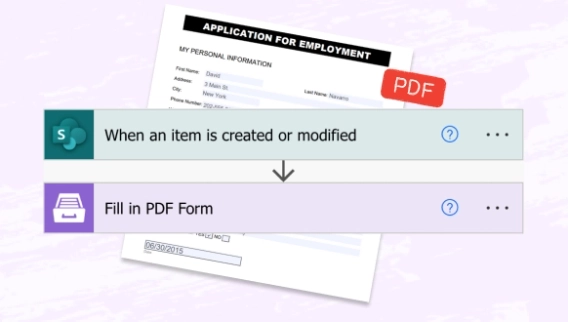
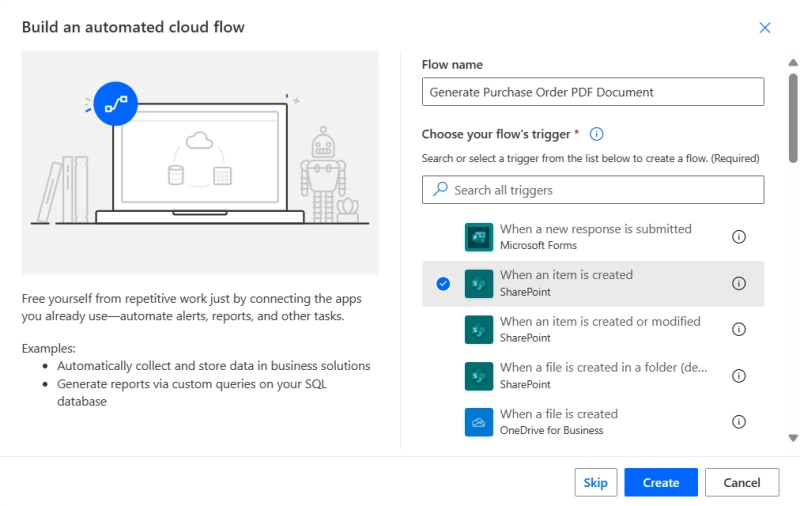
Alternatively, as mentioned above, you can choose any other Power Automate trigger or create an automated cloud flow. For instance, if you want a Purchase Order to be generated automatically when a SharePoint list item is created, you can select the When an item is created trigger from SharePoint.
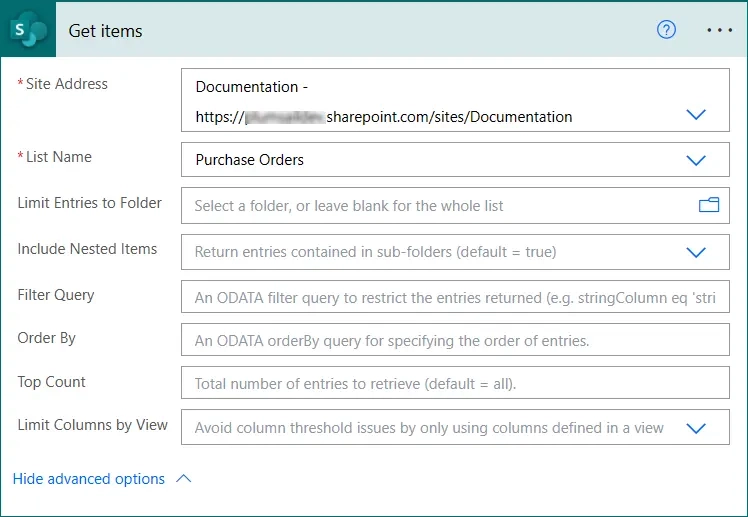
Next, find a Get items action to retrieve all items from our SharePoint list. Add the SharePoint site we worked with earlier and select the specific list. Additionally, you have the option to explore advanced settings, such as a Filter Query for more specific data retrieval:
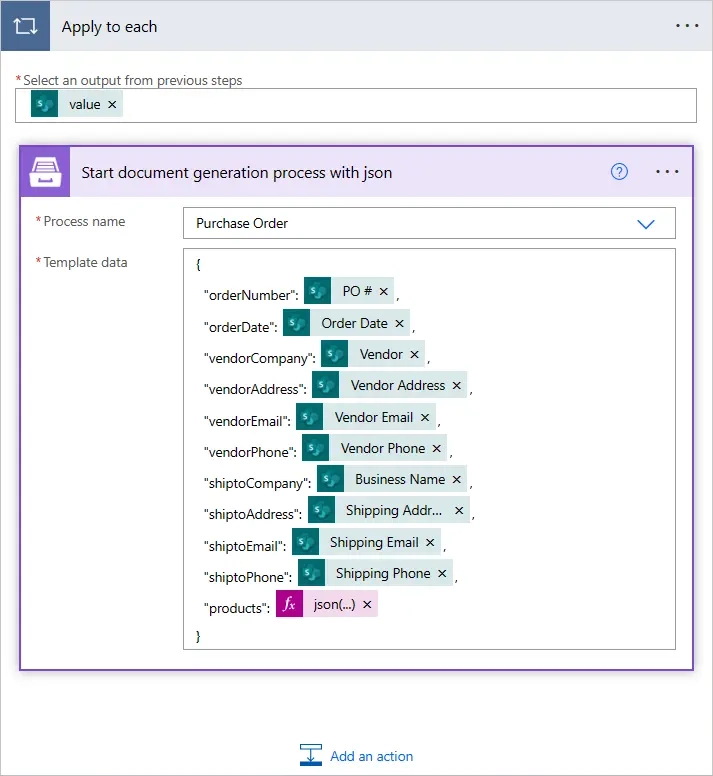
Next action in Power Automate is Start document generation process with JSON action from the Plumsail Documents actions. It will run the process we created and populate the template with SharePoint list item data.
If this is your first time connecting Plumsail Documents in Power Automate, you will need to establish the connection by creating an API Key in your Plumsail account. The process is straightforward.
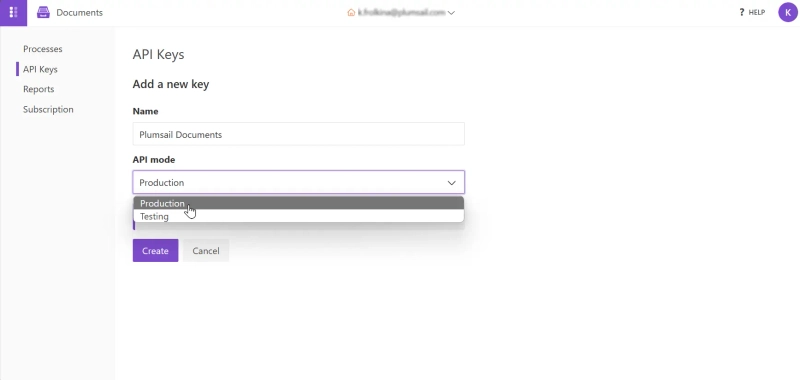
Go back to your Plumsail Documents account and click on API Key and then Add Key. Create a Name for the key and select either Production or Testing mode.
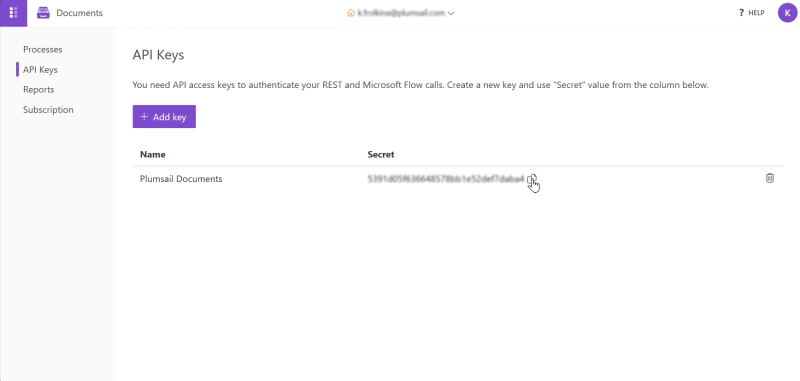
Click Create and the Secret key combination will be autogenerated. Click Copy and return to the Power Automate flow.
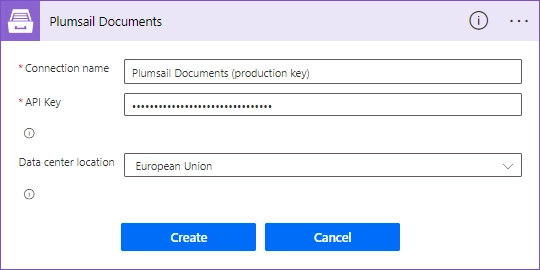
In your Power Automate flow paste the connection name and the key. Ensure that the selected data center location matches one of your accounts. Finally, click Create. You're all set!
In the Process name field, choose the created process, and in the Template data field, enter the data in JSON format. This will connect SharePoint list fields with tokens in the PDF document template.
If your SharePoint list contains an array of data, you will need to convert the data from string to array using an expression in Power Automate. For example, our list has a Products column that contains a collection of ordered products and details about them.
We used the following expression to convert string into JSON:
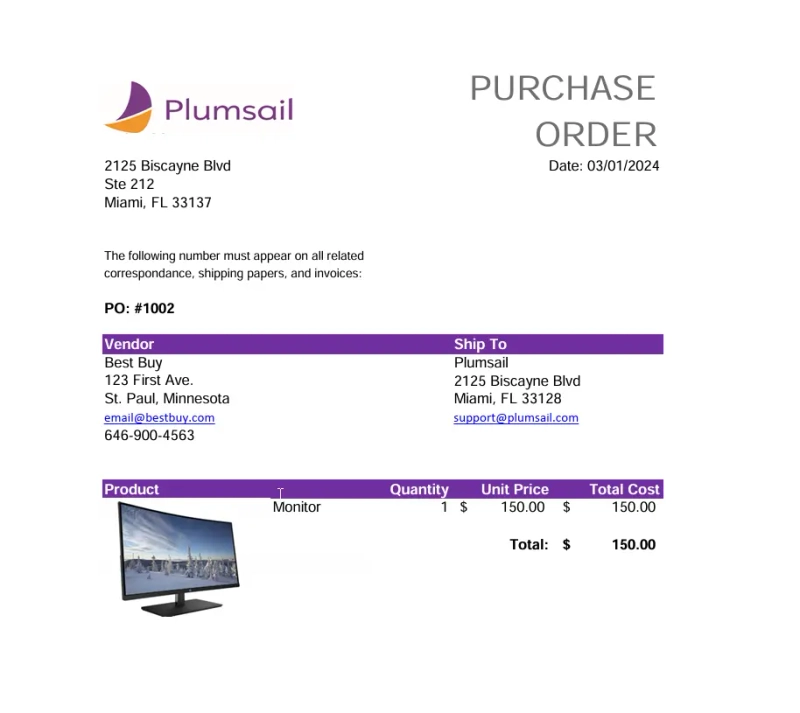
json(items('Apply_to_each')?['Products'])Everything looks good and we can save and run this flow! 🎉 See how the resulting file looks like:
Additionally, we invite you to watch the step-by-step video tutorial available on our YouTube channel. This video not only guides you through the process of converting SharePoint list items to PDF using Plumsail Documents and Power Automate flow but also demonstrates the use of the Plumsail Forms for SharePoint tool and highlights how to incorporate the DataTable control, enabling you to add dynamic tables to your SharePoint forms.
The Plumsail Documents templating engine offers a range of features, including dynamic tables, pictures, and conditional logic. For instance, if you have an image attachment in the SharePoint list you can easily display it in the final document by adding a picture formatter in the template and connecting data in Power Automate. You just need to format tokens according to the Templates syntax so the templating engine can process it correctly.
As you can see the SharePoint list below has a Product Picture field, and the created PDF document also includes the corresponding product image.
In this article we explained how to export SharePoint list items to PDF using Power Automate and it should give you a better understanding of how the process works. This kind of automation can come in handy, and it often saves resources, especially if you use it frequently. If you have any questions, feel free to drop a line in our community.
Sign up for a one-month free trial if you're new to Plumsail Documents.
Plumsail Documents "Create document from template" actions got a new parameter for PDF conversion.
The approach allows you to automatically fill PDF forms with data from third-party systems, sign the results, and send them by e-mail and across any system using the Adobe PDF Services alternative.
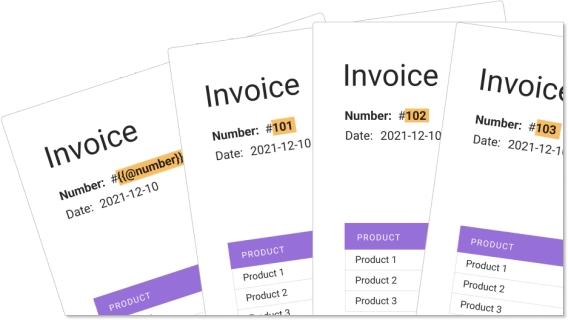
Use an automatic numbering token {{@number}} for documents with sequential numeric identifiers. Handy for invoices and quotes.