How to dynamically create PDF file with multiple images in Power Automate
Learn how to automatically generate PDF documents with dynamic images using Power Automate and Plumsail Documents.
In this article, we'll look at how to use the Microsoft Word Online (Business) connector to populate Word DOCX templates. We'll also discuss its limitations, such as the all-too-familiar "Input size too large" issue, and ways to get around them.
To illustrate, we'll be populating a DOCX inspection report template, but this approach works for all kinds of Word documents.
Further in the article:
We will demonstrate the approach on an inspection report template and retrieve data from SharePoint list. You can download the inspection report template here. In the following section, we’ll outline the steps to configure the template for automatic population via the Word Online (Business) connector, along with some tips to help you simplify the process.
In our template, we've added placeholders for the report number and created tables for key inspection details, like property type, inspector's name, and inspection dates. We also added a couple of sections with inspection details, which include a picture, recommendations, and results.
To add a placeholder, type a name for your placeholder, select it with your mouse, and place it in the Plain Text Content Control found under the 'Developer' tab.
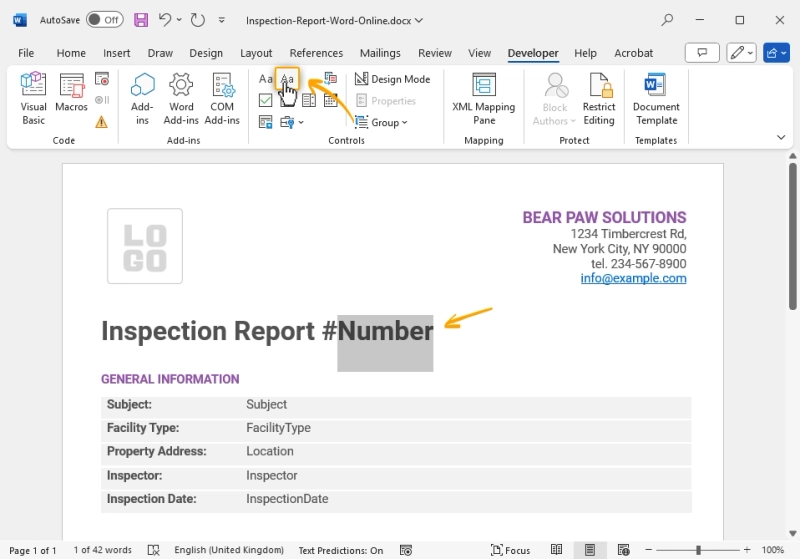
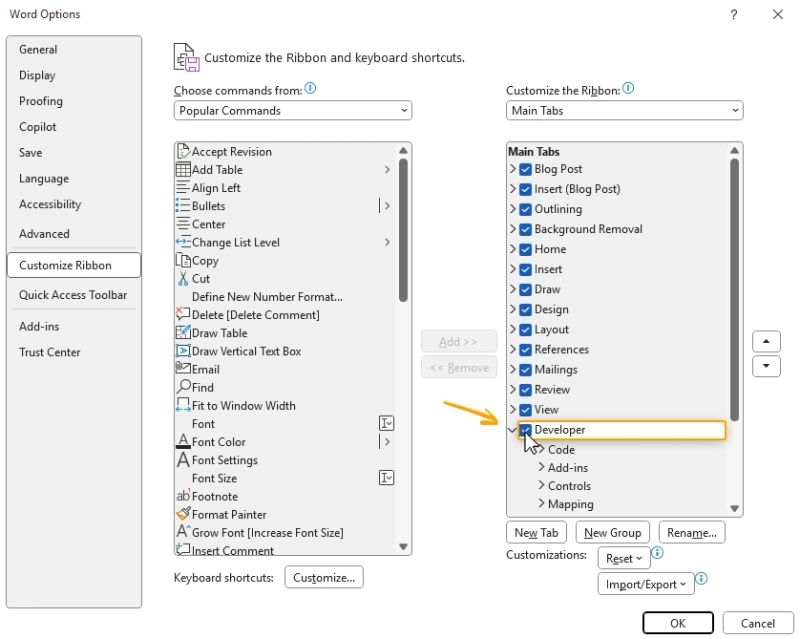
If you can't see this tab, enable it by going to the File menu, then click Options → Customize Ribbon. Check the 'Developer' box under Main Tabs.
Note: The Developer tab is only available in the desktop version of Microsoft Word, and is not available in Microsoft Word Online. We will discuss alternatives in the next section on the limitations of the Word Online (Business) connector.
Once set up, these placeholders will be replaced with the data from our SharePoint list when we start the document generation process in Power Automate.
For picture placeholders, simply add Picture Content Control from the Developer tab. Select your placeholder, and under the 'Developer' tab, go to 'Properties' to give it a title—ours is 'InspectionImage.'
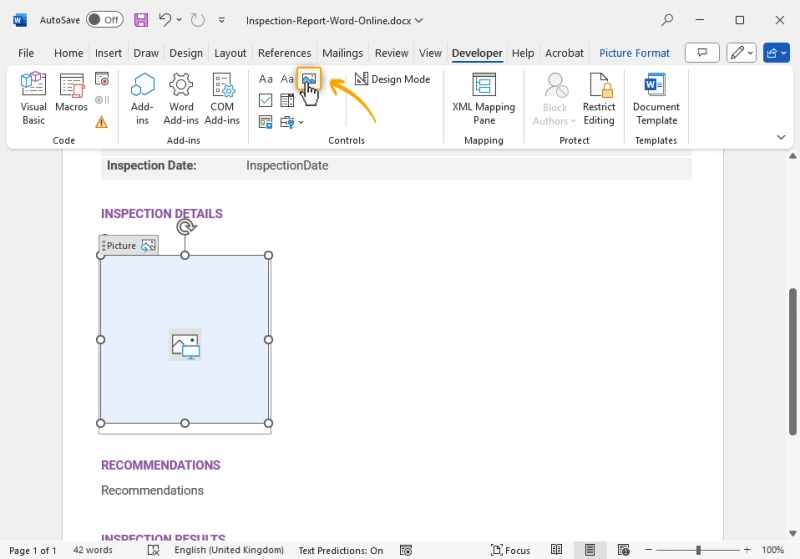
Tip: Ensure the placeholder is sized to fit the images you plan to insert, as the Word Online (Business) connector does not auto-resize images to fit the placeholder box.
Now that you have your template ready, it's time to automate the process using Power Automate. Here’s a snapshot of what the final version would look like:
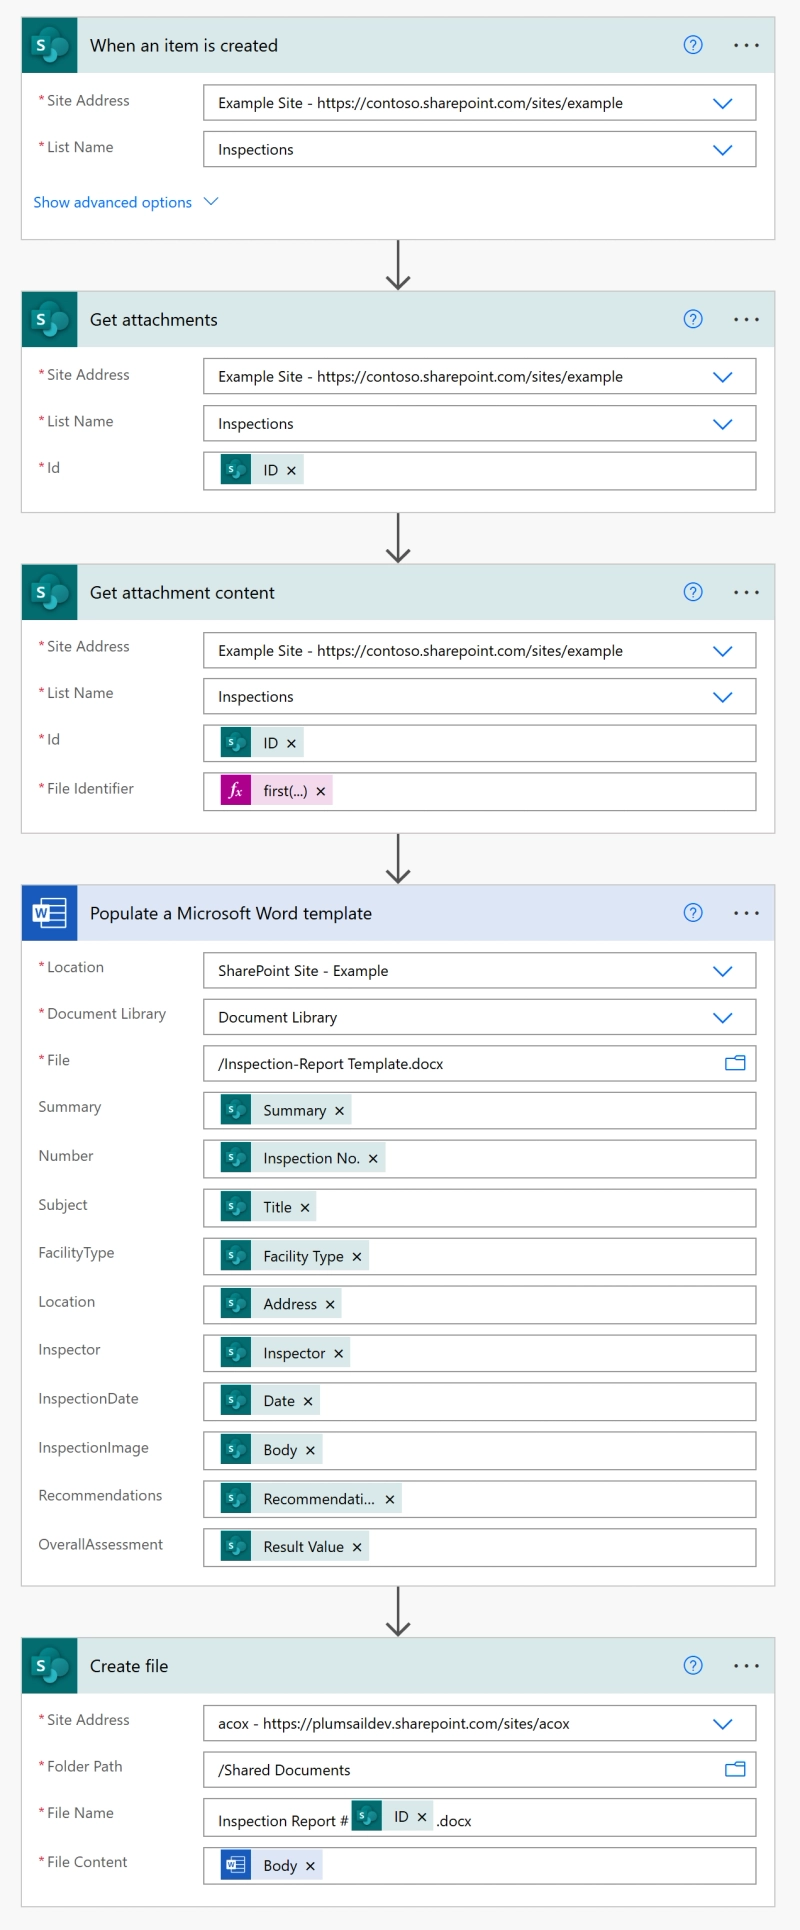
We'll pull data for our template from a SharePoint list. Here's what our list looks like:

Head over to Power Automate and click on the 'My flows' tab. From there, select 'Automated cloud flow'. Select the When an item is created trigger. This means whenever a new item is added to your SharePoint list, a report will be generated automatically.

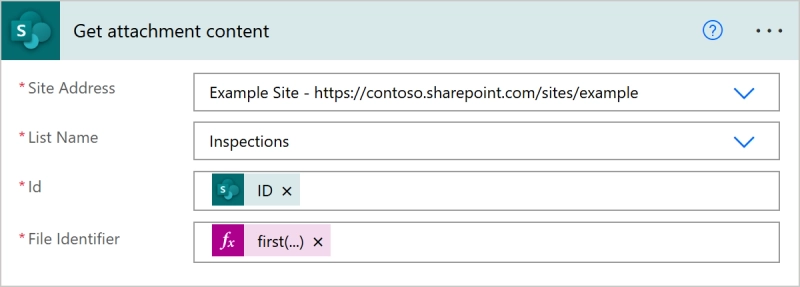
Next, we'll add an action to retrieve images. Use the Get attachments action, and then add the Get attachment content action to access the images. In the file identifier field, enter the following expression:
first(body('Get_attachments'))?['Id']
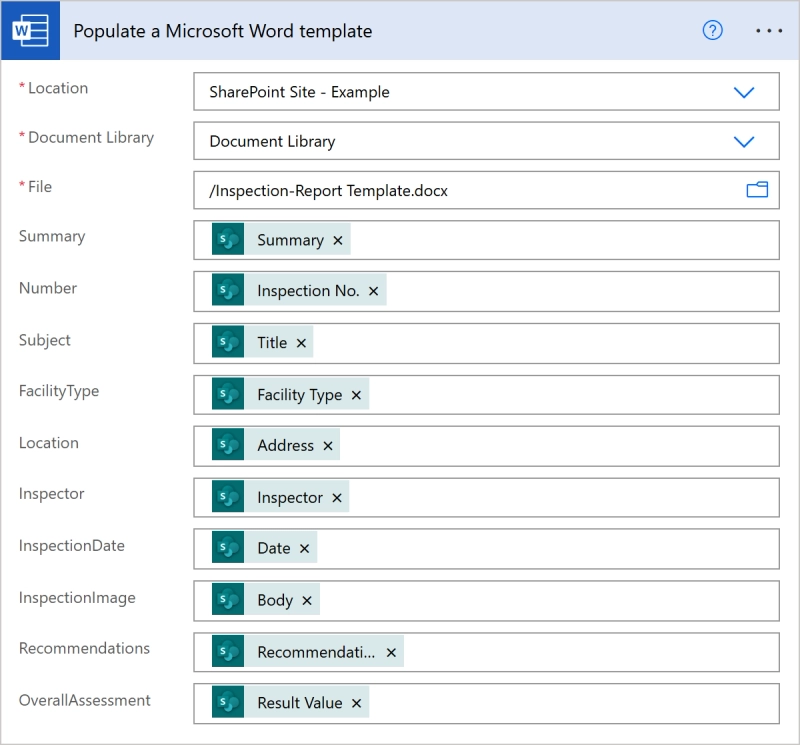
To fill in our Microsoft Word template with data from the trigger, we’ll use the Populate a Microsoft Word template action from the Word Online (Business) connector. Select your template in the 'File' field and use the attachment content for your image.
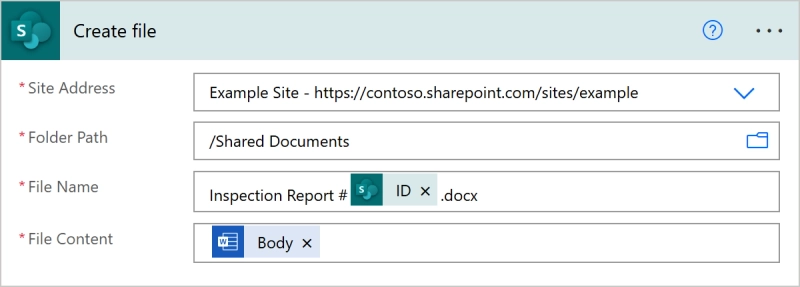
Add a Create file action to save the created document to our SharePoint library. In the 'File content' field, use the output from the previous step.
All set! Let's create a new item in our SharePoint list to start the flow and see how the output document looks.
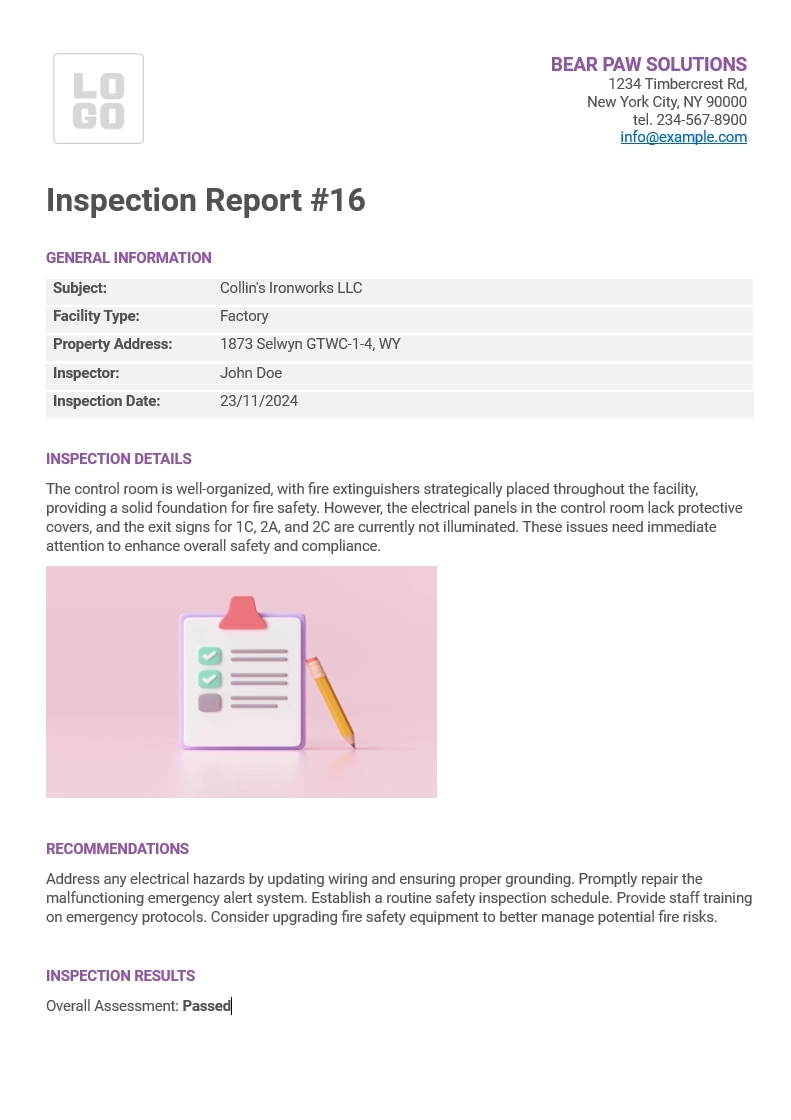
Looks good! However, you might notice that the rich text styles in the Summary and Recommendations sections didn't carry over—this is a limitation of the Word Online (Business) connector. We'll go over these limitations, explore some workarounds, and dive into more advanced options in the upcoming sections.
Some known limitations of the Populate a Microsoft Word template action from Word Online (Business) connector:
While programming can help work some of these limitations around, it requires technical skills and can be a quite time-consuming endeavor. If you're looking to generate more advanced documents or want a more user-friendly tool, consider trying the Plumsail Documents connector. This option addresses all the limitations of the Word Online (Business) connector and offers extra features like integrated deliveries, watermarks, automatic DOCX to PDF conversion, and the ability to work with larger file sizes, addressing the "Input size too large" issue.
In the next section, we'll walk you through how to set up the same scenario using Plumsail Documents, plus cover some additional features. At the end, we'll compare the results so you can see the difference for yourself.
Let's start with setting up the template. First, we'll create a process in Plumsail Documents and upload our template there. Processes are an easy way to automate the creation of documents from templates. You just configure template, test it and specify how to deliver results (email, OneDrive, etc.).
To create a process, go to the 'Processes' tab in your Plumsail account and click 'Add process → Start from blank'. Give your process a name and select DOCX as the template type.
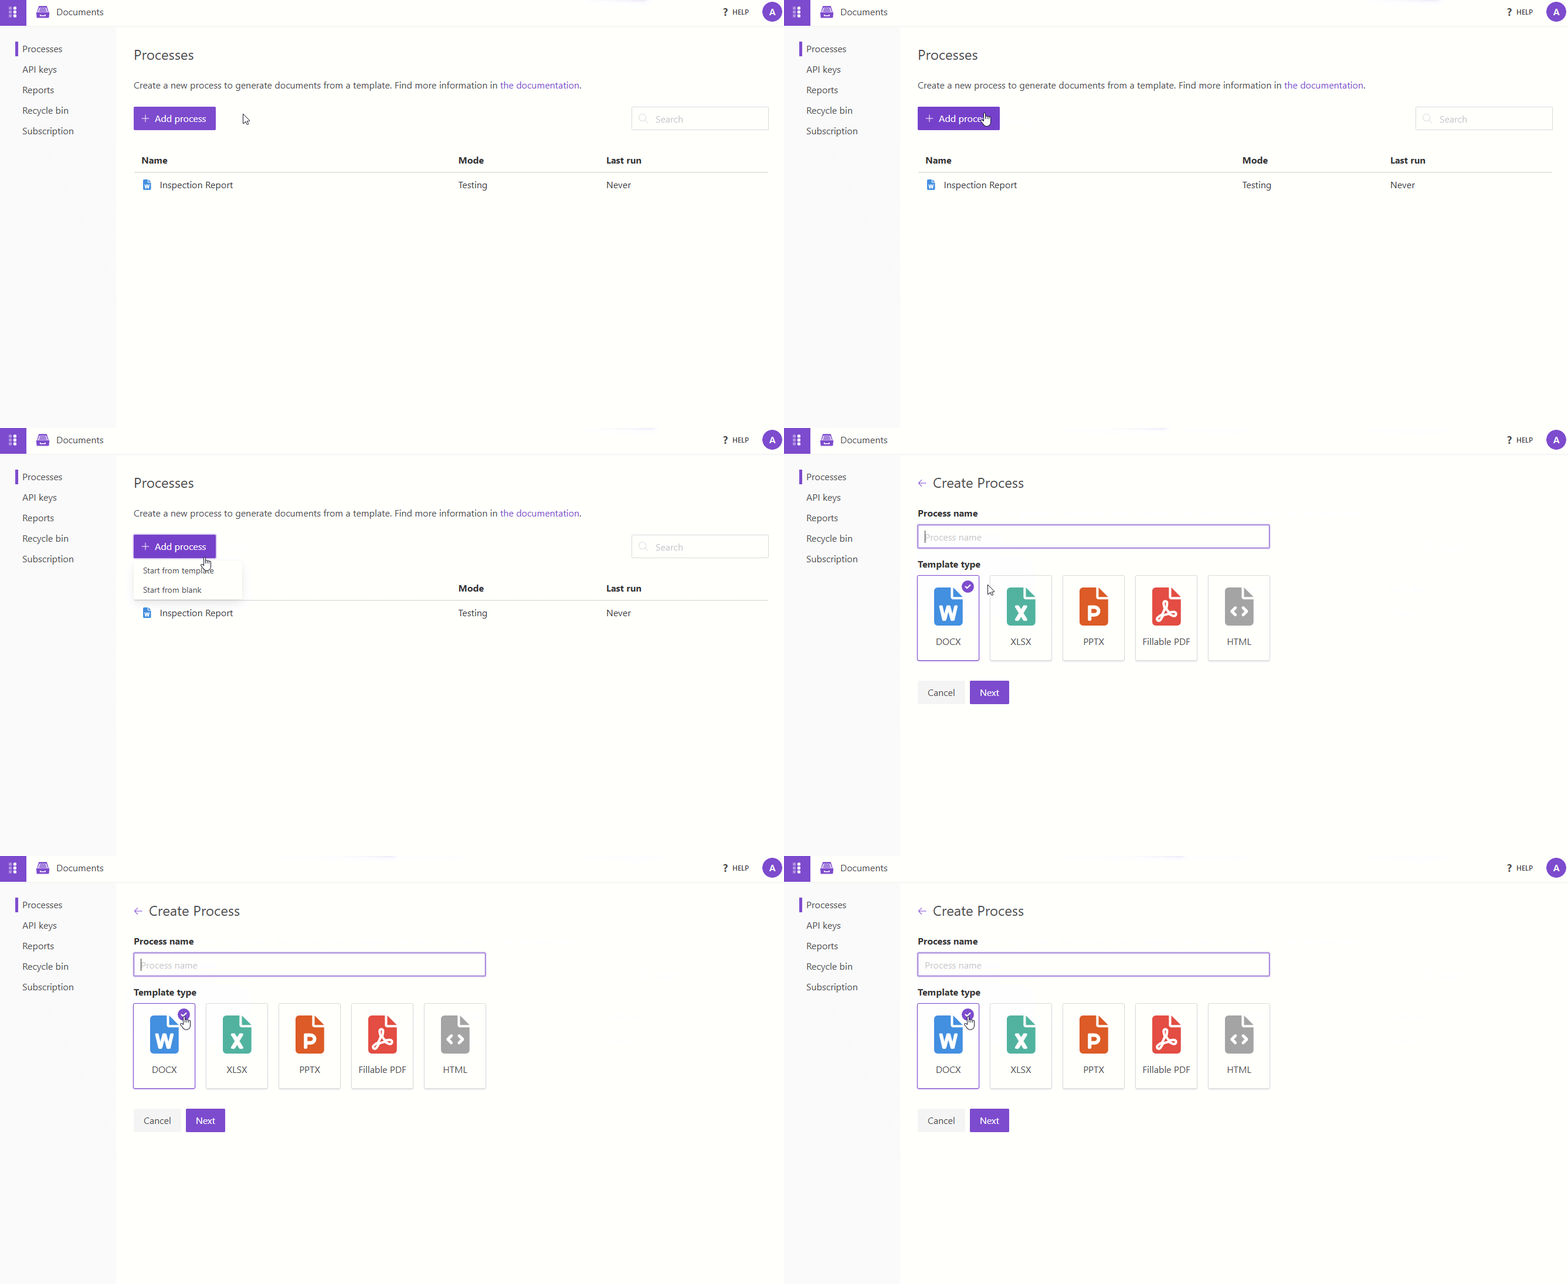
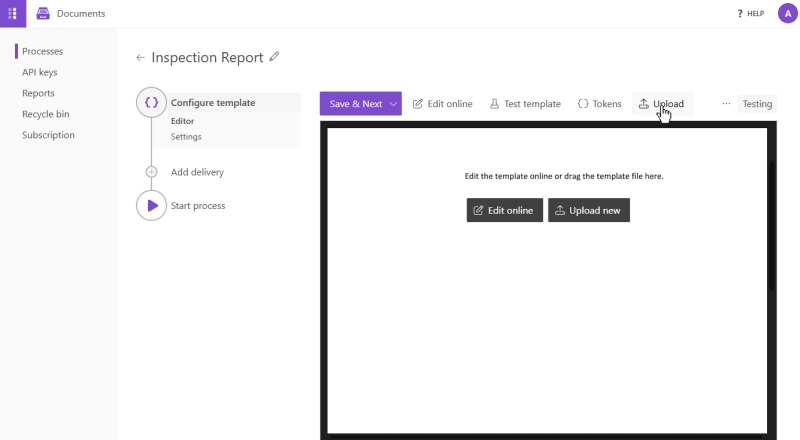
Once the process is created, use the 'Upload' button to upload your template.
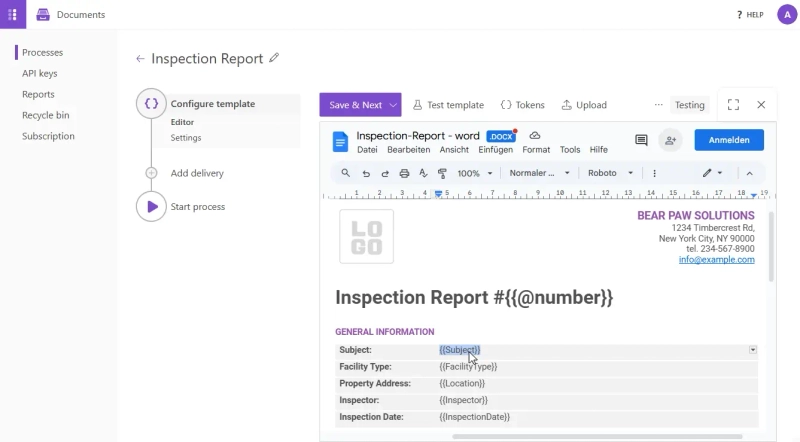
Once uploaded, we can edit our template using the built-in editor by clicking 'Edit online'. Instead of plain content controls, we'll use curly brackets for placeholders, which is simpler, especially if you're using Word Online or Mac OS since this doesn't require access to the Developer tab in Word.
Pictures are just as easy: you can add them using the picture formatter, specifying the desired size and parameters in brackets so that the image keeps its proportions and is not stretched:
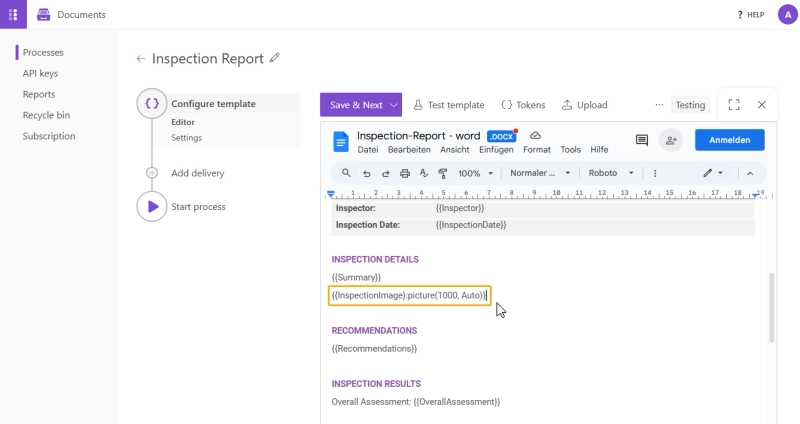
Find more details about the picture formatter here.
For placeholders expecting rich text or HTML data, we will use the html formatter.
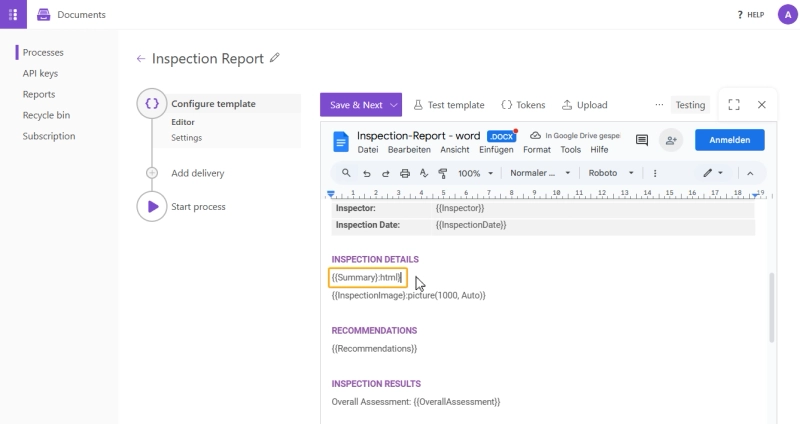
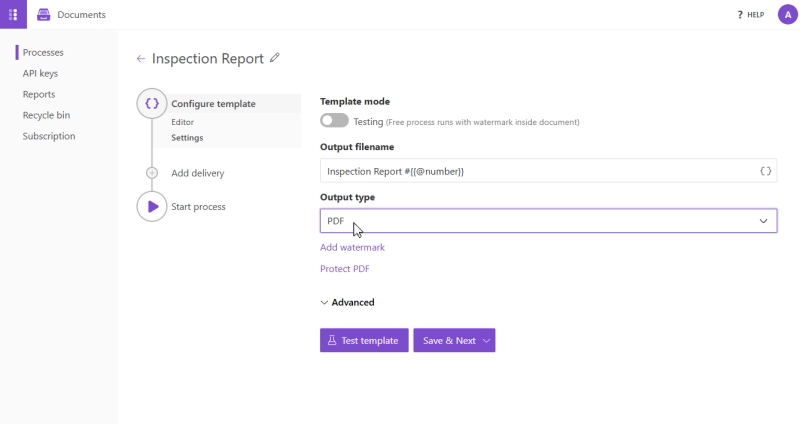
Our template is ready. You can download it here. Click 'Save & Next' to set the output document settings. Here, you can change the output file format (we'll use PDF) and define a dynamic name for the file, like Inspection Report #{{@number}}.
Now, we can add a delivery to save the output file. Let's save it to a SharePoint library as well. For this, let's select the SharePoint delivery and customize it:
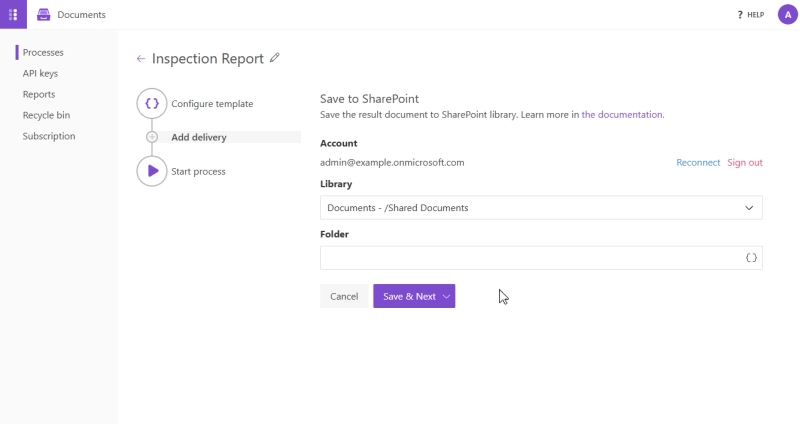
You can add as many deliveries as you like.
Before we move on to setting up our Power Automate flow, we'll need to create an API key to connect our Plumsail account to Power Automate. Simply navigate to the 'API keys' tab in the left menu and click '+ Add key.' Enter a name for your key and select a mode. For more details about API keys, click here.
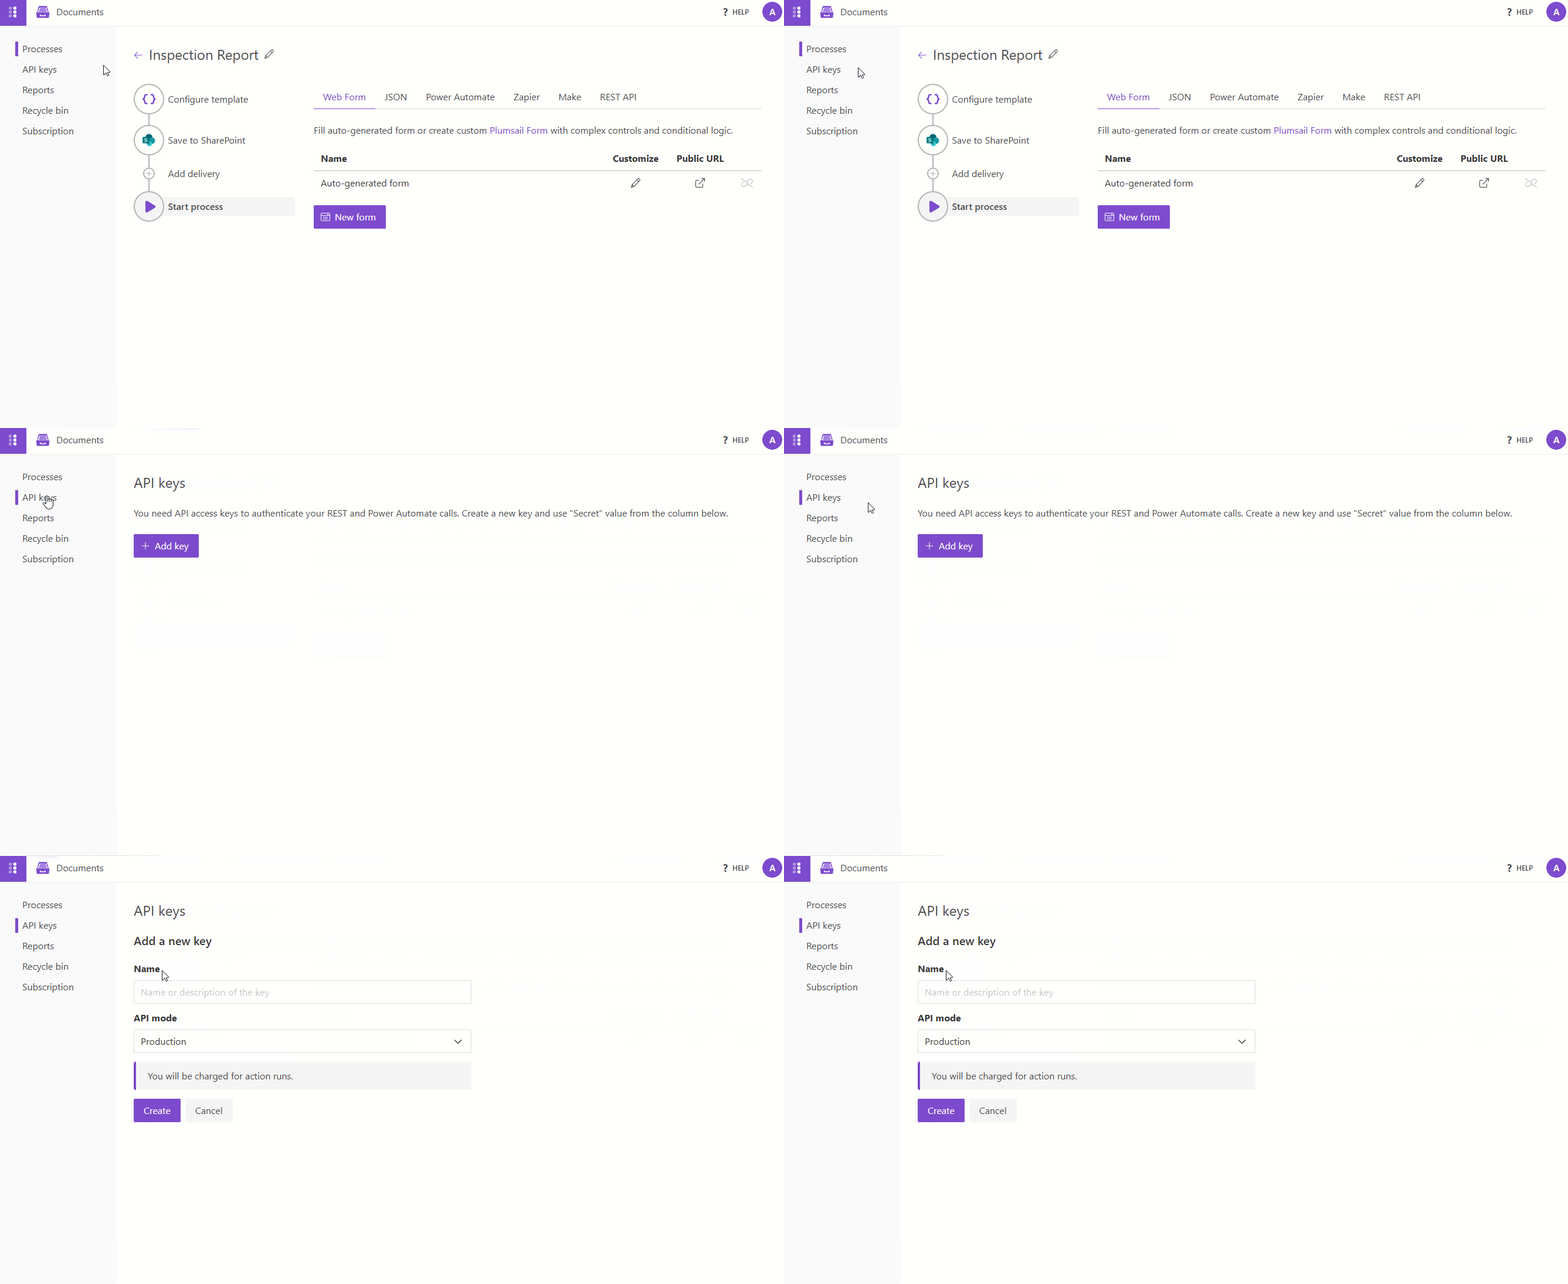
Once you have the key, you can add it to your Power Automate flow by selecting Plumsail Documents as a connector and entering the key in the required field.
We can now automate the created process with Power Automate. It's similar to the previous steps, but instead of using the 'Populate a Microsoft Word template' action, we'll use the Start document generation process action from the Plumsail Documents connector.
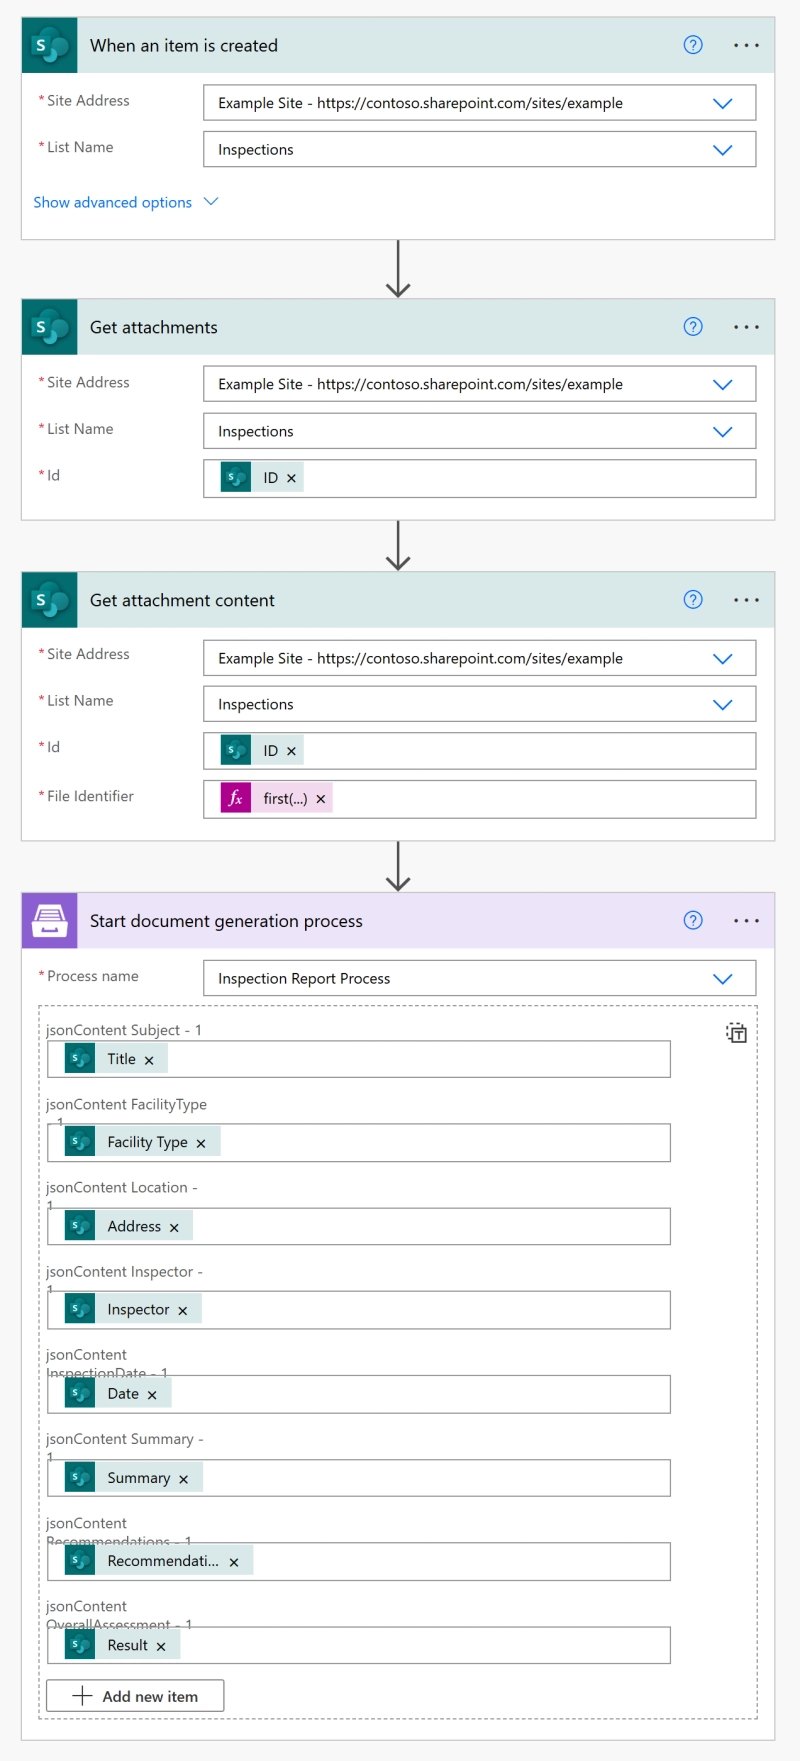
In the 'Get attachment content' action, use the following expression:
first(body('Get_attachments'))?['Id']
Let's break down the 'Start document generation process' action. Select the process you created in the 'Process name' field, and fill in the other fields with data from the trigger and the 'Get attachment content' action. The setup is pretty similar to the 'Populate a Microsoft Word template' action from Word Online (Business) connector.
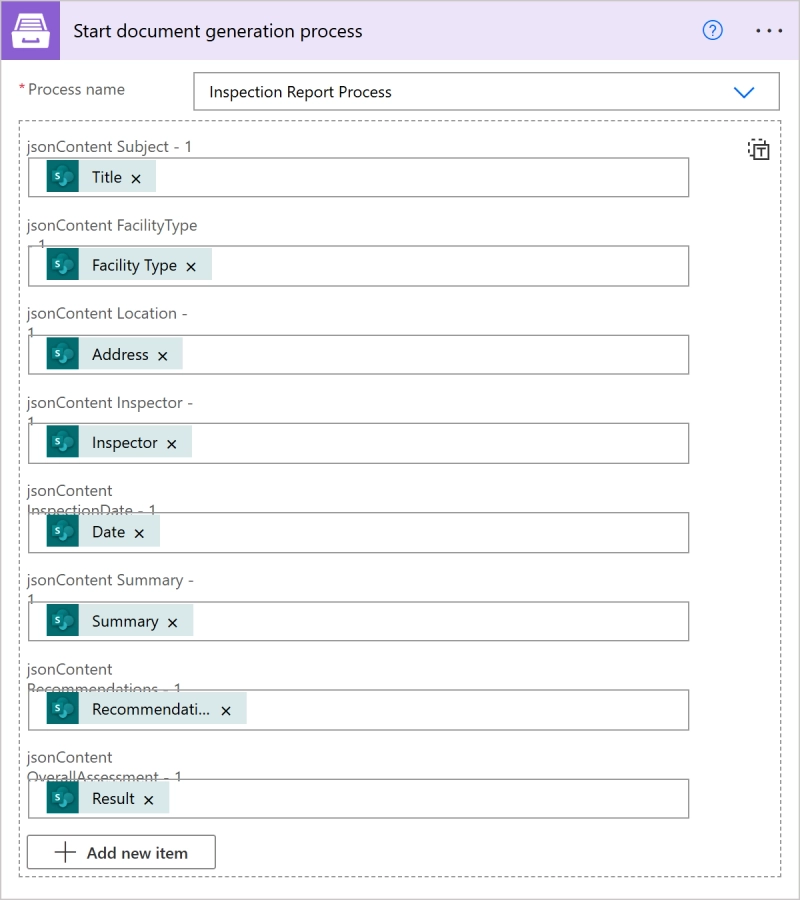
Since we've already configured the delivery in the process, you can skip the 'Create file' action that was needed with the Word Online (Business) connector.
We're all set! Let's run our flow and see how the resulting document looks.
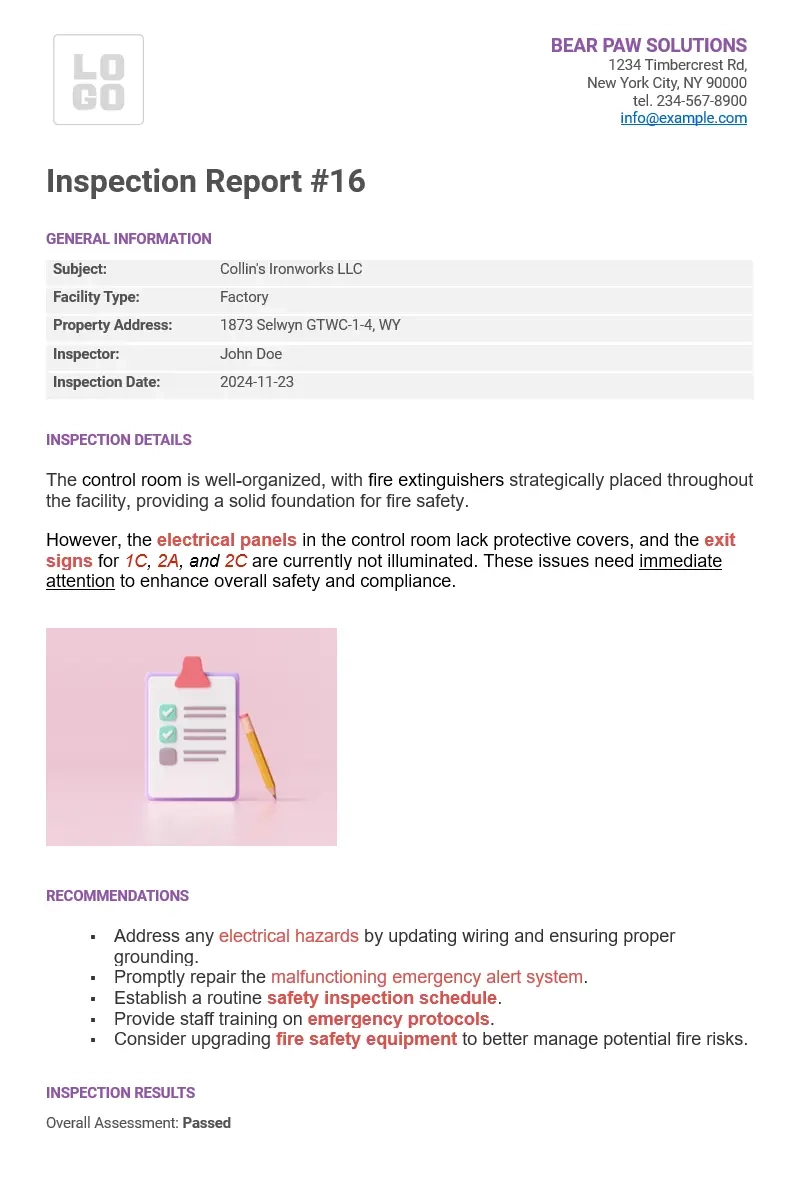
Comparison of output documents from Plumsail Documents and the Word Online (Business) connector:
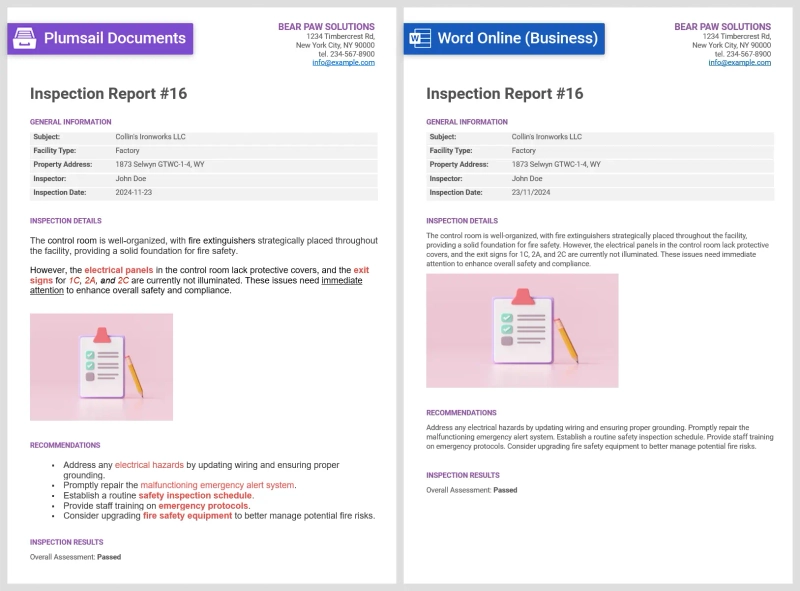
Word Online (Business) connector is useful for creating simple, custom templates like certificates and reports. However, it has limitations, such as the file size limit, no support for rich text content, and others.
In this tutorial, we've explored how to use Microsoft Word Online (Business) effectively and have addressed common questions. If you find these limitations restrictive, consider using a more robust solution like Plumsail Documents. You can start your free 30-day trial with Plumsail, and if you have any questions, feel free to book a call with our team.