Microsoft Copilot in SharePoint can automatically analyze files uploaded to a document library, extract key information, classify documents, and generate summaries. It can also help organize files and compare documents.
With the recent rollout of Copilot in SharePoint, there's a lot more you can do with documents stored in SharePoint libraries. Autofill columns can automatically extract key information, classify documents, and generate summaries. Copilot can also help organize files and compare documents.
This is particularly useful for procurement, legal, HR, and sales teams. For example, instead of managing supplier quotations across multiple email threads, procurement teams can collect proposals in one place. Then use Copilot to extract important details, compare offers, and identify the most suitable suppliers without manually reviewing every document in full.
Create a public form to collect files from external users
To collect files from people outside your Microsoft 365 tenant, you can, of course, use the built-in SharePoint or OneDrive Request files feature—or stick to the old-fashioned approach of playing email ping-pong with attachments.
But there's a more convenient way. With Plumsail Forms, you can collect supplier details alongside quotation files and save everything directly to a SharePoint document library. You can share the form link with potential suppliers or embed it on your website.
Here's how to set up a public form connected to SharePoint:
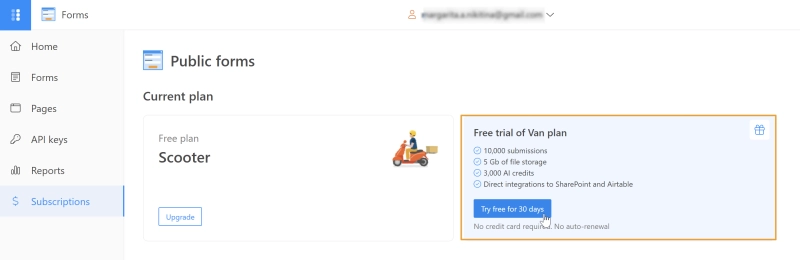
Activate a 30-day trial of the Van plan on the Subscriptions page. The trial gives you access to SharePoint integration, 10,000 monthly submissions, and AI credits for designing forms.
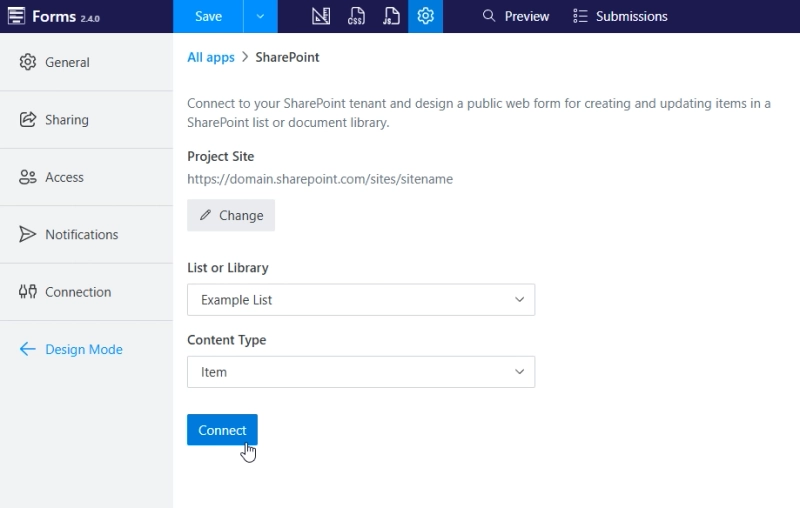
Open the web form designer, go to Settings → Connection, connect to your SharePoint tenant, and select the document library where you want to save uploaded files:
Add fields to your form. Once connected, you'll see the available SharePoint fields. Drag the fields you need onto the form, along with the required File field for uploading documents. Plumsail Forms saves the submitted values as document properties in SharePoint.
Save and share your form. You can share it via a direct link, embed it on your website, or generate a QR code.
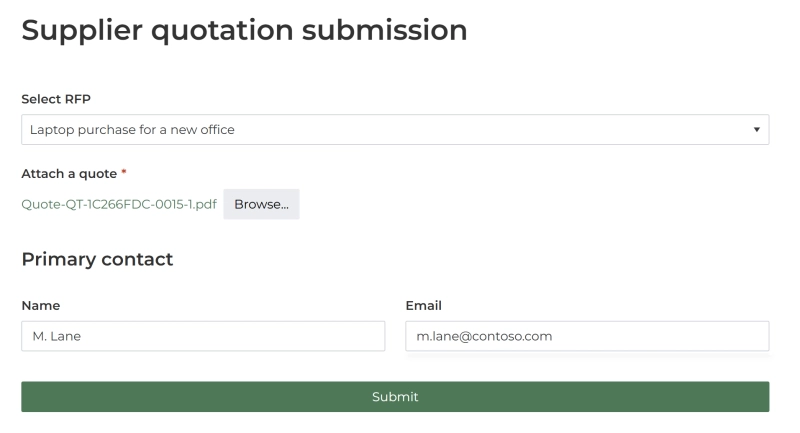
Here's the form I've designed for this tutorial.
It collects just a few details, including the request for proposal (RFP) the supplier is responding to and their contact email. There's no need to ask suppliers to fill in pricing, delivery times, warranty conditions, and other proposal details separately. Copilot will extract that information from the uploaded official quotation documents later.
Using Plumsail Forms connected to SharePoint gives us a central location for every quotation. The suppliers can submit their documents without receiving access to the SharePoint site, and the procurement team can work with all the files in one place.
Analyze files uploaded by external users with Copilot Autofill columns
Autofill columns is an AI-powered SharePoint feature that analyzes documents and automatically populates library columns with information from their contents. You define what information to look for using natural-language prompts, and Copilot processes newly uploaded files once they are added to the library.
You can use Autofill columns to:
Extract information: Find specific values such as invoice amounts, contract expiration dates, customer names, or delivery terms.
Classify documents: Identify whether a file is a quotation, contract, invoice, or another document type.
Generate summaries: Create short descriptions of documents, highlighting key details.
Analyze content: Evaluate documents against specified criteria, such as contract risks, missing information, or compliance with requirements.
The results are stored in regular SharePoint columns, so you can filter, sort, and group documents or use the extracted information in other workflows.
How to set up Autofill columns to extract information from documents with Copilot
To use Autofill columns through Copilot in SharePoint, you need an active Microsoft 365 Copilot license. Copilot suggests useful columns based on documents already stored in your library and creates them for you. You only need to confirm the suggestions and check the results.
To use Copilot to create Autofill columns, follow these steps:
Add sample files to your SharePoint document library. This step is optional, but recommended. Copilot can analyze up to 20 existing files and suggest relevant columns based on their contents.
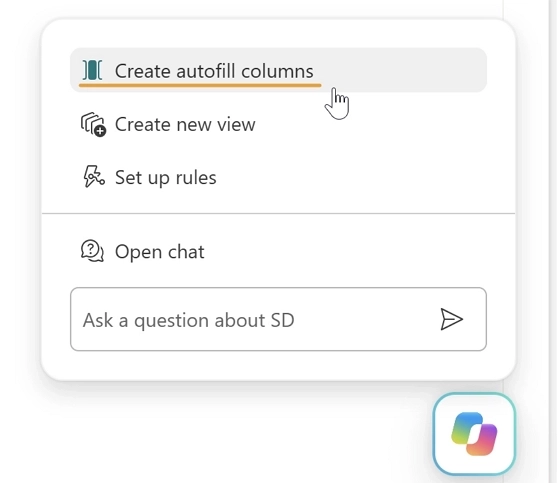
Open Copilot in SharePoint. In your document library, click the Copilot icon in the lower-right corner and select Create autofill columns.
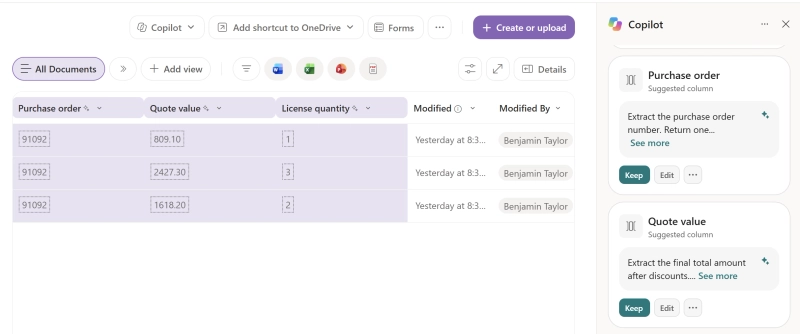
Review columns. Accept Copilot's suggestions, modify them, or ask it to create your own columns using natural language. You can define custom extraction instructions and test them against up to 10 files.
Save and apply changes. Click Save changes → Apply changes. Copilot automatically processes up to 20 existing files and fills the new columns with extracted metadata. Once configured, Autofill automatically processes newly uploaded files and populates the corresponding columns. This works even if the person uploading a document doesn't have a Copilot license.
Apply Autofill columns to existing files. If you have more than 20 files in your library, you can select them and click Apply autofill columns to process them manually.
If you need faster, near-real-time metadata extraction and greater processing capacity, you can enable Advanced Autofill, which uses Copilot Credits through usage-based billing. With standard Autofill, new documents are automatically processed, but metadata might not appear immediately. With Advanced Autofill enabled, documents enter a faster processing queue, so the extracted metadata becomes available sooner.
For my scenario, to extract supplier quotation details, I kept Copilot’s suggested columns and added two more. This gave me the following Autofill columns:
Total Price
Delivery Time
Warranty
Payment Terms
AI Summary
For the AI Summary column, I used the following prompt to generate a short summary of the quotation document:
Summarize this supplier quotation in no more than 100 words. Include the products offered, total price, delivery schedule, warranty, and payment terms. Mention any important limitations or conditions. Use only information found in the document.
The summary is generated and saved in the SharePoint column when a new file is processed:
Compare multiple files with Copilot in SharePoint
Copilot in SharePoint can compare documents, identify important differences, and present the results in a structured format. Depending on how detailed and repeatable you need the comparison to be, there are three approaches.
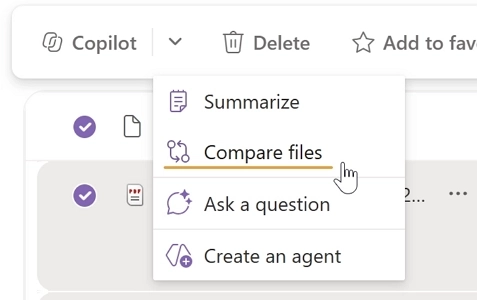
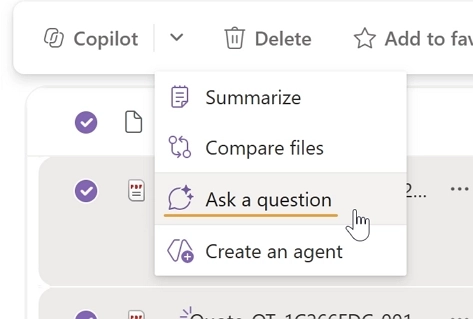
For a quick comparison, select up to five files in a SharePoint document library and click Copilot → Compare files.
Copilot opens a chat with a predefined prompt that identifies meaningful similarities, differences, and potential conflicts between documents.
This approach works best for quick, one-time comparisons without writing your own instructions.
For more targeted results, select up to five files, open Copilot, and choose Ask a question.
Instead of using the default comparison prompt, describe exactly what you want to compare.
Copilot analyzes the selected files and generates a comparison focused on your criteria. You can refine the results with follow-up questions.
This approach works best when you need a detailed comparison focused on specific requirements.
If your team regularly compares similar documents, you can create a custom SharePoint agent with predefined knowledge sources and detailed instructions.
Open your document library, select Copilot → Create an agent, choose the files, folders, or libraries it should reference, and configure its instructions in the Behavior tab.
For procurement teams, you can instruct the agent to evaluate supplier proposals against the same criteria, highlight missing information, produce a standardized comparison table, and recommend the most suitable option.
Instead of executing a one-off prompt, the agent retains these instructions for repeated runs. Although setting this up takes a bit more initial effort, it pays off for recurring comparisons that demand consistent evaluation criteria and output formats.
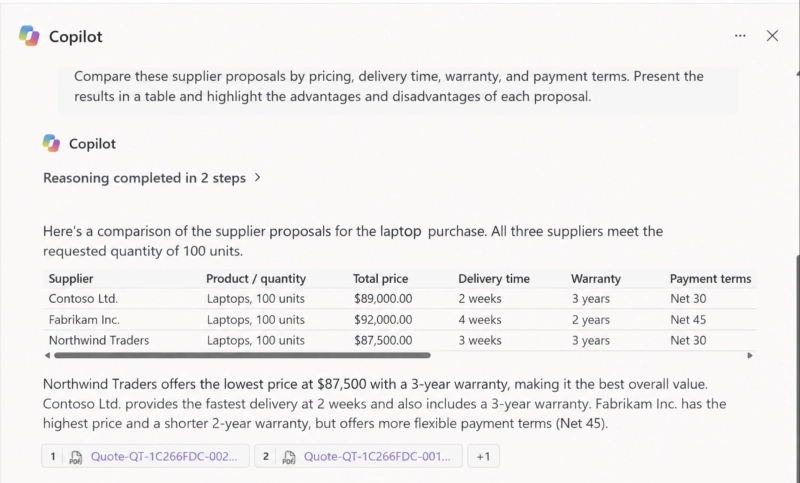
For the supplier quotation scenario, I went ahead with a medium-effort approach by asking Copilot to compare the five quotations using a custom prompt. The results were presented in a table, highlighting the advantages and disadvantages of each proposal. I used this prompt to compare the quotations:
Compare these supplier proposals by pricing, delivery time, warranty, and payment terms. Present the results in a table and highlight the advantages and disadvantages of each proposal.
And here is the result generated by Copilot in SharePoint:
This gives the procurement team a side-by-side comparison of all five quotations, making it easier to review pricing, delivery times, and other conditions without going through each document manually.
Collect files from external users with Plumsail Forms and analyze them with Copilot in SharePoint
Microsoft Copilot in SharePoint can do much more than answer questions about documents. It can automatically extract information, classify files, generate summaries, organize document libraries, and help compare multiple files. Combined with Plumsail Forms for collecting files from external users, it can simplify workflows that would otherwise involve a lot of manual data entry and document review.
In this tutorial, we explored how these capabilities can help streamline procurement, from collecting supplier quotations to comparing offers. But the same setup works for many other scenarios, including reviewing job applications, evaluating project proposals, processing job intake forms, and analyzing customer-submitted documents.
Start a free Plumsail Forms trial, connect a public form to your SharePoint document library, and let Copilot handle the document analysis. And if you need help with your form design or want a live demo, you can always book a free consultation with our team.
Document generation in SharePoint: content assembly, Copilot, templates, and Plumsail
I tested four ways to generate documents in SharePoint and compared their setup, features, limitations, pricing, and best use cases.
Margarita Nikitina
Customer Support Engineer
DocumentsFormsSharePoint
Jul 06
Supplier onboarding form for SharePoint: no login required
Build a supplier onboarding form that saves straight to SharePoint — no vendor login, attachments support, conditional field visibility, e-signatures, and automatic contract generation.
Nikita Kurguzov
Customer Support Engineer
FormsSharePointPower Automate
Last updated: Sep 25, 2025
Save Microsoft Forms attachments to SharePoint with Power Automate
Learn how to save Microsoft Forms attachments to SharePoint using Power Automate. Plus, discover an alternative solution to overcome Microsoft forms file upload limitations.





 Documents
 FormsMicrosoft 365SharePoint
 Power Automate