 FormsAirtable
Last updated: Aug 31
Connect a website form to Airtable
Learn how to create an Airtable form with Plumsail and embed it on any website for free.
 FormsAirtable
Airtable has streamlined the experience for team collaboration, but what if you need external contractors or clients to manage parts of your data? You will find that the built-in solution — Airtable Portals — can quickly become expensive, even if your external users only need to edit one record.
Thankfully, there are plenty of third-party tools with much friendlier pricing that provide external access to Airtable. However, with so many on the table, how do you pick one?

External collaboration is less about getting data into Airtable and more about controlling who can change what. The best solutions let people submit or update information through secure forms, portals, or automated workflows without requiring Airtable licenses or exposing the underlying base.
Let's go through different options and see how to let external users edit Airtable data without breaking a bank. We'll cover different approaches, their use-cases, pricing, and how to start using third-party tools with your Airtable data.
With the introduction of Portals in 2024, it is now possible to share your interfaces with clients without adding them as part of your team. These interfaces provide a way to present relevant records in a clean, accessible way as a set of web pages. These can consist of dashboards, lists, kanban boards, and so on.
While this sounds great on paper, the reality is it can be expensive, with the lowest price being $120 for 15 seats on Team plan.
But Portals are not the only way to let your clients edit your Airtable data — form builders, third-party client portals and automation platforms are all viable alternatives.
If you only need to receive updates for single records — order updates, for example — consider making a custom web form with a form builder. Form builders let you create custom forms that you can then easily share with your clients or other external users. The setup is quick and simple, and operation costs are low.
Unlike native Airtable forms, the examples below offer more features, are more customizable, and most importantly allow external users to update existing records.
Plumsail's public web forms is a form builder with a wide array of integrations, including Airtable. Plumsail Forms supports both single-page and multi-step forms. With a broad set of built-in controls, custom CSS and JavaScript extensibility, and an integrated AI assistant, you can tailor forms to your exact requirements.

I needed something that could connect to Airtable, which we're using as a backend, give me scripting control, and still have a modern-looking interface.
I was happy to come across Plumsail — it checked all the boxes.
See how Studio Source Yearbooks handles orders with Plumsail Forms and Airtable →
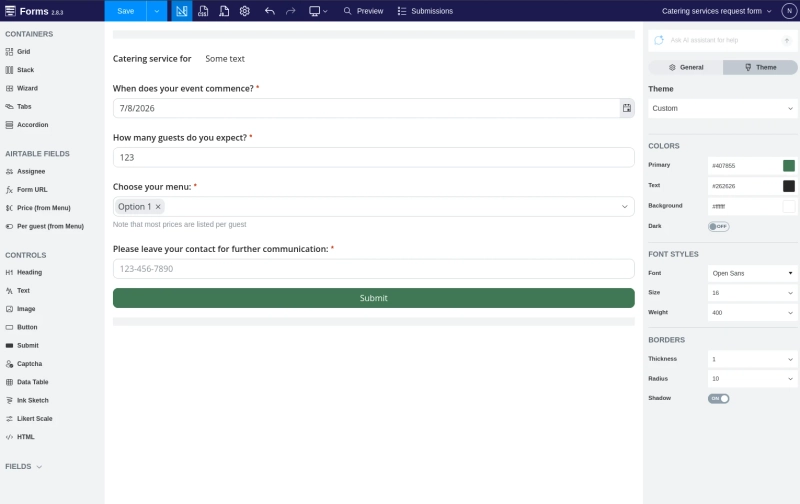
There are only a few steps to start using Plumsail Forms for updating Airtable records:
Create a new form. On the home page, choose the "Design a web form" option.
Connect to your Airtable table. In the opened editor, click "Connect to external source" and choose Airtable. After that add a new connection, grant necessary access to Plumsail, and choose your table. If you only need to create new records, you're done!
Add a form link to your Airtable table. Design your first form draft and save your form. After that go back to Connection settings and toggle "Allow editing records". Copy the generated formula and paste it into a new formula field in your table. Now you can use this field to share forms to let external users edit a specific record.
You can test the Airtable integration with a 30-day free trial. Ongoing access is available on two tiers (pricing as of August 2026):
Fillout lets you build multi-page forms with native Airtable integration. Besides having a sleek and friendly editor, it also comes with powerful features like form branching, login pages connected to your Airtable, and even an option to receive payments through Stripe integration.
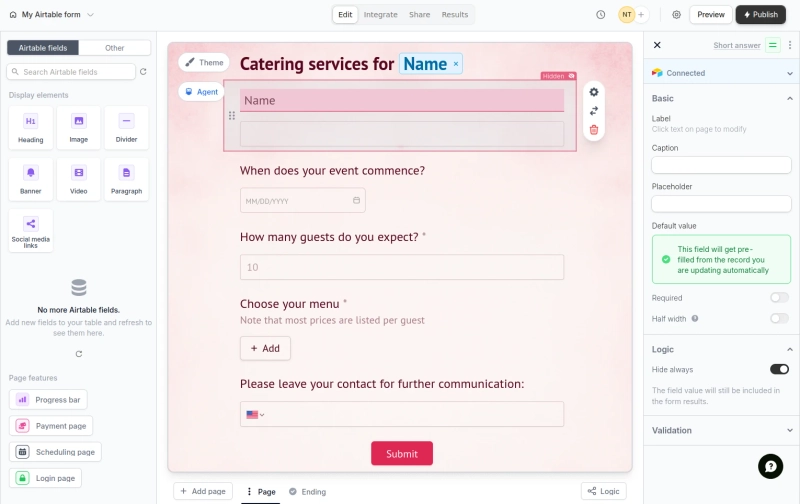
To start creating a new form for updating Airtable records, you only need a few steps:
Create a new form. During the setup you will be asked to choose the form connection. Select Airtable and choose your base and table. If you only need to create new records, you're all set! But we'll go ahead and configure the form to update existing records.
Switch to update mode. Click the Integrate button in the top menu, and edit the Airtable connection in the opened tab. On the opened page, update your form type to "Update record".
Add a form link to your Airtable table. Once you change your form type, you will see a special formula. Copy it, and paste it into a new formula field in your Airtable table. After you publish your form, you can share these links to let users update a specific record.
Fillout's free tier includes all the basic form functionality and has a monthly limit of 1000 form submissions. As of August 2026, their highest Business tier is $75 per month and removes the submission limit entirely.
A client portal is like a front-end for your Airtable. It lets you filter the data your client needs to interact with and present it in a way that fits the external user's role.
Client portals work great for ongoing collaboration, where external contractors or clients regularly update projects, listings, or anything else they are directly involved in. However, if your clients only need to update specific records, building a whole portal can be excessive.
There are several tools that greatly fit the client portal approach.
Softr is an AI app builder that lets you use a variety of data sources such as Airtable, Google Sheets, Notion, SQL, and their own database. You can keep Airtable as your backend, or move the base into Softr Databases with their migration service. When you create an app, Softr automatically syncs any changes made by users with your data source, and its permissions let you control which records each client can see and edit.
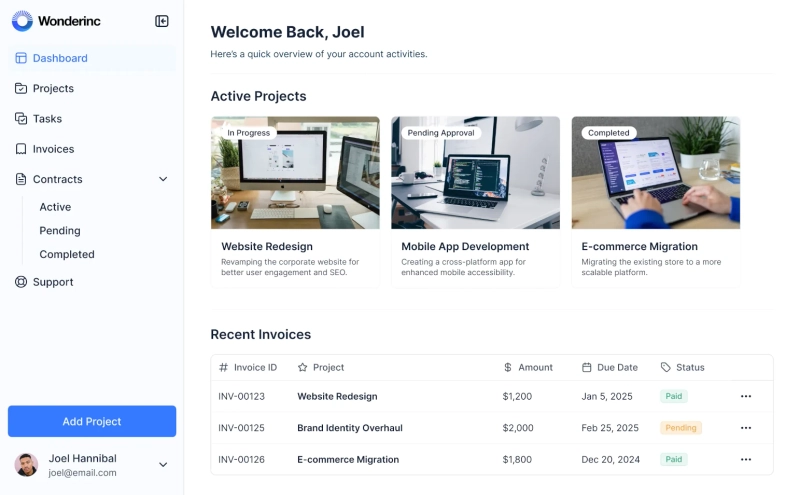
To start building your client portal with Softr, you only need to take a few steps:
Softr has a free plan for up to 5 app users. As of August 2026, its Pro plan costs $99 per month and comes with 10 team users, 50 client users, and granular permissions, plus the option to add more users as you go.
Jet Admin provides all the necessary building blocks to build a multi-page client portal. With built-in page templates you can immediately start with a functional site, and the ability to heavily customize component behavior and to create your own components lets you build the user experience you want.
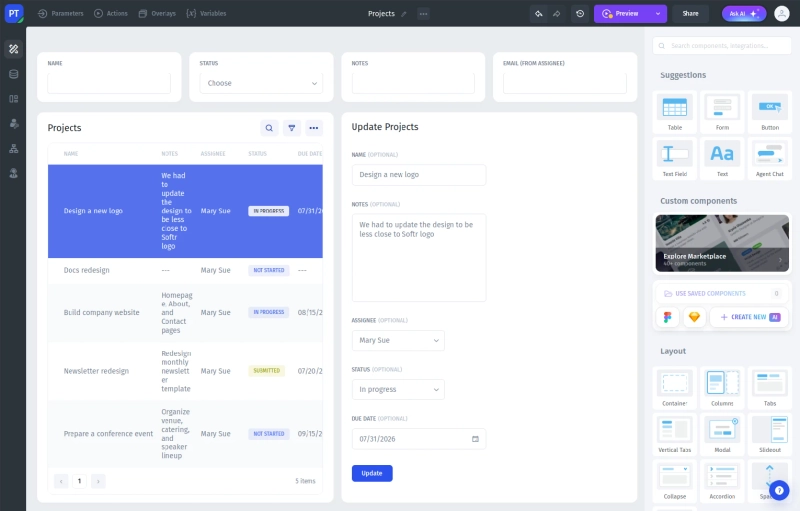
Creating a new Jet Admin app with the Airtable connection is very easy:
While Jet Admin doesn't have a free tier for customer portals, it has a free trial, and its Starter plan comes with a generous 500 users, costing you $39 per month as of August 2026.
Stacker takes the full AI approach for running autonomous processes and building client portals. Instead of the traditional no-code editor with blocks and properties, you are using plain language to spin up AI builders that create the portal for you.
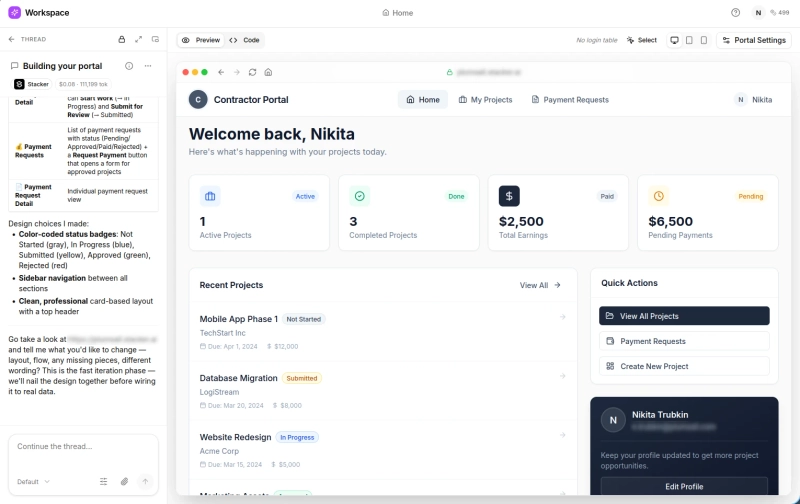
The setup is extremely simple:
Working with Stacker requires AI credits, but new accounts come with $100 in credits for free. Stacker's portals are billed separately, with the cheapest plan starting at $9 per month for 20 portal seats.
Noloco is another no-code app builder that allows you to rapidly design internal tools for your business, covering a wide range of use-cases, from dashboards to a custom intranet for your team. Besides internal tools, Noloco provides all the building blocks for making a client portal.
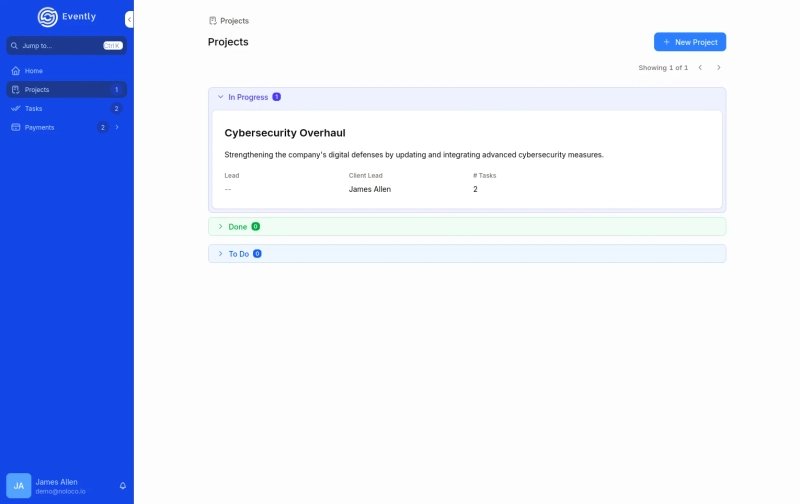
The Airtable connection setup is very straightforward:
Noloco comes with a free tier providing 50 client seats. However to use it with Airtable you need to acquire their BUILD tier that, as of August 2026, costs $99 per month and comes with 1000 client seats.
If your business uses different apps for different purposes, you might want to consider a third route — automation platforms. These platforms are great for "gluing" together different tools used by your organization.
With automation platforms you can take data received from other services like emails, social media posts or tickets from helpdesk software, process this data however you want, and feed it into your Airtable — all done with a no-code automation flow.
A great advantage of automation platforms is that they let clients make indirect changes to your tables. For example, if you have a subcontractor that uses Trello to track their progress, you can easily sync it with your Airtable project management table through an automation workflow.
Zapier lets you connect over 9000 different tools to create automated workflows with no coding required. Its rich set of triggers and actions is complemented by the ability to natively use AI for analyzing data, understanding and handling natural language and making decisions during the workflow.
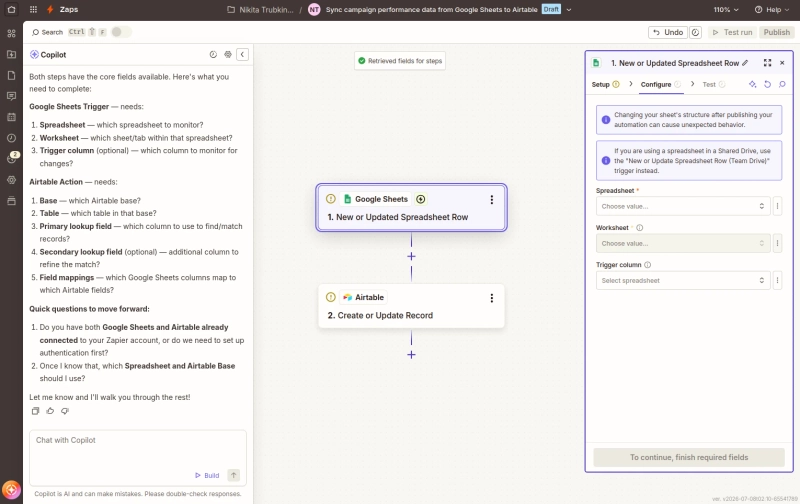
To start updating Airtable records with Zapier, follow these instructions:
Zapier's plan limits are based on tasks, where each successful step that uses an external app is considered a task. As of August 2026, its free plan comes with 100 tasks per month, and their cheapest Professional plan comes with 750 monthly tasks, costing $19.99 per month with the option of pay-per-task billing.
Make is a visual-first automation platform that streamlines your business processes. With built-in monitoring, data transformation functions, and agentic automation, Make enables you to quickly create flexible and scalable workflow scenarios.
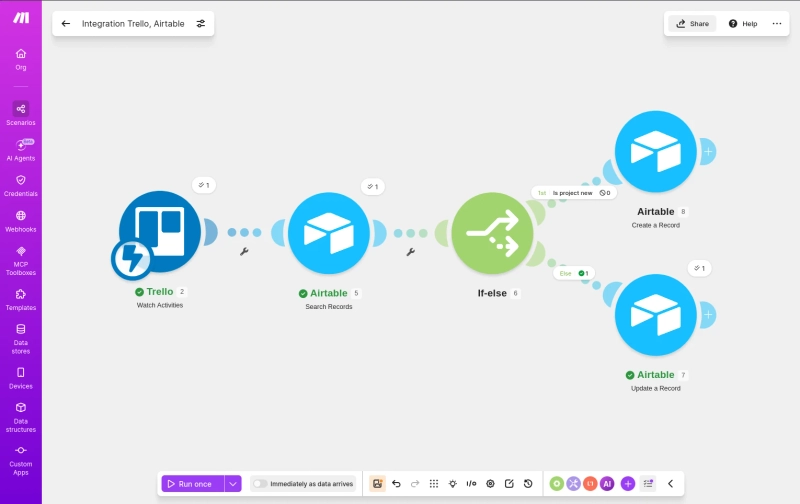
To build a workflow that updates your Airtable records, follow these steps:
As of August 2026, Make comes with a free plan giving you 1000 credits per month, where each module usually costs one credit to run. To see the benefits of a paid plan, sign up here to get two months of the Pro Plan and 20,000 credits per month for free.
n8n is a platform for automating interactions between your business tools and apps, combining the ease-of-use of a node-based visual editor with code steps for handling complex data transforms. Like its alternatives, it also comes with first-class AI agents to support non-deterministic workflows.
A big difference between n8n and previous automation platforms is that n8n is open-source. That means better transparency, direct participation of the community in building the product, and the ability to host n8n on your own servers.
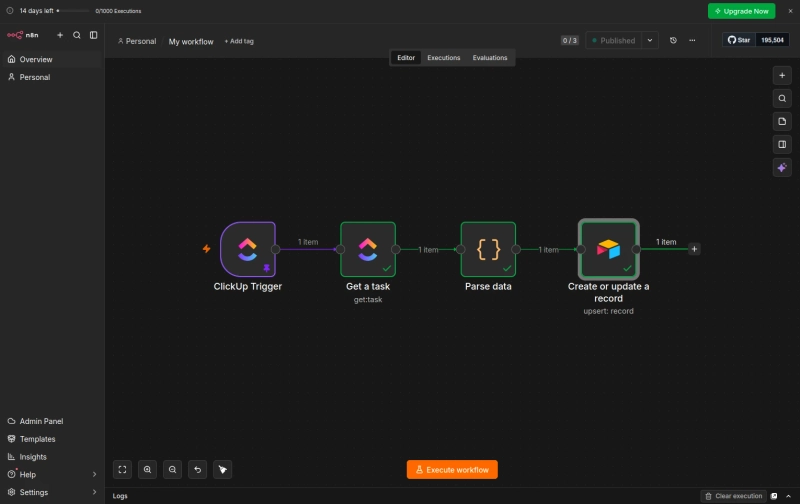
Configuring an n8n workflow to update Airtable records is simple:
If you decide to self-host n8n, its community version is completely free — you only need to pay for your own infrastructure. For the cloud version, the lowest Starter tier comes with 2,500 monthly workflow executions and costs €20 per month as of August 2026.
Each option has its own use-case, and so it's impossible to say that some solution is better than the other. So, let's recap and highlight the differences between the three approaches for letting clients edit your Airtable data.
| Form builder | Client portal | Automation platform | |
|---|---|---|---|
| Scope | Online forms to update specific tables | A dedicated interface for interacting with Airtable | Automated workflows to connect external services with Airtable |
| Pricing model | Form submissions | Portal seats | Workflow runs |
| Complexity | Very easy | Easy | Medium |
| Client interaction | Client receives a form, fills it out, and forgets about it | Dedicated site for interacting with your business | Clients interact with your data through an external app or service |
This is how we generally feel about the different approaches:
Still, to truly understand the tool's weaknesses and strong points, you need to get hands-on with it. Every product mentioned here has a free tier or a trial period, so if you liked the look of it or the experience it promises, take the next step and see if it works for you in practice.
Of course we have to mention that you can use Plumsail Forms for free and claim a 30-day trial for its Van plan, letting you connect your forms to Airtable and utilize the built-in AI agent.
An intuitive form designer, no-code conditional logic, easily modified and mobile friendly layouts, and the ability to extend its capabilities with custom CSS or JavaScript — we invite you to try it all out!
FormsAirtableFormsAirtableLearn how to create an Airtable form with Plumsail and embed it on any website for free.
FormsAirtableFind the Airtable form examples designed with Plumsail Forms and get inspired to create your own forms for Airtable bases.
 DocumentsFormsAirtable
Discover the best Airtable extensions and apps to organize data, build custom interfaces, and get more from every base.