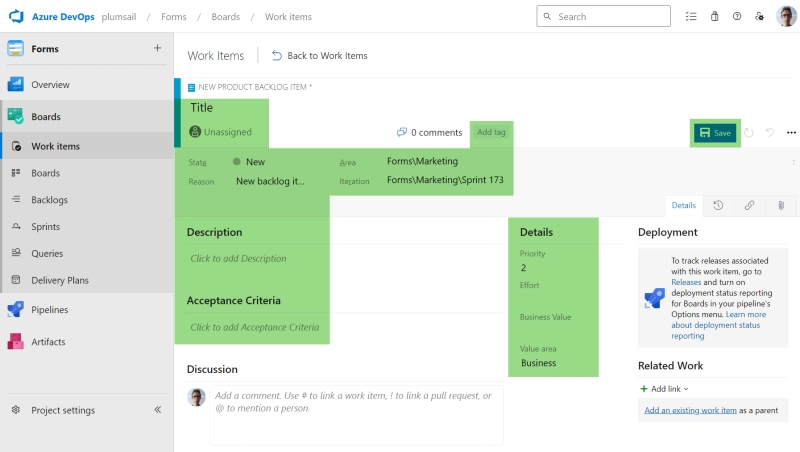
Azure DevOps is excellent when it comes to keeping track of things. It is, however, a little less excellent when it comes to creating work items in the first place. You need to stop what you're doing, open Azure in a separate tab, and wait for it to load. Not to mention the cluttered interface.
Let's be real for a second, you don't use most of these dropdowns anyway. (The only stuff I actively use is in green; call me crazy, but I think this could be a little more efficient)
What if you could replace this form with something light, customizable, and easily integrated with your favorite workplace apps like Slack or Microsoft Teams?
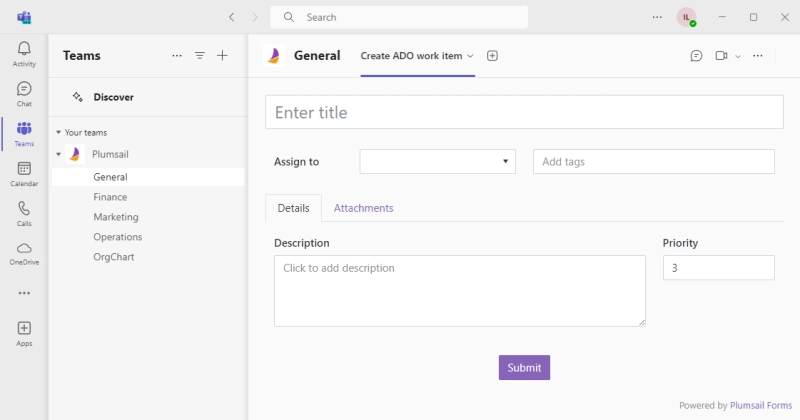
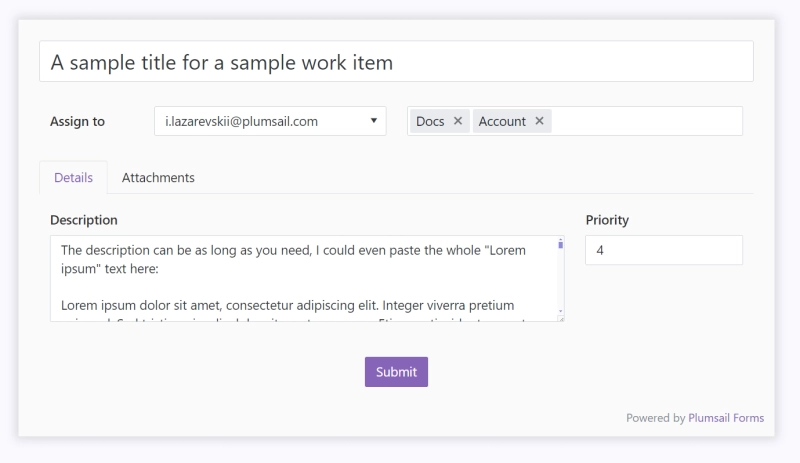
Well, you'd get something like this:
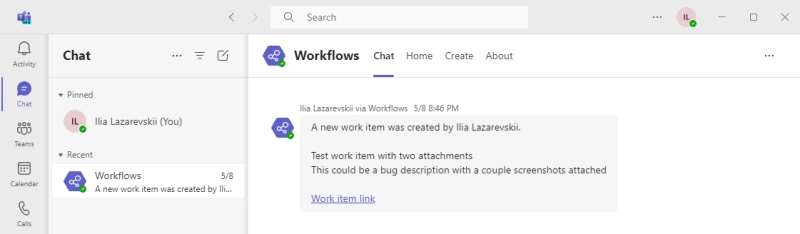
And after someone submits the form, you get a notification:
It's when an Azure DevOps work item is created for you automatically, without filling in a clunky native Create new item form.
This is possible thanks to REST API, which allows apps like Zapier and Power Automate to access your Azure DevOps organization through your account.
Why would you invest your time into building an automation like this? There are several reasons.
1. Efficiency
Creating ADO work items becomes lightning-fast. You can create an item automatically when an email arrives, do it from your favorite apps like Teams and Slack, or even create it by sending an SMS.
And you don't have to stop at just one way to create the items, use as many as you please.
2. Easy access
If you need to allow an external stakeholder to create work items, just give them a link to your form. No need to create accounts or manage access permissions.
You could even allow regular users to create feature requests or bug reports without risking your database.
3. Flexibility
You can apply all kinds of validation criteria to your data, automatically fill in certain fields, or notify the right people when the item is created. With most automation tools, the only limit to what you can do is your creativity.
4. Decluttering
You can choose the fields to fill in, so forget about the clutter of the standard Azure DevOps menus. And if your process changes and you need to include more data into the item, go ahead and configure one more field, you're the boss.
5. Beauty
Azure DevOps has a couple of color schemes available, but other than that it's not very customizable. When creating an automated solution, you can ensure that the user interface uses your brand colors and fonts, fits your tone of voice, and overall looks good. It's always better to work with software that's pleasing to the eye, isn't it?
How to automate ADO item creation
Many great minds have already been applied to this problem, and many ways to utilize REST API have been described.
...the beauty of another great Microsoft product - Power Automate - is that it can take even a great platform like Azure DevOps and make it even better. Case in point, this past Friday I spent only an hour putting together a Power Automate flow that has turned a completely manual process into an automated - auditable - one instead.
And if you don't feel like reading, check out this great video by Kent Weare:
My use case is a bit more beginner-friendly. I'll explain how to automate the creation of work items in Azure DevOps with a customizable form in Microsoft Teams.
Recreate Azure DevOps new item form
First, register an account with Plumsail and create a public form. If this step isn't self-explanatory, check out our starting guide.
1. New ADO item form layout
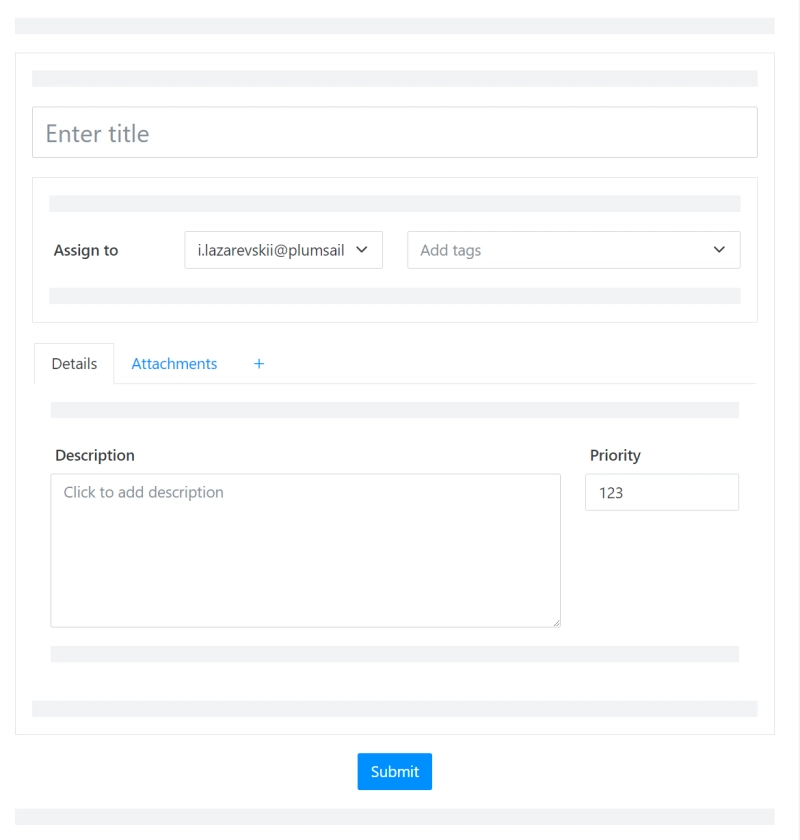
The form should accept some important info about the ticket (feel free to leave out some of the fields):
Title: a Text field that should be required, since a work item can't be created without a title
Assign to: a Dropdown, probably also required (though you could allow the user to leave it blank if you wanted)
Tags: another Dropdown; check the Multiple options box for it
Description: a Note field
Priority: a Number field; make sure to fill in the max and min amounts according to your needs
Attachments: self-explanatory, an Attachments field
Pay attention to the Name property of each field, we'll need it later in the process. Name each one something meaningful, like Title or Description.
You can adjust font size, font itself, colors, and so on. I'd also recommend playing around with the theme to find something that best suits your workspace.
(Pro tip: a slightly off-white color like #fafafa usually looks much better as a background than pure white, try it out)
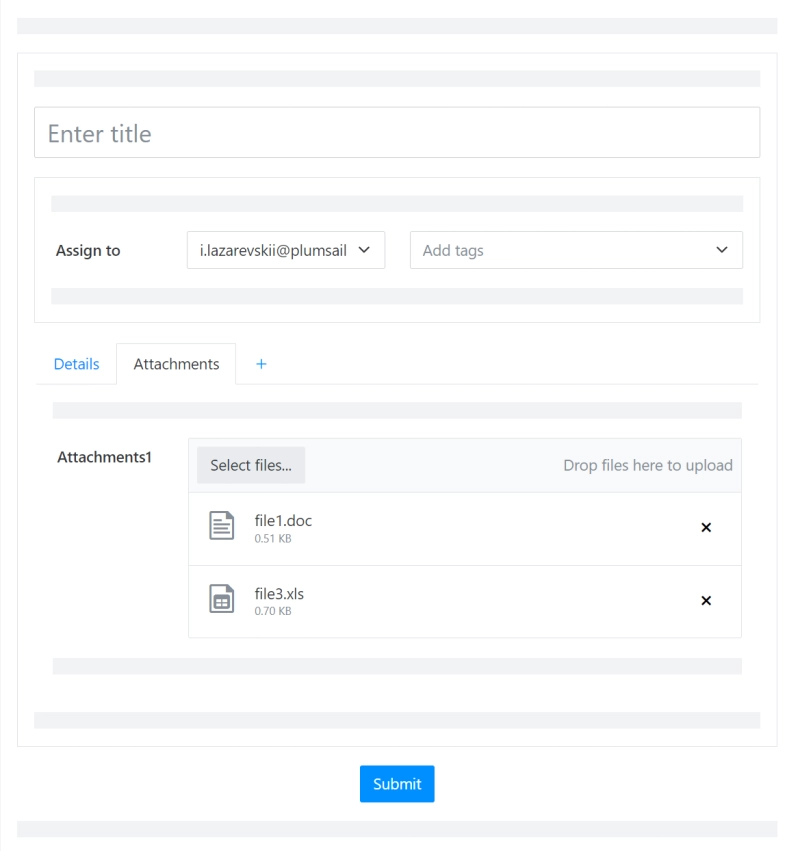
Here's how I arranged the fields:
The Attachments field is tucked away in its own tab, so you can always open it, but it doesn't take a lot of space on the page:
I have everything in a Grid container, so my fields are comfortable sitting side by side. In the lower half of the page, I have a Tab container with two tabs: one for item details and one for attachments.
And here's how the form looks in Preview mode:
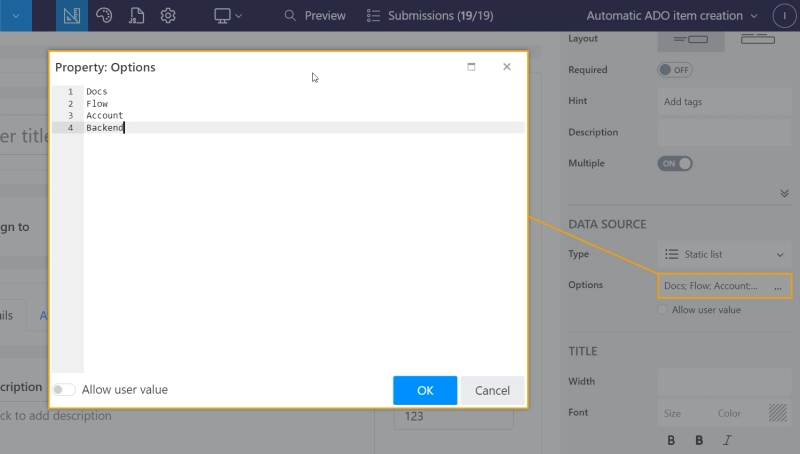
2. Options for Tags and Assign to dropdowns
Now we need to configure the possible options for both dropdowns. The simple way to do this is to put all options in the Options property of the dropdown.
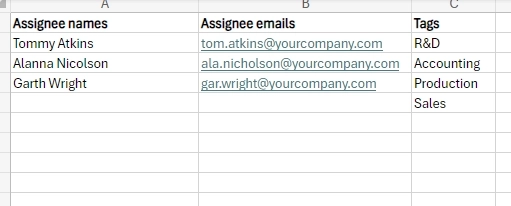
However, if you'd like to allow some members of your team to change the options, setting up a spreadsheet would be better for collaboration.
Open your OneDrive and create a table with three columns: Assignee names, Assignee emails, and Tags.
Choose Excel as a data source for your dropdowns. Then choose the correct sheet and columns. If your table has headers like the example, switch on the Has headers switch.
For the Assign to dropdown, the display and value columns have to be different. An item from the display column is shown as an option in the dropdown (this should be the Assignee names column), and the corresponding item from the value column is saved when the user chooses an option (this should be the Assignee emails column).
3. Authentication
Go to the settings of your form and enable the Allow only authenticated users switch.
We will use the form in the Teams app, which means the users will be already signed in with their Microsoft accounts.
Add Azure DevOps new item form as a tab in Microsoft Teams
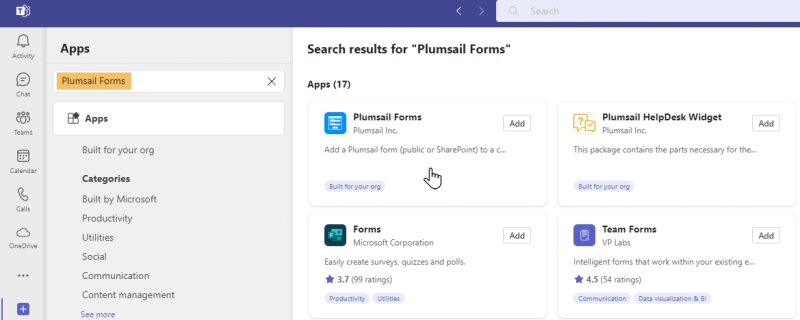
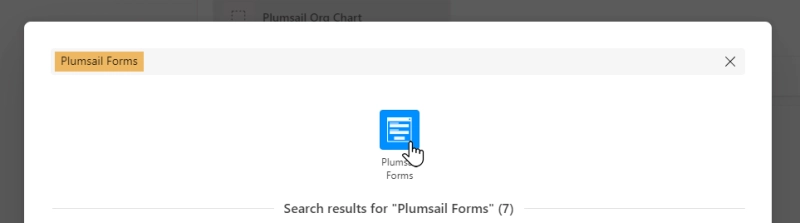
Get the Plumsail Forms app for Teams, so we can create a DevOps item without ever leaving Teams.
Create a new Plumsail Forms tab.
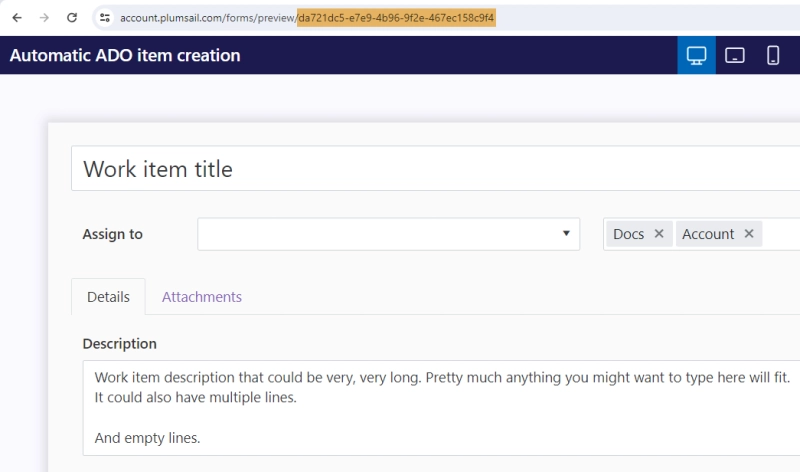
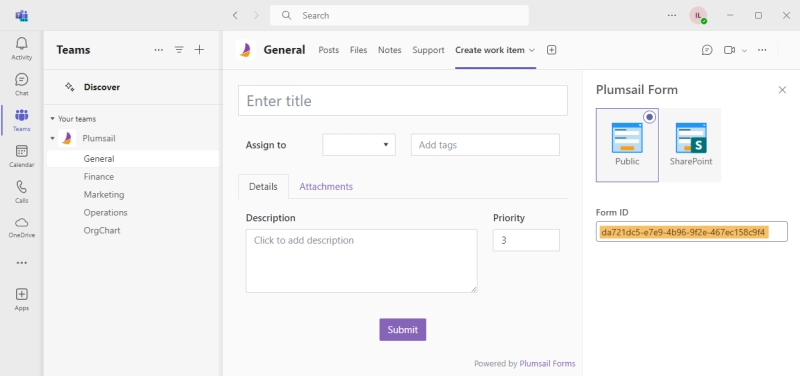
Copy the ID of your form:
Paste it into the Form ID box:
Check if everything works, fill in the form, and submit it. You should receive an email detailing the submission. If you want to stop receiving these emails, just go to the settings of your form and choose None in the Notify on submissions dropdown.
Set up Power Automate flow to create Azure DevOps work items
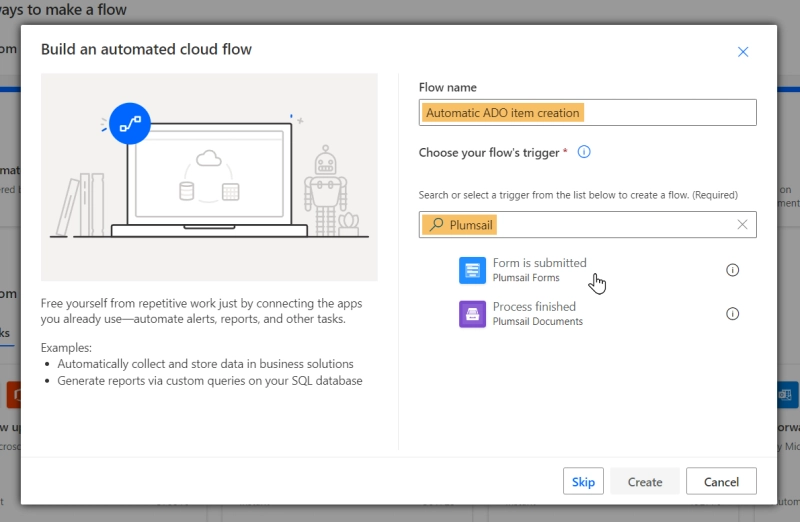
1. Start creating a new ADO item when the form is submitted
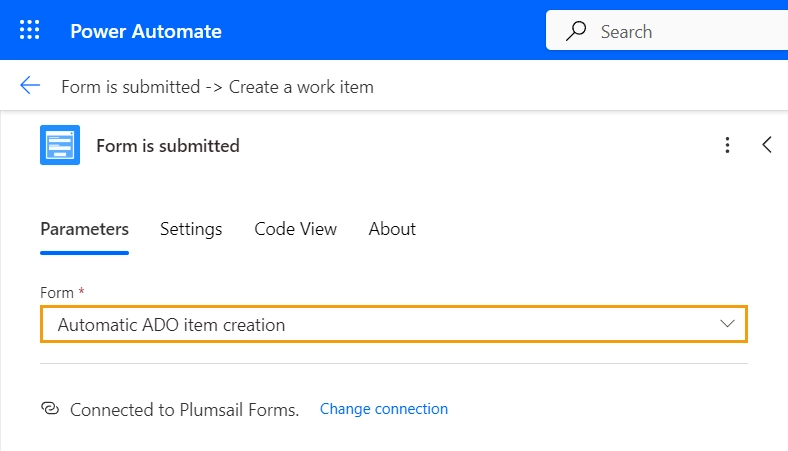
When creating your flow, choose the Form is submitted trigger from Plumsail:
Connect to your Plumsail account and choose the form you've configured.
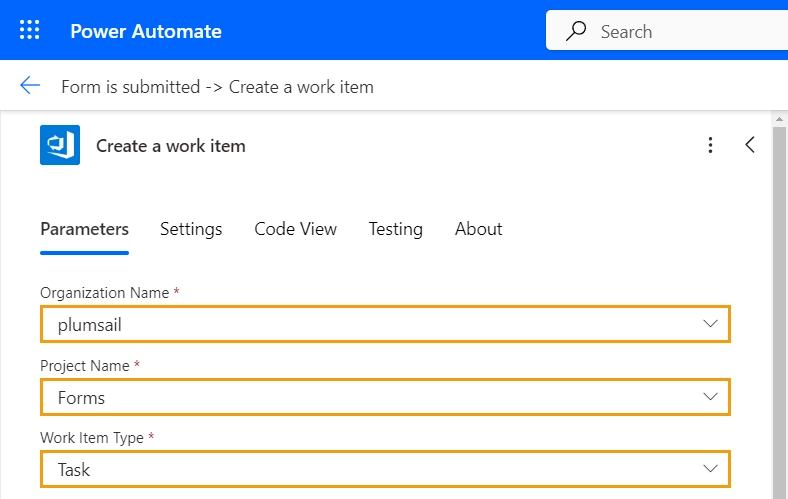
2. Create a work item with Azure DevOps API
Put a Create a work item action into the flow and authorize it with your Azure AD account.
Fill in Organization name, Project name, and Work item type.
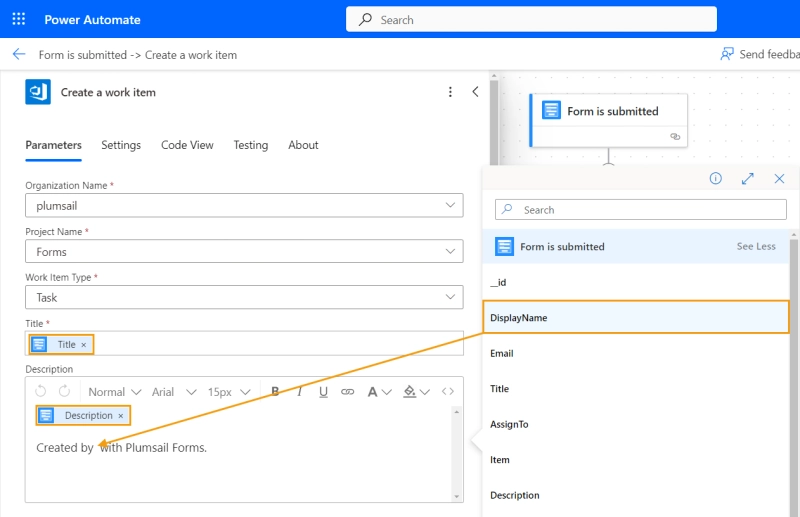
Now fill in the values from the form. The value of the title field goes into Title, description is for Description, and so on.
Filling in the Created by field of the work item is quite complicated, so I opted to mention it in the item description. You can insert it into the text like so:
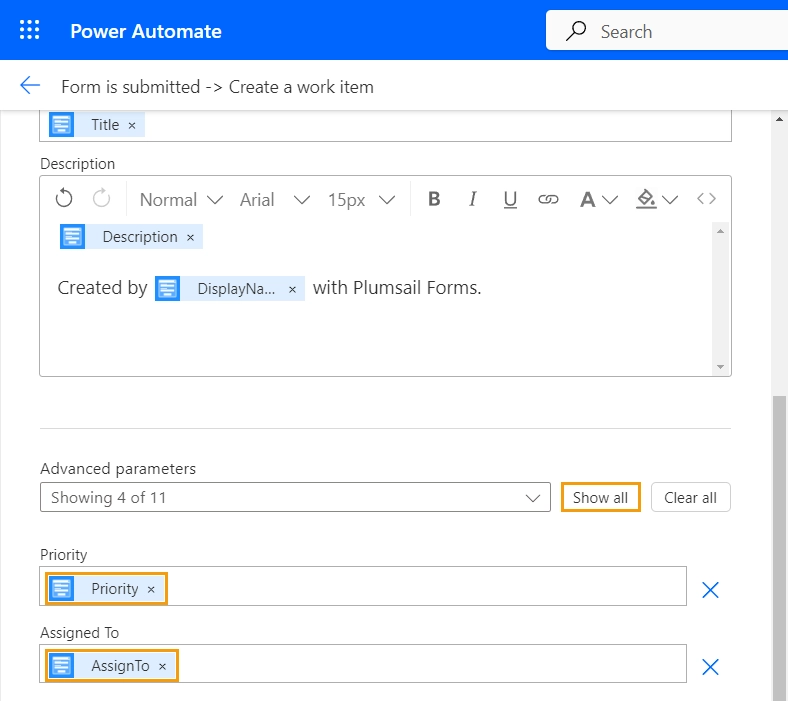
Click the Show all button to get the rest of the work item fields. Fill in Priority and Assign to.
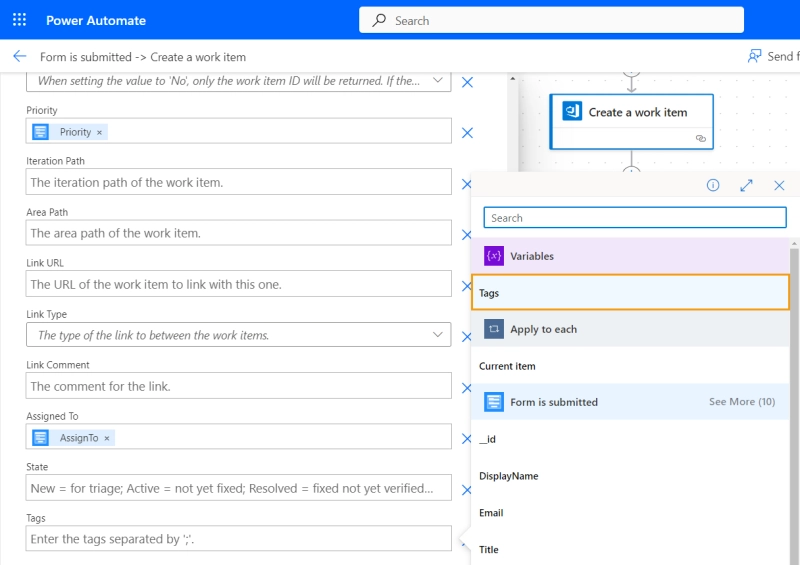
3. Handle Azure DevOps work item tags
You'll notice that tags can't be put into the Tags box since it accepts a single string, and we have many. We need to put all tags into one variable and separate them with semicolons.
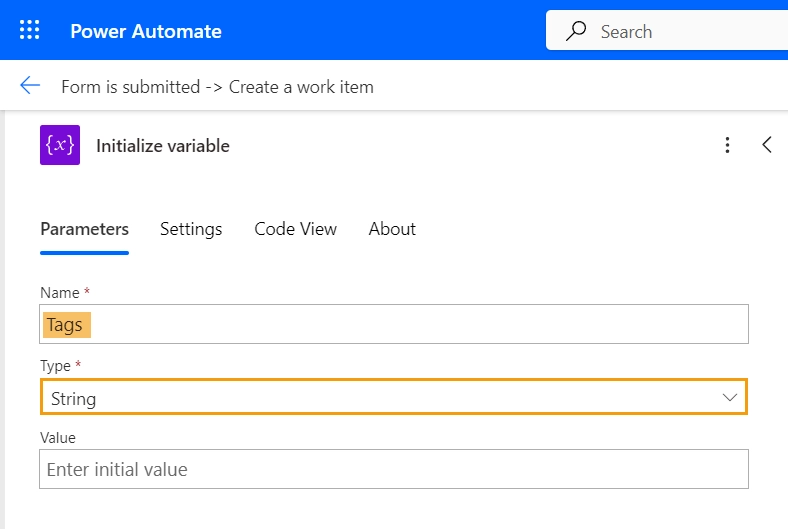
First, let's declare the variable. Add an Initialize variable action to your flow before the Create an Azure AD work item. Let's call it Tags and choose String as its type. It doesn't need an initial value, so we'll keep the field blank.
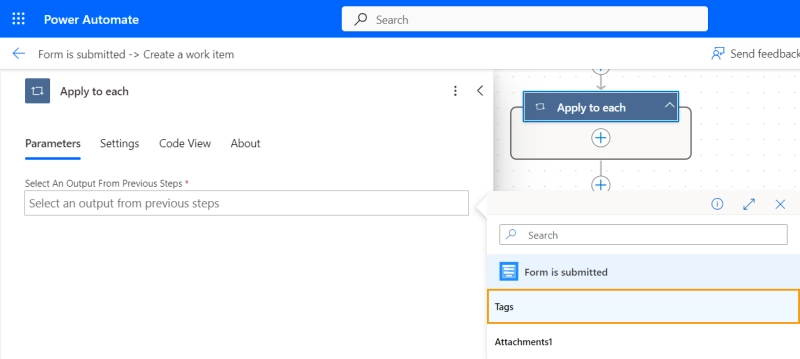
Now let's combine all tags and put them into this new variable. Add an Apply to each cycle to the flow and give it tags from Form is submitted as input.
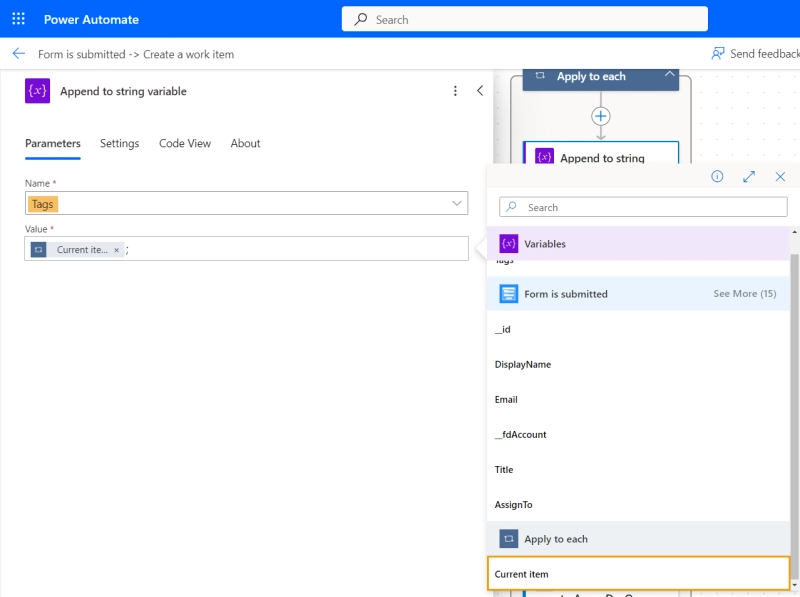
Add an Append to string variable action inside the cycle so it appends each tag to Tags. Don't forget the semicolon, or else all tags will be considered one giant mega tag by Azure DevOps.
Now we can use the variable when creating the work item:
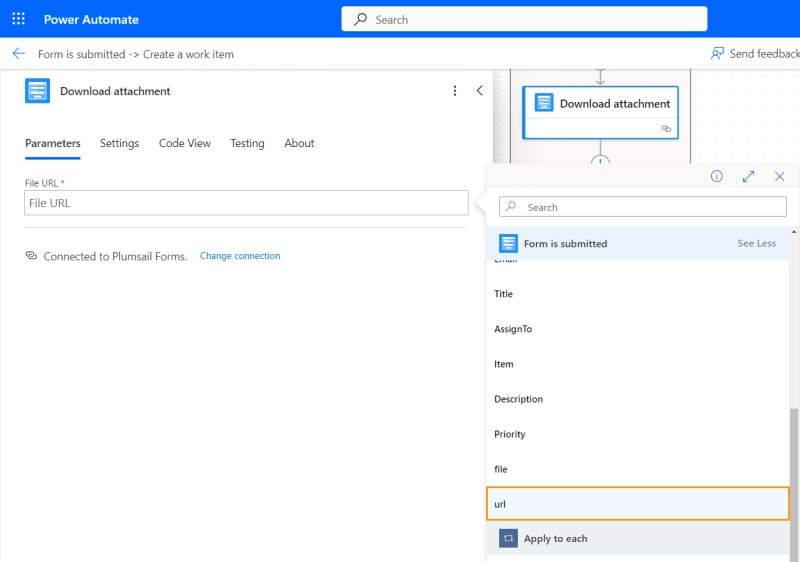
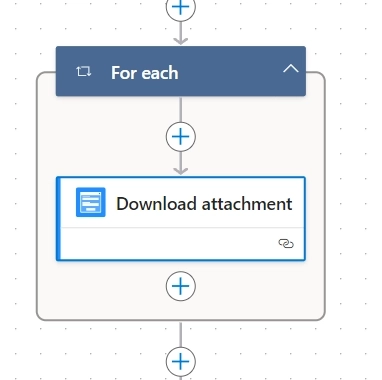
4. Get the attachments from Plumsail Forms
The Form is submitted trigger doesn't provide us with attachments right away, but it has a link to each of them on one of Plumsail's servers.
We can access these files with the Download attachment action of Plumsail Forms. Add it to your flow and fill in the URL field:
A For each cycle will be added automatically since there might be multiple attachments:
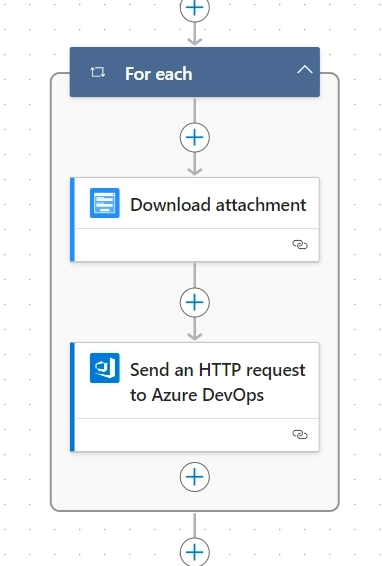
5. Upload the files to Azure DevOps
Even though there is no dedicated action for this, we can still use Azure DevOps API to upload the files.
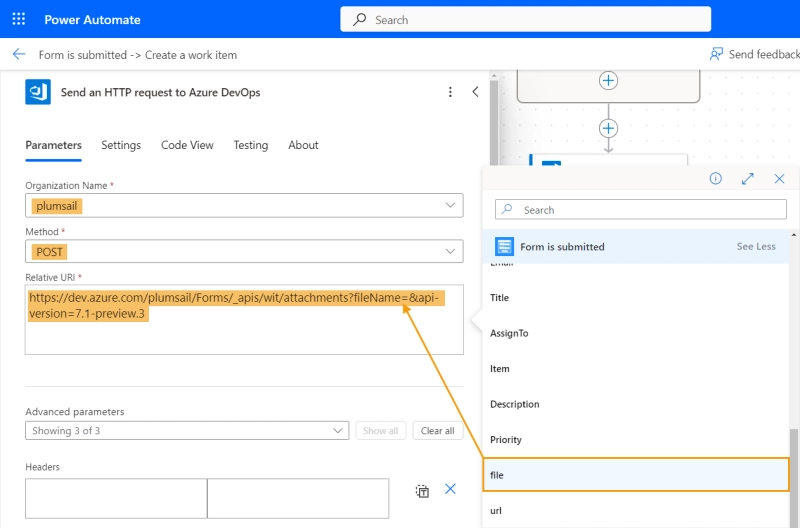
Add the Send an HTTP request to Azure DevOps action after Download attachment and choose your organization:
The relative URI should be constructed like this: https://dev.azure.com/organization/project/_apis/wit/attachments?fileName=FILENAME_GOES_HERE&api-version=7.1-preview.3
Replace organization with the name of your organization in Azure DevOps, and project with the name of your project.
Notice that fileName can be anything, but I decided to insert the name of the attachment there. Replace FILENAME_GOES_HERE with items('Apply_to_each')?['file'].
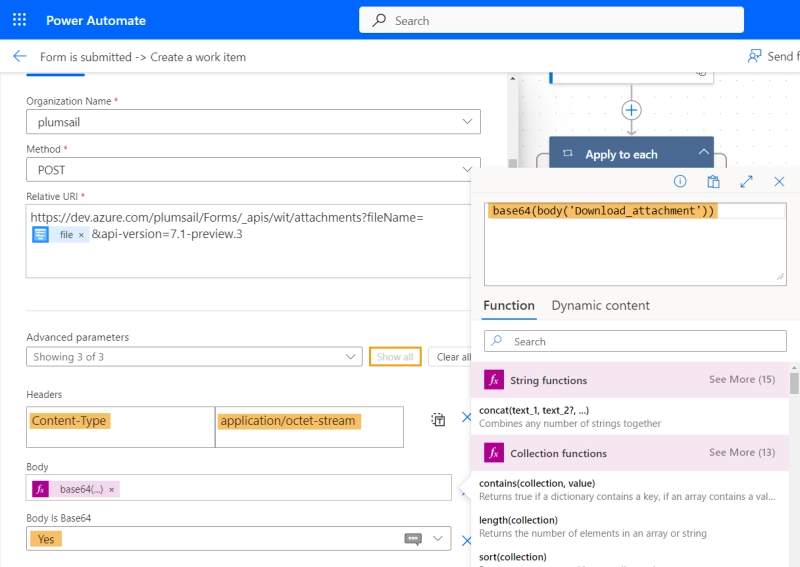
Click the Show all button to see all the advanced parameters.
In Headers, add one key: Content-Type with the value of application/octet-stream.
In the request body, we need this expression: base64(body('Download attachment')), where the 'Download attachment' is the name of the previous action and base64() is a function that returns a string representation of the attachment.
Pick Yes in the Body is Base64 dropdown.
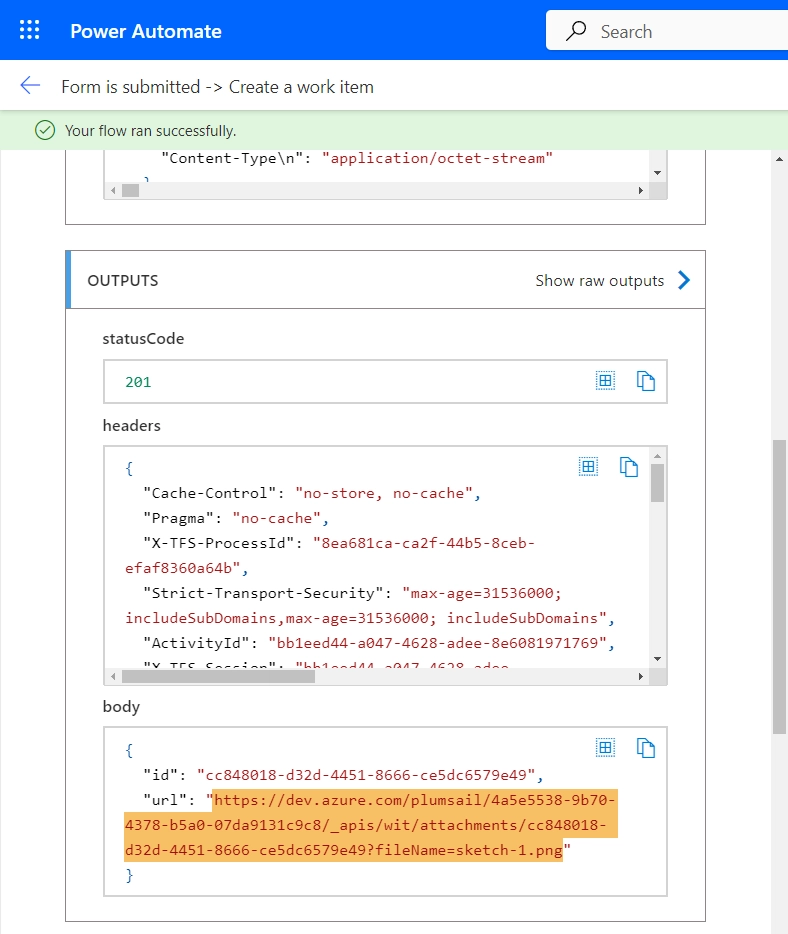
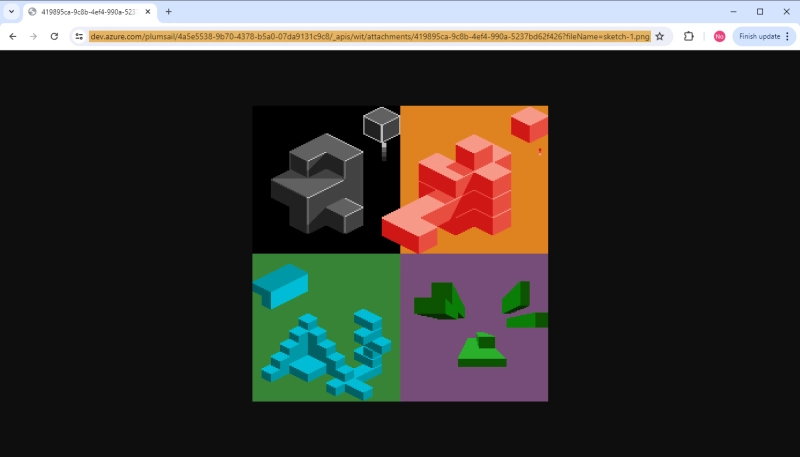
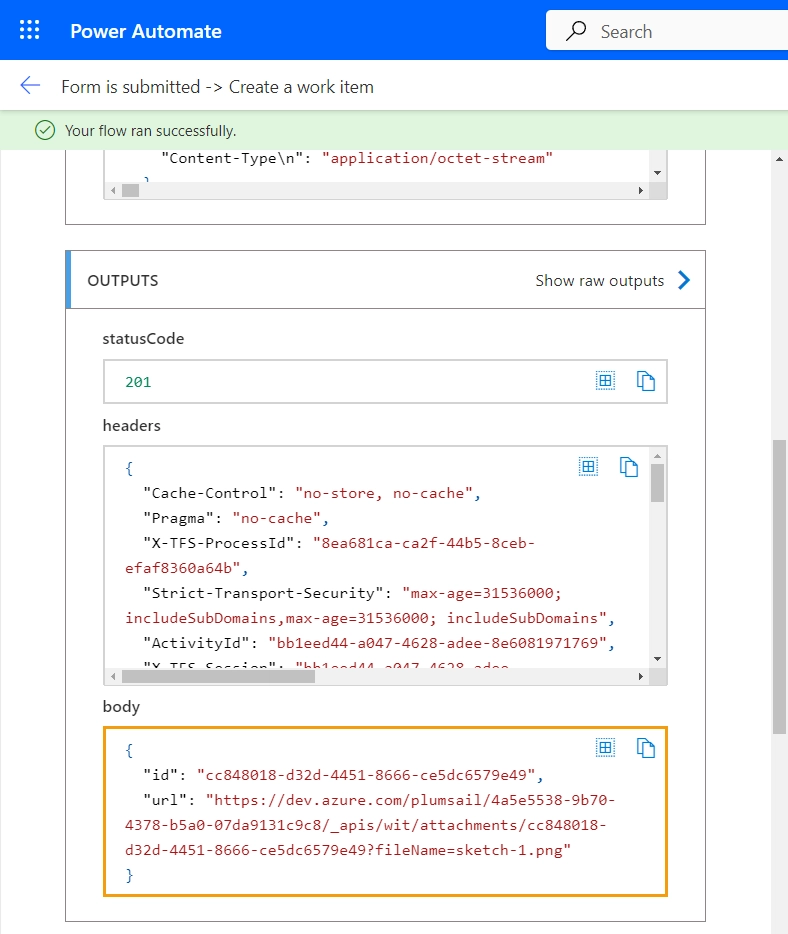
Test the flow. If all went well, you should be able to access the file by the resulting link:
Put it into the address bar of your browser and check that the file is displayed correctly.
6. Attach the files to an Azure DevOps work item
Now the files are uploaded to Azure DevOps, but they're not connected to any work item. To fix this, we need the URL of the file we just uploaded.
The Send an HTTP request to Azure DevOps action does return the URL, but it's in JSON format with some other information. We need to parse the JSON.
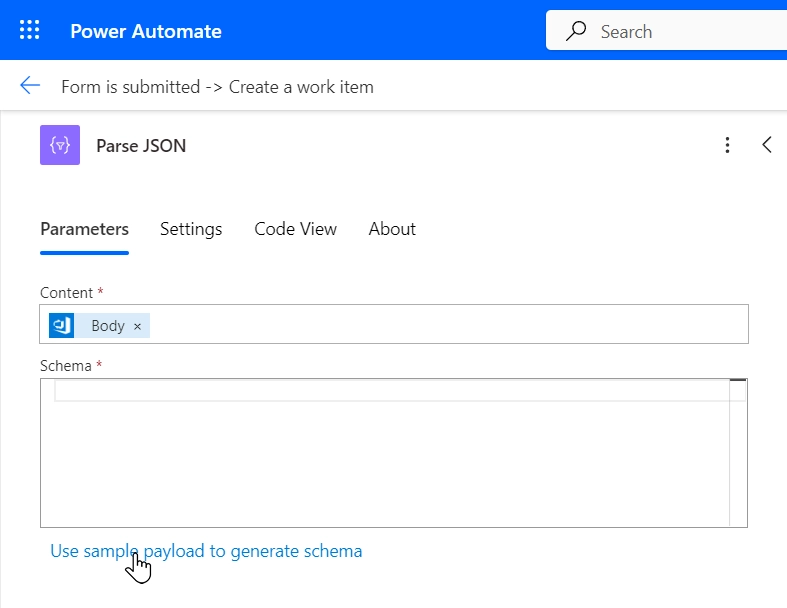
Add the Parse JSON action to your flow and use the body of the previous request as an input. Use this schema:
Alternatively, you can run the flow in test mode and use the JSON from the Send an HTTP request to Azure DevOps action to generate schema. Copy the body of the request's output:
Open the Use sample payload to generate schema menu and paste the JSON you copied:
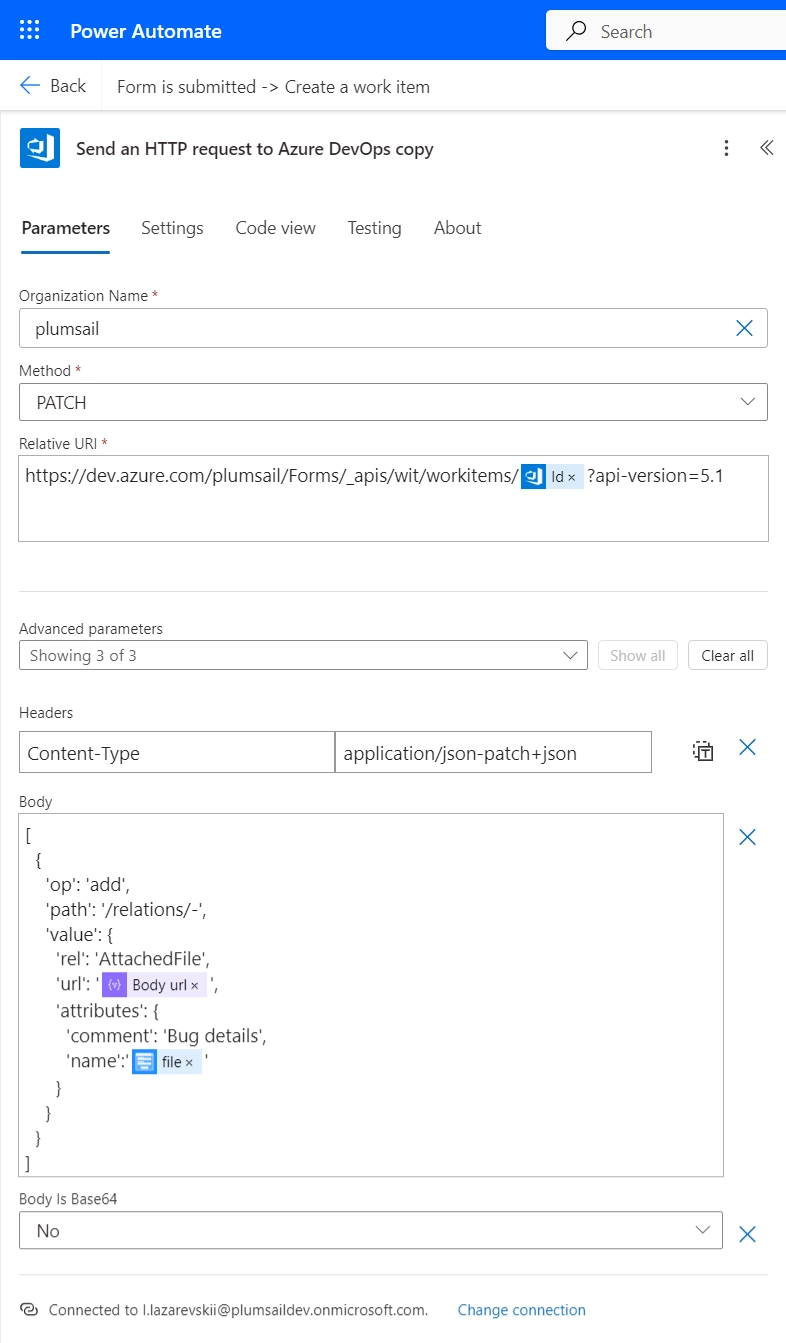
Add the second Send an HTTP request to Azure DevOps action. The method will be PATCH since we're modifying existing data this time.
Paste the following expression into the Relative URI field: https://dev.azure.com/organization/project/_apis/wit/workitems/@{outputs('Create_a_work_item')?['body/id']}?api-version=5.1
Make sure to replace organization with the name of your organization in Azure DevOps, and project with the name of your project.
In Headers, add Content-Type, just like in the POST request. The value should be application/json-patch+json.
Use the following scheme as the Body of the request, changing Parse_JSON and Apply_to_each to the corresponding names of the actions in your flow.
Pick No in Body is Base64, and you're ready to roll. Here's how the configured action should look like:
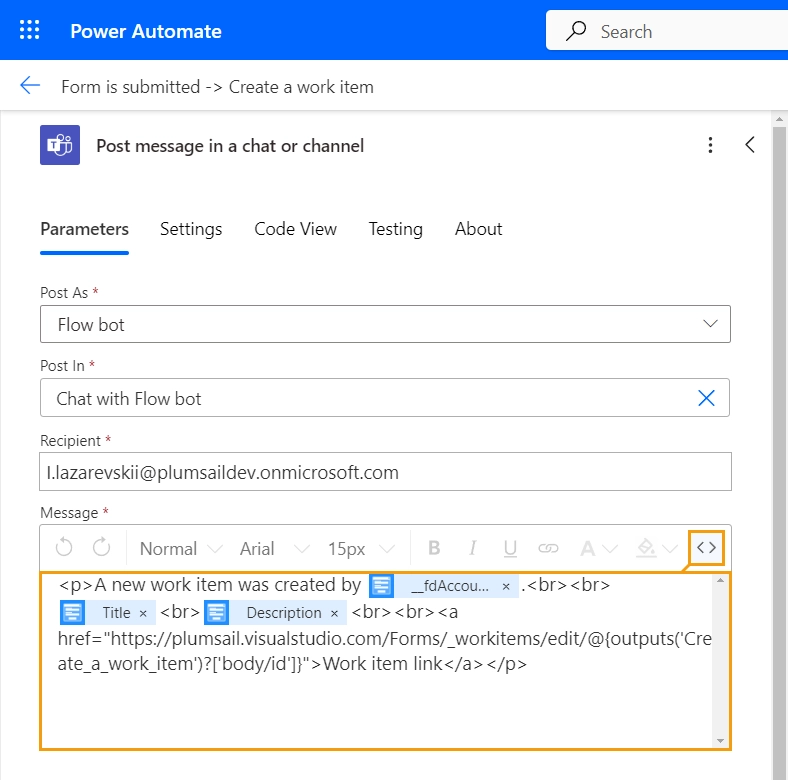
7. Send the summary of the created work item to a Teams chat
After you're done with processing attachments, sending a summary of the task to a Teams chat is a piece of cake.
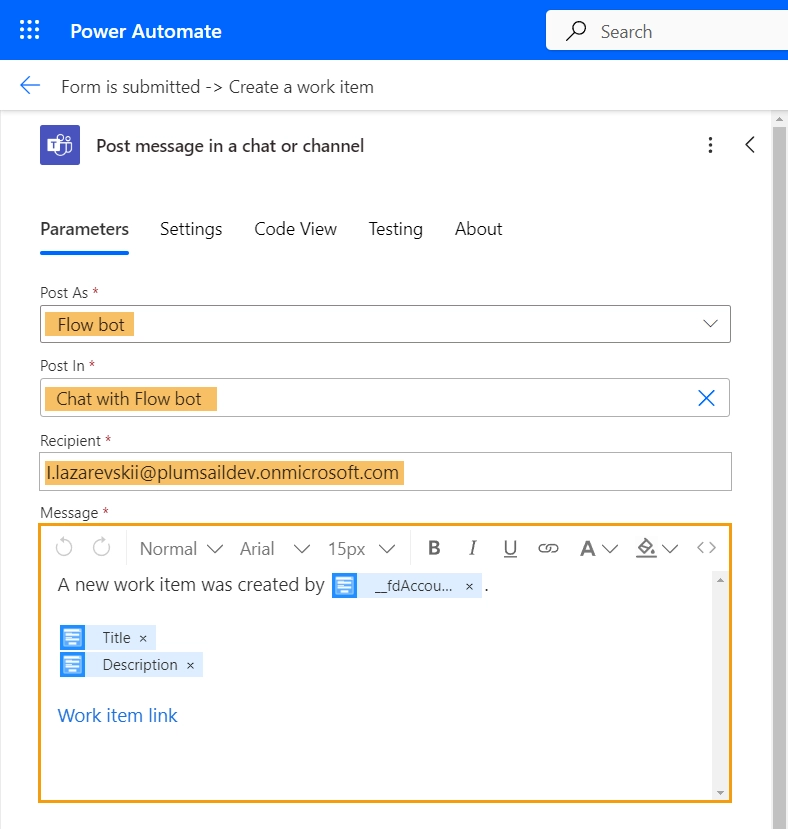
Create a Post message in a chat or channel and choose where and how you'd like to send the message.
When it comes to configuring the body of the message, you can write whatever you like there, including the outputs of different actions. For example, to get the name of the item's creator, use this expression: triggerBody()?['__fdAccount']?['DisplayName']
This is how your message might look in the editor:
To make the work item link clickable, you need to wrap it in an <a> tag.
Click the Toggle code view button in the corner of the editor. Now you can see the message in HTML format.
Replace the Work item link text with this HTML tag: <a href="LINK GOES HERE">Work item link</a>
Now you can replace the LINK GOES HERE string with your link. The only problem? You don't have the link. All actions we used before return URI, which is not the same as a URL.
To create the link, open any work item in Azure DevOps and copy the address up to the item ID. It should look something like this: https://plumsail.visualstudio.com/Forms/_workitems/edit/
Put it in place of LINK GOES HERE and add this expression right after it: outputs('Create_a_work_item')?['body/id']
(You need to open the Expressions menu or type '/' in the text box)
In the end, the Message parameter should look something like this:
And this is the resulting message in a Teams chat:
Now we're finally done with Power Automate. The entire flow should end up like this:
Why not Microsoft Forms
You might wonder why we'd use Plumsail Forms for the task when Microsoft Forms are in the picture.
Technically, you could create the Azure DevOps work items with an MS Form, and it can even be embedded in MS Teams. The devil is in the details, as always.
1. Limited customization
With Microsoft Forms, you can split a form into sections, but you can't control how the fields are placed on the form (no placing fields side-by-side, no tabs). This also means that your form will take up a lot of space on the screen, whether you want it or not.
You can customize the theme of your form, but there is no support for custom CSS, so you can't change the appearance of individual fields.
2. Authentication requires workarounds
In Plumsail forms, you can enable authentication or add a CAPTCHA to your form with one click.
This is not the case for Microsoft Forms, you'd likely have to use Power Automate to authenticate your users.
3. Absence of custom logic
You can apply custom logic to Plumsail forms: create custom validation criteria, show or hide fields, and automatically fill in certain values. Check here for more examples.
With Microsoft Forms, you're out of luck, custom logic is not a thing there.
4. Limited data sources
Fetching dropdown options like we did for Assign to and Tags fields would be impossible with MS Forms. It's not a very big deal, but it does make your process less flexible.
5. No attachments for people outside your organization
As for the attachments field, in MS Forms it only works for people inside your organization.
With Plumsail Forms you can allow any user to upload anything, or you can restrict the attachments with custom validation. Everything is up to you.
Get started with Azure DevOps work item automation
You now know everything you need to make an automation for creating ADO work items. You could simply follow my example or give the process your own spin, anything and everything is customizable.
If you have an issue at any stage of setting up the automation, go ahead and book a free Intro call with Plumsail. Tell us your pain points, and we will do our best to make it happen for you.
Happy automation!
Top 5 Microsoft 365 Booking Systems: Find the Perfect Fit for Your Needs
Want to create a booking system within Microsoft 365? Build one that perfectly aligns with your needs using Resource Mailbox, Bookings, Shifts, PowerApps, or SharePoint.
Margarita Nikitina
Customer Support Engineer
Documents
Apr 15, 2024
How to create PDF documents from Smartsheet new rows in Power Automate
Learn how to create PDF documents from Smartsheet records using Power Automate and Plumsail Documents when a new row is added.