On-site construction forms with Dynamics 365 integration using Plumsail Forms
How LDD Construction Ltd operatives use Plumsail forms on-site to record daily works, with direct integration and data loading from Dynamics 365.
advantegy GmbH shared a business case with us, demonstrating how their customer uses HelpDesk along with a customization they made. We're excited to share it with you! - Plumsail
Our customer manages sales and after-sales service of diesel and gas engines. They are running Plumsail HelpDesk in SharePoint Online for registration, management, and request monitoring. They reached out to us as they had planned to roll out HelpDesk and were looking for a certified Microsoft and trusted Plumsail partner to assist them in implementing various use cases.
Contents
As the customer operates at several locations, they started expanding the backend of their system by adding Outlook mailboxes for different languages, along with corresponding widgets.
With an increasing number of messages, the customer sought a way to convert public comments in tickets to private comments. The reason for the request was the changing nature of the comments, which over time may become irrelevant or only important for internal purposes and should not always be sent.
We have designed a user-friendly solution that allows authorized users to modify the comment type in a separate tab in the ticket form. This was made possible using the Plumsail Forms application, which is integrated into Plumsail HelpDesk for SharePoint Online.
Here is a step-by-step recap of the configuration process and an overview of the solution's functionality:
Step 1: Create a new view in the 'Comments' list with the comment properties to be shared for editing with the target audience.
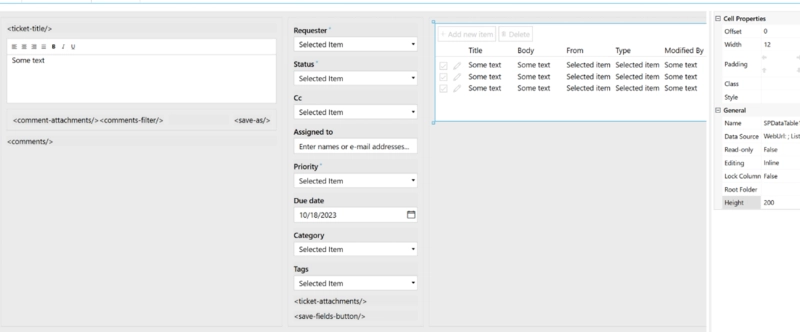
Step 2: Add a grid or a new tab along with a DataTable to the 'Edit' form of the ticket:

Using grid or tab enables you to hide or show this control depending on the membership of the logged in user to a specific group. Follow these instructions to learn how to show or hide sections conditionally based on user's groups.
Step 3: Configure the DataTable by adding the 'Comments' list and the view from the first step into the 'Data source' field.
Step 4: Filter the comments by title in the JS section to render only those comments referring to the open ticket.
That is all for the configuration. Let's transition to the HelpDesk now.
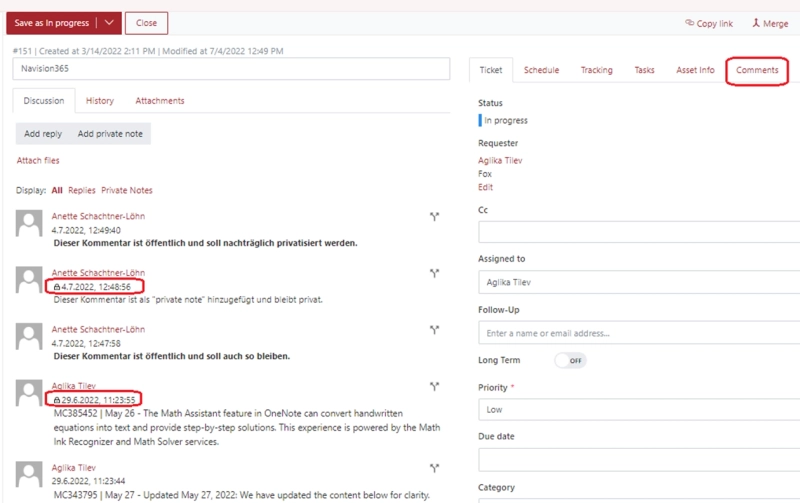
In this ticket, there are three public comments and two private ones in the left pane. On the 'Ticket' tab in the right pane, we see information such as status, agent, and priority. So far, so familiar.

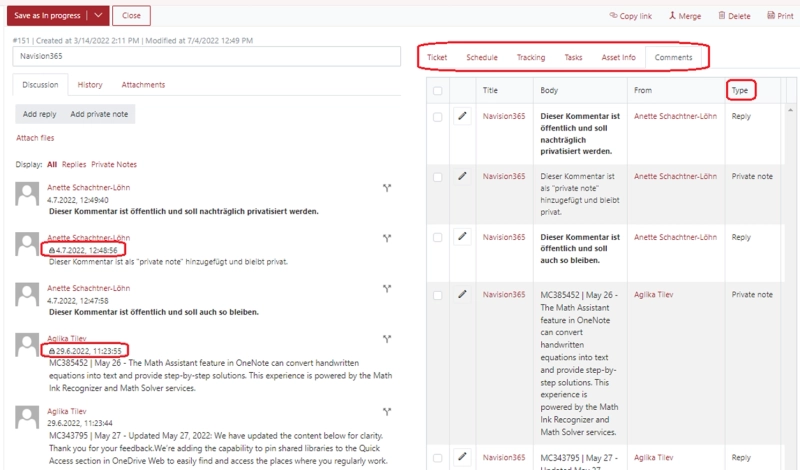
To make comments private retroactively, we will now click the 'Comments' tab that we added:

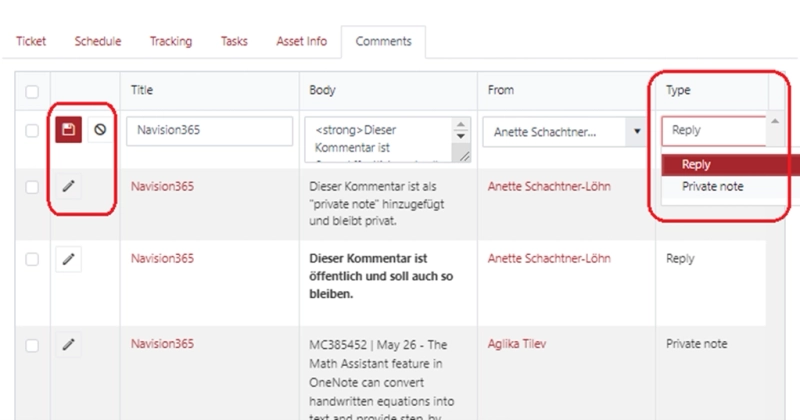
Here we can change the comment type from 'Reply' (i.e. public) to 'Private note', or vice versa. Click the 'Edit' icon in the row and select the desired comment type in the 'Type' column:

Upon saving, the comment will be marked as 'Private' and will display the corresponding icon:

Using a SharePoint group and appropriate permissions, the visibility of the tab can be controlled to allow only certain users to subsequently change the comment type.

With all the customer's diverse requirements, Plumsail HelpDesk for SharePoint Online with the integrated Plumsail Forms app is a powerful and flexible tool that meets their highest expectations.
Start your free one-month trial of Plumsail HelpDesk for SharePoint Online by downloading the installation wizard and following the installation instructions in our documentation.