The Airtable Page Designer block is a versatile tool for creating custom layouts and documents directly from your Airtable base, making it ideal for reports, invoices, catalogs, and more. However, the Airtable Page Designer block has some limitations, such as being focused on single-record layouts and lacking the ability to automate PDF generation from templates.
Users often face challenges with how to use Airtable Page Designer effectively:
Page Design is really useful but I can't do a seemingly simple thing.I have a list (view of a table) and I want to layout it and print it in PDF with Page Designer but I can't find a way. It seems you can only print a single record at a time. Can you tell me if there is a way?
I’ve been searching the community pages and it seems that there is no way to create PDF’s automatically from templates created using Page designer, is that right?
Is there a way to send the document I created in the page designer extension straight to the attachment field rather than manually downloading it and uploading it to the Attachment field?
This Airtable Page Designer tutorial provides a concise guide on how to use Airtable Page Designer, helping you navigate its features and overcome common challenges.
To begin using the Page Designer block, you first need to add it to your Airtable base. Follow these steps:
Open your Airtable base where you want to use Page Designer. We will take a ready-made database from the Airtable template library.
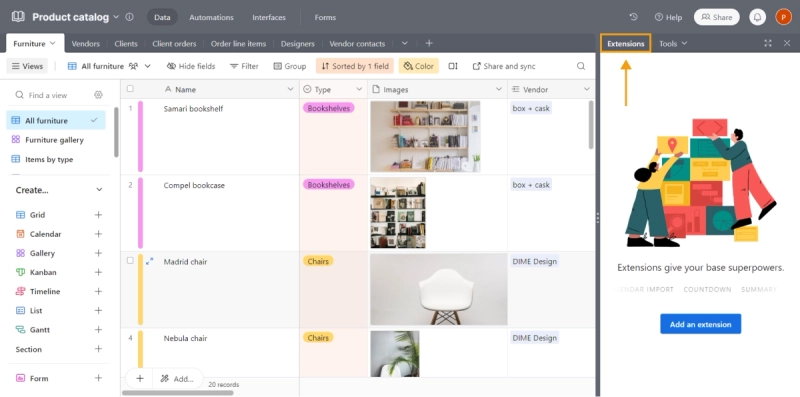
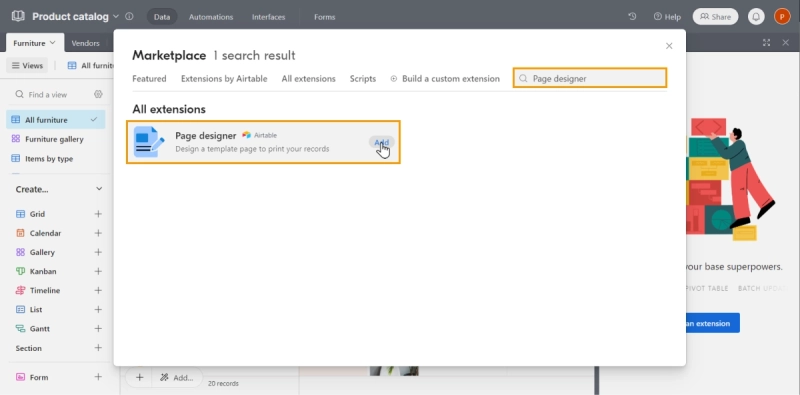
Click on the Extensions button (formerly known as Blocks) in the upper-right corner of the screen.
Choose Add an extension and select Page Designer from the list.
Once added, you'll see the Page Designer block interface where you can start building your custom templates.
Configure initial settings: Source table and layout
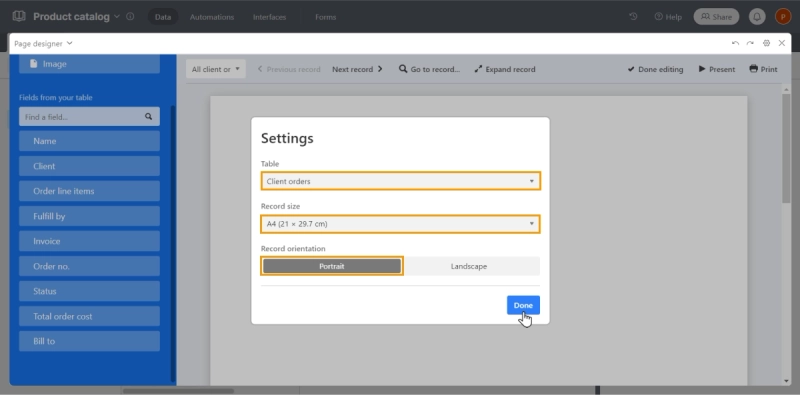
After adding the Page Designer block, it's time to configure the initial settings:
Choose the table: Select the table from which your data will be pulled. This is crucial as the fields available in your template will depend on this selection.
Set up layout and page size: Choose the layout orientation (portrait or landscape) and define the page size based on your needs. You can opt for standard sizes like A4 or go for custom dimensions.
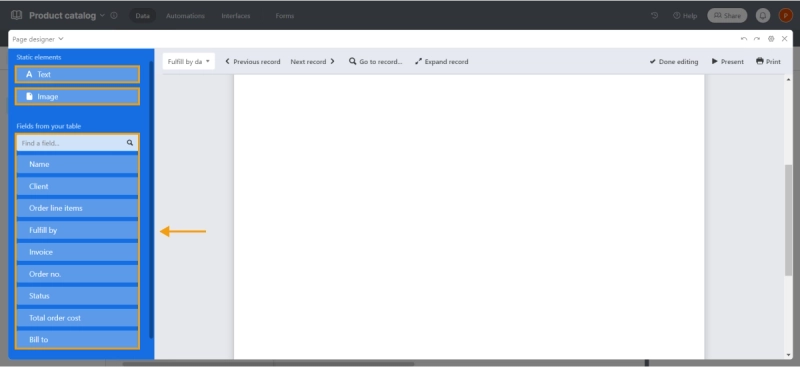
Add fields to your template
When setting up your template in Airtable Page Designer, you can use two types of fields: Static Elements and Fields from your table.
Static elements
Text Fields: These are perfect for adding headers, labels, or any static text that doesn't change between records.
Image Fields: Use image fields to insert logos, product images, or other fixed visual elements. These images can be directly linked to image attachments in your records.
Fields from your table
These fields pull dynamic data directly from your selected table in Airtable. You can include various field types from your base, such as checkboxes, single-select options, dates, and numbers, allowing you to create templates that automatically populate with relevant data from your records.
Set up text fields
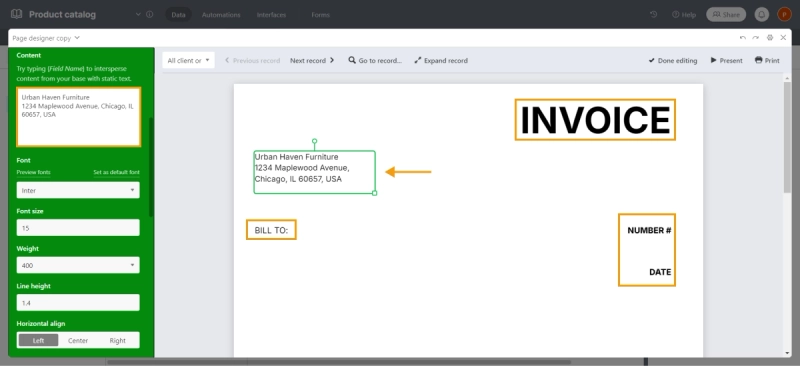
Let's start by adding a text field with static information. To do this, click on the Text in the left panel, place the text field frame on your template, and begin customizing it.
You’ll have access to the following options:
Position, Size, and Rotation: Adjust the field's placement, dimensions, and angle.
Order: Manage the stacking order of the field in relation to other elements on the page.
Content: Enter your static text in this field.
Font Settings: Customize the font, size, weight, and other typography options.
Alignment: Align the text horizontally and vertically within the field.
Text and Background Colors: Set the color of the text and the background.
Padding: Adjust the spacing around the text within the field.
Border Settings: Configure the border’s color, width, and corner radius.
Quick Actions: Easily duplicate or delete the element from your template.
This process allows you to tailor the text field to fit your design needs perfectly.
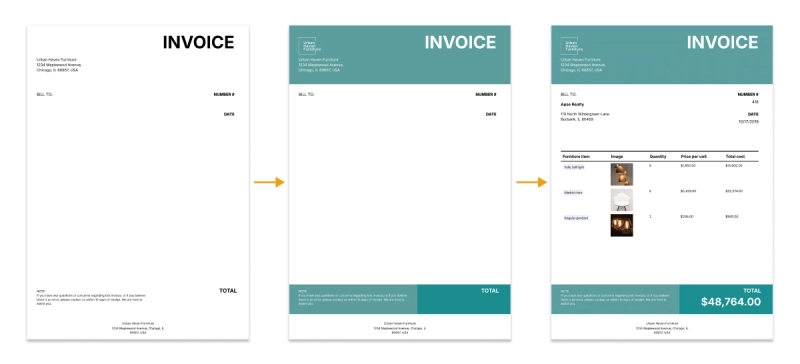
We've added titles and static information, such as the name, address of the billing company, and notes.
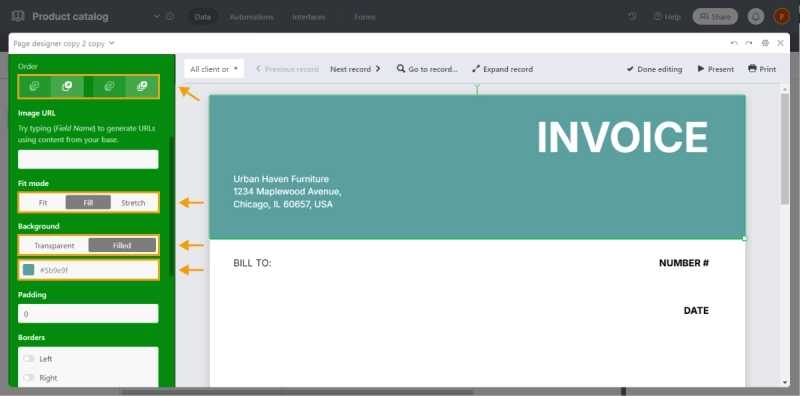
Set up image fields
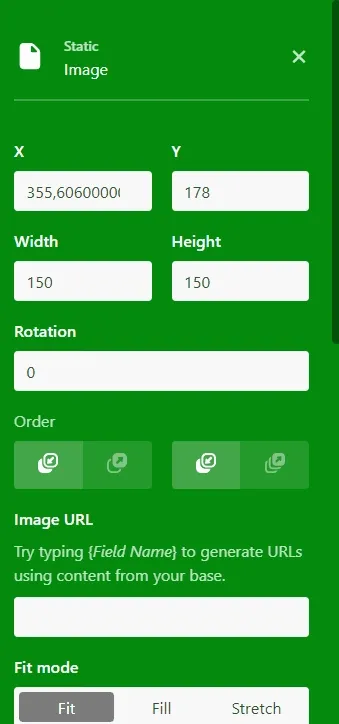
Next, let's set up the image fields. Start by clicking the Image in the left panel, then add an image frame to your template. Once the frame is selected, you'll see various settings on the right side of the panel:
Position, Size, and Rotation: Adjust the image frame's placement, dimensions, and angle.
Order: Manage the stacking order of the image frame relative to other elements on the page.
Image URL: Enter a URL or type {Field Name} to generate URLs using content from your base.
Fit mode: Choose how the image fits within the frame (e.g., fill, fit, or stretch).
Background: Set the transparent or color background.
Padding: Adjust the spacing around the text within the field.
Border Settings: Configure the border’s color, width, and corner radius.
Quick Actions: Easily duplicate or delete the element from your template.
In Airtable Page Designer, you can add images to your templates, but there are specific steps you need to follow since the tool doesn't allow direct image uploads.
Using a Direct URL: Copy the image URL from an external source.
Hosting the Image on Airtable: Use the URL of an image stored in your Airtable table.
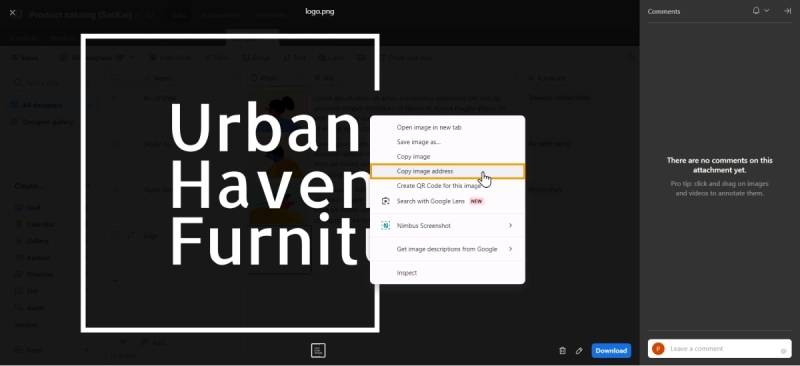
We'll use the second method to insert a logo into our document. To do this, return to your Airtable base, open the image in the attachment field, right-click on the image, and choose Copy image address.
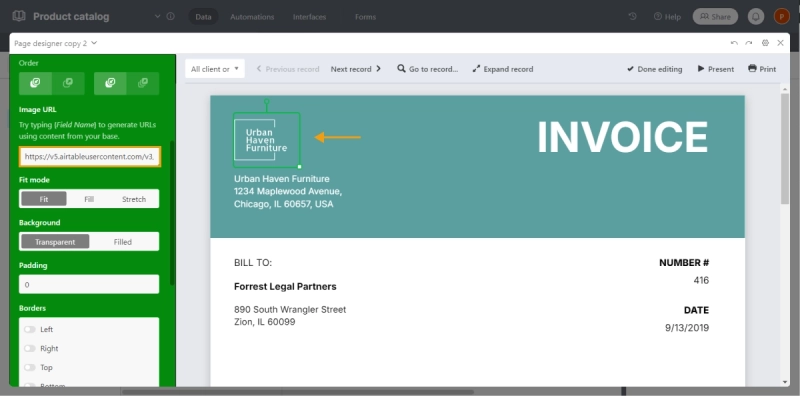
Then, go back to Page Designer and paste the URL into the frame settings and adjust the size and place the logo where you want it in the template.
However, as noted in the Airtable community, this method has certain drawbacks related to the stability of Airtable's internal image URLs for static images:
I am trying to add two static images within the extension page designer through the image url but after a few hours the images break and stop working. I have added the images I want to use to another table within the same airtable base and I am copying the image address to add that to the image url for the static image.
These image URLs can become invalid after some time, causing the images to disappear from the template. It's important to keep this in mind when creating documents from templates with static images. At the time of writing this Page Designer Guide, there is no effective and permanent solution; the only option is to use the URL of the image from an external source.
Let's go back to our template, and additionally, we'll use image frames to add background fills to certain areas. This will be done by stretching the frame to the desired size and using the fill function to create a background for the document header. We will also highlight the field where the total invoice amount and notes will be displayed. Finally, we'll change the font color of the static text on the image frame to white for better visibility
With this frame, you can also easily create dividers in your Page Designer template or highlight a visually important part of your document.
Set up dynamic fields
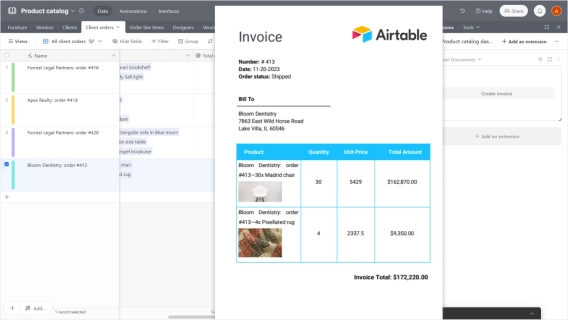
Now that we've added static text and image fields, it's time to incorporate dynamic fields that pull data directly from your Airtable base using Airtable Page Designer. These fields are automatically formatted to match the type of data in your table, ensuring a consistent and professional look. For our template, we will use the following fields:
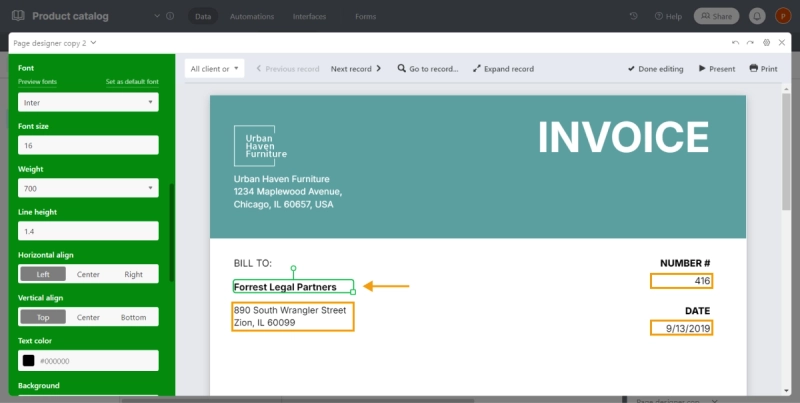
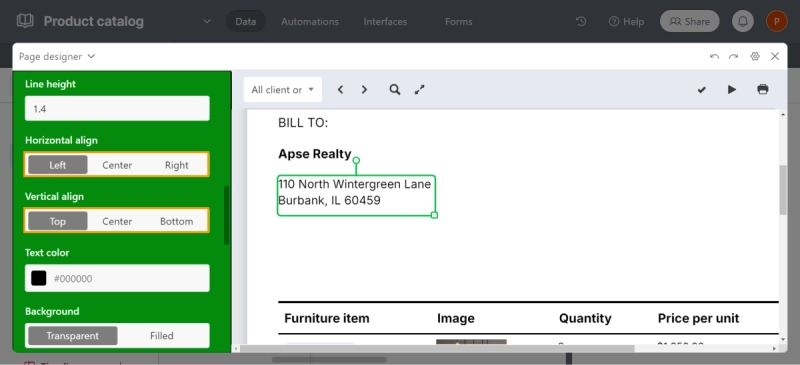
Client: Displays the name of the client.
Bill to: Shows the client's address.
Fulfill by: Indicates the date associated with the invoice.
Order no.: Reflects the order number that matches the invoice number.
Order line items: A table displaying the list of products in the order.
Total order cost: Displays the total cost of all items in the order.
These dynamic fields will ensure that each invoice is automatically populated with the correct data for every client and order, streamlining the invoice generation process.
Let's take a closer look at the field settings.
Single value fields
These are simple fields that most commonly have text, numeric, date, currency, or similar values. The following fields fall into this category:
Client
Bill to
Fulfill by
Order no.
Total order cost
The settings for these dynamic fields are identical to those for static text fields. This means you can adjust font, size, color, alignment, and other formatting options just as you would for any static text.
Multiple value fields
When configuring fields that pull data from cells containing multiple values, such as linked records or multi-select fields in Airtable Page Designer, you can choose a display Mode to control how this data appears. Each mode offers unique features that enhance the presentation of your data, in addition to the common settings available for all fields—such as position, size, borders, text settings, and background options.
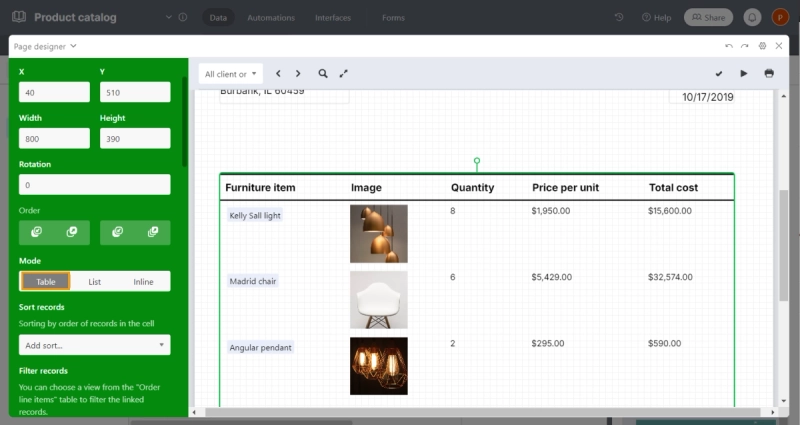
Table Mode displays data in a grid format, ideal for organizing items like product lists, invoices, or order details. It allows you to sort records, select specific columns from your table, customize linked attachments (such as adjusting thumbnail styles, image size, and padding), and modify the appearance of table headers and rows.
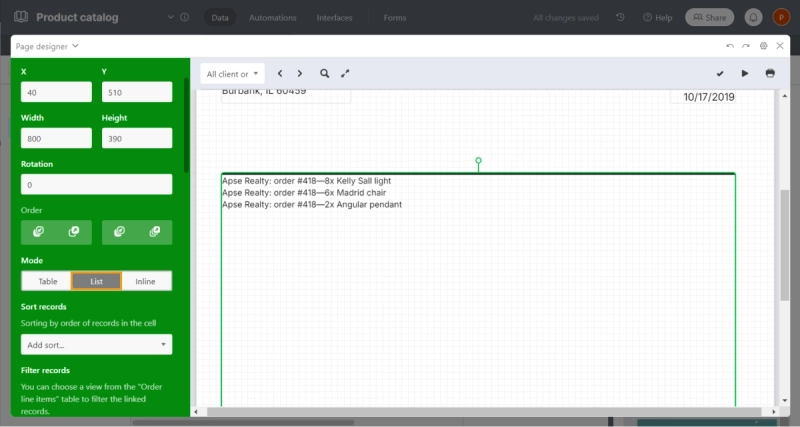
List mode presents data in a vertical list, making it perfect for displaying itemized details. This mode lets you sort and filter the list data, choose the list style (such as bullets, numbers, or none), and customize the text to align with your template's design.
Inline mode combines all values into a single line of text, separated by commas or another delimiter, providing a concise way to display information. In this mode, you can sort and filter the data, as well as customize the text style, ensuring that the inline data fits seamlessly into your overall template.
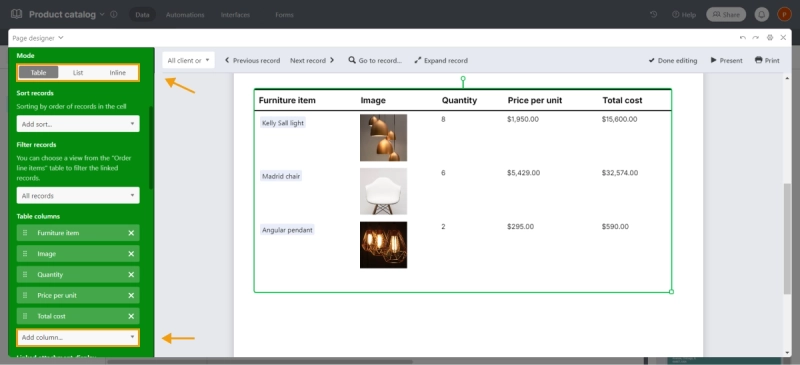
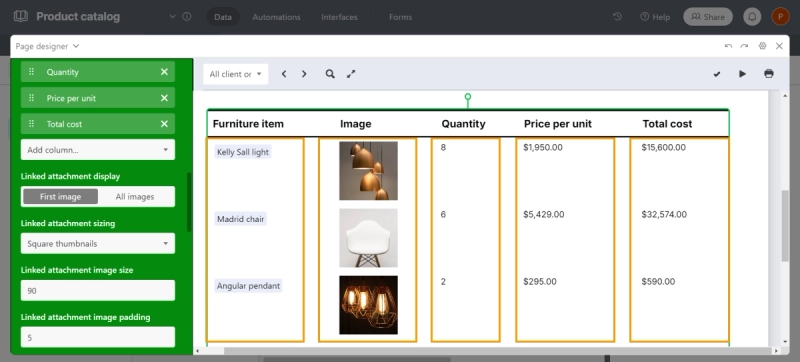
One of the fields with multiple values is Order line items, which we'll use to create a table in the invoice. The best way to display the list of products, quantities, and costs is by using Table mode. We'll select this mode and configure it as follows:
Choose Table mode.
Select the columns from the list of fields generated from our Airtable table.
Set up the linked attachment.
Apply a border to the table header.
Enable the Show headings option.
Customize the heading and row styles.
In the Borders section, turn on the top border.
Here's the table we'll get as a result:
The settings for all field of template are complete, now let's move on to exporting records to a PDF document.
Advanced customization in Airtable Page Designer
Multi-page layouts and multiple records on one page
Airtable Page Designer does not support the creation of multi-page templates for generating multi-page documents. However, you can work around this limitation by using a single-page template and selecting specific print settings to achieve a similar effect.
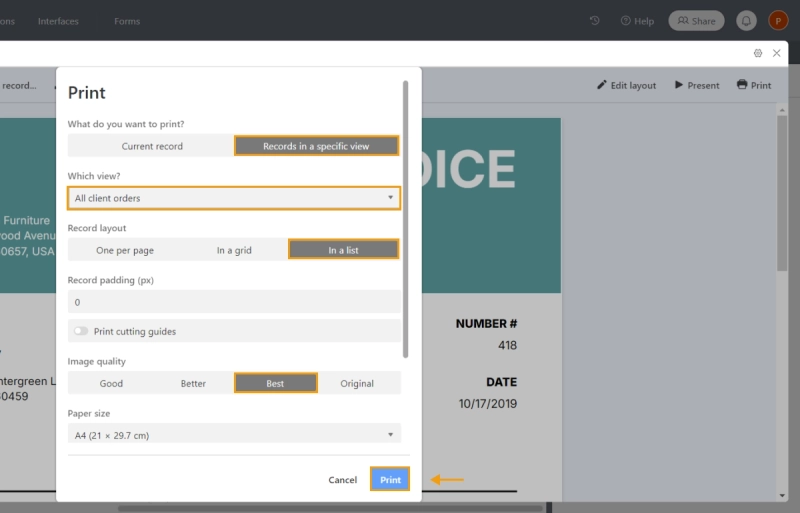
To generate a multi-page PDF document where each page contains a different record:
Choose records in a specific view: Select the desired view that contains the records you want to include.
Set record layout: In the Record layout settings, choose In a list or One per page.
Print: Select your print quality settings and click Print.
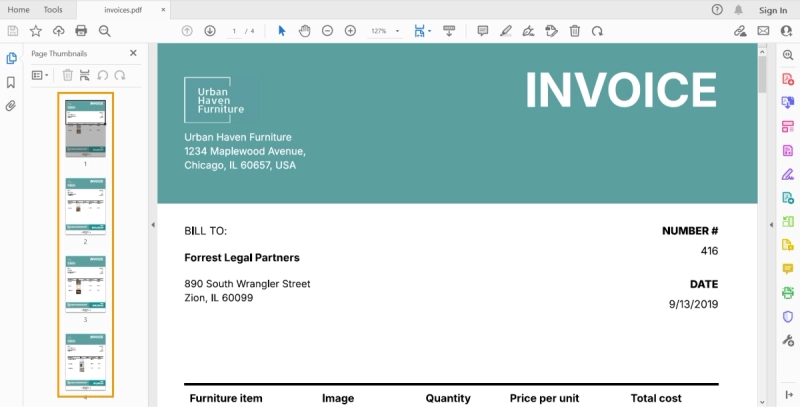
This will produce a single PDF document where each page represents a separate record. The number of pages in the document will correspond to the number of records in the selected view.
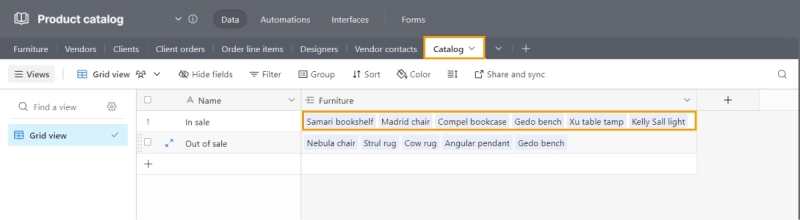
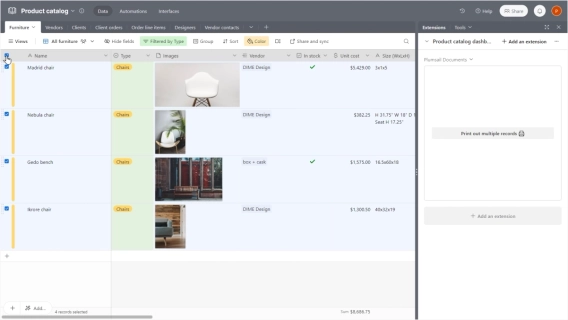
Airtable Page Designer also doesn't support the direct creation of templates that display multiple records on a single page. However, there is a limited workaround to achieve this. To demonstrate how to display multiple records on a single page in Airtable Page Designer, we'll use our current database to create a list of products available for sale. To do this, we'll create a new table called Catalog. Here's how we'll set it up:
Create and link the catalog table: In our Airtable base, we'll create a new table named Catalog with two rows: In Sale and Out of Sale. We’ll add a column named Furniture and link it to our existing Furniture table to include information such as names, sizes, descriptions, and prices.
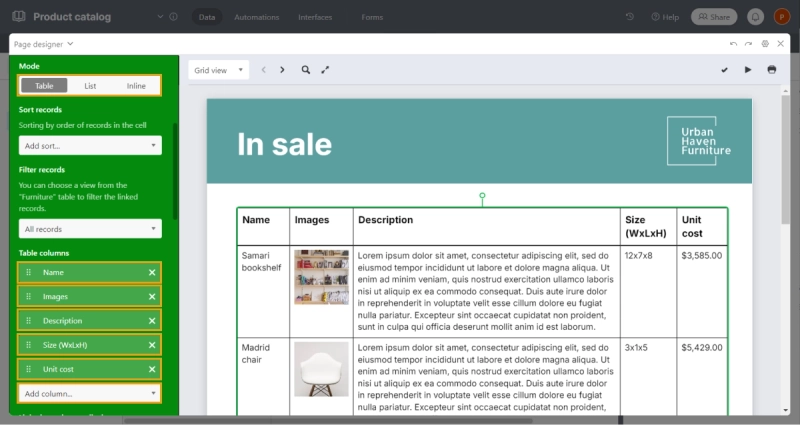
Set Up Page Designer: Next, we'll add the Page Designer extension again and select our new Catalog table as the data source. We'll then add the Furniture field, which is linked to our Furniture table, into the Page Designer template. Since this field contains multiple values, we'll be able to choose the display mode.
Select table mode: We'll choose Table mode for this field. This will allow us to display the linked records in a table format. We’ll customize the table by adding the columns we need, such as name, size, description, and price.
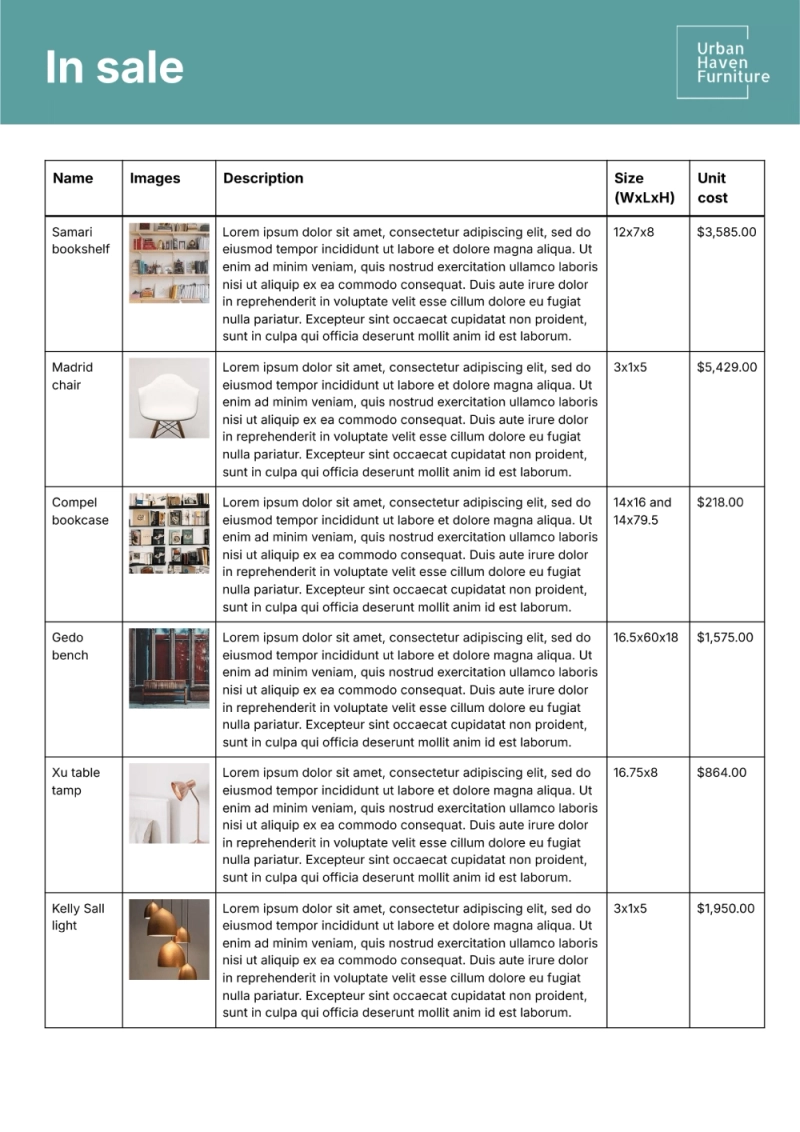
After clicking on the print button, we will receive a document like this:
NOTE When printing the document, please note that the file will only include the records that fully fit within the template area. If a record does not fit entirely, it will not be displayed in the final document.
If you require true multi-page documents, consider using external tools like Plumsail Documents, which integrates with Airtable and allows for more advanced document generation, including automated multi-page layouts. You can find out more about how to do this in the article How to print multiple Airtable records on one page and include them in one document.
Organize elements in Page Designer
To create a clean and professional design, it's important to properly align and distribute elements:
Align fields within the template: Use the grid in the designer to accurately place fields, ensuring consistent and organized layout throughout the template.
Align field content: Adjust the vertical or horizontal alignment of text and images within fields for a neat presentation of information.
Distribute elements evenly: If you have multiple elements arranged in a row or column, use the element settings (alignment, headings, image sizes, etc.) to create a balanced and symmetrical layout on the page.
Integration with automation services
Page Designer doesn’t support direct integration with automation platforms. Unlike other tools, it cannot be connected to applications via connectors in Zapier, Make, or Power Automate. This limitation means that automatic document creation, exporting, or syncing with other apps isn't possible using these services. If you need automated workflows involving document generation, you'll need to consider alternatives that offer better integration capabilities.
Page Designer cannot be automated in any way. To automate the process of creating a PDF, emailing the PDF, and/or attaching the PDF into an attachment field, you would need to use external tools to do this.
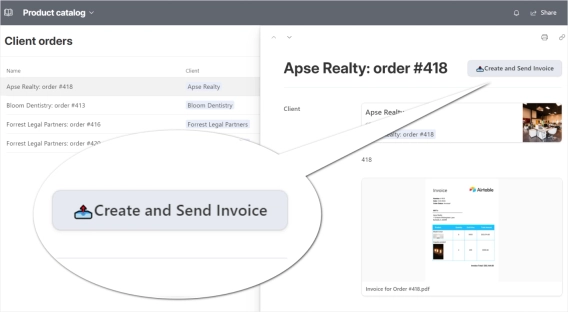
Combining Page Designer with other extensions for Airtable
Maximize the potential of your Airtable setup by using Page Designer alongside other extensions. For example, you can use the Chart block to visualize your data and then incorporate those charts into your Page Designer templates for a more comprehensive report. This combination can help you present data in a more insightful and visually appealing manner.
Export and share your designs
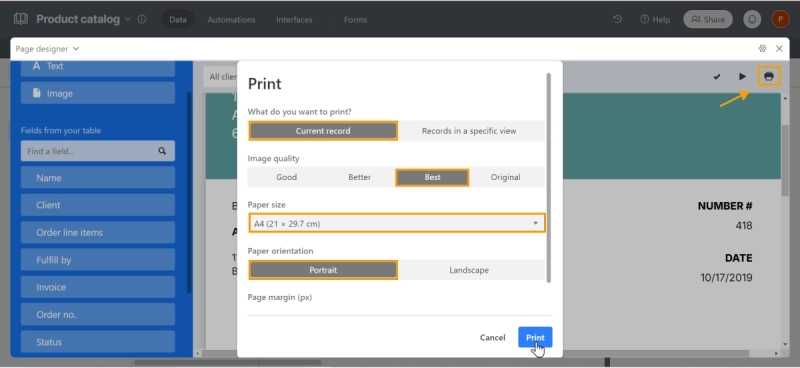
Export and print to PDF
Once your template is complete, exporting it to PDF is straightforward:
Click on the Print button within the Page Designer block.
Choose your desired print settings, such as page range and orientation.
Save the output as a PDF file.
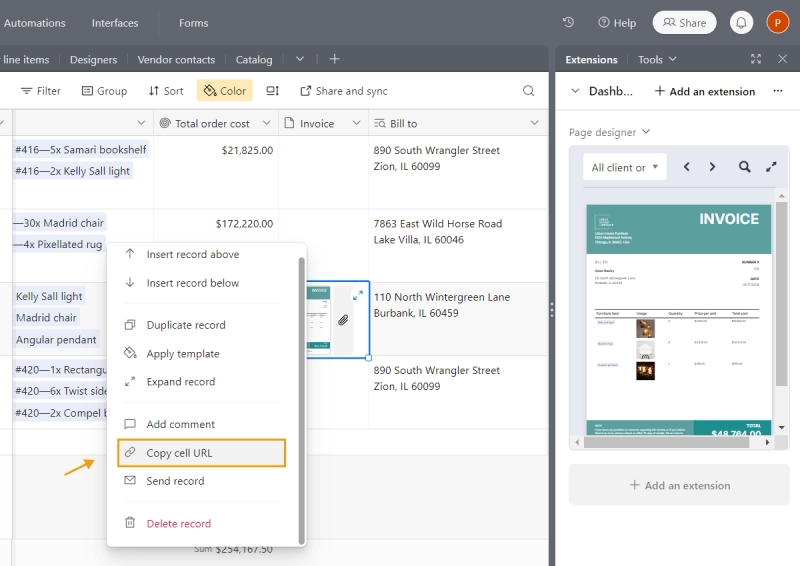
Share with others
While Page Designer doesn't offer a direct sharing link, there is a workaround:
Save as PDF: Manually save the Page Designer report as a PDF.
Attach and Share: Insert the PDF file into an Attachment field in your base and share the view link with others. However, keep in mind that the recipient will need access to the Airtable base to view or download the document.
Frequently Asked Questions
How do I add the Page Designer block to my Airtable base?
Adding the Page Designer block is done through the Extensions panel. Simply navigate to Add an extension and select Page Designer from the list.
Can I create multi-page templates in Page Designer?
No, Page Designer only supports single-page templates.
How do I automate the generation of PDFs using Page Designer?
Click the Print button in the top right corner of the Page Designer interface, adjust the row output settings, and then click Print again.
What are the limitations of Airtable Page Designer?
You can only create single-page templates, cannot directly upload images to your template, the design functionality is limited, there is no support for charts or graphics, and the output format is restricted to PDF. Additionally, you cannot upload pre-made templates.
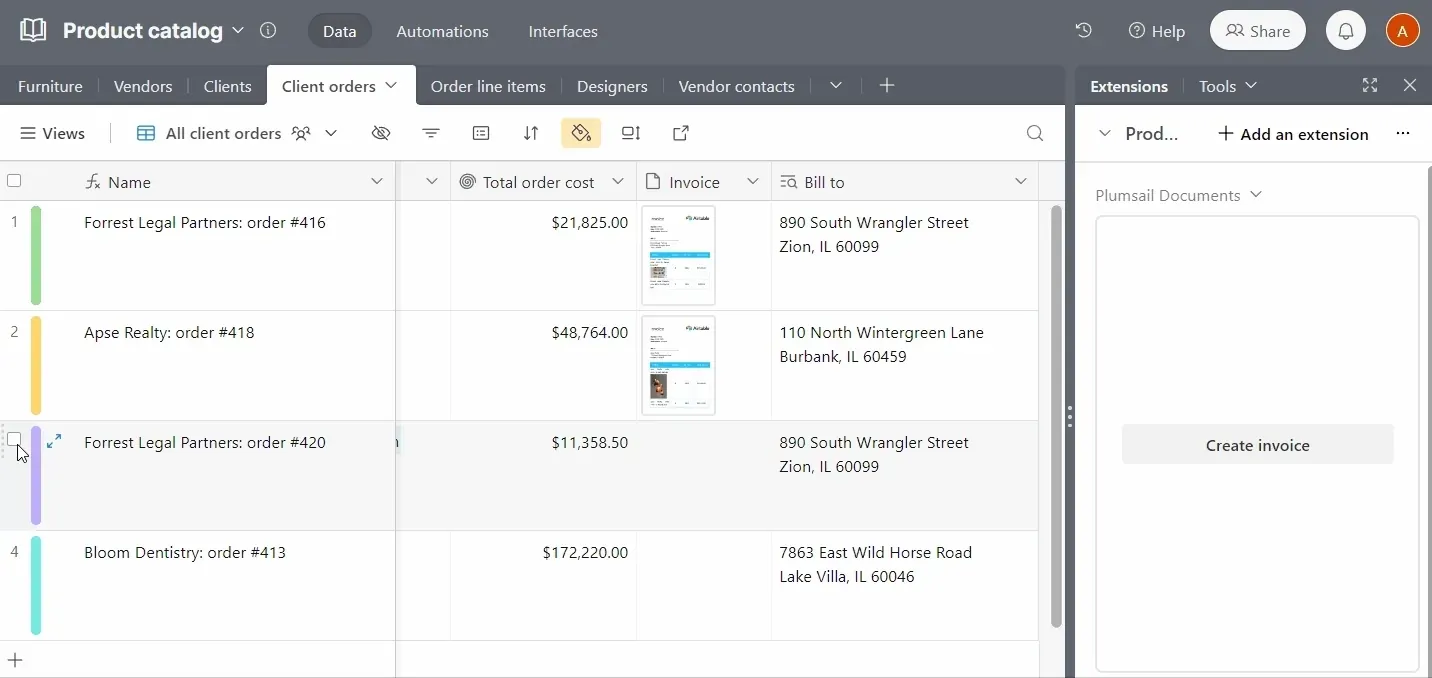
What to use when Airtable Page Designer isn't enough: Plumsail Documents
If Airtable Page Designer doesn't meet your needs, Plumsail Documents offers a more advanced solution with a range of enhanced features:
Multi-page document creation: Easily create and manage complex, multi-page documents such as reports, contracts, and catalogs.
Flexible file formats: Generate documents in various formats like PDF, DOCX, XLSX, and PPTX, integrating smoothly with Microsoft Office tools.
Dynamic content integration: Incorporate images, tables, and lists dynamically, supporting complex layouts and content repetition for invoices, quotes, and more.
Seamless automation: Automate document creation, attachment, and delivery with integrations like Zapier and Power Automate, streamlining your workflows.
Advanced customization: Use familiar tools like Word and Excel to design and customize documents with greater flexibility, including branded templates and detailed formatting.
With one click you can generate any document you need from the selected Airtable records.
Plumsail Documents offers the features that Airtable Page Designer lacks, making it a better choice for those who need more than basic templates. Whether you need multi-page support, advanced customization, or seamless automation, Plumsail provides a powerful way to create professional, dynamic documents directly from Airtable data.
Conclusion
Airtable Page Designer is useful for creating simple, custom templates like invoices and reports. However, it has limitations, such as only supporting single-page templates, basic customization options, and no automation features.
In this tutorial, we've explored how to use Airtable Page Designer effectively and have addressed common questions. If you find these limitations restrictive, consider using a more robust solution like Plumsail Documents. You can start your free 30-day trial with Plumsail, and for further assistance, feel free to book a call with our team.
How to print multiple Airtable records on one page and include them in one document
Learn how to include multiple Airtable records on one page and fit them into one document. This guide will help you overcome the limitations of Airtable Page Designer.
Angelika Cherina
Lead Marketing Specialist
Documents
Feb 27, 2024
Create and manage documents in Airtable Interfaces and Automations
Plumsail Documents extension for Airtable got new feature for document creation and management in Airtable Interfaces and Automations.
Angelika Cherina
Lead Marketing Specialist
Documents
Nov 21, 2023
Airtable extension for seamless document creation
Introducing a Plumsail Documents extension for Airtable. Create documents from Airtable records with just one click.