
Forms
Documents
Actions
HelpDesk
Charts
Actions Pack
Org Chart
Apr 17, 2023
Introducing Plumsail affiliate program
Are you a content creator or social media influencer? Spread the word about Plumsail and earn money doing it!

Usually, SharePoint development process looks as follows. You create a new site which is based on one of the standard SharePoint templates (Team Site, Blog, Project Site, etc.) after that, you work hard and deeply customize it (add new lists, views, workflows, customize UI) and finally you will get a complete business solution.
But there is another question: “How to deliver your solution to a client?”. One of the answers to this question is to use site templates. You can save the customized site to WSP package and deploy the package to the customer’s environment.
Looks very interesting and useful, but in SharePoint’s world, the Devil is in the detail. For example, if you’re using custom workflow actions in your workflows you will get an error during deployment process:
Microsoft.Workflow.Client.ActivityNotFoundException: The activity named 'WorkflowXaml_988fe3c3_dc3e_47a9_8ff3_c912c82eb56d' from scope '/spo/216722f1-1dc0-4c6d-aafd-86b12ef60a14/1f87e1ae-da77-44d4-92d1-502507b5f2d4/34ceaf02-5217-46be-a307-e09dd93da230' was not found. HTTP headers received from the server - ActivityId: 224e672a-4e00-44ed-8b55-894a059608c2. NodeId: . Scope: . Client ActivityId : f6cadd9c-c011-1000-aa42-85eedd28fc19. ---> System.Net.WebException: The remote server returned an errorThis not informative message means that the SharePoint tried to publish your workflow, but it can’t find custom workflow action. I saw this issue for several of our clients and after research, we have found the reason. It turned up that during deployment process SharePoint doesn’t trigger feature event receivers. Event receiver doesn’t deploy workflow actions and SharePoint throws an error during publishing process (because it can’t find workflow actions used in the workflow).
As result of our research, we have found two workarounds how to solve the issue and deploy site template with workflows including custom actions.
The first way: You need to save workflows as templates. Then remove them from the site (you are always able to restore them from saved templates). Deactivate a feature which contains custom actions (In my case it is Workflow Actions Pack) and save the site as a template. Thus, you have the site template and the templates of workflows as separate WSP packages. To deploy such site you need to create the new site using your template (without workflows). Then activate feature with your custom actions. Then deploy site workflows templates which you saved earlier.
The second way: You can save the site as a template and manually edit WSP package. You need to move workflows to another feature that will be activated manually, also you need to remove workflow actions from modules (because they are deployed via separate WSP package). This is the preferred way, but it requires strong developers skills. I will describe it below. And together we will try to automate the solution.
Before can start playing with the inner content of WSP package we should understand its structure.
As you maybe already know any WSP package is renamed CAB archive. If we open it we should see something like this:
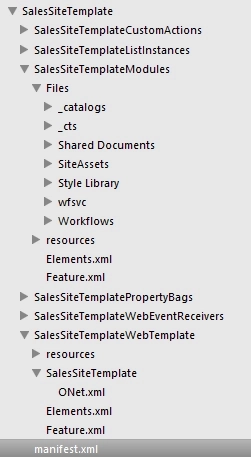
The main file “manifest.xml” contains the list of features, each feature is located in a separate folder. You may notice that SharePoint divided features by executed functions (CustomActions, ListInstanes, PropertyBags, etc..)
The feature definition files are “Feature.xml” and “Elements.xml”. Additionally, a feature may deploy other files, all deployable files are described in the feature definition file.
Typical feature definition looks like:
<Feature  Id="{98ae7648-c63b-4473-8921-43355f83e14e}"
    Title="User custom workflows"
    Description="Custom user workflows"
    Version="1.0.0.0"
    Scope="Web"
    Hidden="FALSE"
    xmlns="http://schemas.microsoft.com/sharepoint/">
   <ElementManifests>
    <ElementManifest Location="Elements.xml" />
    <ElementFile Location="Files\wfsvc\988fe3c3dc3e47a98ff3c912c82eb56d\workflow.xaml" />
    <ElementFile Location="Files\wfsvc\988fe3c3dc3e47a98ff3c912c82eb56d\WorkflowAssociation_3d5de7c53c1347fc9779e48926f1d0ef" />
    <ElementFile Location="Files\wfsvc\ee7bc602661d442b9ea00f08d09594e8\workflow.xaml" />
    <ElementFile Location="Files\wfsvc\ee7bc602661d442b9ea00f08d09594e8\WorkflowAssociation_2351a8b91c354902ab1b6976138d5546" />
   </ElementManifests>
</Feature>
As you can see it is pretty simple. The Feature has a Title, ID, Description, link to manifest and a list of included files. If you want to know a little bit more you can read MSDN documentation.
Additionally, I want to highlight ONet.xml file, it contains the list of features that will be activated during deployment process. Apart from features in the package it contains references to dependent features from other packages. An example from this file is shown below:
<!--BaseWeb Feature-->
<Feature ID="{99fe402e-89a0-45aa-9163-85342e865dc8}" Name="FeatureDefinition/15/99fe402e-89a0-45aa-9163-85342e865dc8" SourceVersion="15.0.0.3" />
<!--Plumsail.ActionsPack_Plumsail.ActionsPack Feature-->
<Feature ID="{d7891031-e7f5-4734-8077-9189dd35551c}" Name="FeatureDefinition/15/d7891031-e7f5-4734-8077-9189dd35551c" SourceVersion="0.0.0.0" />
<!--SiteFeedController Feature-->
<Feature ID="{5153156a-63af-4fac-b557-91bd8c315432}" Name="FeatureDefinition/15/5153156a-63af-4fac-b557-91bd8c315432" SourceVersion="15.0.0.0" />
<!--WorkflowTask Feature-->
<Feature ID="{57311b7a-9afd-4ff0-866e-9393ad6647b1}" Name="FeatureDefinition/15/57311b7a-9afd-4ff0-866e-9393ad6647b1" SourceVersion="1.0.0.0" />Now when we studied the structure of typical WSP package we can move forward. I want to write a simple console utility which will repair the WSP package and it will move all workflows to separate feature.
To start we will divide all work into separate stages:
To ensure that the solution will work we can walk through these steps manually, but the next step we will automate this process and in next part of the article I will show you the main functions of the console program that you can use.
I do not want to clutter the article with a lot of code and I will just show examples of the main functions.
To add a new feature we will create Feature.xml and Elements.xml in a separate folder inside WSP package.
Firstly we need to create new workflows feature, to do this I used the following code:
void CreateWorkflowFeature()
{
    wfFeatureDir = Path.Combine(BasePath, WFFeaturePath);
    System.IO.Directory.CreateDirectory(wfFeatureDir);
    wfFeature = new XDocument(
        new XElement(ns + "Feature",
            new XAttribute("Id", Guid.NewGuid().ToString()),
            new XAttribute("Title", "Template workflows"),
            new XAttribute("Description", "Template workflows"),
            new XAttribute("Scope", "Web"),
            new XAttribute("Version", "1.0.0.0"),
            new XElement(ns + "ElementManifests",
                new XElement(ns + "ElementManifest", new XAttribute("Location", "Elements.xml")))
            ));

    wfElements = new XDocument(new XElement(ns + "Elements"));
}
Then we need to process the manifest file and iterate through the all features:
var manifestFilePath = Path.Combine(BasePath, "manifest.xml");

//Load features
var manifest = XDocument.Load(manifestFilePath);
var features = manifest.Descendants(ns + "FeatureManifest");

//Process features list defined in manifest.xml
foreach (var featureDef in features)
{
    var featureFile = Path.Combine(BasePath, featureDef.Attribute("Location").Value);
    ProcessFeature(featureFile);
}
For each feature, I call a list of working methods that will process a feature individually
void ProcessFeature(string featureFile)
{
    var featureDir   = Path.GetDirectoryName(featureFile);
    var elementsFile = Path.Combine(featureDir, "Elements.xml");

    var feature  = XDocument.Load(featureFile);
    var elements = XDocument.Load(elementsFile);

    RemoveCustomActions(feature, elements, featureDir);
    RemoveModules(feature, elements, featureDir);
    RemoveDependentFeatures(feature, elements, featureDir);
    MoveWorkflowModules(feature, elements, featureDir);

    //Save files
    elements.SaveToFile(elementsFile);
    feature.SaveToFile(featureFile);
}
The main thing here in the methods RemoveCustomActions, RemoveModules, RemoveDependentFeatures and MoveWorkflowModules. They work with input XElements and also move files physically. Then we just save the Feature and Elements files.
As result of our work the structure of WSP package will look as follows:

As aconclusion of this small research, we’ve got a small console utility that will help you to prepare WSP package to deploy to another SharePoint environment.
All source code is available on GitHub and you can research it deeper or write something useful for your case.
Feel free to comment the article. I will be glad to answer interesting questions.
P.S. If you’re not a developer and you want to just solve the issue, you can read the following article where is shown how you can use this small utility.
Are you a content creator or social media influencer? Spread the word about Plumsail and earn money doing it!
Services outage on March 29th, 2022
Plumsail doesn't use the Log4j library in any of the products.