This guide explains how to create a PDF from Airtable records with image attachments. We will use a Word document as a template to generate a PDF, but this can also be done with other formats like PowerPoint or Excel, depending on your needs. We developed this guide in response to community requests for optimizing the process to generate PDFs from Airtable.
I am working with Airtable/Stacker, Zapier and Plumsail documents. My users upload images to Airtable/Stacker, which I would like to display in a plumsail document. Is it possible to have the plumsail document display more than one image if there is more than one?
I’m currently using Airtable to manage a catalog of items. Each record is a single item, with fields like SKU, description, dimensions, and so on. The client has asked me to figure out a way to export this catalog information from Airtable into a powerpoint document that can be downloaded and edited. What do you recommend? Is there an integration I could use?
Generate PDF from Airtable using the Plumsail Documents extension.
Create PDF from Airtable using Make and Plumsail Documents.
The main difference is that the first method is simple and ideal for most cases, using Airtable and the Plumsail Documents extension to generate PDFs directly from the database. The second method uses Make and is better for complex scenarios where you need to create PDFs based on specific events or manipulate data outside of Airtable.
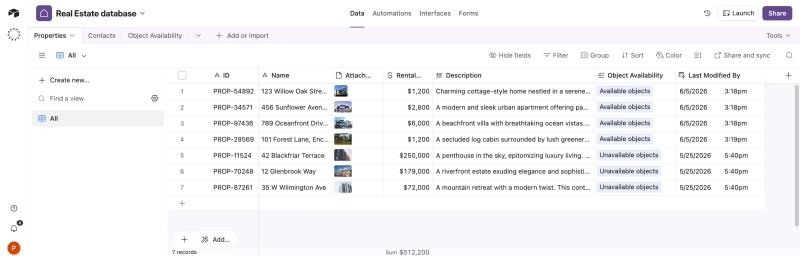
Let's take a closer look at our database in Airtable. To generate a PDF from Airtable, we have created a database with multiple records. The primary data we will work with is the name of the object, description, rental price per month, and attached photos of the object.
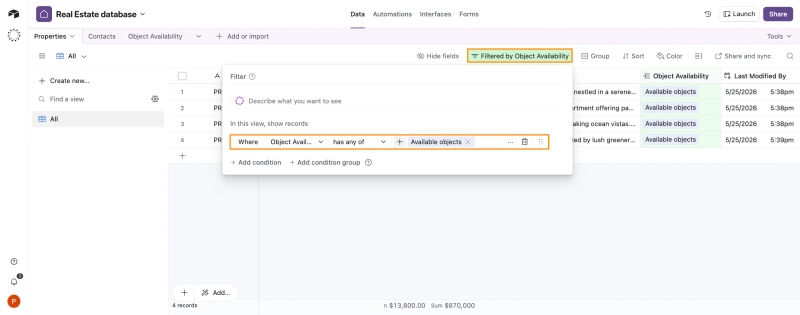
We need to pay attention to the field of object availability and the panel with views. We duplicated the All view as the base and created a new view, Available Objects, by setting a filter on the Object Availability column so that only objects available for rent are displayed. This view will come in handy later.
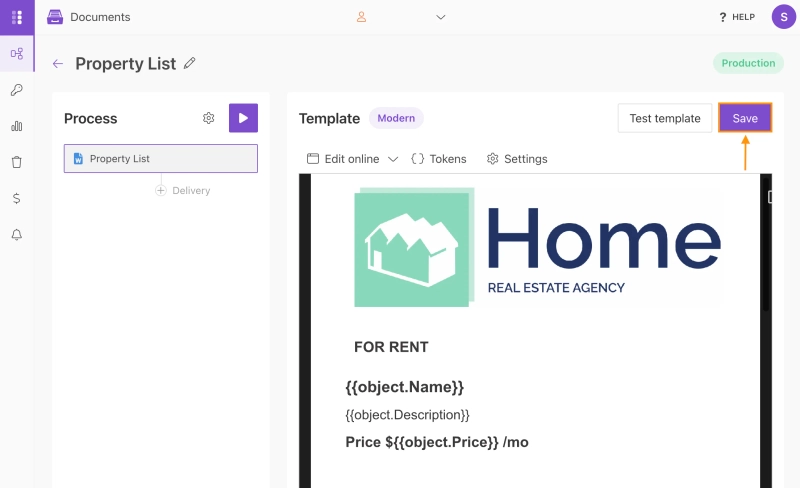
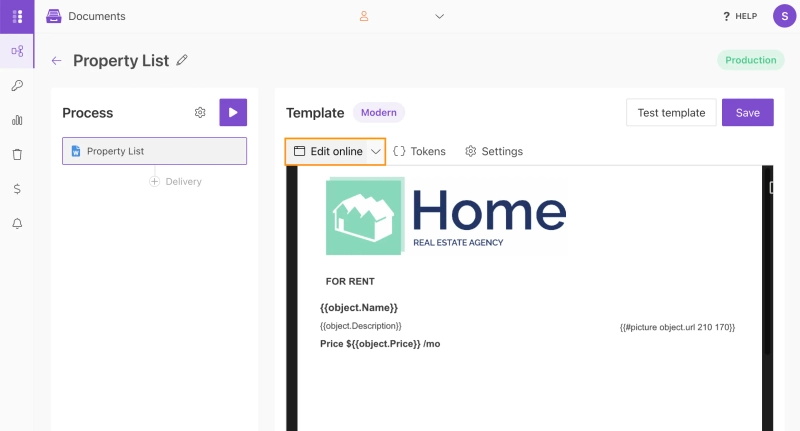
Our next step is to set up the start-generation process for the document with multiple line items using Plumsail Documents. The first thing we need to do is make a template. We took a ready-made Property List template in Word DOCX format from our library.
The template uses nested tokens with a dot operator inside a table to indicate that properties refer to the same collection of the object: {{object.Name}},{{object.Price}},{{object.Description}}. The templating engine is intelligent enough to recognize which content needs to be duplicated. It will iterate through all of the objects in the array to render them and automatically add rows.
The table also has settings for displaying the inside horizontal border, and when a new row appears, the border between them will be displayed.
It also uses a picture formatter {{#picture object.url 210 170}} to handle photos from columns with attached photos of the object from Airtable. The numbers in the brackets of the token indicate the width and height of the image. Specifying two sizes allows you to use images with different resolutions, since, in the finished document, it will be stretched to these values.
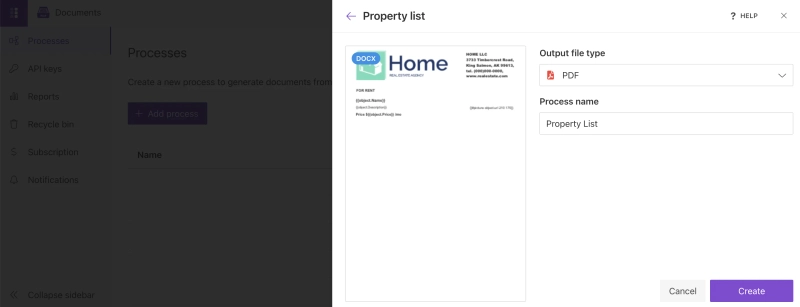
We launch Plumsail Documents, click the Add process button, and select the Premade template item. In the list of templates, select Property list. Enter the name of the process, check the template, and click the Save button.
The next step is setting up the output file that we will receive after generating the document.
Click the Settings and configure Template settings. The main lines to fill will be Output filename and Output file type. We also add the @date token to the file name.
Depending on your needs, you can choose one of two formats for the final document: PDF or Word DOCX. Select PDF format and click the Save button.
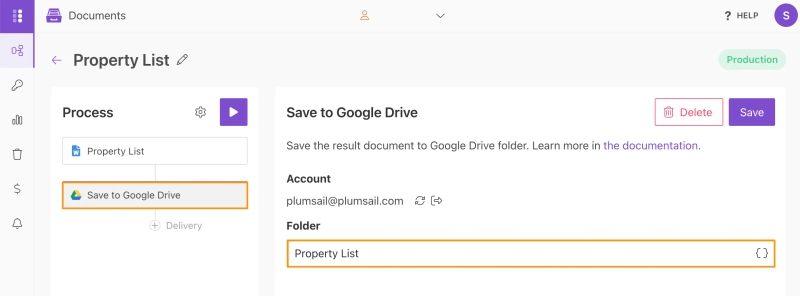
After completing the configuration of the output file, we go to the Delivery settings. It can be your mailbox, Slack, SharePoint, etc. We set it to save our generated document to Google Drive. Alternatively, if the needed delivery option is missing, you can manipulate the resulting file in Make and send it to any app.
When a document is generated, it will have the creation date in its title. Click the Save button and go to the settings Start process.
In this section, we do not need to do anything. Returning to Airtable.
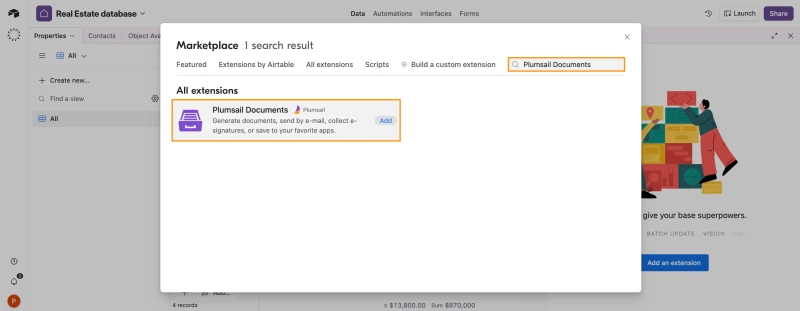
Let's start by adding the Plumsail Documents extension to the database for Airtable to create PDF documents directly from the database records. Click on the Extensions button, then click Add an extension, and in the pop-up window, enter Plumsail Documents in the search bar. Find the application and click Add.
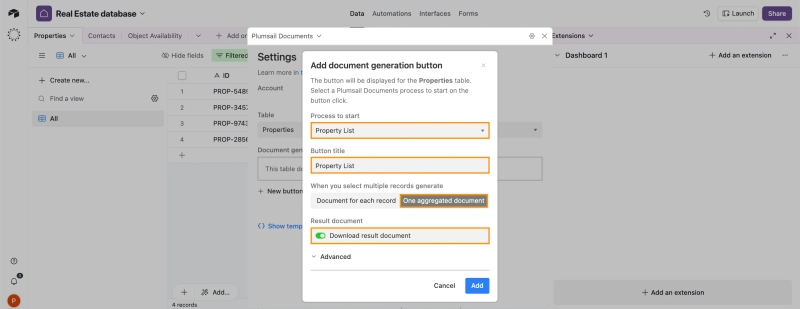
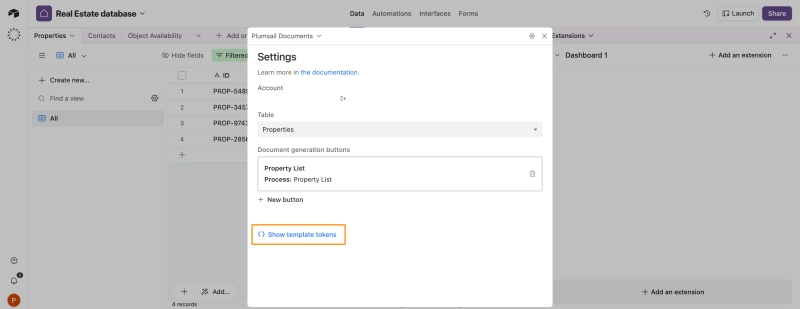
After we have logged into our Plumsail Documents account, the Add document generation button window pops up where we need to make settings.
In the Process to start field, select our template in Plumsail Documents. In our case, it is the Property list. The Button title was generated automatically. Also, we must choose an option on how to create a PDF from Airtable if several records are selected. Click One aggregated document. The Download result document switch is already automatically turned on. Click on the Add.
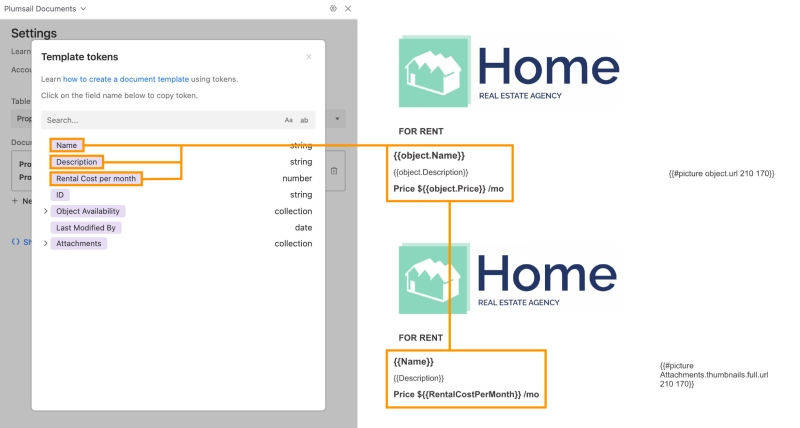
The next step is to set up tokens. Airtable automatically generates tokens according to the database we work with. Therefore, we will need to copy the tokens from Airtable and replace the tokens in the Plumsail Documents template with them.
Click on Show template tokens.
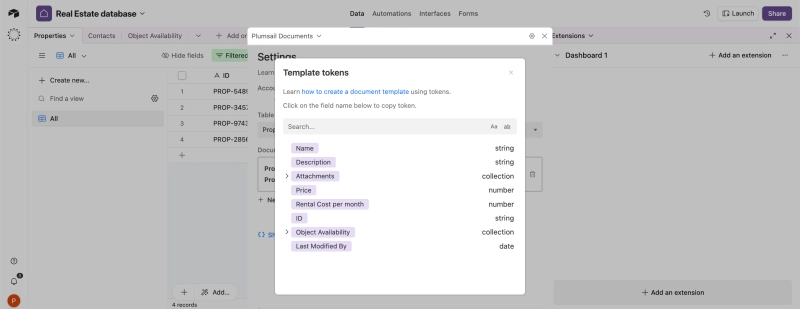
After clicking, we will see a list of database columns. Clicking on any of them causes the field token to be copied to the clipboard.
Now we need to go back to Plumsail Documents. Click the Edit online to сonfigure template.
We return to Airtable, click on the name of field, copy the token to the clipboard, and paste it into the appropriate place in our template, replacing the old token with the new one. Save the changes made.
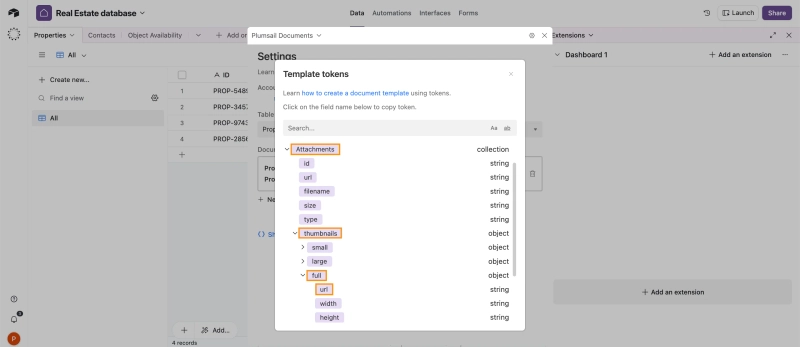
Particular attention should be paid to the use of tokens for images. The token for images will be located in attachments --> thumbnails --> full --> url.
Click on url and copy the {{Attachments.thumbnails.full.url}} token to the clipboard.
We paste the copied token into the template instead of the {{#picture object.url 210 170}} token and supplement it with a picture object operation{{#picture Attachments.thumbnails.full.url 210 170}}.
After all settings are completed, close the window with extensions. Turn on the filter Available Objects and select all remaining objects with one click. On the panel with Plumsail Documents extensions, click on the button Property list and Airtable will create PDF documents from the database records.
When Airtable creates a PDF document, the list of real estate objects will be downloaded to your computer automatically. It is important to mention that with Plumsail Documents, you can not only download files but also choose any convenient delivery method. For instance, the document can be automatically sent by email or saved in the cloud.
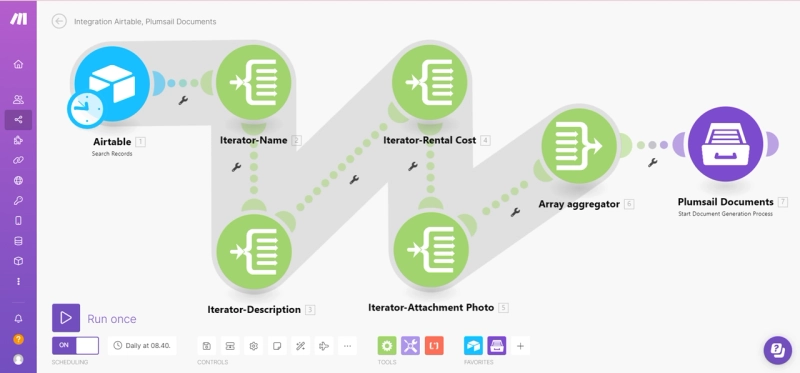
We will use the same document generation process for creating PDFs from Airtable that we described earlier and schedule it to trigger in Make. Let's create an automated workflow that will search Airtable records with image attachments. Then, the Make flow control modules will convert the data from records into an array and transfer it to Plumsail Documents, which will generate a PDF file using a customized Word template. Here is what it will look like in the end:
Trigger
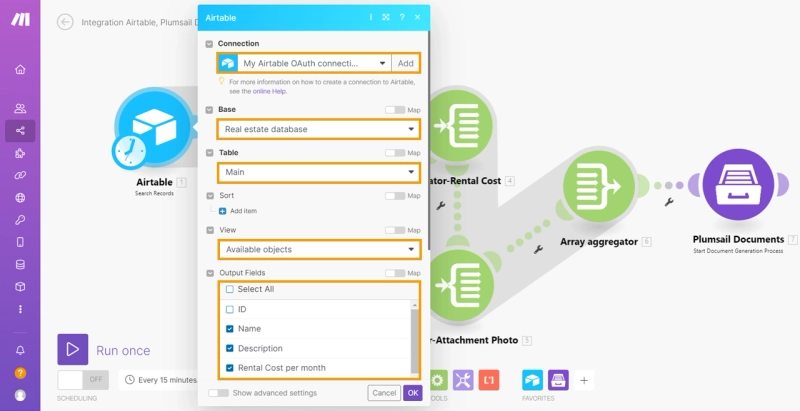
The first thing we need to do is set the Trigger. In our case, we used the module Search Records in the Airtable database and performed the following steps:
Connect Airtable and Make accounts.
Select a database Real estate database.
Specify the Main table where we will take the data.
Choose the Available objects view that we created earlier.
Set the Output Fields.
Iterators
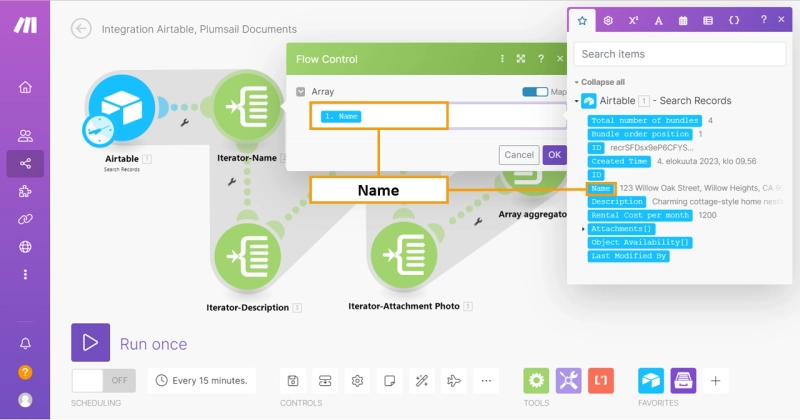
After creating the search module, we will add modules with Iterators. An Iterator is a special type of module that converts an array into a series of bundles. Each array item will be outputted as a separate bundle. In each iterator, we write one array. As a result, we get an Iterator with an array of names, an Iterator with an array of descriptions, and so on. The number of Iterators corresponds to the number of fields to fill in our template.
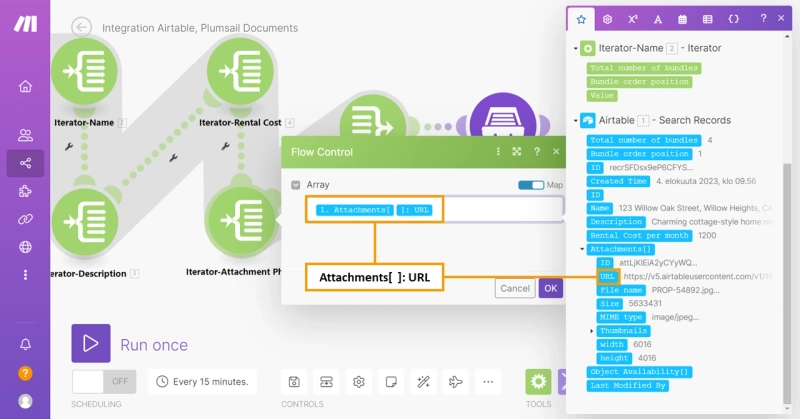
For an array of attachments with photos of objects, select the source URL.
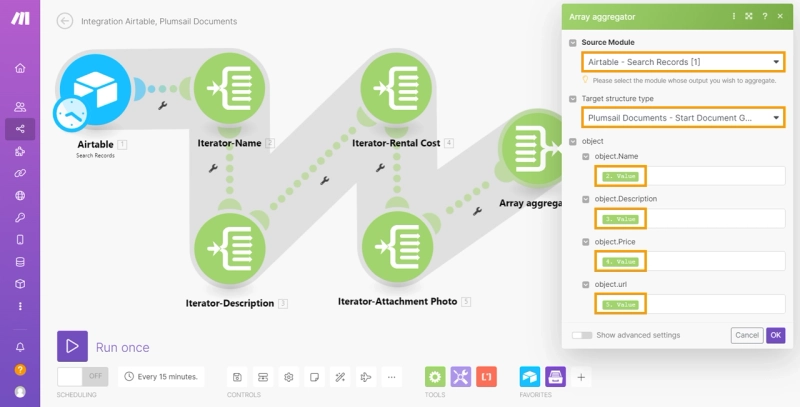
Arrays Aggregator
Next, we add the module Array Aggregator. An Aggregator is a type of module designed to merge several bundles of data into a single bundle. It accumulates all the bundles it receives and outputs a single bundle with an array containing one item for each accumulated bundle. The content of the array's items depends on the particular Aggregator module and its setup.
NOTE: Before setting up Aggregator, add the Plumsail Documents module and synchronize it with Make. Select a process and go back to the Aggregator setup.
Having opened the settings of the Aggregator, we indicate the Source module is the Airtable - Search Records. Then we select the Target structure type, the Plumsail Documents, and merge the fields of the document template with the resulting arrays from Iterators.
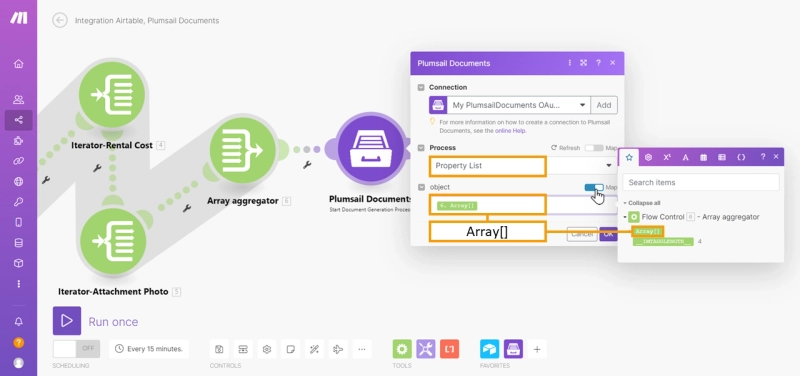
Plumsail Documents - Start document generation process
The next step is adding and configuring the Plumsail Documents module. We made the connection and process selection earlier, before setting up the Aggregator. We make the Map switch in the object field active and select the resulting array from the Aggregator.
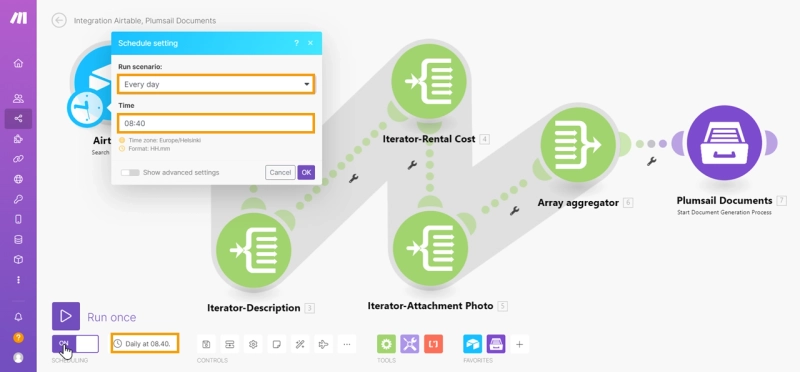
Our last step is to set up the launch of the scenario. We click on the time, select the launch scenario Every day, and specify the time as 8:40. Click OK and switch SCHEDULING to the active position.
All settings are ready. Now every morning, Make will query Airtable for all records from the database. It will process the received data according to our settings and transfer it to Plumsail Documents to generate a PDF document from the template and save it on Google Drive.
In summary, using Airtable to create PDF documents from database records with image attachments can be done through two methods, each of which has its own advantages.
Create PDF from Airtable using Plumsail Documents extension
Ease of use: Direct integration into Airtable ensures simplicity in setup and usage.
Efficiency: Allows direct document creation from Airtable data without the need for additional tools.
Create PDF from Airtable using Make as a connector
Flexibility:Make provides flexible capabilities to extract data from Airtable and transfer it to various templates.
Advanced functionality: Enables integration and automation of processes across different applications, expanding functionality.
The choice between methods depends on specific needs and user preferences: if simplicity is crucial, the first method is preferable; if greater flexibility and integration with other applications are required, the second method may be more suitable.
Supplier onboarding form for SharePoint: no login required
Build a supplier onboarding form that saves straight to SharePoint — no vendor login, attachments support, conditional field visibility, e-signatures, and automatic contract generation.
Nikita Kurguzov
Customer Support Engineer
Documents
Customer Story
May 21
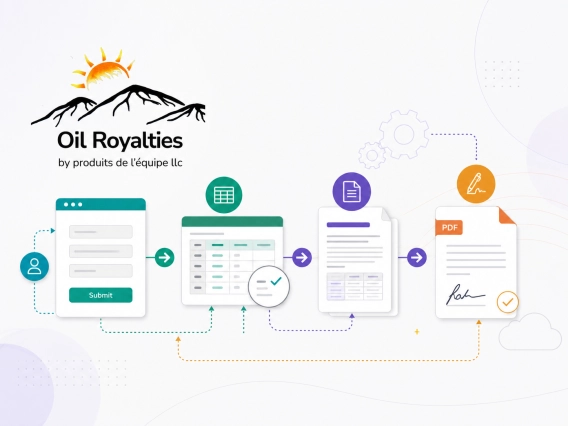
How Oil-Royalties automated agreement generation and e-sign workflows
Learn how Oil-Royalties used Plumsail Documents with Jotform, Make, and Dropbox Sign to automate agreement generation and deliver pre-filled e-sign agreements.
Ronald Achs
Founder and Chief Executive of PRODUITS DE L’EQUIPE LLC
Forms
Documents
Customer Story
May 18
How to automate multi-step approval process in SharePoint with PDF timesheet result
See how FileBank Inc. built a four-stage timesheet approval workflow in SharePoint Online — with auto-calculated hours, signature capture, and final PDF generation — with Plumsail and Power Automate.