
Forms
Documents
Actions
HelpDesk
Charts
Actions Pack
Org Chart
Apr 17, 2023
Introducing Plumsail affiliate program
Are you a content creator or social media influencer? Spread the word about Plumsail and earn money doing it!

Update: We glad to inform you that we released ready to use HelpDesk for SharePoint. It can be installed and configured in 15 minutes.
In this article, I would like to demonstrate how to create HelpDesk on SharePoint Online or SharePoint 2013/2016/2019. The idea is simple. I want to implement a system, which will allow each side of the process to work with their own tools.
Thus, a ticket initiator works with an e-mail client and a support specialist works with SharePoint web interface. Finally, we will get something like this:

I chose SharePoint Discussion board list template because it provides ready to use friendly interface. I will change it a little bit to adjust needs of the HelpDesk system. After modifications it will look like this:
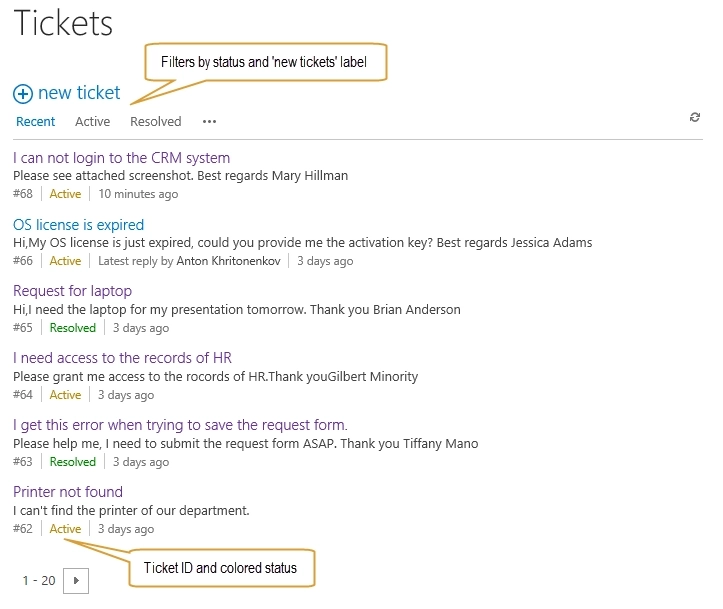
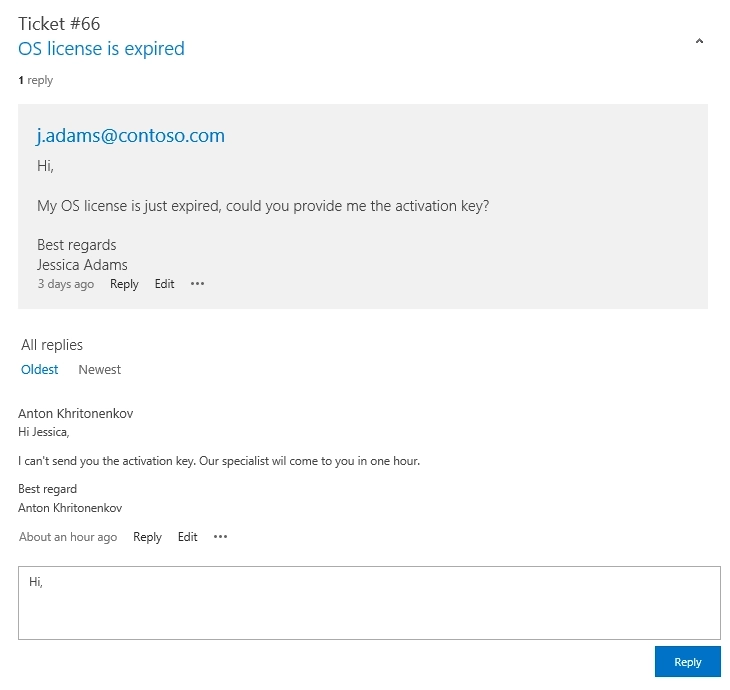
Each discussion is a ticket. All responses from ticket initiator and support specialist displayed inside the discussion. A sample ticket about license expiration is in the picture below:
I divided implementation of the HelpDesk into three stages:
Firstly, let us create the new list from the discussion board list template. I named it Tickets. Then we need to add new fields:
As you can see from the first two names, we will use these fields to store ‘To’ and ‘From’ fields from the e-mail message. We will use TicketStatus in the discussion board views, look at the first picture in this article.
That is all we need to do before configuring SharePoint workflows, but to clarify future workflows’ behavior I will describe out of the box discussion board field ‘Parent Folder Id’. This field is used by discussion board comments to refer to an initial discussion. Please look at this sample to understand the typical structure of a discussion list.
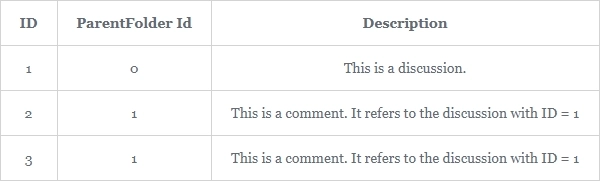
Discussions and comments are stored in the same list, we will use ‘Parent Folder Id’ to find the discussion for a specific comment.
I use SharePoint Designer workflows for synchronization of the Exchange mailbox with SharePoint list and for e-mail notifications. We will create two workflows: the site level workflow will sync e-mails with SharePoint list and the list level workflow will send notifications about new tickets and comments.
Note: SharePoint 2013 has two types of workflows: SharePoint 2010 workflows (Workflow Foundation 3.5) and SharePoint 2013 workflows (Workflow Foundation 4.5). In this example, are used SharePoint 2013 workflows.
Now let us create a new site-level workflow using SharePoint Designer. I named it ‘Sync Tickets’.
Out of the box, SharePoint designer activities do not support synchronization of the Exchange mailbox with SharePoint lists. To set up synchronization I used custom workflow activity Sync Exchange e-mails with list. This activity is included in the paid Plumsail Workflow Activity Pack. It is a set of additional workflow activities for SharePoint Online and SharePoint 2013/2016/2019.
This workflow looks like this:
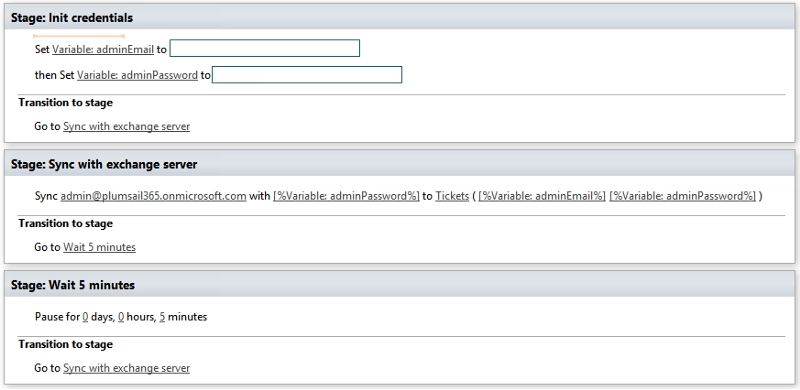
As you can see from the picture, the workflow is pretty small. It contains three stages.
In the ‘init credentials’ stage, I store credentials inside the workflow variables. I will use these credentials to check Exchange mailbox and to synchronize emails with SharePoint list.
In the ‘Sync with exchange server’ stage I use only one workflow activity Sync Exchange e-mails with list. This activity will load data from the mailbox to the SharePoint list. I specified following parameters:
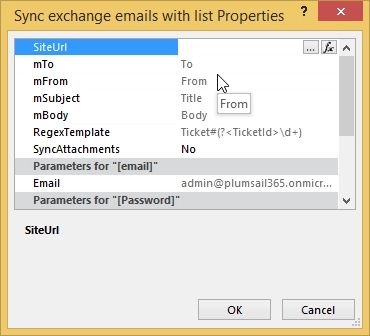
In general, it is enough, but for advanced scenarios, it is possible to change the mapping of the e-mail fields to SharePoint list fields, to specify a regular expression for e-mail subject parsing and to choose different SiteUrl. The SiteUrl is a URL of the SharePoint site. By default, it is the current site, but you can specify another SharePoint site. To manage these properties open properties of the activity:
Note: It is not necessary to use Discussion board template for synchronization, you can create a custom list and specify your own fields mapping in the properties of the activity.
In the ‘Wait 5 minutes’ stage, the workflow just waits 5 minutes and starts synchronization again by transitioning to the ‘Sync with exchange server’ stage. To wait 5 minutes I use out of the box ‘Pause for Duration’ workflow activity.
That is all we need to do to set up periodical synchronization of the Exchange mailbox with SharePoint list.
Now let us create list level workflow for Tickets list. I named it ‘Process new tickets and comments’. This workflow is responsible for e-mail notifications about the new tickets and comments.
In the ‘Start Options’ section of the workflow settings I checked ‘Start workflow automatically when an item is created’:
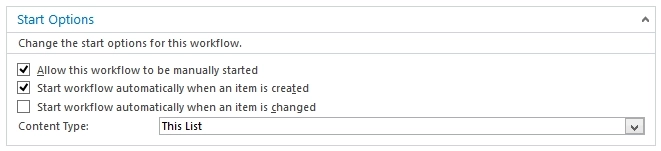
As you know from the description above, all discussions and comments are stored in the single list. Thus, this workflow will be automatically started each time the new ticket or comment is created.
The workflow looks like this:
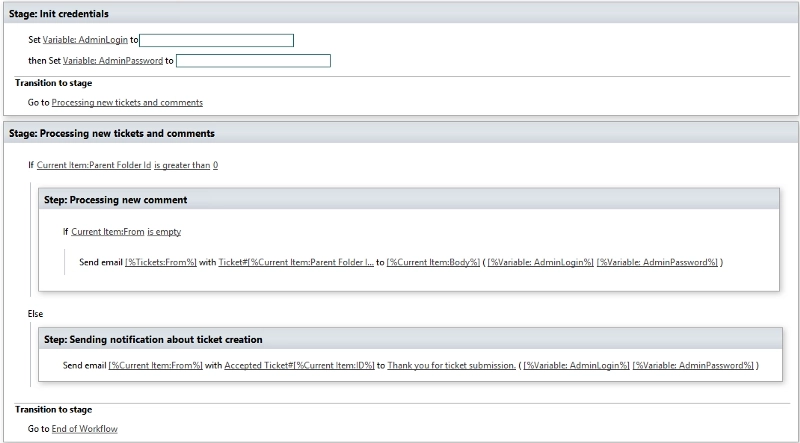
The workflow contains two stages.
In the ‘init credentials’ stage, I store credentials inside the workflow variables. I will use these credentials to send email notifications.
In the ‘Processing new tickets and comments’ stage I check if the current item is a new ticket or a new comment. If ‘Parent Folder Id’ is equal to 0 it is a new ticket because it doesn’t have any reference to the parent. If ‘Parent Folder Id’ is greater than 0 it is a new comment, because it is linked to some discussion. If the current item is a new ticket, I send a notification to the ticket’s initiator with Id of the new ticket in the subject and thanks for submitting the ticket. All future conversations will contain this ticket Id in the subject. That is why the activity in the site level workflow will know how to process the new e-mail, when to create new discussion and when to create new comment.
I do not use out of the box ‘Send an Email’ workflow action to send notifications because it cannot send e-mails to external addresses. Our ticket initiators can be external users as much as internal. The out of the box activity also does not support sending attachments. I want to send attachments and pictures from the SharePoint discussion board comments. Instead, I use Send e-mail with attachment workflow activity from the Plumsail Workflow Activity Pack. It allows sending e-mails to external users. It also allows to manually attach documents or automatically parse HTML content of the message and attach images and files from <img> and <a> tags.
Note: Images and files will be attached to the e-mail only if they are stored in the SharePoint library, otherwise they will be ignored. This is not a problem for the current case because all files and images submitted by support specialist will be stored in the SharePoint library.
Now let me describe how to configure this workflow activity correctly. I will start with the activity for sending notifications about the new ticket:

As you can see, I used ‘From’ field value of the current item as address, then I filled subject with ‘Accepted Ticket#’ and the ID of the current item. Finally, I specified friendly body and an e-mail with a password for Exchange mailbox.
Then next activity sends notifications about the new comment:

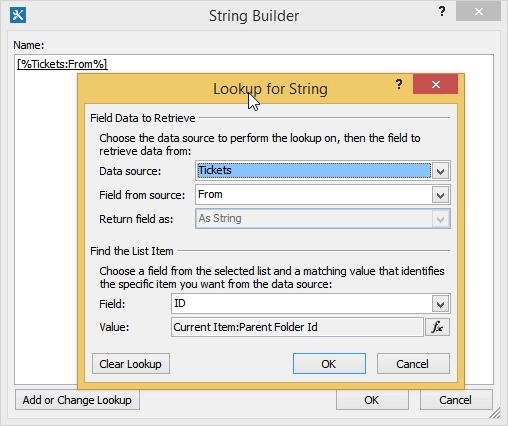
To send notification about the new comment we need to find the address of the ticket’s initiator. It could be difficult because the comment submitted by the support specialist does not contain this address. Good for us it contains ‘Parent Folder Id’, thus we can get parent item (Initial ticket discussion) and use it’s ‘From’ field value as the address. Use ‘Add or Change Lookup’ button to open Lookup window, then configure it as follows:
Then we need to specify a subject. It has to contain ID of the initial ticket. It is ‘Parent Folder Id’ for comment:
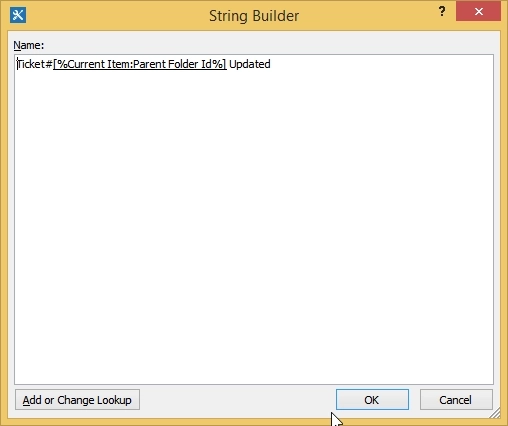
The body of the e-mail will be the same as the body of the comment, just chose ‘Body’ field of the current item.
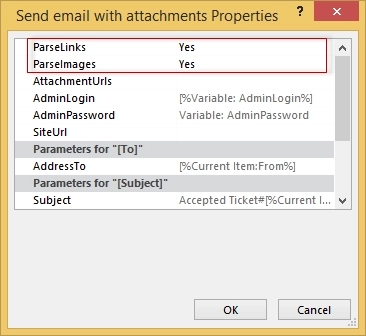
Another important moment is attaching images and files from the discussion board. Open properties of the activity and set ‘ParseLinks’ and ‘ParseImages’ to ‘Yes’. Now workflow activity will parse the body of the comment and attach images and files to e-mail automatically.
That is all we need to do with list level workflow. Of course, you can add your own notifications to this workflow, or for example, assign responsible employees to the ticket.
As I mentioned above, we will customize out of the box views of our discussion board. These views can be customized only with JavaScript (JS Link) and I will show how to do that.
Discussion board list has two important for us views:
Both views cannot be customized using SharePoint UI. We added three columns to the tickets list (TicketStatus, From, To). To make them visible we need to add them to the ViewFields using SharePoint Designer. Open it and navigate to All Files -> Lists -> Tickets and open AllItems.aspx for edit. Then find tag
<FieldRef Name="From"/>
<FieldRef Name="To"/>
<FieldRef Name="TicketStatus"/>
Do the same for the Flat.aspx.
Once we added ‘From’, ‘To’ and ‘TicketStatus’ fields to the ViewFields it is possible to use them inside JavaScript.
The Discussion board list views are JavaScript based, there is a ton of JavaScript and we will override only part of JavaScript functions. Otherwise, we would need to rewrite the whole JavaScript. You can download the source code of the JavaScript file with customizations here.
There is only one problem, the Minimal Download Strategy feature is enabled by default in the SharePoint Online and SharePoint 2013. We need to disable it for current SharePoint site to prevent JavaScript conflicts between out of the box sp.ui.discussions.js file and our customizations. This action is required because if you have multiple discussion boards within one SharePoint site with Minimal Download Strategy the JavaScript for the first visited discussion board will be loaded to the browser, thus if you visited not customized discussion board firstly your customizations will not affect previously loaded file. This is not the best approach, but it allows us to quickly change part of the out of the box functionality.
To disable Minimal Download Strategy navigate to the Site settings -> Site features and disable the ‘Minimal Download Strategy’ feature:

Now open root web of your Site Collection using SharePoint Designer and navigate to the Style Library. Then create JavaScript file there, I named it plumTickets.js.
In this article I will show only the beginning of the script, you can download complete script here. In the beginning of the script you can see:
//Ticket internal field names
var ticketIDField = "ID";
var ticketStatusField = "TicketStatus";
var ticketFromField = "From";
//New ticket link title. This text is displayed above the main view
var newTicketLintTitle = "new ticket";If you use other internal names for ticket status, ‘From’ or ‘To’ fields you can change it here. You also can specify the text for the new ticket link. If you have the same fields, do not change anything.
Another part of the script is filtration settings. This part is responsible for the filters on the top of the view:

The settings script looks like this:
SP.UI.Discussions.HeaderBehavior.prototype.populateSortFilterItemList = function SP_UI_Discussions_HeaderBehavior$populateSortFilterItemList() {
 var filters = [new SP.UI.Discussions.QueryOverrideItem(this.context,
 Strings.STS.L_SPDiscSortMostRecent, ''),
 new SP.UI.Discussions.QueryOverrideItem(this.context,
 'Active',
 '<Query><Where><Eq><FieldRef Name=\"' + ticketStatusField + '\"/><Value Type=\"Choice\">Active</Value></Eq></Where></Query>'),
 new SP.UI.Discussions.QueryOverrideItem(this.context,
 'Resolved',
 '<Query><Where><Eq><FieldRef Name=\"' + ticketStatusField + '\"/><Value Type=\"Choice\">Resolved</Value></Eq></Where></Query>'),
 new SP.UI.Discussions.QueryOverrideItem(this.context,
 Strings.STS.L_SPDiscFilterFeatured,
 '<Query><OrderBy UseIndexForOrderBy=\"TRUE\" Override=\"TRUE\"/><Where><Eq><FieldRef Name=\"IsFeatured\"></FieldRef><Value Type=\"Integer\">1</Value></Eq></Where></Query>')];
for (var $$arr_1 = filters, $$len_2 = $$arr_1.length, $$idx_3 = 0; $$idx_3 < $$len_2; ++$$idx_3) {
var $v_1 = $$arr_1[$$idx_3];
this.sortFilterPickerControl.addItem($v_1);
}
}If you do not need to change filters, just do not read this part.
As you can see it has the array named filters. The array contains QueryOverrideItem objects. Each object defines a separate filter. If you add the new QueryOverrideItem object, the new filter will appear in the view.
To create a new object you need to set three values:
Look at this example:
new SP.UI.Discussions.QueryOverrideItem(this.context, 'Active', '<Query><Where><Eq><FieldRef Name=\"' + ticketStatusField + '\"/><Value Type=\"Choice\">Active</Value></Eq></Where></Query>')We finished with customizations script, now we need to apply it to discussion board views.
Almost each web part in SharePoint 2013 and SharePoint Online has JSLink property. This property allows specifying custom JavaScript for the client-side rendering of the web part.
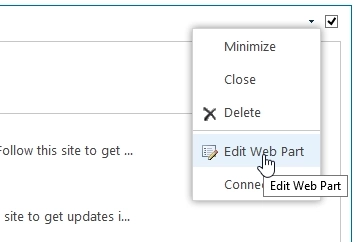
Now we need to change JSLink property of the web parts inside views. Navigate to the Subject view in the browser and open the page for edit. Then open the web part for edit:
In the Miscellaneous section of the web part properties find JS Link property and specify the following link:
sp.ui.discussions.js|~SiteCollection/Style Library/plumTickets.js
Then save web part.
As you can see this link actually contains two links, the first is sp.ui.discussions.js, the second is plumTickets.js. The first file is out of the box rendering script, the second in our script with customizations.
Do the same for the Flat view.
The HelpDesk is ready for use. By the way, it is not necessary HelpDesk, you can use this approach for any system, which handles communication with internal or external users, for example, CRM. You can further complicate the logic of ticket processing, add mail formatting, custom statuses, ticket priorities, some approval logic.
Are you a content creator or social media influencer? Spread the word about Plumsail and earn money doing it!
Services outage on March 29th, 2022
Plumsail doesn't use the Log4j library in any of the products.