Getting Started
- How Plumsail HelpDesk works
- HelpDesk installation
- Quick HelpDesk configuration
- Frequently asked questions
- Resources
Configuration guide
- Email settings
- Triggers
- Web widget
- Tab for Microsoft Teams
- Customize widget forms
- Customize ticket and contact forms
- Customer satisfaction survey (CSAT)
- Scheduling of tasks and reminders
- Business hours and holidays
- SLA policy
- Localization
- Appearance settings
- Color theme
- Customize ticket statuses
- Reports customization
- Ticket numbering customization
- Update HelpDesk
- Uninstall HelpDesk
User guide
- Home page
- Ticket management
- Ticket search
- Knowledge base
- All tickets
- Contacts
- My contact
- Reports
- Canned responses
- Ticket merging
- Ticket splitting
- SLA policies
General
- Version history
- Data protection and security
- Data center location
- Licensing details
- Billing and subscription management
- Support plans
- Status page
Power Automate (Microsoft Flow) and Public API
How to
Introduction to classic triggers in HelpDesk for SharePoint
What is a trigger?
The trigger is one of HelpDesk automation tools. A lot of default triggers are available out of the box. The default triggers send notifications to agents and requesters about significant events: for example, there is a trigger that notifies your clients about a new reply on the ticket:
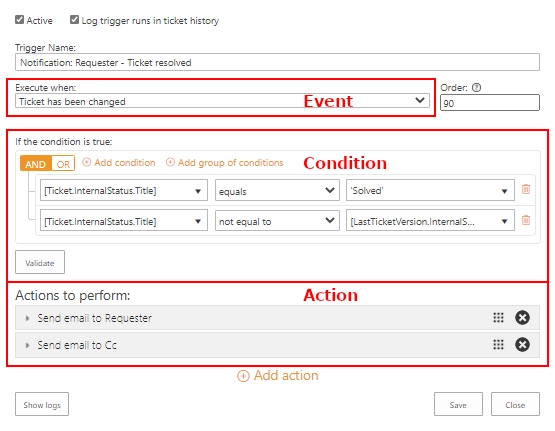
Whenever a new comment is added, HelpDesk runs the trigger. Then it checks the condition rule i.e. whether the added comment is not initial and is a reply. If it is true, the trigger sends notifications to the requester and CC contacts. Trigger settings define when to run the trigger, what conditions to check and what actions to perform. You can create triggers for other cases, more about this in further sections of the article.
Note
If you are using Plumsail HelpDesk with a version older than 1.3.0, please follow this link to learn about triggers.
How to create a new trigger?
Let’s create a trigger that will assign sales tickets to a specified agent and tag them accordingly.
New trigger
Open HelpDesk settings and find triggers in the Automations section:
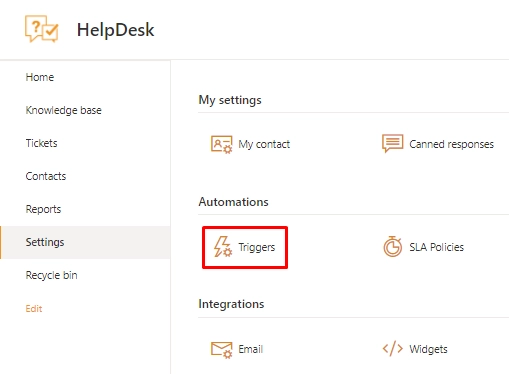
Create a new item in the Triggers list.

General properties overview:
Active, it defines whether HelpDesk will run the trigger on a specified event; use this option to temporarily disable some triggers;Log trigger runs in ticket history, it adds a record to the History tab of a ticket form if trigger actions were performed on its basis;Trigger name, a name to identify the trigger on the list;Order, the integer number that defines a trigger’s position in the queue of triggers to run in ascending orger (the triggers with the lower number have more proirity).
Set the general parameters as follows:

Events
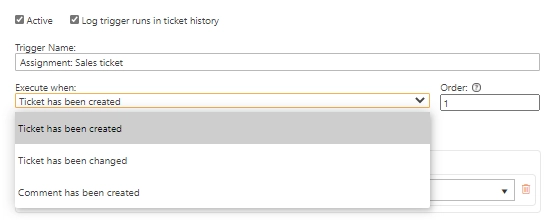
The Execute when field contains possible events within your HelpDesk site that can start the trigger. Their names are self-explanatory:
Ticket has been created, a new item on the “Tickets” list is created;Ticket has been changed, an item on the “Tickets” list is modified;Comment has been created, a new comment in the existing ticket is created.
For the current case, I select the event Ticket has been created.
Conditions
The trigger will execute the specified actions only if conditions are true. You can combine them with logical operators AND/OR, select ticket or comment fields on one side, and enter custom values on the other. It is possible to build more complex conditions using functions and regular expressions. Review the article Building advanced conditions for more information.
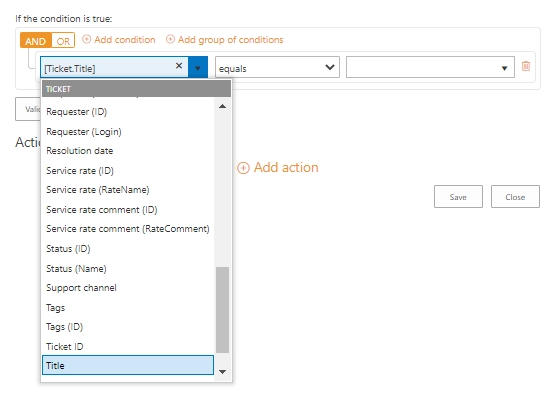
Let’s check whether the title of a newly created ticket contains such keywords as Quote or Invoice to define it as a sales ticket.
Select [Ticket.Title] in the left dropdown and type the keywords in the right part of each condition.
The custom strings should be enclosed in single quotes for proper processing.
Also, set the operator to contains, pay attention that it is case-sensitive.
After configuring the condition, click the Validate button to ensure that there are no syntax errors.

Actions
The main point of any trigger is to perform some actions. There can be as many actions as you need, and they can be arranged in the order you want. To add one, just click Add action.
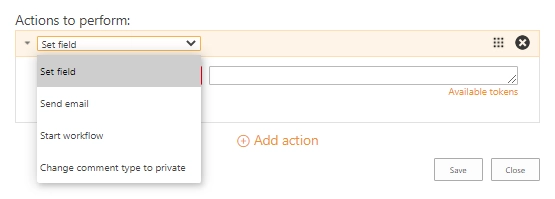
There are four types of available actions:
Set field, the action assigns a value to the selected field of a ticket;
Send email, the action sends an e-mail message based on a template that is filled with ticket data;
Start workflow, the action starts a selected SharePoint 2013 workflow;
Change comment type to private, if the trigger was started on comment creation, then you can change its type to private.
For more information on the actions, check the article Actions reference.
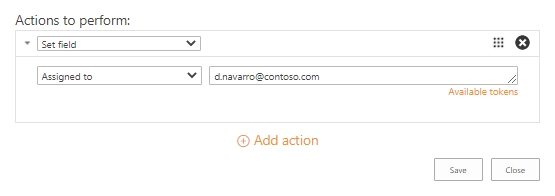
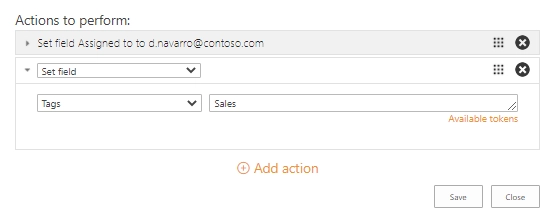
In this example, we assign a ticket to a certain agent and tag it as Sales.
So, I set the field “Assigned to” to the e-mail of the agent responsible for sales tickets.
Then, I add another action and set the “Tags” field to the Sales value.
After saving, the trigger is ready for use.
Learn more
You will find more useful information about triggers in the following articles: