Public REST API
Prerequisites
To start using REST API you need to complete the following prerequisites:
Review the reference for the API you want to call, depending on the HelpDesk data center location:
Note
For more information about the data center location, please refer to the article.
How to use API
Our API is REST based. Thus, you can use any programming language that is able to execute web requests. For example, you would use C#, PowerShell, node.js, Python, PHP.
There are a lot of ready to use helper REST API clients for those languages. Here are just a few of them:
RestSharp for C#
Invoke-RestMethod cmdlets for PowerShell
request - Simplified HTTP client for node.js
Requests: HTTP for Humans for Python
Guzzle for PHP
Curl and HTTP request examples
Here you can see a couple of examples of using HelpDesk REST API using curl command line tool or raw HTTP requests.
Get tickets
This is an example of a raw request to get tickets:
GET https://helpdesk-services.plumsail.com/_api/v4/Tickets?$select=SupportChannel&$filter=SupportChannel%20eq%20'API'&$orderBy=ID%20desc&$top=100 HTTP/1.1
Accept: application/json
X-HD-ApiKey: YOUR_API_KEY
Host: helpdesk-services.plumsail.com
And this is cURL representation for it:
curl -X GET --header 'Accept: application/json' --header 'X-HD-ApiKey: YOUR_API_KEY' 'https://helpdesk-services.plumsail.com/_api/v4/Tickets?$select=SupportChannel&$filter=SupportChannel%20eq%20'API'&$orderBy=ID%20desc&$top=100'
Create a ticket
This is an example of a raw request to create a ticket:
POST https://helpdesk-services.plumsail.com/_api/v4/Tickets HTTP/1.1
Accept: application/json
X-HD-ApiKey: YOUR_API_KEY
Content-Type: application/json

{
"subject": "Printer Issues",
"body": "My printer is not working. Please help. ASAP.",
"requesterEmail": "m.cane@example.com",
"priority": "High",
"tagTitles": [
    "Printers"
],
"attachments": [
    {
    "Name": "error.txt",
    "Content": "BASE64_FILE_CONTENT"
    }
],
"customFields": {}
}
And this is cURL representation for it:
curl -X POST --header 'Content-Type: application/json' --header 'Accept: application/json' --header 'X-HD-ApiKey: YOUR_API_KEY' -d '{ \
"subject": "Printer Issues", \
"body": "My printer is not working. Please help. ASAP.", \
"requesterEmail": "m.cane%40example.com", \
"priority": "High", \
"tagTitles": [ \
    "Printers" \
], \
"attachments": [ \
    { \
    "Name": "error.txt", \
    "Content": "BASE64_FILE_CONTENT" \
    } \
], \
"customFields": {} \
}' 'https://helpdesk-services.plumsail.com/_api/v4/Tickets'
Delete a ticket
This is an example of a raw request to delete a ticket:
DELETE https://helpdesk-services.plumsail.com/_api/v4/Tickets/1 HTTP/1.1
X-HD-ApiKey: YOUR_API_KEY
And this is cURL representation for it:
curl -X DELETE --header 'X-HD-ApiKey: YOUR_API_KEY' 'https://helpdesk-services.plumsail.com/_api/v4/Tickets/1'
Update a ticket
This is an example of a raw request to update a ticket:
PUT https://helpdesk-services.plumsail.com/_api/v4/Tickets/18 HTTP/1.1
X-HD-ApiKey: YOUR_API_KEY
Accept: application/json
Content-Type: application/json

{
"assignedToEmail": "j.davis@example.com",
"status": "In progress",
"category": "Problem",
"priority": "Normal",
"dueDate": "2018-05-07",
"ccEmails": [
    "j.davis@example.com", "m.smith@example.com"
]
}
And this is cURL representation for it:
curl -X PUT --header 'Content-Type: application/json' --header 'Accept: application/json' --header 'X-HD-ApiKey: YOUR_API_KEY' -d '{ \
"assignedToEmail": "j.davis@example.com", \
"status": "In progress", \
"category": "Problem", \
"priority": "Normal", \
"dueDate": "2018-05-07", \
"ccEmails": [ \
    "j.davis%40example.com", "m.smith%40example.com" \
] \
}' 'https://helpdesk-services.plumsail.com/_api/v4/Tickets/18'
Using Custom Fields
Customize your tickets with new fields to fit your specific needs. This guide will show you how to add a custom field to your list and use it in an API request.
Note
Learn more about column creation.
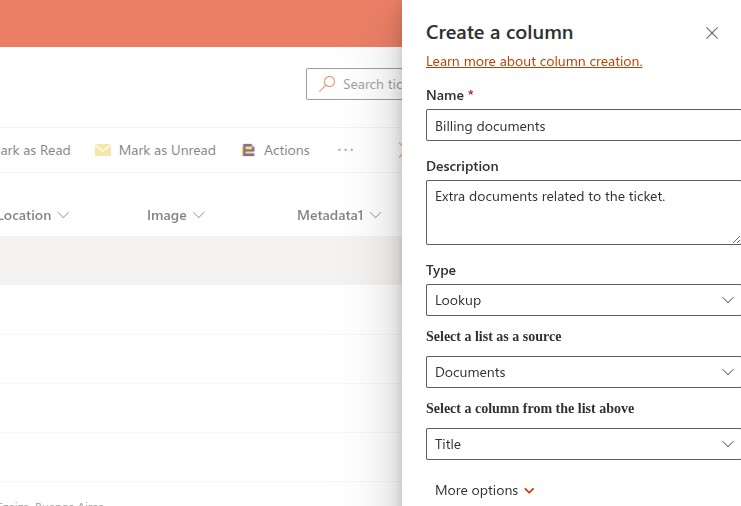
Adding a Custom Lookup Field
Let’s say you want to link a ticket to a specific billing document. To do this, you’ll need to create a Lookup column in your HelpDesk ticket list.
After creating the column, you can start creating or updating tickets that use it. To do this via our API, you’ll use the customFields key in your request’s JSON payload.
{
   "subject": "New subscription",
   "body": "I’d like to purchase your product",
   "requesterEmail": "mymail@mysite.com",
   "priority": "Normal",
   "tagTitles": [
       "Sales"
   ],
   "attachments": [],
   "customFields": {
       "Billingdocuments": 13
   }
}
Note
For Lookup columns, you must use the identifier of the item you want to link. In the example above, 13 is the ID of the billing document.
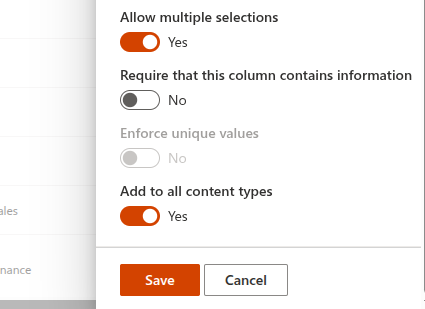
If you need to link more than one document to a ticket, configure your column to Allow multiple selections.
This turns your column into a multi-value Lookup field, and your payload will look like this:
{
  "subject": "Printer Issues",
  "body": "My printer is not working. Please help. ASAP.",
  "requesterEmail": "mymail@mysite.com",
  "priority": "High",
  "tagTitles": [
    "Printers"
  ],
  "attachments": [
    {
      "Name": "error.txt",
      "Content": "BASE64_FILE_CONTENT"
    }
  ],
  "customFields": {
    "Billingdocuments": [
      15,
      17
    ]
  }
}
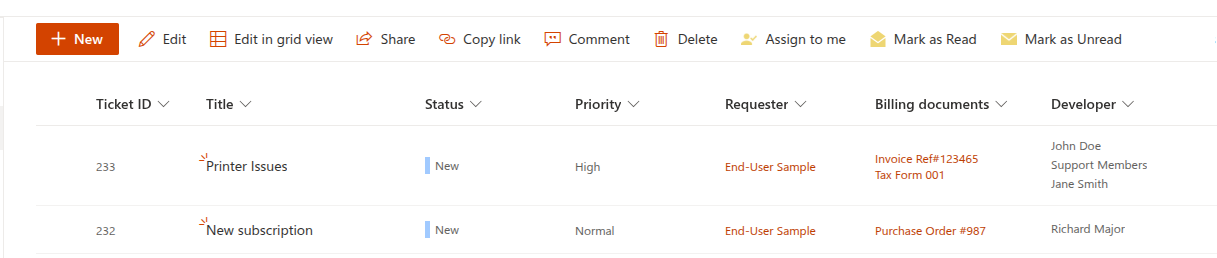
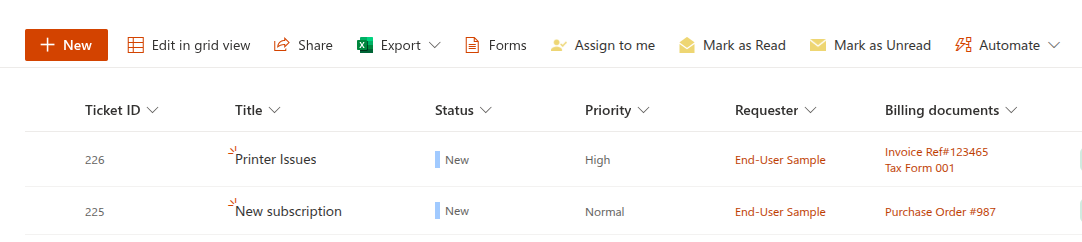
The resulting tickets:
Using Other Custom Field Types
You can use other column types, such as a Person column, to assign a ticket to a specific team member.
For example, to assign tickets to your developer team, you would first add a Person column. This type of column is more flexible than a Lookup field because you can reference users by their email address or their user ID.
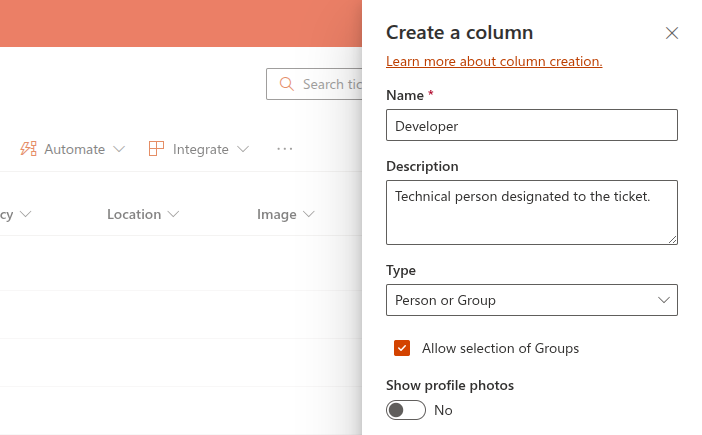
Here’s how your JSON payload would look:
{
  "subject": "New subscription",
  "body": "I’d like to purchase your product",
  "requesterEmail": "mymail@mysite.com",
  "priority": "Normal",
  "tagTitles": [
    "Sales"
  ],
  "attachments": [],
  "customFields": {
    "Billingdocuments": 13,
    "Developer": "RichardMajor@mydomain.onmicrosoft.com"
  }
}
Just like with the Lookup column, you can enable Allow multiple selections for the Person column. Your payload will then use an array of values.
{
  "subject": "Printer Issues",
  "body": "My printer is not working. Please help. ASAP.",
  "requesterEmail": "mymail@mysite.com",
  "priority": "High",
  "tagTitles": [
    "Incidents"
  ],
  "attachments": [
    {
      "Name": "error.txt",
      "Content": "BASE64_FILE_CONTENT"
    }
  ],
  "customFields": {
    "Billingdocuments": [
      15,
      17
    ],
    "Developer": [
      "JohnDoe@mydomain.onmicrosoft.com",
      1,
      "2"
    ]
  }
}
The result will look like this: