Building advanced email templates (classic triggers)
This article describes advanced practices for customizing email notifications sent by the triggers. We will customize the email template for the Send email trigger action.
How to include values conditionally
Template engine allows you to include (or excluding) arbitrary content into a message based on a custom condition. Let’s review this feature on the following example. In the “Tickets” list, we created a yes/no column that defines whether to include all comments into agents’ notifications:

In the template, it is necessary to add conditional tokens {{#if}} and {{/if}}.
The first one should contain a reference to a field.
If it resolves the value to true, content between the tokens will be rendered in the resulting message.
In this case, we include the snippet conditionally:
{{#if Ticket.IncludeComments}}
    {{snippet:AllComments}}
{{/if}}
The conditional tokens has complimentary ones: {{#elif}} and {{#else}}.
They are optional and allow to include alternative content.
{{#elif}} checks alternative condition fields, should be placed after {{#if}} and its quantity is not limited.
{{#else}} should be placed just before {{/if}} and may occur just once.
The token defines what content to render if all previous conditions were false as it is in the current case.
So I add {{#else}} for notifying about switching comments off:
{{#if Ticket.IncludeComments}}
    {{snippet:AllComments}}
{{#else}}
    <br/>
    <p style="font-style:italic">Comments are switched off in notifications for the current ticket.</p>
    <br/>
{{/if}}
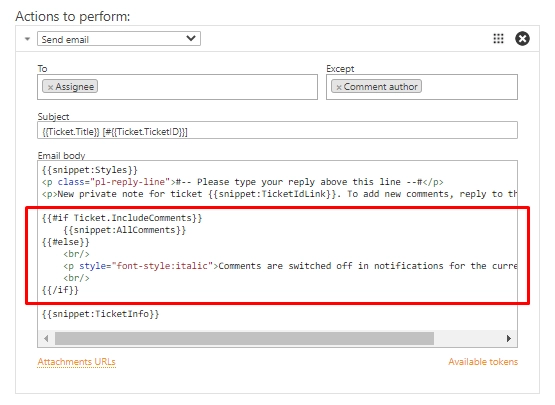
Thus, the template with conditional including of comments will be as follows:

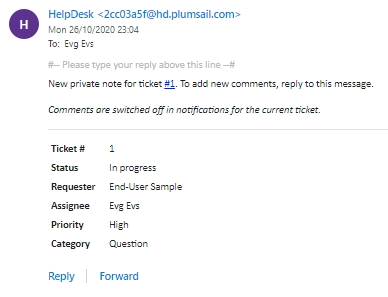
And the agent will receive the following notification if we switched the comments off:

How to iterate over a collection of values
Some of the SharePoint list columns may contain multiple values and as such, they are considered as collections of values. But HelpDesk has several system ones:
AllComments,AttachmentUrlsCollection,FieldChanges.
Find an example of iteration over FieldChanges in this article while the one below concerns comments and attachments.
{{#!Ticket.AllComments.From.Title}}
{{#!Ticket.AllComments.Created}}
{{#!Ticket.AllComments.Body}}
{{#!Ticket.AllComments.CommentType}}
{{#each Ticket.AllComments}}
<div>
<div>{{From.Title}}</div>
<div>{{Created}} | {{CommentType}}</div>
{{#if AttachmentUrlsCollection}}
<div>
Attachment(s):
{{#each AttachmentUrlsCollection}}
<a href="{{URL}}">{{FileName}}</a>
{{/each}}
</div>
{{/if}}
<div>{{Body}}</div>
</div>
{{/each}}
In the beginning, it is necessary to list tokens for the repeating fields of each iteration.
In such a list, each one should start with #!.
They will not be included in the result message and just let the template know about the fields that it needs to prepare for using inside the iteration.
In the example above, we used the ticket property AllComments.
It refers to the “Comments” list where all of them are stored.
Thus, each comment has multiple fields which you can use in each iteration, and we selected the following:
{{#!Ticket.AllComments.From.Title}}, the title of a comment’s author;{{#!Ticket.AllComments.Created}}, the date of a comment’s creation;{{#!Ticket.AllComments.Body}}, the body of a comment.
Then go the limits of the repeatable block specified with special tokens {{#each}} and {{/each}}.
The first one should contain a reference to the field which contains the collection of values.
In the example, it is {{#each Ticket.AllComments}}.
Within the block, we use only the repeatable parts of the listed tokens and mark them up with HTML, for example, <div>{{From.Title}}</div>.
Including of attachments is conditional and also requires the iteration because each comment can have multiple of them.
For this purpose, use a system token with a collection of comments’ attachments: {{AttachmentUrlsCollection}}.
The iteration over it doesn’t require listing of the repeated tokens.
Each object in this collection has the FileName and URL properties, i.e. tokens to include in the iteration.
How to use snippets
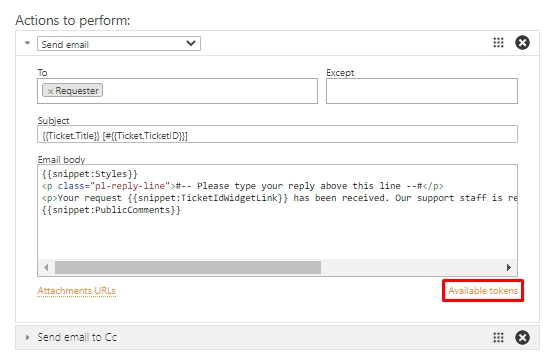
The snippet is a small predefined part of a template in the Send email action that allows inserting blocks of information in the resulting message. Currently, it is not allowed to customize or to create snippets. All of them are in the hint to a template:

Here is the list of available snippets:
{{snippet:AllComments}}(it renders a list of all comments for a current ticket){{snippet:PublicComments}}(it renders a list of public comments for a current ticket){{snippet:Styles}}(it sets the style of an email message to the default HelpDesk style via CSS){{snippet:TicketInfo}}(it renders a summary for current ticket as a table){{snippet:TicketIdLink}}(it renders a link to a ticket in HelpDesk){{snippet:TicketIdWidgetLink}}(it renders the ticket link to a widget){{snippet:FeedbackLink}}(it renders a link to rate the service on the current ticket)
How to use context data
You can use the context tokens on any event to get site related information. There are three possible tokens:
{{Context.SiteUrl}}(a URL of the site collection, where HelpDesk is installed){{Context.ServerUrl}}(a URL of the server, where SharePoint is hosted){{Context.WidgetUrl}}(a default widget URL, specified in HelpDesk settings)