This article shows how to combine Plumsail Forms, Plumsail Documents, monday work management, and Make to streamline quote generation processes.
The process consists of two Make scenarios:
A scenario to capture form submissions with a possible AI data enrichment
A scenario to generate a PDF quote based on information in a monday.com board
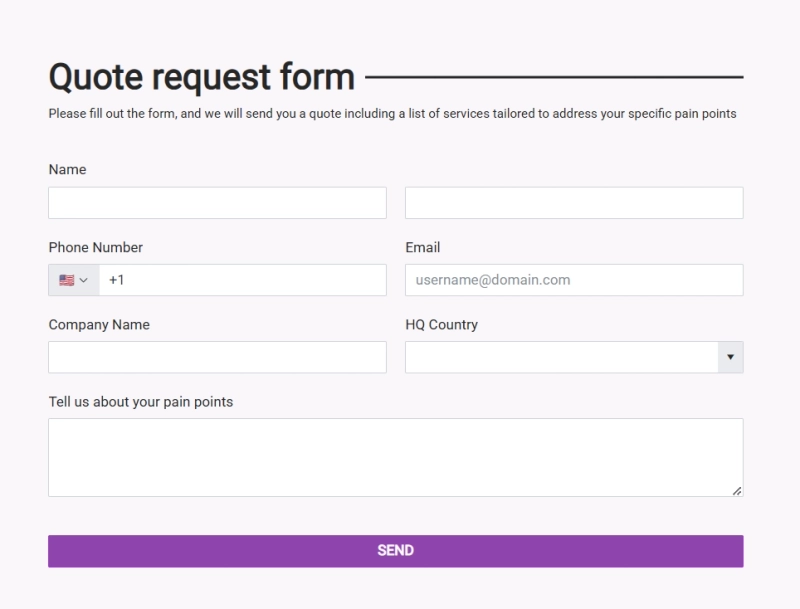
The goal is to create a PDF quote customized to a specific customer from the form entry. Our sample Plumsail form looks like this:
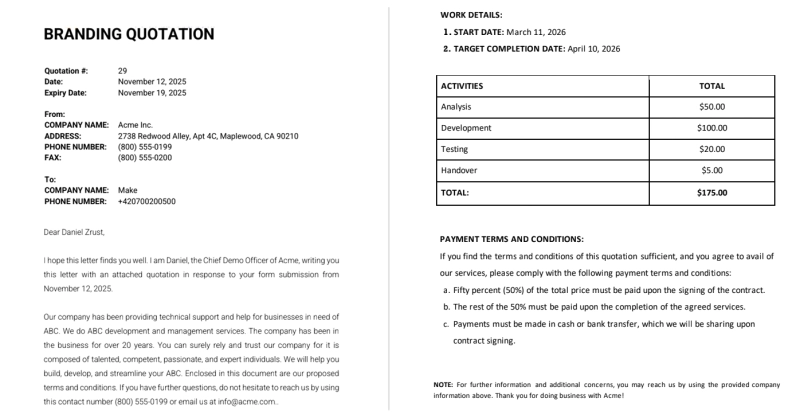
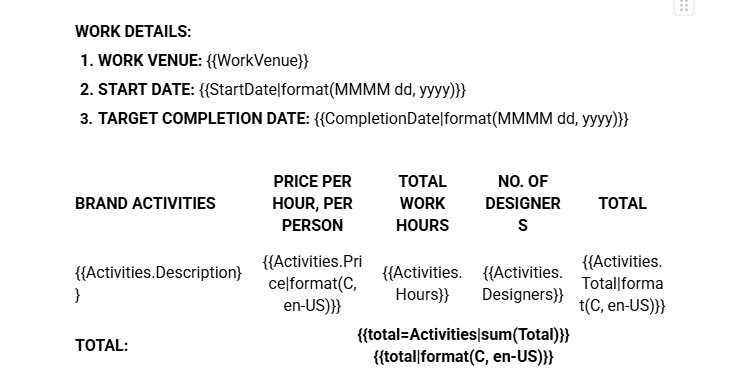
And the end outcome will look like this:
While we'll be using monday.com as our front end, keep in mind that a similar approach could work for other project management tools such as ClickUp, or Asana, Airtable, or even Google Sheets.
Prefer a video? Watch the webinar recording that walks through each step from this post.
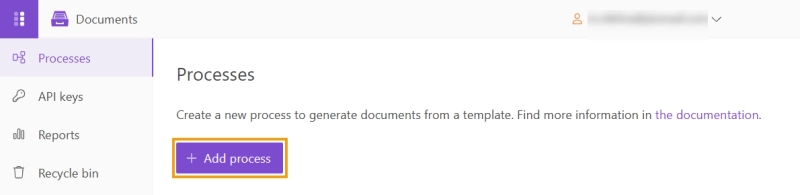
Process form submissions
First, we want to collect quote requests from our prospects. To do that, we will create a public form with Plumsail Forms and connect it to monday.com using Make.
Create a quote request form
To start, go to Plumsail Forms web designer and create a new form. If you don't have a Plumsail account yet, you can just sign up and use a free plan (no card required).
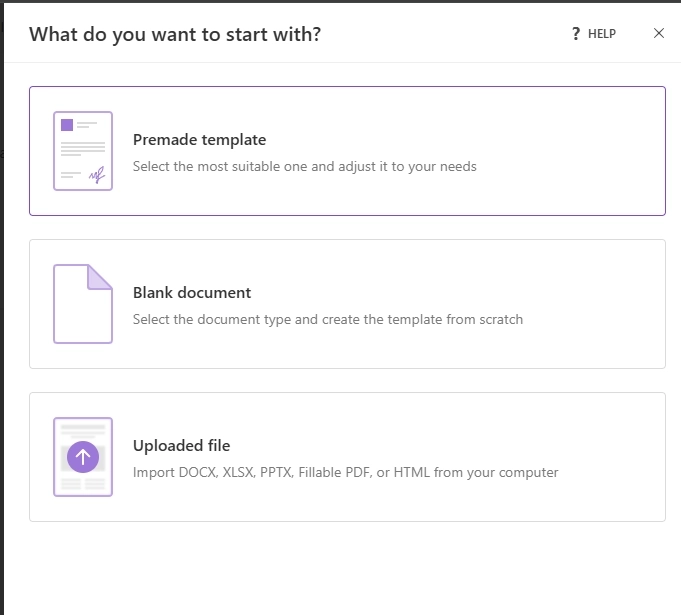
When creating a new form, you have several options to start. You can:
Even if you are starting from scratch, the build process is straightforward. You need to drag'n'drop form elements from the left pane to the form canvas:
I highly recommend you think twice about selected field types to manage data quality of the submissions. For example, if you know that you will need to map a specific form answer to a list of possible values in monday.com, you should select the appropriate field type in Plumsail—potentially Drop Down, Single Choice, or Multiple Choice.
At the same time consider what you really need to ask for—some information can be easily retrieved with simple AI prompts as I will demonstrate in the upcoming paragraphs.
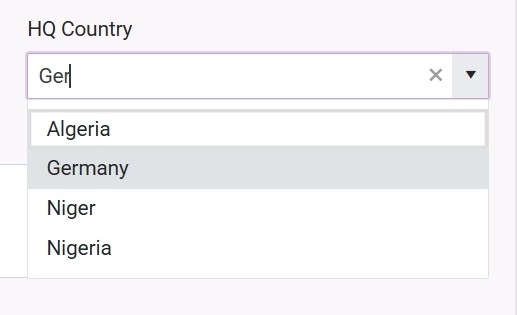
You can see that I'm following my own advice: the HQ country is a dropdown with a predefined list of values from the Excel file. Because I want to avoid getting multiple possible entries for a country: Germany vs DE vs Deutschland.
Configure Make scenario
Now it's time to create your Make scenario so the submissions can flow into monday work management. Similarly as with Plumsail, you can sign up for a Free Make account if you don't have one yet. Once in Make, create a new scenario (or alternatively, just go straight to the scenario.new).
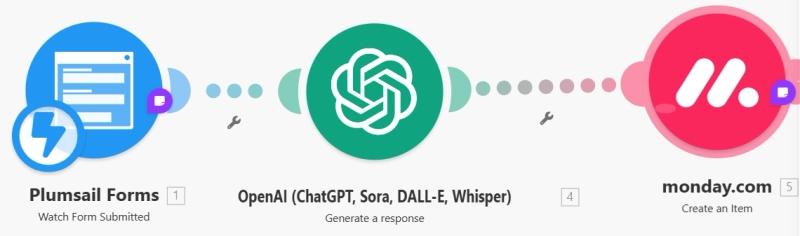
And this is the scenario we are going to build to capture form submissions and create items in monday work management:
1. Capture form submissions
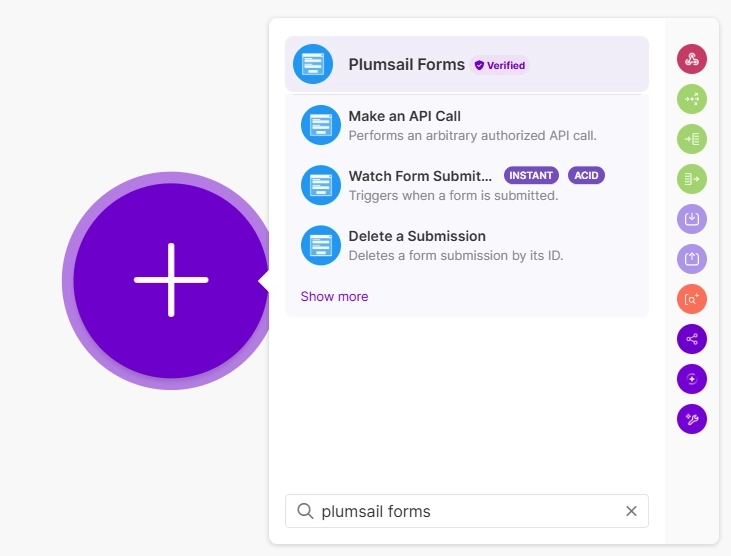
Search for Plumsail Forms. Click Show more and select Watch Form Submitted:
Once the module is added into your canvas, open it and create a connection to your Plumsail account and then select the form that you want to monitor. Note that you will only be able to select the form after your Plumsail connection is authorized with your user credentials.
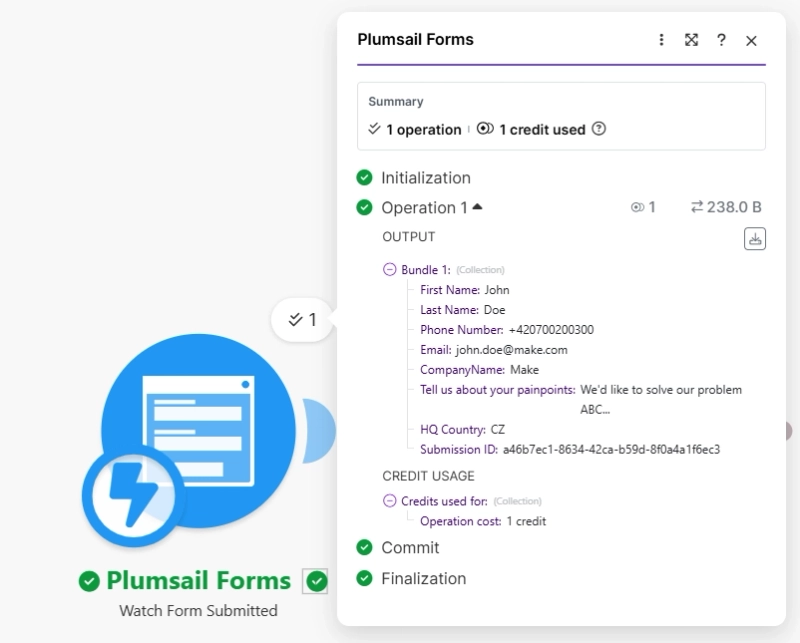
Once the module is configured, it will look like this:
You can now test the scenario:
Save your new Make scenario and run it once.
Open the preview of your form, fill it out, and submit it.
The submission will arrive in Make within a few seconds, and you will see all the data you entered in the form.
2. Enrich submissions with AI
In our board, we'd like to see a company bio so that the BDR or AE processing the lead knows the basic details about the company. Since you don't want to clutter your form by asking for such basic information, we're going to solve this problem using AI.
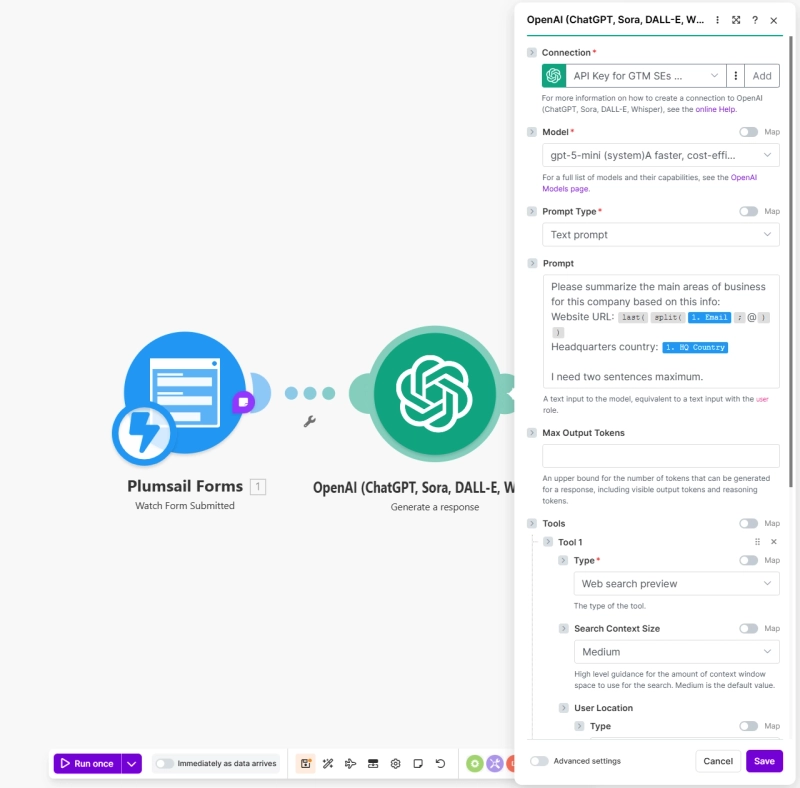
We are going to add an OpenAI module called Generate a response:
In the next step it's important to configure the module properly:
For testing you can use my prompt:
Please summarize the main areas of business for this company based on this info:
Website URL: {{last(split(1.Email; "@"))}}
Headquarters country: {{1.HQCountry}}
I need two sentences maximum.
You can use the same gpt-5-mini model that I am using, or alternatively, choose from other competing LLMs like Gemini or Claude.These apps are also available on Make.
Note: Make sure it supports Web search preview.
Another option is the Make AI Web Search app. This is particularly handy because it's a built-in Make tool, meaning you don't even need to set up external API keys to use it:
As you get more proficient in Make, you will realize that there are often multiple solutions to the same problem—and this is such a situation.
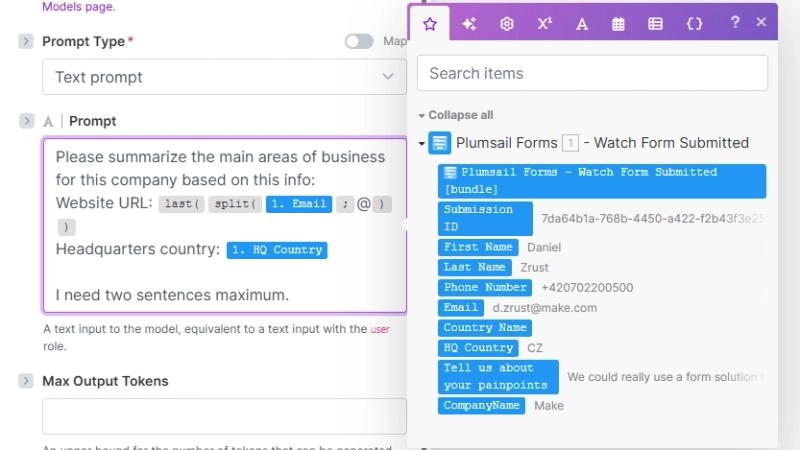
But let's continue with the OpenAI approach. You will notice that I have included mapped variables from the preceding steps as part of my prompt:
So how do you map the variables?
Once you click into a field, the right-hand side mapping panel will open. You can now map outputs from preceding steps into the current module simply by clicking a variable or dragging'n'dropping it into the target field.
Once the variables are in the target field, you can also wrap them in functions. See the full list of functions. In my example, I am using a combination of the split and last functions to extract the domain from the submitter's email.
last(split({{1.Email}}; @))
With the OpenAI module configured, it's time to move to the final step: monday.com.
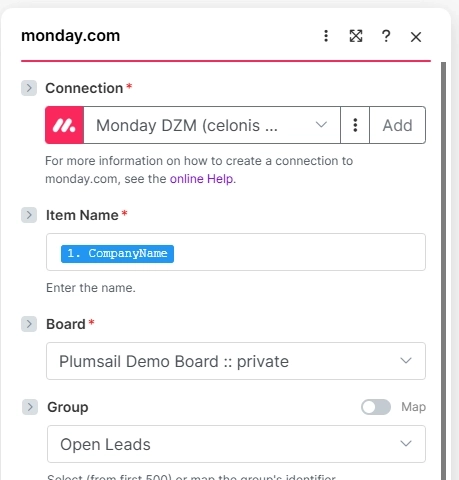
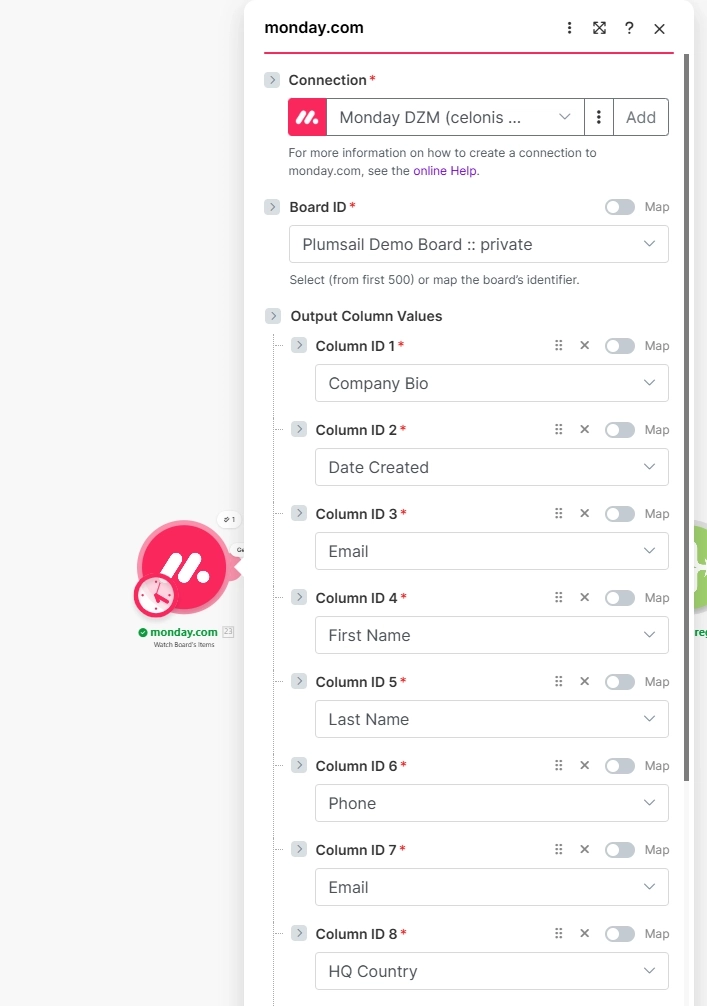
3. Create item in monday.com board from form submission
Every time a new form is submitted, we want to create a new item containing the submission details.
I am using the Company Name field from the form as the item name in a board:
And I am specifying the target board and extra columns I want to map with variables from preceding steps.
Once I complete the mappings in the monday.com module, I save the scenario and turn it on:
Next time a new form submission arrives, it will be passed to the board while also being enriched with OpenAI. Feel free to test the entire workflow yourself!
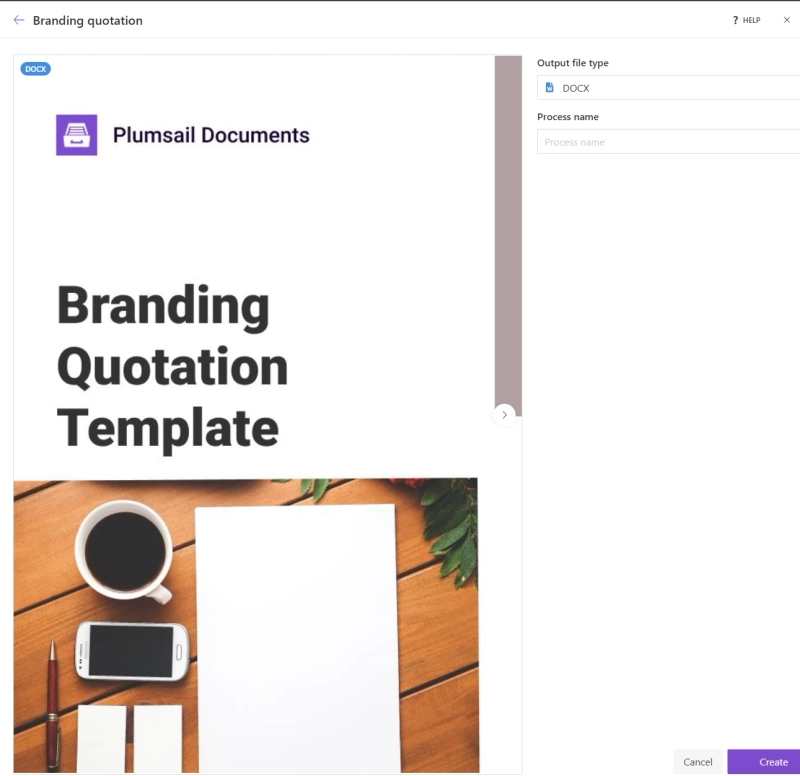
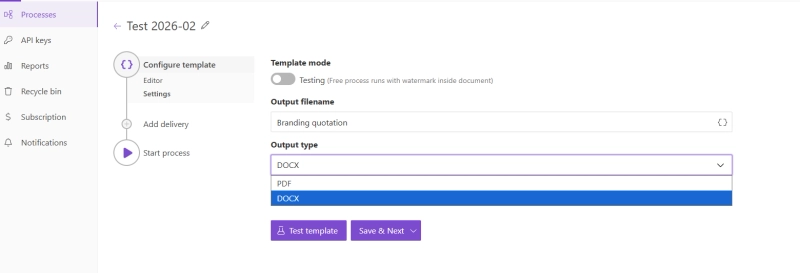
Before we dive into the Make scenario, we need to create a quoting template in Plumsail Documents. You can sign up for a free 30-day trial of Plumsail Documents—no credit card is required.
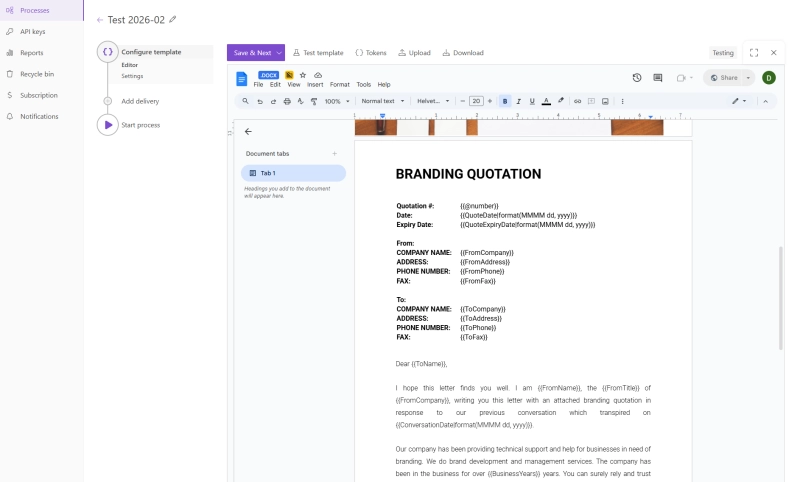
Once you hit the Create button, the template becomes a part of your process. The edit mode is the same as if you edit a Google Document:
Make sure you have included all the tokens you need. These {{tokens}} act as placeholders that will be mapped in Make and eventually replaced with real values from your monday.com board:
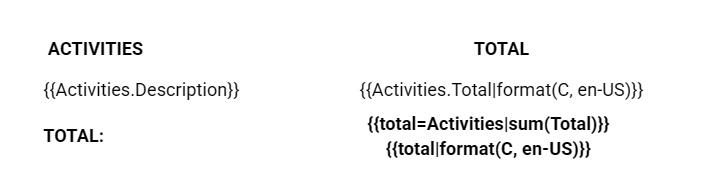
Pay special attention to the table syntax—it uses the Table_Name.Item_Name notation. You are free to add or remove columns or add extra columns with additional tokens:
In my case, I am keeping it simple—I have only two columns at the end:
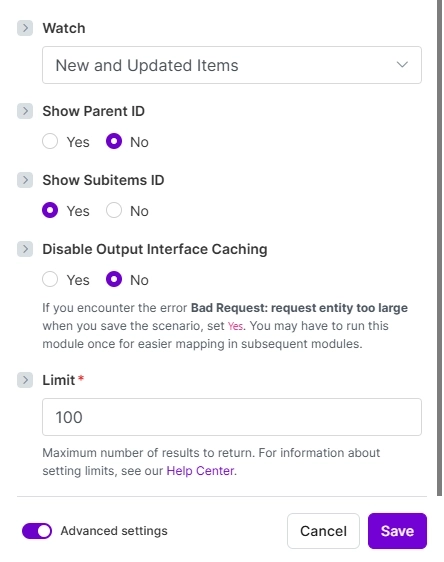
The scenario starts with Watch Board Items. In my case, it's the non-instant module. I specify which board I want to monitor and what columns to retrieve as outputs. To be safe, I am adding all columns:
Also pay attention to the module configuration at the bottom:
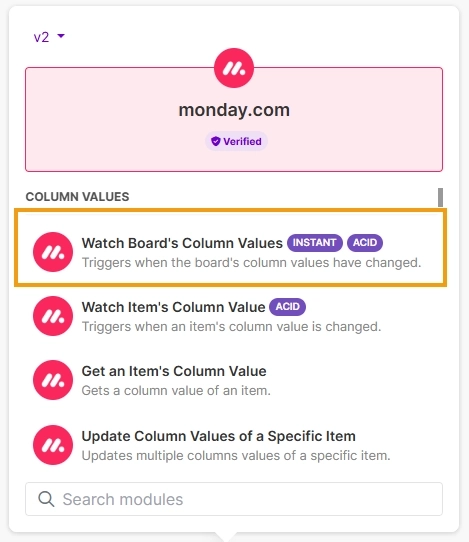
You could also consider using the instant Watch Board's Column Values:
The difference between the instant module and the non-instant one is that the instant version is webhook-based and captures events on your board immediately, while the non-instant version checks for changes periodically (e.g., once per hour).
Note: To use instant module, the user account associated with your monday.com API key must have the necessary permissions to read and monitor the board's data. Otherwise, you will encounter an error during the module configuration.
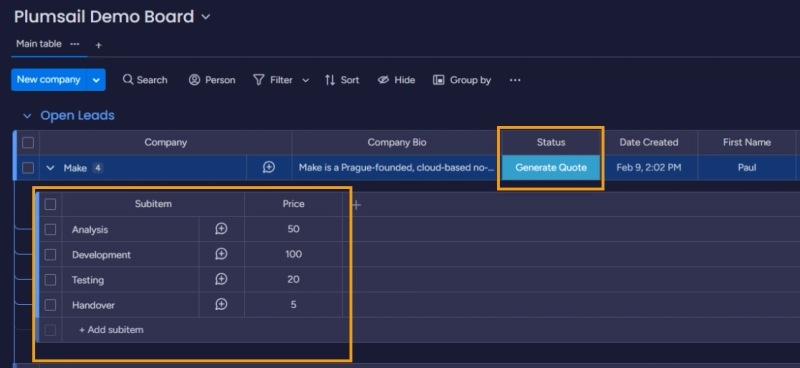
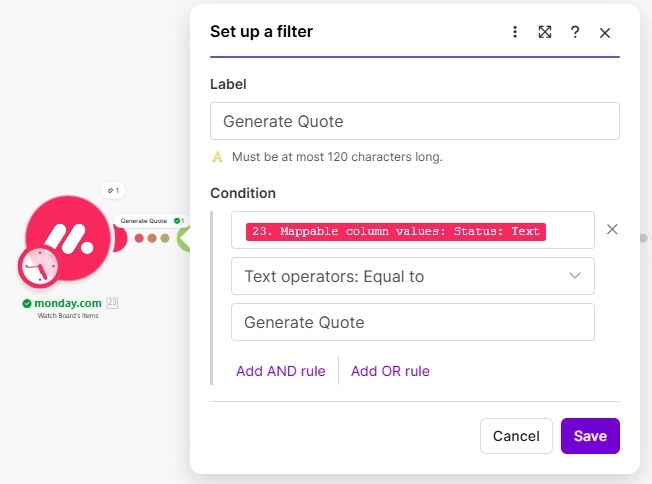
Since I am using the non-instant one, I add a filter behind the first module to only capture the items that need the quote. I can identify them by filtering the Status column for Generate Quote value:
2. Create PDF quote with Plumsail Documents
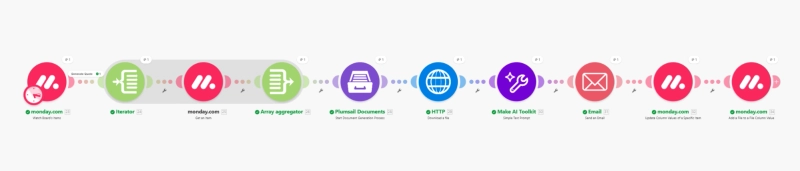
Let's now focus on the steps in Make to create the PDF quote.
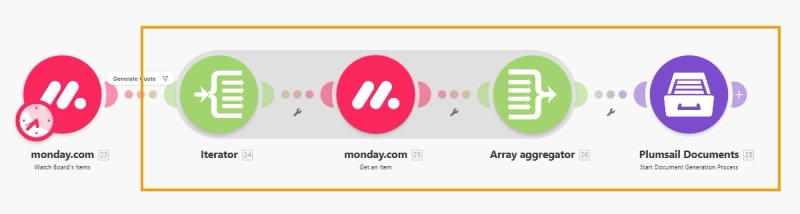
First, add these four modules to your scenario without configuring them yet—it's fine if you see errors for now:
Once all the modules are placed in the scenario, do the following:
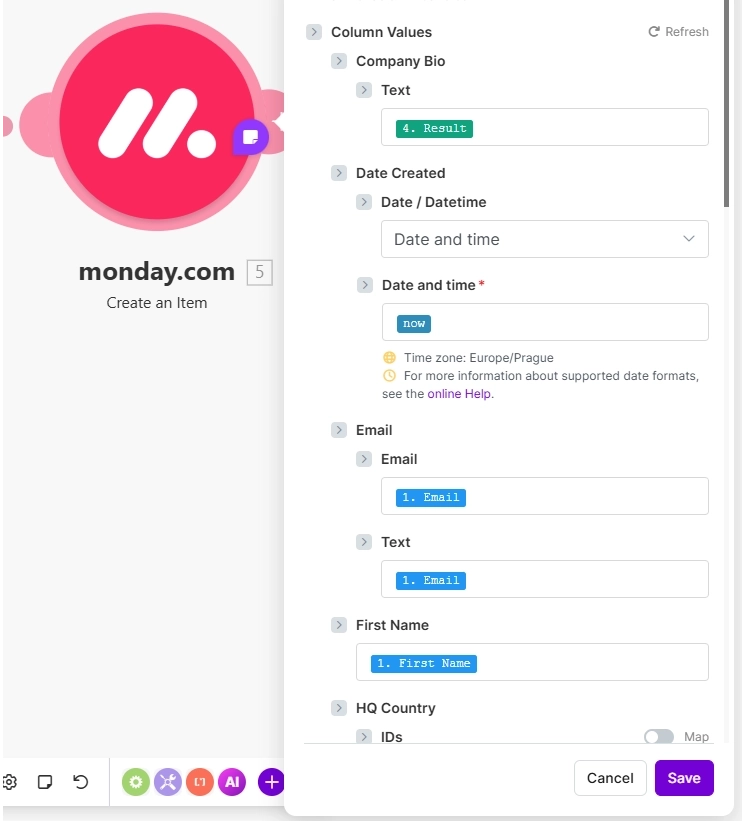
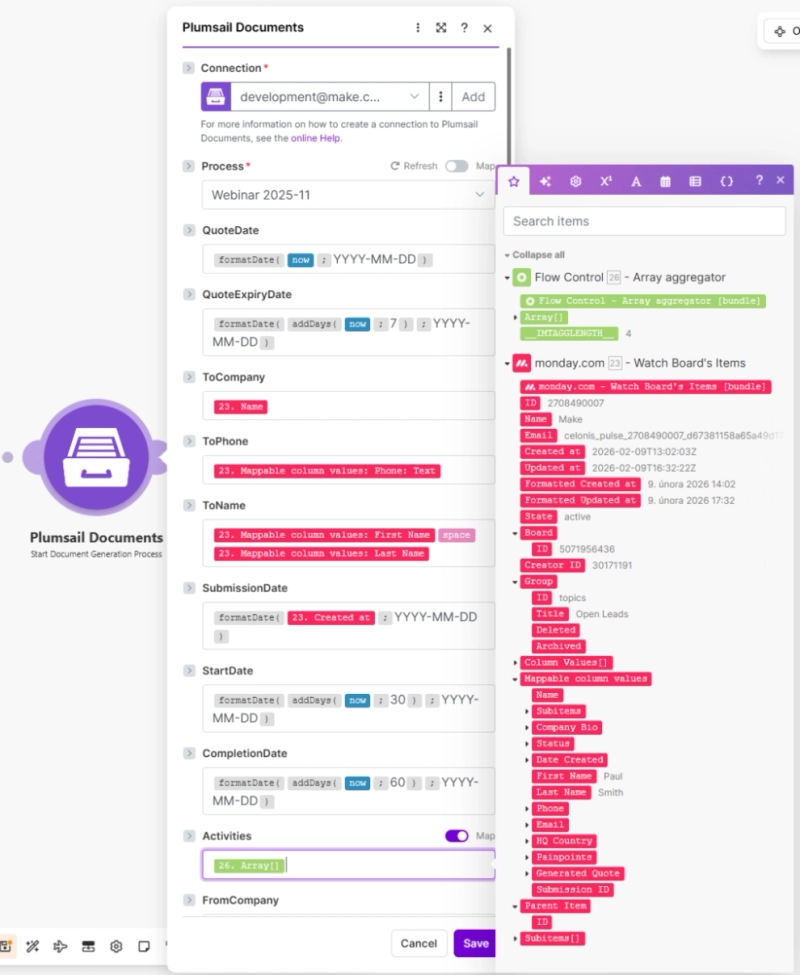
Open the Plumsail Documents module and map the fields to populate your document template.
One of the key outcomes is the dynamically generated table of line items
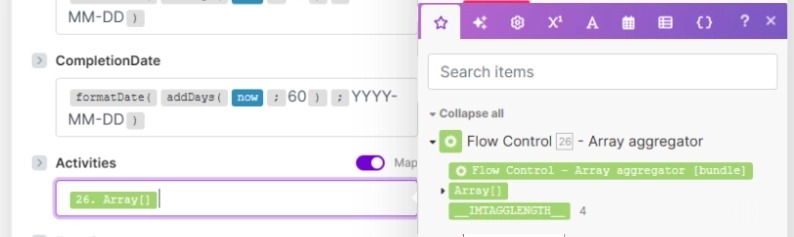
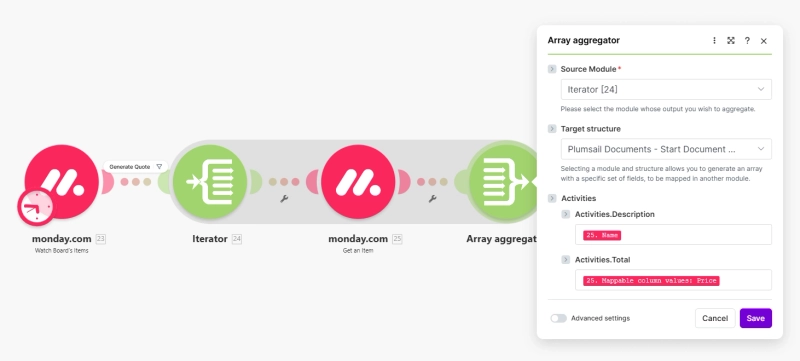
This table will be built from an array of items generated by the Iterator → Get an Item → Array Aggregator sequence.
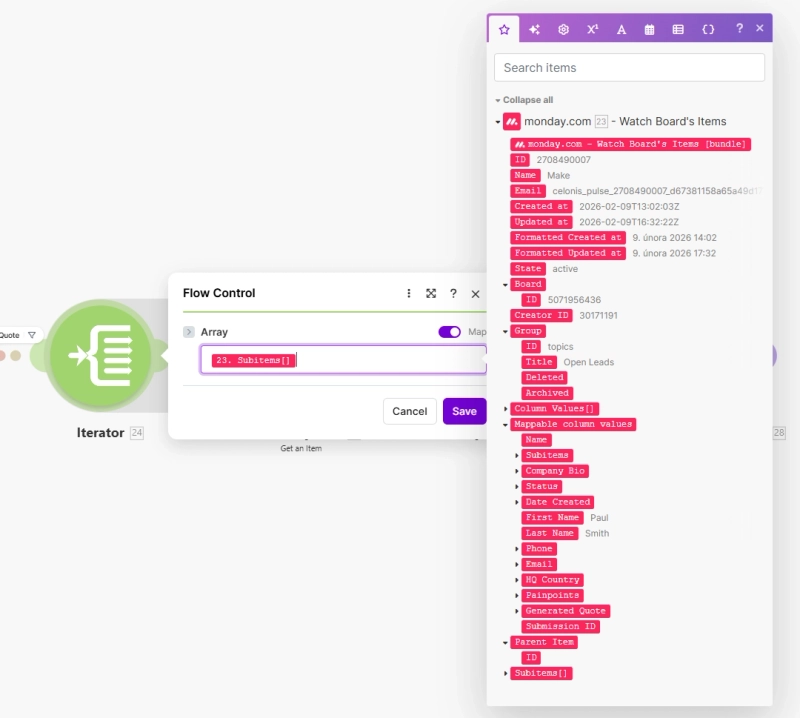
Go to the Iterator module and map the subitems from the first module. These subitems represent the individual line items for my pricing table:
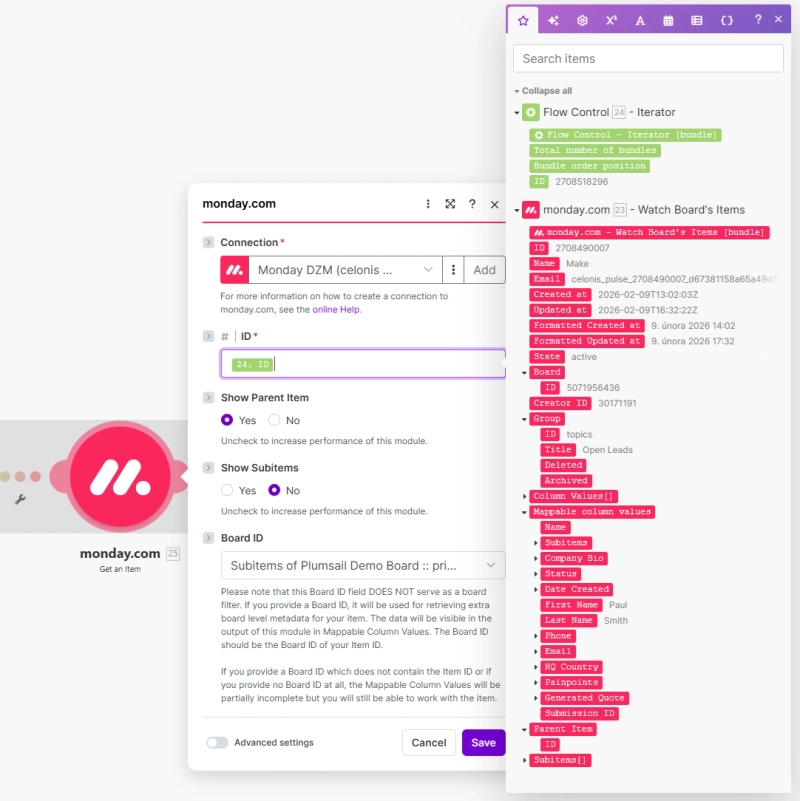
Open the Get an Item module and map the Subitem ID from the Iterator to fetch the specific details for each line.
In the Array Aggregator, set the Target Structure to the table fields defined in your Plumsail module. Then, map the specific data (like Name, Price, and Quantity) from the preceding 'Get an Item' module into these fields.
It's possible you will have more tokens with different names, which means more fields to map in Make at this step. This depends entirely on how your template table is configured. For example, my table configuration in Plumsail looks like this; therefore, I see Activities.Description and Activities.Total as the two fields to map in Make:
The hardest part is now done!
3. Send the quote by email and update monday.com item
The final part of the process is to send the generated quote to the prospect and update the item in your board.
Here is what we need to do in this step:
Download the generated Plumsail document as a PDF.
Create a customized email body for the quote.
Send the email with the PDF quote attached.
Update the status in monday.com board to 'Quote Generated'.
Upload the PDF quote file back to the monday.com item.
So let's tackle the remaining steps one by one.
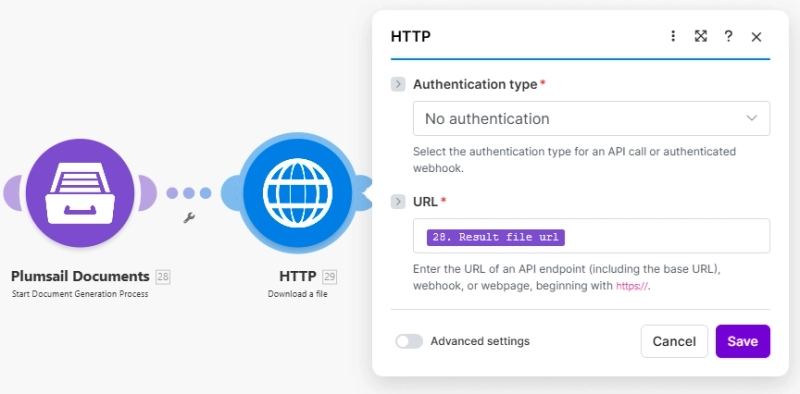
1. Download the generated Plumsail document as a PDF
To download the document, let's use the HTTP - Download a file module and map the download URL from the Plumsail Documents output:
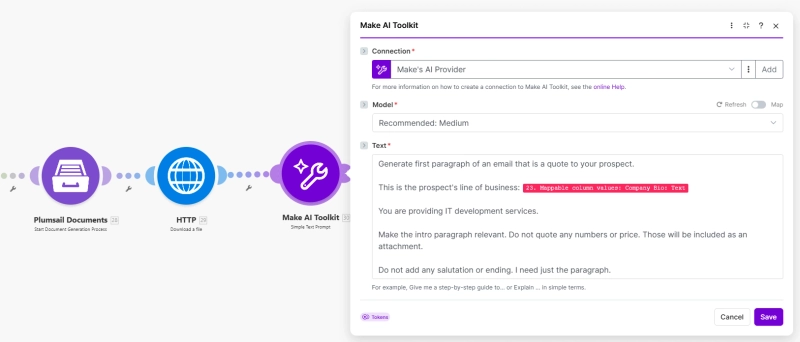
2. Set up AI agent
Now it's time for a little bit of AI again. To personalize the message for the prospect, we'll customize the email body using the Make AI Toolkit - Simple Text Prompt module:
Here is my sample prompt:
Generate the first paragraph of an email that is a quote to your prospect.
This is the prospect's line of business: {{YOUR_MAPPED_VARIABLE_HERE}}
You are providing IT development services.
Make the intro paragraph relevant. Do not quote any numbers or price. Those will be included as an attachment.
Do not add any salutation or ending. I need just the paragraph.
I'm generating the email based on the company bio that was also generated by AI in the first scenario.
You might be wondering, why we use the Make AI Toolkit here and not OpenAI as before?
I just want to show you the different options you have.
Make AI Toolkit is a great entry point to the AI world in Make. It's very simple, there are no complicated parameters to worry about, just drop your prompt and that's it. And as a bonus, you don't even need any API keys if you choose Make AI Provider when you create your connection. But if you prefer the OpenAI app we used in the first scenario, you are of course welcome to use that one too.
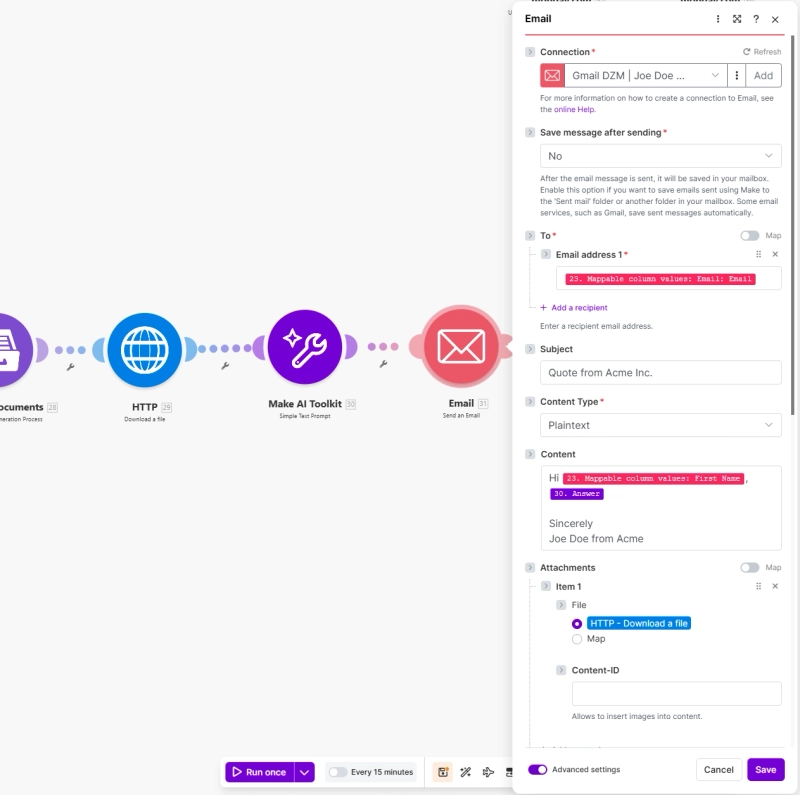
3. Send the email with the PDF quote attached
We are entering the final stretch! To send the quote, I'm using the generic Email module, but you can use the Gmail or Outlook apps if you prefer—both are available as standalone apps in Make.
For the email configuration, you need to:
Simply map the recipient's address directly from the monday.com module.
Specify the subject
Put together the email body. Map the 'First Name' from monday.com to create a personalized salutation, and then map the 'Answer' from the Make AI Toolkit below it. The 'Answer' is the customized email content that the AI generated based on the Company Bio:
Add the quote as an Attachment. Select the HTTP - Download a File in the Attachments section of the module.
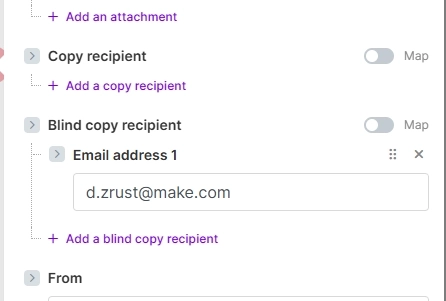
PRO Tip: I also recommend you add an internal email to BCC so you can keep track of all sent quotes:
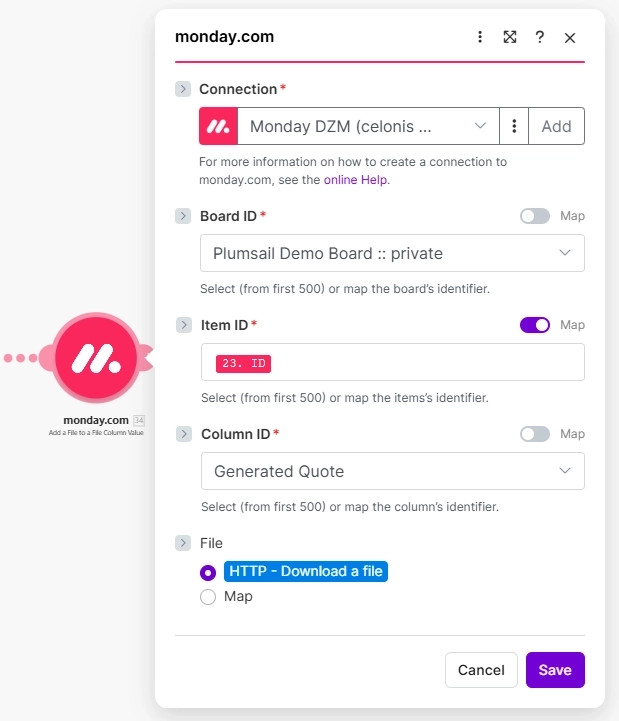
4. Update the status in monday.com board
Once the email is sent, the final step is to change the status of the item to Quote Generated. And add a generated quote PDF to File Column
Et violá, here is your full scenario:
Now it's time to test it: Go to monday work management, change the Status column to 'Generate Quote' and watch what happens.
Conclusion
In this article we covered how you can connect Plumsail, Make, and monday.com together to create a tailored quoting workflow.
One could argue that a similar result can be achieved using native Plumsail functionality alone—and that's certainly true. However, if you require maximum flexibility for data storage and seamless access to advanced AI tools, Make is the way to go.
How to send public web form data to QuickBooks using Make
Learn how to connect your public web forms to QuickBooks. Build a Make scenario that automatically creates a new customer and generates an estimate every time a lead submits a form.
Margarita Nikitina
Customer Support Engineer
Documents
Jul 04, 2025
Extract text from PDF and automate document processing in Make
Learn how to extract text from PDF files and automate your workflows in Make using Plumsail Documents
Sergey Kaigarodov
Internet Marketer
Documents
Jul 11, 2023
Integrate Plumsail Documents with other apps using Make (formerly Integromat)
Plumsail Documents is now available on the Make platform to bring even more flexibility to your document generation.