Building advanced conditions
How to refer to values of ticket and comment fields
You can use a reference in the trigger conditions. When the one is checked, the reference will be replaced by the ticket or comment property to which it refers.
Define the source of data
One of the options is retrieving properties of either a ticket or a comment. You can get the properties of a current or previous version of the ticket. One of the following keywords should be used to get a required property:
[Ticket](can be used on any event)[LastTicketVersion](can be used on aTicket has been changedevent, see an example)[Comment](can be used on aComment has been addedevent)
Get simple values
To get a column value for a ticket or comment, it is necessary to use the column’s internal name.
Find some examples of references below.
There, TicketID, Title, and FirstComment are internal names of the columns in the “Tickets” list.
Body, Type, and IsInitial are the internal names in the “Comments” list.
This way you can retrieve any simple value such as text, choice, or date and time.
In the case of multiple values, they will be separated by semicolons.
[Ticket.Title]returns the title (subject) of a ticket,[Ticket.TicketID]returns the ticket ID (do not mix up it with the list item ID),[Ticket.FirstComment]returns the initial comment in the current ticket,[Comment.Body]returns the body of the current comment,[Comment.CommentType]returns the type of the current comment (ResponseorPrivate note),[Comment.IsInitial]returns a Boolean value (trueorfalse) showing whether the comment is initial or not,etc.
Get lookup values
Sometimes you may need to access data from a lookup column. Reference to it will look like this:
[Ticket.Requester.Title]
[Ticket.Requester.Organization.Title]
In the example above, the tokens return a full name of the requester and a name of the requester’s organization via lookup columns. The “Requester” is a lookup column in the “Tickets” list that refers to the “Title” column in the “Contacts” list. The “Organization” is another lookup column in the “Contacts” list that refers to the “Title” column in the “Organizations” list.
Get person or group values
Getting data from the field which has a Person or Group type is almost the same as in the case with lookup fields. The only exception, that there is a fixed list of properties that you can refer to:
IDLoginNameTitleEmail
For example, references for a person or group specified in the “Assigned to” field will look as follows:
[Ticket.AssignedTo.ID]
[Ticket.AssignedTo.LoginName]
[Ticket.AssignedTo.Title]
[Ticket.AssignedTo.Email]
How to use expression operators
There is an operator in the middle of each condition expression.
It performs some actions with data from both ends of expression and returns true or false.
The operator can be a basic mathematical comparison:
equals (
==)not equal to (
!=)less than (
<)greater than (
>)less than or equal to (
<=)greater than or equal to (
>=)
As well as a function:
contains(returnstrueif the left string contains the right one, it is case-sensitive)does not contain(returnstrueif the left string doesn’t contain the right one, it is case-sensitive too)matches(the function returnstrueif the left part is an occurrence of the regular expression which is in the right part of the condition expression)
Options for “matches” operator
The pattern can contain inline options to modify the behaviour of the regular expression.
Such options have to be placed at the beginning of the expression inside brackets with a question mark: (?YOUR_OPTIONS).
For example, options (?mi) will allow processing multi-line text with case insensitivity.
List of available options:
allowing whitespace and comments (
x)single-line mode (
s)multi-line mode (
m)case insensitivity (
i)only allow explicit capture (
n)
You can find additional information about inline options in this article.
How to group condition expressions
Condition expressions are grouped with the following logical operators:
AND(the group of expressions returnstrueif each element does)OR(the group of expressions returnstrueif any element does)
By default, there is always one basic group of conditions even if you have just one expression. You can add nested groups which will return a common result for all expressions it contains.
How to manipulate data inside operands
Besides operators, you can perform some additional actions on data right in the operands’ fields (the left and right parts of expressions). There are boolean, arithmetical, and date/time functions. They can be applied to hardcoded data as well as to ticket or comment fields.
Boolean Functions
Name |
Description |
Usage |
Result |
|---|---|---|---|
|
An argument of the function is a set of elements separated by comma. The function returns |
|
|
|
The function receives three arguments: condition expression, values to return depending on the condition (whether it is true or false). |
|
|
Arithmetical Functions
Name |
Description |
Usage |
Result |
|---|---|---|---|
|
Returns the absolute value of a specified number. |
|
|
|
Returns the smallest integer greater than or equal to the specified number. |
|
|
|
Returns the largest integer less than or equal to the specified number. |
|
|
|
Returns the larger of two specified numbers. |
|
|
|
Returns the smaller of two numbers. |
|
|
|
Rounds a value to the nearest integer or specified a number of decimal places. |
|
|
Date/Time Functions
Name |
Description |
Usage |
Result |
|---|---|---|---|
|
Returns the current system date. |
|
|
|
Returns the current system date and time. |
|
|
|
Returns the date part of a particular datetime value. |
|
|
|
Adds the specified number of minutes to the specified date parameter. |
|
|
|
Adds the specified number of hours to the specified date parameter. |
|
|
|
Adds the specified number of days to the specified date parameter. |
|
|
|
Adds the specified number of months to the specified date parameter. |
|
|
|
Adds the specified number of years to the specified date parameter. |
|
|
|
Returns day’s index in the week extracted from the provided timestamp.
For example, |
|
|
|
Extracts the hour value from the provided timestamp. When left empty, it uses the current date and time. |
|
|
|
Extracts the minute value from the provided timestamp. When left empty, it uses the current date and time. |
|
|
|
Returns True if the specified time falls within your configured business hours. |
|
|
|
Returns True if the specified date is a designated holiday. |
|
|
Learn more about Business hours and holidays.
How to assign tickets proportionally on the shift basis
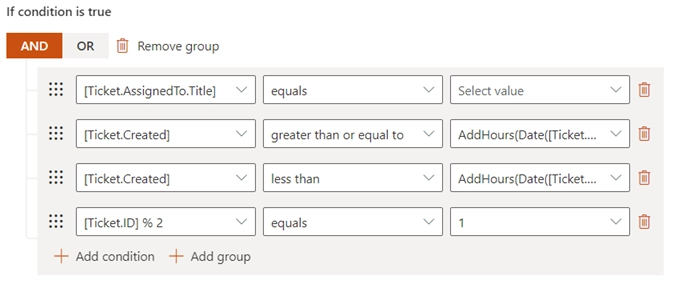
To demonstrate how conditions should be configured, let’s consider the following example. There are three shifts with 2 agents in each to provide 24/7 support. New tickets are assigned to agents of a certain shift depending on the time of their creation. All tickets should be distributed proportionally between agents of a certain shift. We create a separate trigger for assigning tickets to each agent. The triggers will run on the creation of a ticket. Here’s how its condition will look like for one of the agents of the day shift.
It is necessary to check whether the ticket is assigned to nobody. A reference to assignee’s ID is used:
[Ticket.AssignedTo.ID]
For checking the time of creation, a reference to the accordant ticket field is required:
[Ticket.Created]
Use the Date() function to get the day.
If you pass the reference [Ticket.Created] as an argument, it will return 12 AM of the day when the ticket is created:
Date([Ticket.Created])
Use the AddHours() function to define a certain time point of a day.
I used the following functions to define limits of the day shift (from 8 AM till 4 PM):
AddHours(Date([Ticket.Created]), 8)
AddHours(Date([Ticket.Created]), 16)
Also, the division with remainder will be useful in this case. Divide the item ID by the number of agents in one shift. In this case, it’s 2. The possible remainders are 0 and 1. It means that we assign all tickets with the former to one agent and with the latter to another.
[Ticket.ID] % 2
Thus, the condition for the described example will look as follows for one of two agents of the day shift which lasts from 8 AM till 4 PM.
All expressions are united with the logical operator AND since each should return true.
Note
You can also combine these expressions with IsBusinessTime() to ensure tickets are assigned only during working hours.