Use as REST API
This tutorial shows how to use Plumsail Actions API. There are just a few steps to get started:
Create an API key
Just follow the steps described in this topic. You will pass the API key as the Authorization HTTP header in your requests to the API.
Review reference for API that you want to call
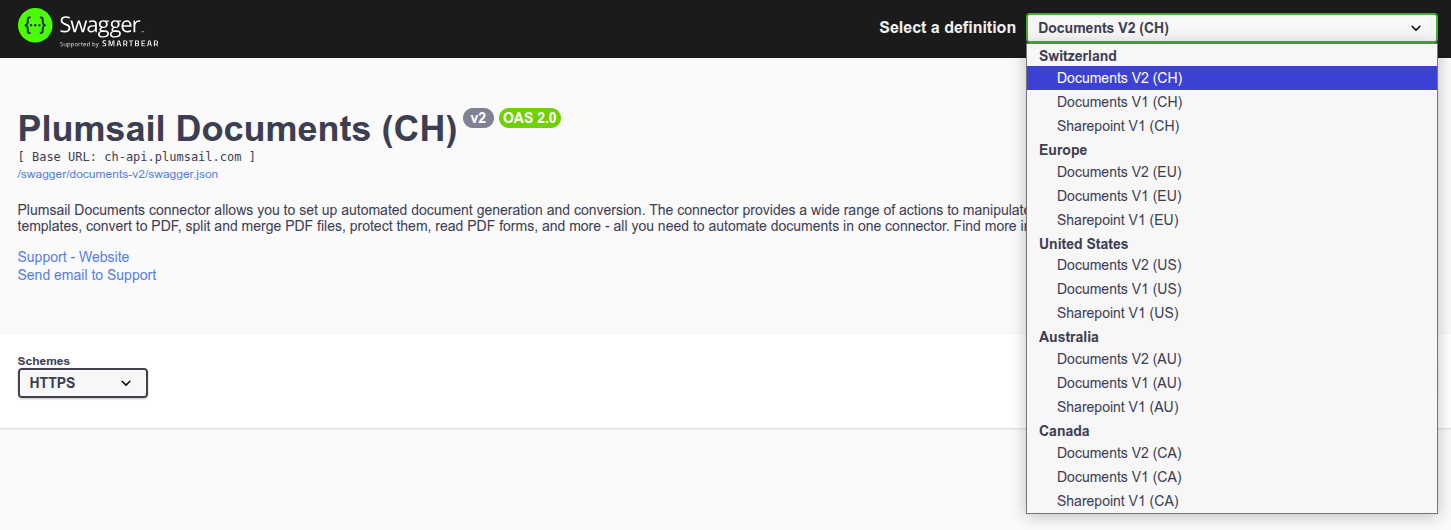
You can find the API reference by one of these links depending on the region of your account:
You can also change the region directly in the Swagger UI:
Use API from your programming language
Our API is REST based. Thus, you can use any programming language that is able to execute web requests. For example, you would use C#, PowerShell, node.js, Python, PHP.
There are a lot of ready to use helper REST API clients for those languages. Here are just a few of them:
RestSharp for C#
Invoke-RestMethod - cmdlets for PowerShell
Axios - simple promise based HTTP client for node.js
Requests: HTTP for Humans for Python
Guzzle for PHP
Learn two ways to call API
There are two ways to work with API:
The first way is good for light operations. When execution of method doesn’t take a lot of time. You just call an API method and receive a response with results.
The second way is good if you want to perform a long-running operation. For example, create a large SharePoint site from a template. You just start a site creation job and then download the result once the job is finished.
You can find descriptions of all available methods in the API reference.
Call a method and get the result immediately
This approach is good for processing small amounts of data and for testing purposes. If your request cannot be processed within 30 seconds, our service will return an error. Therefore, if you want to process a large amount of data, it is better to use the second option with jobs.
Some of the methods in the API are not mirrored in jobs. Those methods are designed to work with quick operations. They just don’t need any jobs.
All jobs are placed under ‘/jobs/’ path. You may notice it in the API reference. The rest of methods return results right in the response.
Below is an example of a raw request to create a SharePoint site from a template. The request returns a result immediately.
Note
Please ensure you are using the correct URL corresponding to your data center region:
USA: https://us-api.plumsail.com/api/v1/sharepoint/CreateSiteFromTemplate
Australia: https://au-api.plumsail.com/api/v1/sharepoint/CreateSiteFromTemplate
European Union: https://eu-api.plumsail.com/api/v1/sharepoint/CreateSiteFromTemplate
Switzerland: https://ch-api.plumsail.com/api/v1/sharepoint/CreateSiteFromTemplate
Canada: https://ca-api.plumsail.com/api/v1/sharepoint/CreateSiteFromTemplate
POST https://eu-api.plumsail.com/api/v1/sharepoint/CreateSiteFromTemplate

Authorization: API_KEY
Content-Type: application/json
Accept:  application/json

{
    "title": "Sales department",
    "template": "Team Site",
    "leafUrl": "Sales_Department",
    "description": "Sales department's site",
    "lcid": 1033,
    "inheritPermissions": true,
    "inheritNavigation": true,
    "onTopNav": true,
    "onQuickLaunch": true,
    "spUrl": "string"
}
And this is cURL representation for it:
curl -X 'POST' \
  'https://eu-api.plumsail.com/api/v1/sharepoint/CreateSiteFromTemplate' \
  -H 'accept: application/json' \
  -H 'Authorization: API_KEY' \
  -H 'Content-Type: application/json' \
  -d '{
  "spUrl": "string",
  "title": "Sales department",
  "template": "Team Site",
  "leafUrl": "Sales_Department",
  "description": "Sales department'\''s site",
  "lcid": 1033,
  "inheritPermissions": true,
  "inheritNavigation": true,
  "onTopNav": true,
  "onQuickLaunch": true
}'
You have to include the ‘Authorization’ header with your API access key and send the rest of the parameters in the body of the request. You can find the description of parameters in the API reference.
You will receive results of site creation in the response for your request. It will return ‘OK’ status with the code ‘200’. It indicates that the operation was successful. Here’s an example response:
{
    "url": "https://contoso/sites/subSite/Sales_Department"
}
Start a job and get the result once the job is finished
You may notice that some methods in the API reference are located under ‘/jobs/’ path. For example, the method below starts site creation job:
/api/v1/sharepoint/jobs/CreateSiteFromTemplate
This is an example of a raw request to start the job:
Note
Please ensure you are using the correct URL corresponding to your data center region:
USA: https://us-api.plumsail.com/api/v1/sharepoint/jobs/CreateSiteFromTemplate
Australia: https://au-api.plumsail.com/api/v1/sharepoint/jobs/CreateSiteFromTemplate
European Union: https://eu-api.plumsail.com/api/v1/sharepoint/CreateSiteFromTemplate
Switzerland: https://ch-api.plumsail.com/api/v1/sharepoint/jobs/CreateSiteFromTemplate
Canada: https://ca-api.plumsail.com/api/v1/sharepoint/jobs/CreateSiteFromTemplate
POST https://eu-api.plumsail.com/api/v1/sharepoint/jobs/CreateSiteFromTemplate

Authorization: API_KEY
Content-Type: application/json
Accept:  application/json

{
    "title": "Sales department",
    "template": "Team Site",
    "leafUrl": "Sales_Department",
    "description": "Sales department's site",
    "lcid": 1033,
    "inheritPermissions": true,
    "inheritNavigation": true,
    "onTopNav": true,
    "onQuickLaunch": true,
    "spUrl": "string"
}
And this is cURL representation for it:
curl -X 'POST' \
  'https://eu-api.plumsail.com/api/v1/sharepoint/jobs/CreateSiteFromTemplate' \
  -H 'accept: application/json' \
  -H 'Authorization: API_KEY' \
  -H 'Content-Type: application/json' \
  -d '{
  "spUrl": "string",
  "title": "Sales department",
  "template": "Team Site",
  "leafUrl": "Sales_Department",
  "description": "Sales department'\''s site",
  "lcid": 1033,
  "inheritPermissions": true,
  "inheritNavigation": true,
  "onTopNav": true,
  "onQuickLaunch": true
}'
You have to include the ‘Authorization’ header with your API access key and send the rest of the parameters in the body of the request. You can find the description of parameters in the API reference.
Once the job is created the method returns response message ‘Accepted’ with the code ‘202’. It means the job has been created and site creation operation is in progress. There is a ‘Location’ header presented in the response. It contains URL where the result of the job execution will be available. Here’s an example response:
{
    "status": "202",
    "location": "http://eu-api.plumsail.com/api/v1/sharepoint/jobs/CreateSiteFromTemplate/0HL80VGO2DC6N",
    "date": "Thu, 21 Sep 2017 16:11:07 GMT",
    "server": "cloudflare-nginx",
    "access-control-allow-origin": "*",
    "cf-ray": "3a1e4c69c8a28da7-DME",
    "content-length": "0"
}
A URL with the result is usually the same as URL of the original job plus identificator of the job. Example:
http://eu-api.plumsail.com/api/v1/sharepoint/jobs/CreateSiteFromTemplate/0HL80VGO2DC6N
Where ‘0HL80VGO2DC6N’ is an ID of the job.
All you need to do now is to execute GET request for the URL from the ‘Location’ header. If the result is not ready yet, it returns ‘Accepted’ message and ‘202’ code again with the same ‘Location’ header.