Move documents in current site and cross-site
This article will show how to move documents using SharePoint 2013 workflows. This approach works well for SharePoint 2013 on premise deployment as well as for SharePoint Online in Microsoft 365. I will implement archival workflow as a proof of concept, which moves documents from one document library to another, but you can modify it a little and use to copy documents or folders cross-site.
As you probably know, you can store many documents in the SharePoint document libraries. For SharePoint 2013 it is 30 000 000 per library. However, there is another limit which spoils all the fun, it is list view threshold 5 000 documents or list items. There are also another limit, like security scope limit, which doesn’t allow to have more than 50 000 security scopes. Roughly speaking it is amount of documents or folders with unique permissions. You can find full list of list and library limits on technet.com .
As result it is not always possible to store 30 000 000 documents in the single document library. So, we have enough reasons to think about setting up archival workflow which will move outdated documents to archival document libraries. Thus, we will eliminate the issue with large amount of documents in the document library.
It will show how to set up periodical archival process, which will run monthly. This workflow will create new document library and move documents created during the previous month into this document library. The workflow produces the structure of libraries like this:
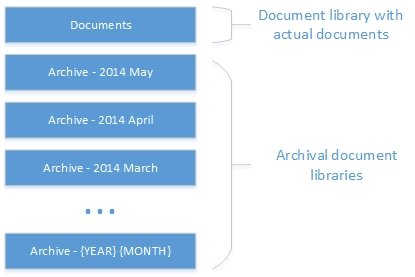
It has single document library ‘Documents’ at work, once per month the workflow creates new document library and names it using such pattern ‘Archive – {YEAR} {MONTH}’ .
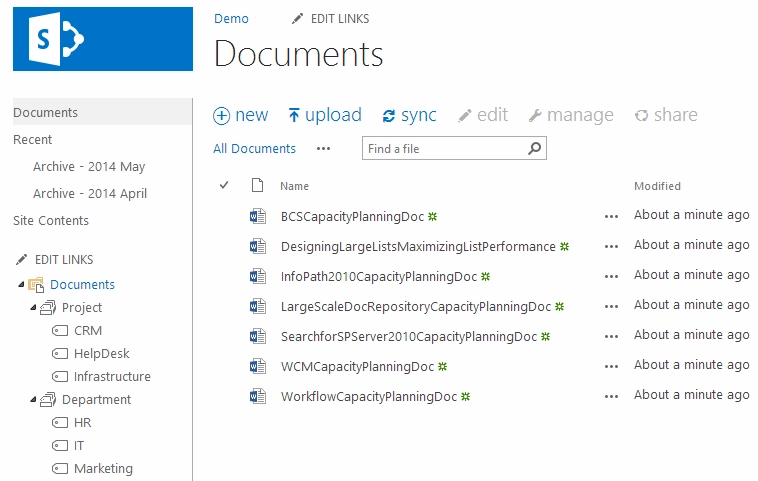
The document library has plain structure without folders, it was use metadata navigation by project and by department instead of folders. I added two metadata columns into document library ‘Project’ and ‘Department’. You can see how it looks below:
To implement archival workflow with such functionality, it has to be able to create new document libraries by custom template, because I have two metadata column in the library. I also need to query documents using CAML query, because I have to archive documents created in the last month only. To create document library I need to generate appropriate name using template ‘Archive – {YEAR} {MONTH}’ . Then I have to move documents which I received from CAML query into created document library. In this example I work within the same SharePoint site, but I want to have possibility to move documents cross-site. Finally I need to schedule the archival workflow to run periodically.
Out of the box workflow actions don’t allow to implement even half of such functionality. In this example it will show how to use some workflow actions from Workflow Actions Pack to implement the workflow and how to schedule the workflow using Workflow Scheduler .
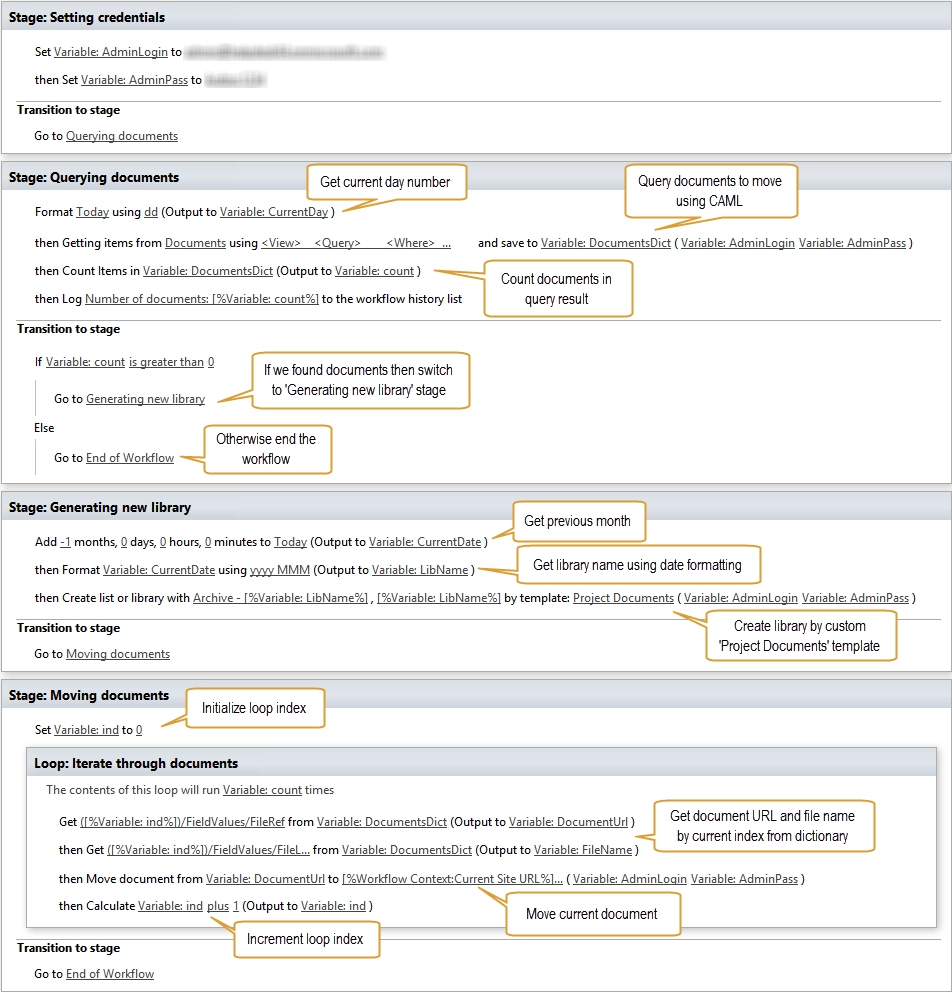
Archival workflow configuration
It was created one site level workflow named ‘Move to archive’ . It consists of five stages:
Setting credentials
Querying documents
Generating new library
Moving documents
You can see the stage outline for the workflow below:

As you can see, there is stage transition condition after ‘Querying documents’ stage. In this conditinon it checks if any documents for archiving found. If there are no documents, the workflow will be completed.
Take a look at documentation to get more information about properties of workflow actions used in this article.
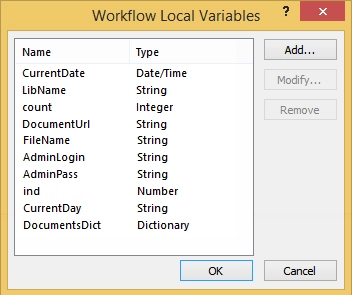
Before we dive in, also take a look at workflow variables of the archival workflow:
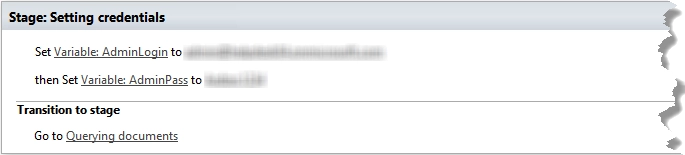
Setting credentials stage
At this stage it just saved credentials which I use within workflow actions in workflow variables. This step is actual for SharePoint Online in Microsoft 365 only. If you use SharePoint 2013 on-premise you can go to the next step.
You can see text-based view of this stage below:
Querying documents stage
At this stage it was used two custom workflow actions:
Format date – allows to format dates using format string. You can find description date format strings on MSDN
Get items by query – allows to query documents using CAML query
You can see text-based view of the stage below:
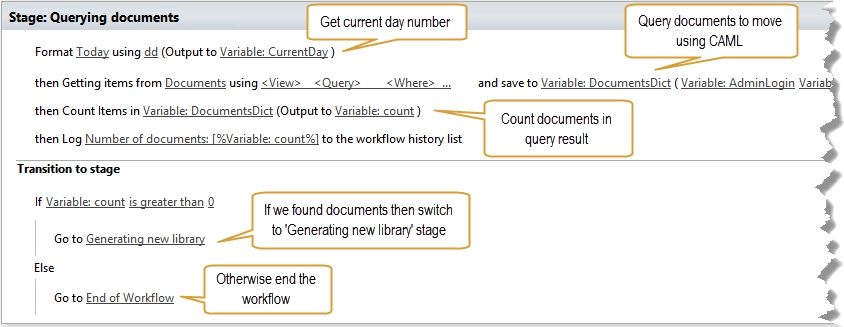
At this stage it used ‘dd’ format string which allows to get day number. It needed this to build CAML query which could return documents from the previous month only except documents created in the current month.
This is how CAML query looks:
<View>
    <Query>
        <Where>
            <Lt>
                <FieldDef Name="Last_x0020_Modified">
                    <Value type="DateTime">
                        <Today OffsetDays="-[%Variable: CurrentDay%]"></Today>
                    </Value>
                </FieldDef>
            </Lt>
        </Where>
    </Query>
    <ViewFields>
        <FieldDef Name="Title">
        <FieldDef Name="FileRef">
        <FieldDef Name="FileLeafRef">
    </ViewFields>
</View>
As you can see it used -[%Variable: CurrentDay%] inside offsetdays of the CAML query. Note, there is minus (-) sign before CurrentDay variable. This allows the workflow action to query documents created earlier than Today – CurrendDay . So, I the workflow action will query all documents created earlier than current month.
It was used this CAML query inside ‘Get items by query’ workflow action. This workflow action saves result in the dictionary workflow variable. Dictionary in SharePoint 2013 workflows can store collection of objects as well as single objects with key value pairs. You will see how to iterate through items in the dictionary at the last stage of the workflow.
As you see above, there is also condition in the transition section. It checks if no documents found, it completes the workflow without creation of new document library and without moving of documents.
Generating new library stage
At this stage it generates name for new document library and create new library.
Firstly it was used ‘Add Time to Date’ workflow action to subtract one month from the current date to get date of the previous month. Then I used this date inside ‘Format date’ workflow action to get name for new document library. I used ‘yyyy MMM’ format string. It allows the workflow to generate string in the following format ‘{YEAR} {MONTH}’ .
To create new document library I used ‘Create list or library’ workflow action. As mentioned in the beginning of this article, I added two metadata columns into document library, therefore archival document libraries also have to contain such columns. To guarantee that archival document libraries will have such columns I saved source document library as template. To save library as template navigate to ‘Library Settings’ and click ‘Save document library as template’. I named the template as ‘Project Documents’ . I used this template’s name in the workflow action as well as name generated in the ‘Format date’ workflow action. See text-based view of this stage:

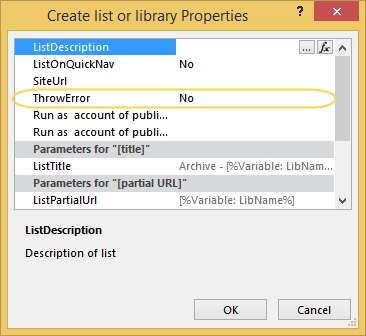
One important note about configuration of ‘Create list or library’ workflow action. There is ‘ThrowError’ property and I set it to ‘No’ , because I don’t want to interrupt the workflow if the document library already exists. You can find this property in workflow action’s properties:
Moving documents stage
At this stage the workflow iterates through documents received from the CAML query and moves them into created document library.
To move documents it was used ‘Move document from library’ workflow action. Firstly I initialized the index variable. The workflow increments this variable in the loop. I used this variable to get values from dictionary with information about documents by index. You can see two workflow actions ‘Get an Item from a Dictionary’ in the text-based view below. I used them to get the URL and the name of the document from dictionary. To get value from current item of dictionary I use following paths:
([%Variable: ind%])/FieldValues/FileRef
([%Variable: ind%])/FieldValues/FileLeafRef
Paths has following format:
({INDEX})/FieldValues/{FIELD_INTERNAL_NAME}
The ‘ind’ variable stores current index within the loop. You can see how I used it on the picture below.
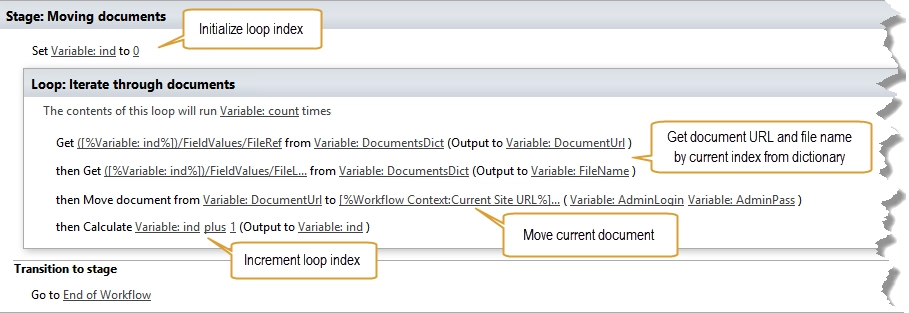
It was used ‘FileName’ and ‘DocumentURL’ in the ‘Move documents from library’ workflow action. The ‘FileName‘ is required to build the URL of the new documents. To build the URL I used following combination of workflow constants and variables:
[%Workflow Context: Current Site URL%][%Variable: LibName%]/[%Variable: FileName%]
It is current site URL plus document library name plus file name.
Once we got all necessary information, it is possible to move documents using the workflow action. You can see how I configured the workflow action on the picture above.
Note: If you have structure with folders, you can use ‘Move folder from library’ workflow action.
Workflow scheduling
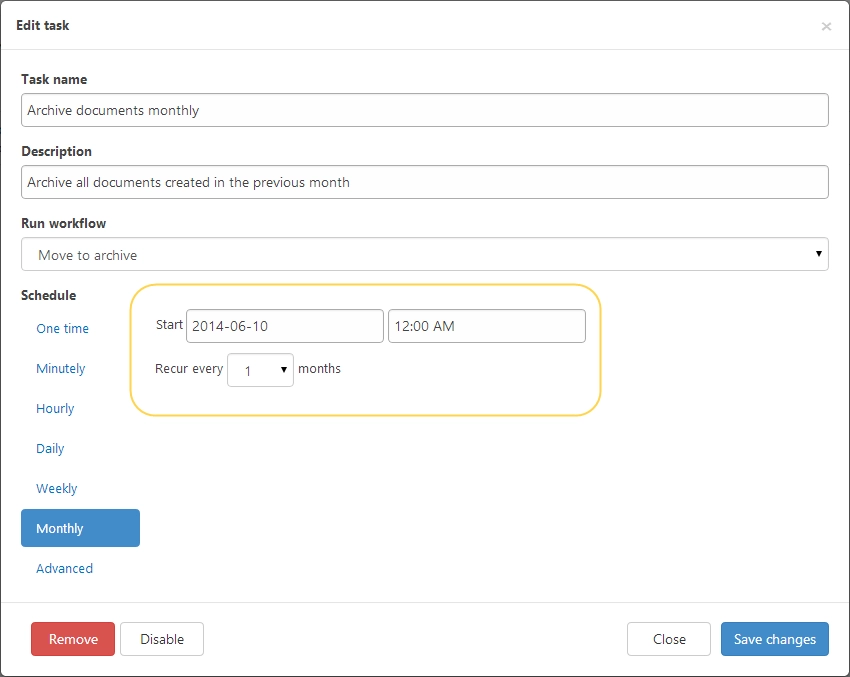
Scheduling of workflows is quite useful, especially for SharePoint Online in Microsoft 365, because there is not any possibility to create custom timer job or something like this. To schedule the archival workflow I used Workflow Scheduler. I configured schedule to run the workflow at 6th day of each month. So, in the beginning of the month I still can use documents from the previous month, but at 6th day, if I didn’t use them, they will be moved to the newly created document library archive. As I described above, I created the workflow with possibility to change the schedule. Do you remember ‘dayoffset minus current day’ ? So it is possible to specify any other day to start the workflows. You can see configuration of the workflow scheduling task below:
Full schemes of the workflow