Automatically create Microsoft 365 user accounts
This article will show how to automate creation of Microsoft 365 user accounts and granting permissions using SharePoint 2013 workflow. Creation of accounts and granting permissions for new employees is a part of daily tasks for many IT specialists. I would like to suggest approach how to automate this and maybe how to delegate part of work to HR specialists using SharePoint workflow.
This article will also show how to use SharePoint list to manage user accounts automatically. As an example I will create new SharePoint list ‘Employees’ . I will use this list as an employees directory. Then I will create two SharePoint 2013 workflows to create and to update user on list item creation and list item update. The workflow on creation will also add new user to SharePoint or Azure AD group according to the department of the employee. Finally the workflow will send a temporary password and account details to initiator of the workflow and to the new employee if alternate e-mail address is specified.
Thus, the new user will receive temporary password and access to SharePoint resources automatically based on their department. With such scenario I can delegate creation of new users to HR, they can use simple SharePoint list to manage employees, the workflow will do all the work.
To implement SharePoint workflows it uses a few workflow actions from Workflow Actions Pack 2.1 which allows to create a new Azure AD user account, assign a license to created user and to add them into SharePoint group or Azure AD group. To get more information about workflow actions and their parameters read the documentation.
Create ‘Employees’ list
Firstly it was created new SharePoint list named ‘Employees’ . I added commonly used fields only, but feel free to add other fields you need to set in Azure AD. This is how the list looks:
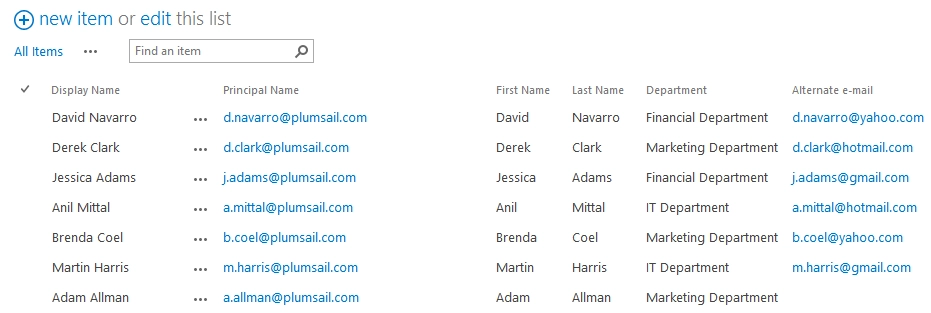
It was used choice field to store department to simplify this ‘proof of concept’, but you can use lookup instead and store departments in the separate list. On the picture above you can see that it was added ‘Alternate e-mail’ address field. The workflow uses this fields to send temporary password and other account related information to the new employee.
Create the workflow to create new users
The next step is to create the workflow which creates Azure AD user accounts on list item creation, adds new account to specific SharePoint or Azure AD group and sends e-mail message to the initiator with temporary password.
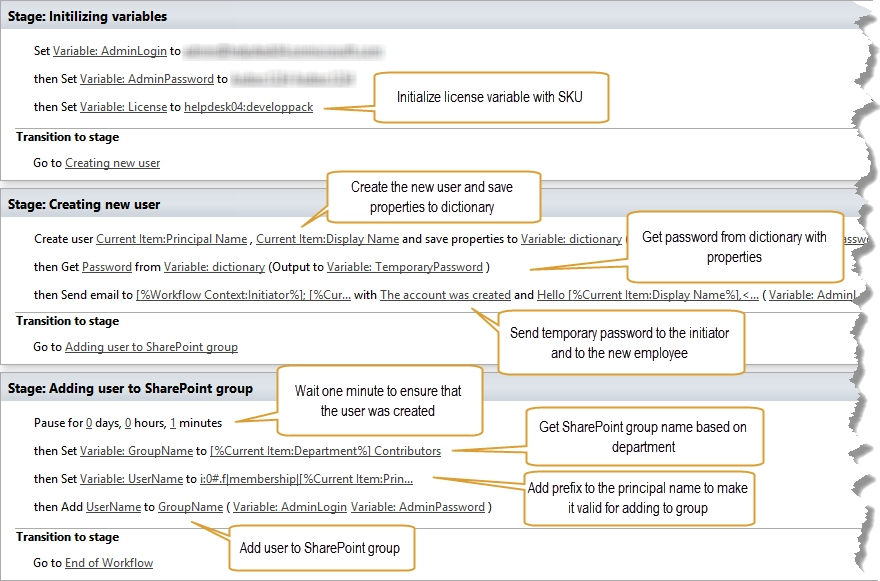
This is how the workflow looks. It was will describe it in detail below:
Stage: Initializing variables
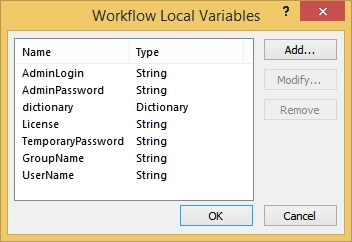
To reproduce the workflow you may need to know workflow variables it was used:
At this stage it was initialized variables with credentials required to create new Azure AD users and specified SKU for Microsoft 365 license. SKU is a code of Microsoft 365 subscription.
To get available for you SKU codes you need to use PowerShell Windows Azure Active Directory Module for Windows PowerShell . Just download the version for your operation system and install it. Then execute following script:
Import-Module MSOnline
$msolcred = Get-Credential
$username = "*{Your Microsoft 365 username}*"
$password = ConvertTo-SecureString "*{Password for Microsoft 365 user}*" -AsPlainText-Force
$cred = New-Object -typename System.Management.Automation.PSCredential -argumentlist $username, $password
Connect-MsolService -credential $cred
Get-MsolAccountSku
As result you will see the screen like this:

Copy and paste AccountSkuId to ‘Set Workflow Variable’ workflow action.
Stage: Creating new user
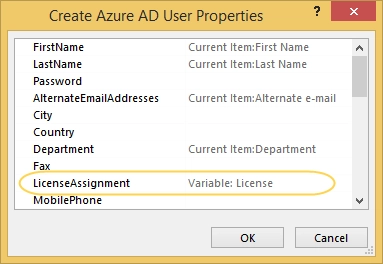
To create new user it was used ‘Create Azure AD User’ workflow action from Workflow Actions Pack . You can find complete description of parameters for workflow action in the documentation. In the properties I specified principal name for the new user, display name and other information like department.
It is possible to create new user without assigning a license, but in my case I want to assign licenses automatically. That is why it was also set LicenseAssignment property to SKU code stored in the License variable.
This workflow action stores properties of the new user including password into dictionary variable. The next step is to get password from the dictionary using ‘Get an Item from a Dictionary’ workflow action. See the picture wit text-based view of the workflow to understand how to configure it.
Once the temporary password is stored in the variable the workflow sends it and related information to the workflow initiator and to the new user if they have alternate e-mail address. I used ‘Send Email with Attachment (Exchange)’ workflow action from Workflow Actions Pack to send notification because alternate e-mail address is surely external and out of the box workflow action doesn’t allow to send messages to external users.
Stage: Adding user to SharePoint group
At this stage the workflow adds the new user to SharePoint group according to department. In the beginning of the stage a placed ‘Pause for Duration’ workflow action to ensure that the new user is already created in Microsoft 365.
As prerequisite it was created SharePoint groups for each department and named them using such pattern ‘{Department name} Contributors’ . In the workflow it was just added ‘Contributors’ to the name of department and saved it to ‘GroupName’ variable. I didn’t use any conditional logic here, but if you need you can implement it.
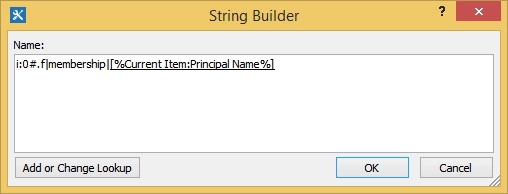
To add new user to group it was used ‘Add User to SharePoint Group’ workflow action. It requires username in the correct format. You need to add ‘i:0#.f|membership|’ string just before principal name. I saved the result of concatenation in the ‘UserName’ variable. See the picture below for example of configuration:
Finally it was used ‘UserName’ and ‘GroupName’ variables in the ‘Add User to SharePoint Group’ workflow action.
As mentioned in the beginning of this article it is possible to add user to Azure AD group instead of SharePoint group. If you manage permissions using Azure AD groups you can use ‘Add User to Azure AD Group’ workflow action . It doesn’t require adding ‘i:0#.f|membership|’ string before principal name.
Create the workflow to update users
It is possible that some information about employees will be changed in the future, and if we want to manage employees on the SharePoint side we need to support updating of an employee. That is why I created the workflow which starts on item update and updates information about an employee in the Azure AD.
This is how the workflow looks:
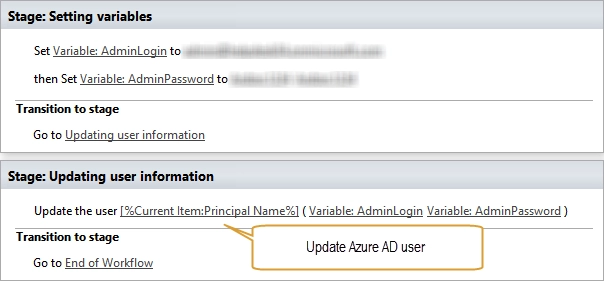
It was used ‘Update Azure AD user’ workflow action to update information about an employee. The configuration of this workflow action is very much the same with ‘Create Azure AD User’ . It was specified principal name and other information from list item fields in the properties of the workflow action:
