How to save SharePoint form as PDF for printing
Plumsail Forms has built-in functionality allowing to export any SharePoint form to PDF by clicking the button on the right side of the toolbar.

Or you can call the fd.exportToPDF when the form is submitted:
// export PDF on form submission
fd.spBeforeSave(() => {
    return fd.exportToPDF('FileName');
});
From this article, you will learn how to customize the appearance of the resulting PDF file and how to solve common problems.
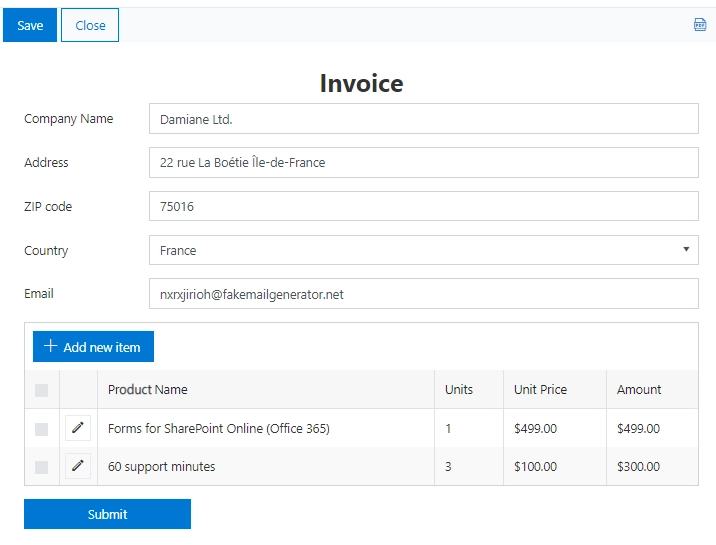
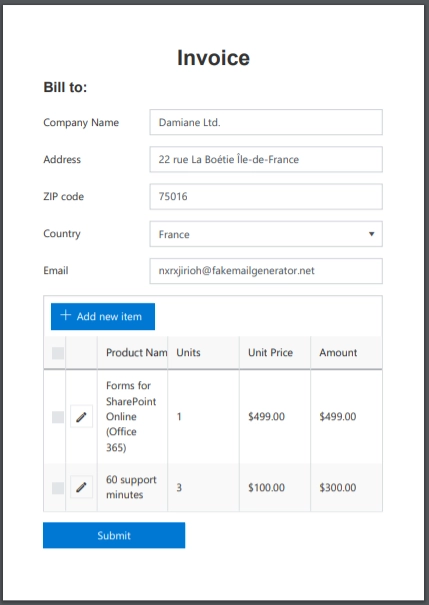
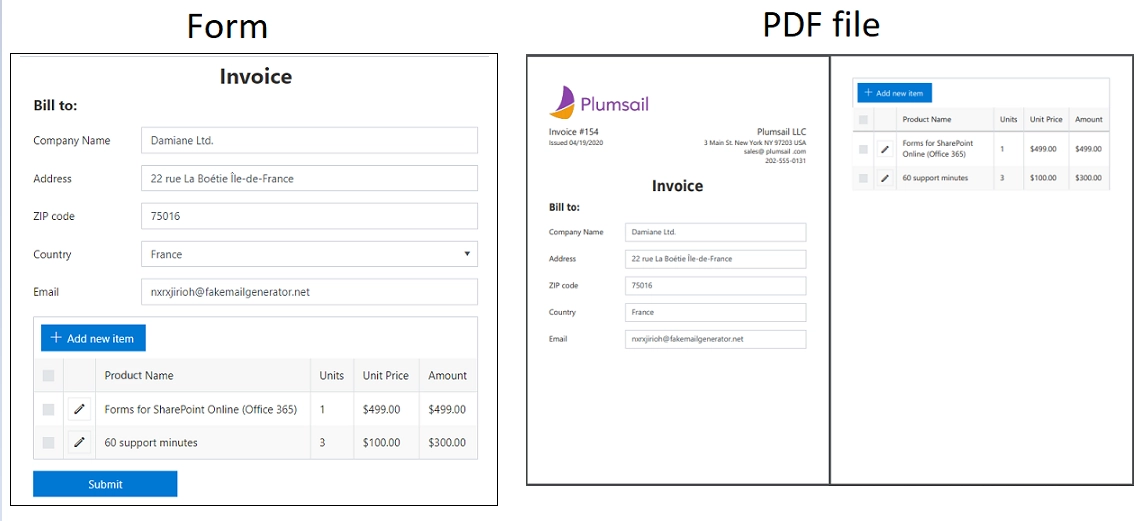
Form
Assume that you have a SharePoint form that you need to export into PDF. In this example, there is a simple Invoice form with the following fields and controls:
Company Name (text field);
Address (text field);
ZIP code (text field);
Country (choice field);
Email (text field);
Purchased Products (List or Library control).
This is our form:
Up next, you can find various approaches to the design of the final PDF document.
Page layout
With JavaScript, you can specify the basic layout properties of PDF pages, such as page size, margins, etc. Let’s have a closer look at each property.
Size
paperSize option specifies the size of the pages.
By default, the option is ‘auto’—the page automatically adjusts its size to the content. You can set this option to one of the predefined paper sizes or specify a custom size.
The following predefined paper sizes are available:
A0-A10, B0-B10, C0-C10,
Executive, Folio, Legal, Letter, Tabloid.
Examples:
Paper size: A4
fd.pdfOptions = {
    paperSize: 'A4'
};

Paper Size: Custom
fd.pdfOptions = {
    paperSize: ['297mm', '297mm']
};
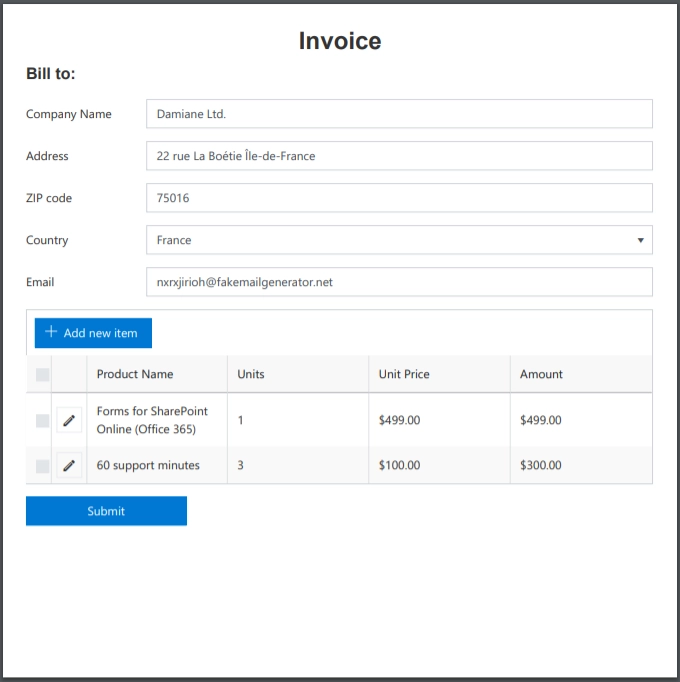
For the invoice document, you can see that the standard A4 page size is selected.
Orientation
landscape option specifies the orientation of the pages. By default, the option is ‘false’—the page orientation is portrait (vertical). To change the orientation of PDF pages to landscape (horizontal), set the parameter to true.
Examples:
Page Orientation: landscape (horizontal)
fd.pdfOptions = {
    paperSize: 'A4',
    landscape: true
};
Page Orientation: portrait (vertical)
fd.pdfOptions = {
    paperSize: 'A4',
    landscape: false
};
The optimal page orientation for the invoice is portrait (vertical).
Margins
margin is an object that defines the top, left, right, and bottom margins of a page. You can set the same size for all margins or specify the size of the margins for each side of the page separately.
Examples:
Page Margins: one size
fd.pdfOptions = {
    paperSize: 'A4',
    landscape: false,
    margin: '10mm'
};
Page Margins: custom size
fd.pdfOptions = {
    paperSize: 'A4',
    landscape: false,
    margin: {
        left: '20mm',
        top: '40mm',
        right: '20mm',
        bottom: '40mm'
    }
};

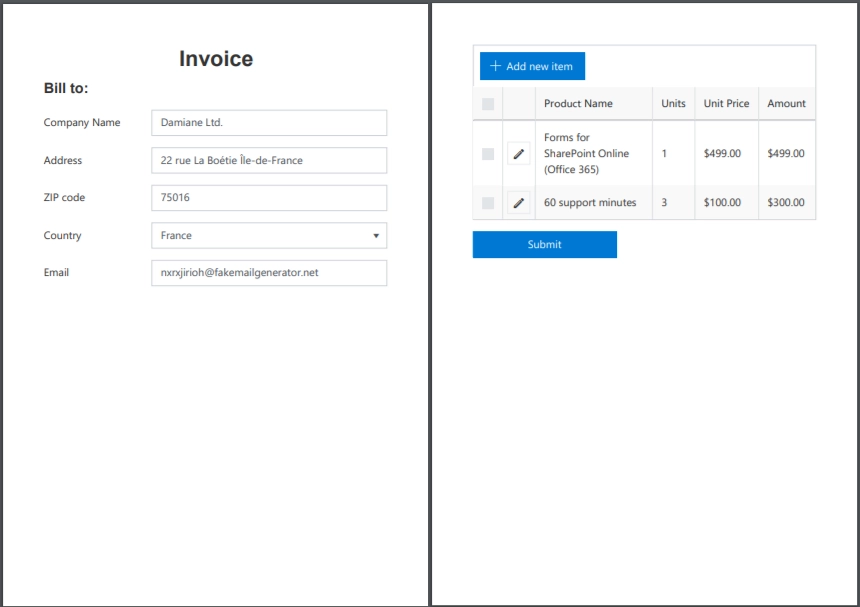
Page breaks
By default, the page breaks are placed automatically depending on the page dimensions: page size, margins, and orientation. But you can define where you want the page to break manually using the forcePageBreak option that holds the CSS class of the element before which the page break occurs.
For instance, you want the page to break before the Data Table control. For this, you need to add a CSS class to the parent grid and specify this class in the forcePageBreak option.
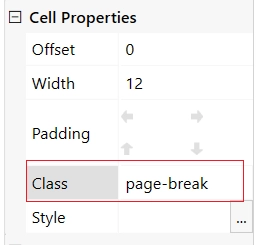
fd.pdfOptions = {
    paperSize: 'A4',
    margin: '5 mm',
    forcePageBreak: '.page-break'
};
Content adjustments
You can change the appearance of the resulting PDF using the ‘k-pdf-export’ class. CSS rules for this class apply only to the PDF document..
Show or hide blocks of elements
For instance, you want to hide elements in the resulting PDF or vice versa. These can be buttons, fields, titles, containers, etc.
In this example, the Submit button is hidden in the resulting PDF. First, assign the ‘pdf-hide’ CSS class to it:
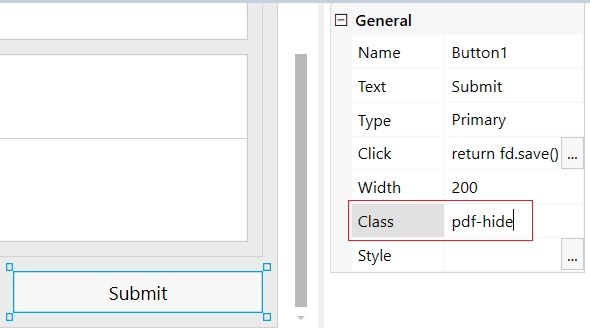
Then, add the following rule to the CSS editor to hide it in PDF:
.k-pdf-export .pdf-hide {
    display: none !important;
}
You can assign the same class to each element you want to hide in the PDF and hide them all at once.
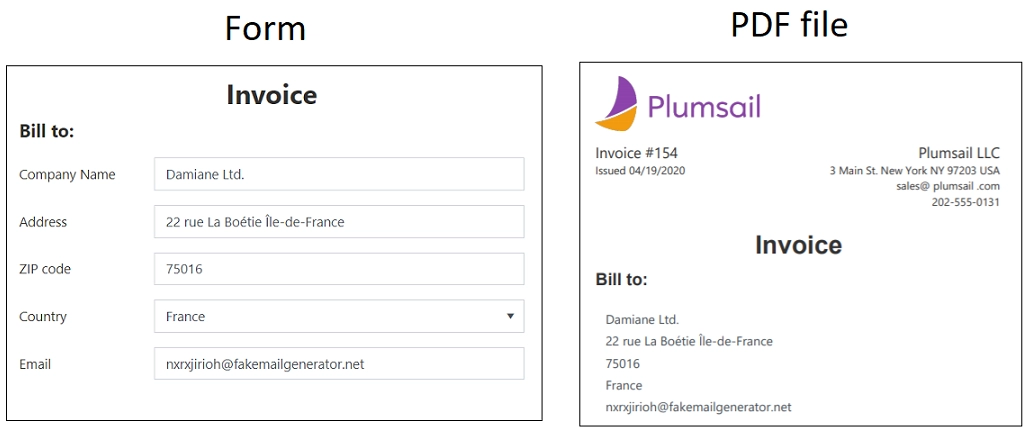
Additionally, the date and contact information are added to the PDF document, but they are not visible in the form. To do so, put the contact information in the Grid and assign it a CSS class ‘company-info’.

Next, add rules to the CSS editor that make the company information visible only in the PDF document.
/*hide company information on the form*/
.company-info {
    display: none !important;
}

/*show company information in PDF document*/
.k-pdf-export .company-info {
    display: contents !important;
}
And this is the result:
Change fields appearance
To hide field titles and input borders, use the following CSS rules:
/*hide field titles*/
.k-pdf-export label.fd-field-title {
    display: none;
}

/*hide input borders*/
.k-pdf-export span.k-dropdown-wrap.k-state-default,
.k-pdf-export .fd-form input.form-control {
    border: none !important;
}
And get rid of the icons: the arrow icons in the drop-down, number fields, and the calendar icon in the Date and Time field.
.k-pdf-export span.k-select {
    display: none !important;
}
Here is the difference between the form and the PDF document:
Adjust Data Table and List or Library
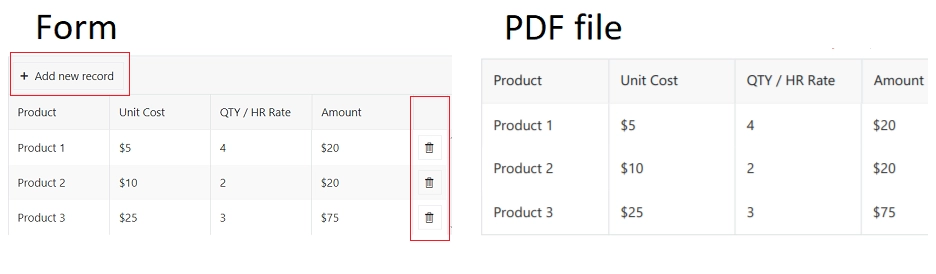
One more thing you may want to change is the appearance of the Data Table control in the PDF document.
Use the following CSS rules to hide the last command column of the Data Table, toolbar, and colored lines.
/* hide delete column and toolbar from datatable */
.k-pdf-export .fd-datatable table tr th:last-child,
.k-pdf-export .fd-datatable table tr td:last-child,
.k-pdf-export .fd-datatable div.k-header.k-grid-toolbar {
    display: none;
}

/* remove colored lines from datatable */
.k-pdf-export .fd-datatable table tr.k-alt {
    background-color: white;
}
This is the difference between the form and the PDF file:
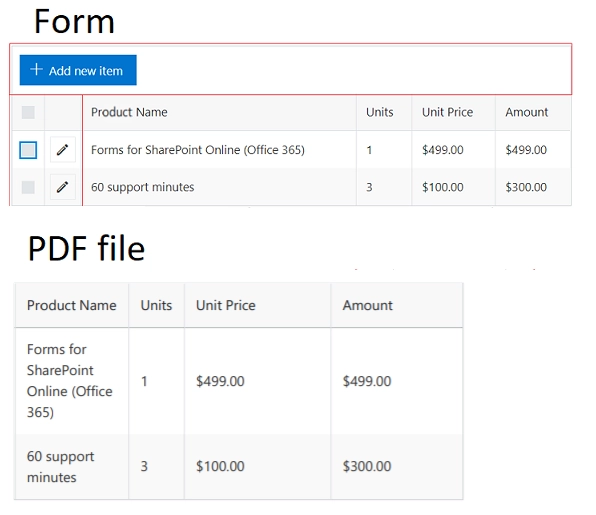
To do the same for List or Library control use this CSS:
/* hide delete column and toolbar from List or Library  */
.k-pdf-export .fd-sp-datatable-wrapper table tr th:nth-of-type(1),
.k-pdf-export .fd-sp-datatable-wrapper table tr td:nth-of-type(1),
.k-pdf-export .fd-sp-datatable-wrapper table tr th:nth-of-type(2),
.k-pdf-export .fd-sp-datatable-wrapper table tr td:nth-of-type(2),
.k-pdf-export .fd-sp-datatable-toolbar {
    display: none !important;
}

/* remove colored lines from List or Library  */
.k-pdf-export .fd-sp-datatable-wrapper table tr.k-alt {
    background-color: white;
}
This is how the List or Library control looks in a web form and in PDF file:
Expand Tabs, Accordion, and Wizard sections
If you use Tab or Accordion containers, you would probably want to display all its content at once in the resulting PDF file. This can be achieved using CSS rules.
For example, there are three tabs on the form:
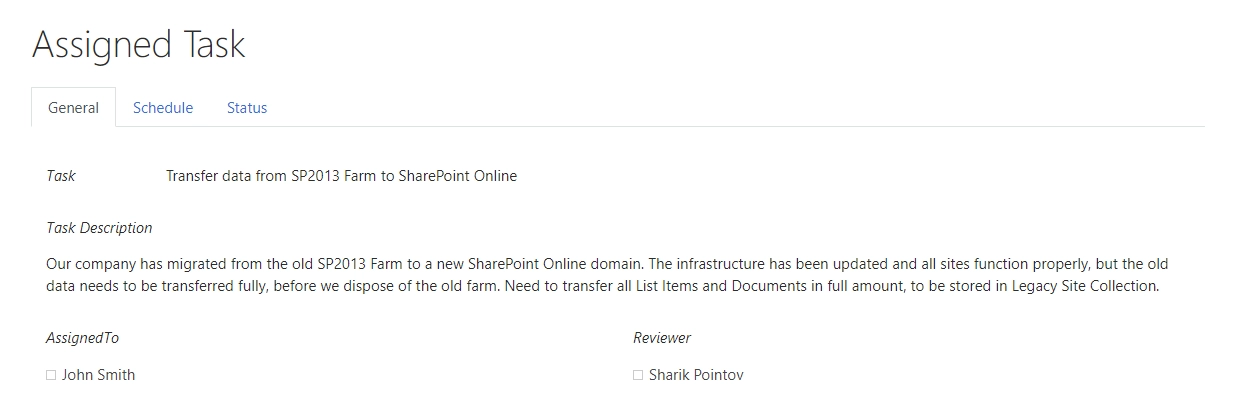
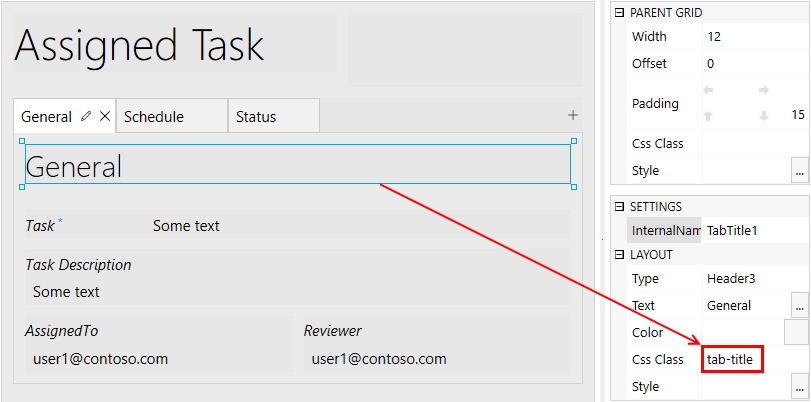
Since the tabs are hidden in the PDF, you can add a Heading control to each tab and give it a common CSS class. The titles will only be shown on the exported PDF, you can give each title ‘tab-title’ CSS class:
Next, add the following CSS rules to the CSS editor:
/* show tab contents for all tabs */
.k-pdf-export .tabset .tab-content div.tab-pane.fade {
    display: block !important;
    opacity: 1 !important;
}

/* hide tab navigation bar */
.k-pdf-export .tabset ul.nav.nav-tabs {
    display: none !important;
}

/* hide tab titles by default */
.tab-title {
    display: none;
}

/* show tab titles when exporting */
.k-pdf-export .tab-title {
    display: block;
}
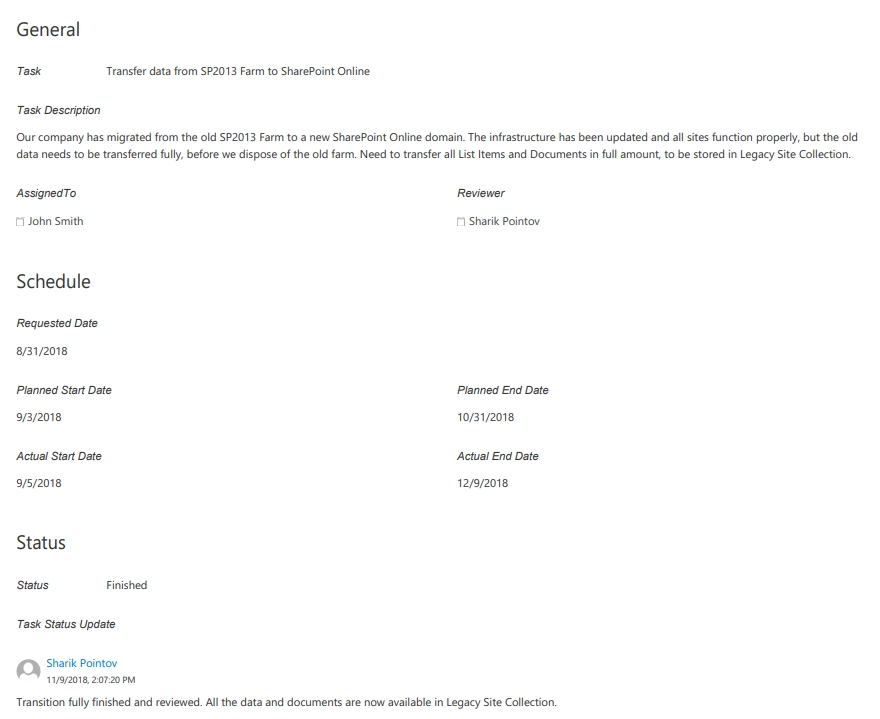
And then, after exporting to PDF, this is the result:
Similar to tabs, accordion panels can be extended with appropriate CSS styles.
This is the form with Accordion container:
Add the following CSS to expand Accordion in the resulting PDF file:
/* show contents for all Accordion panels */
.k-pdf-export .accordion .card-block {
    display: block !important;
    height: auto !important;
}

/* gray out all navigation links */
.k-pdf-export .accordion>.card>.card-header>.nav-link {
    background-color: #fff;
    color: #55595c;
}
And get the following result on the PDF page:

The same approach can be applied to Wizard container.
This is the form with Wizard container, there are Heading controls for each step to make them distinct in the PDF:

Add the following CSS to expand Wizard in the resulting PDF file:
.k-pdf-export .wizard-tab-container {
    display: block !important;
}
.k-pdf-export .wizard-nav, .k-pdf-export .wizard-card-footer {
    display: none !important;
}
And get the following result on PDF page:

Same with the Heading controls, you can add any CSS class to each heading and use it to show only in PDF, for instance:
* hide Wizard titles by default */
.wiz-title {
    display: none;
}

/* show tab titles when exporting */
.k-pdf-export .wiz-title {
    display: block;
}
Adjust layout prior to PDF export
Some key features of PDF export are calculated before the styles of .k-pdf-export are applied - for example, page-breaks are calculated without taking these styles into account.
To adjust for this downside, it’s possible to take it into account, and apply special styles prior to PDF export.
For this, you can modify existing button’s functionality to add .pre-print class to the form on export:
// change PDF button click function
fd.toolbar.buttons[2].click = async () => {
    // get the DIV element by class name
    const divElement = document.querySelector('.fd-form-container');

    // add the class pre-print to the DIV element
    divElement.classList.add('pre-print');

    await fd.exportToPDF('My Document', {
        landscape: false,
        paperSize: 'A4',
        forcePageBreak: '.breaker',
        multiPage: false,
        margin: '0mm'
    });

    // remove the class pre-printfrom the DIV element after export
    divElement.classList.remove('pre-print');
};
You can adjust styles and layout of .pre-print elements, and these changes are taken into export calculations:
.pre-print .subtitle {
    font-size: 8px;
    padding: 0px;
    margin-bottom: 0px;
    margin-top: 0px;
}

.pre-print *,.pre-print ::before,.pre-print ::after {
    padding: 0 !important;
    margin: 0 !important;
    box-sizing: border-box !important;
}

.pre-print .fd-form {
    font-size: 45%;
}
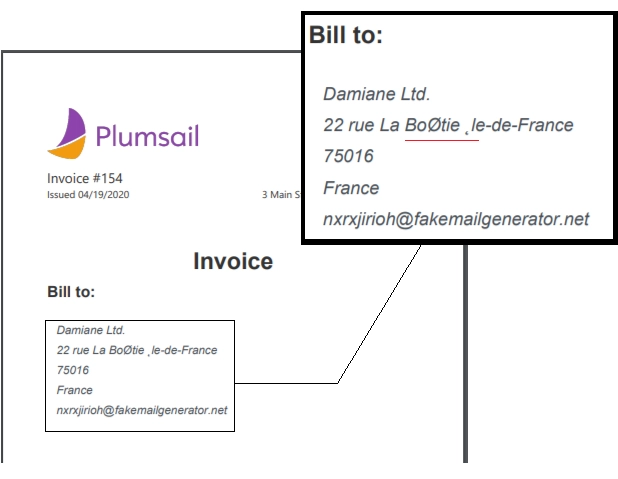
Non-Latin and special characters
Suppose you have a form in French, German, or Arabic. If you apply font styling to the text, you may notice that the exported PDF stops displaying Unicode characters.
For example, if you make the following text italic:

You get the following in the resulting PDF document:
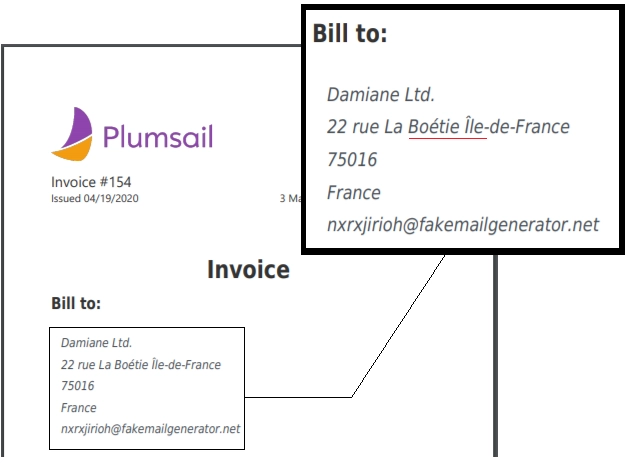
The DejaVu Sans font contains all Unicode characters. To avoid this problem, you need to declare DejaVu Sans font using the CSS font-face:
/*apply DejaVu Sans font to the content*/
.k-pdf-export {
    font-family: 'DejaVu Sans', 'Arial', sans-serif !important;
    font-size: 12px;
}

/*declair DejaVu Sans font*/
@font-face {
    font-family: 'DejaVu Sans';
    src: url('https://kendo.cdn.telerik.com/2020.1.406/styles/fonts/DejaVu/DejaVuSans.ttf') format('truetype');
}

@font-face {
    font-family: 'DejaVu Sans';
    font-weight: bold;
    src: url('https://kendo.cdn.telerik.com/2020.1.406/styles/fonts/DejaVu/DejaVuSans-Bold.ttf') format('truetype');
}

@font-face {
    font-family: 'DejaVu Sans';
    font-style: italic;
    src: url('https://kendo.cdn.telerik.com/2020.1.406/styles/fonts/DejaVu/DejaVuSans-Oblique.ttf') format('truetype');
}

@font-face {
    font-family: 'DejaVu Sans';
    font-weight: bold;
    font-style: italic;
    src: url('https://kendo.cdn.telerik.com/2020.1.406/styles/fonts/DejaVu/DejaVuSans-Oblique.ttf') format('truetype');
}
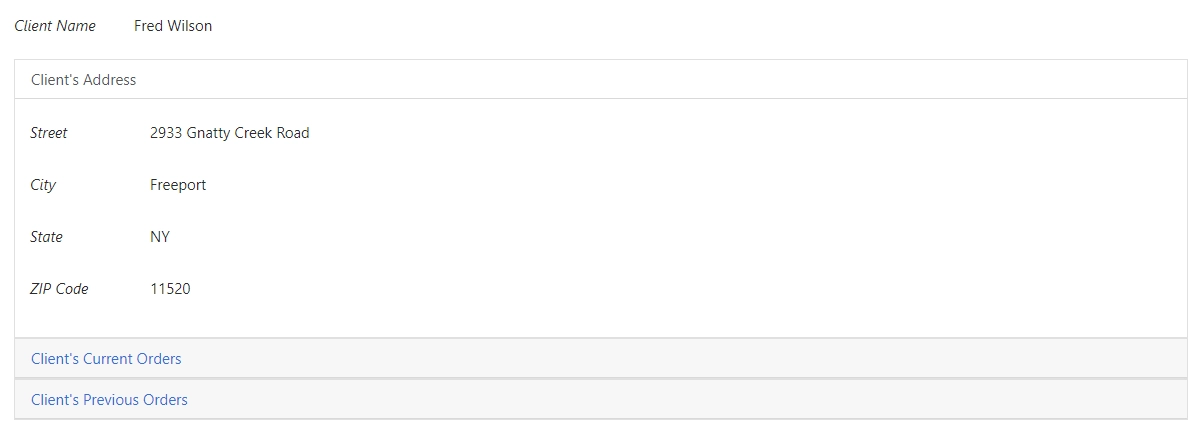
And this is how the client data renders in the PDF file:
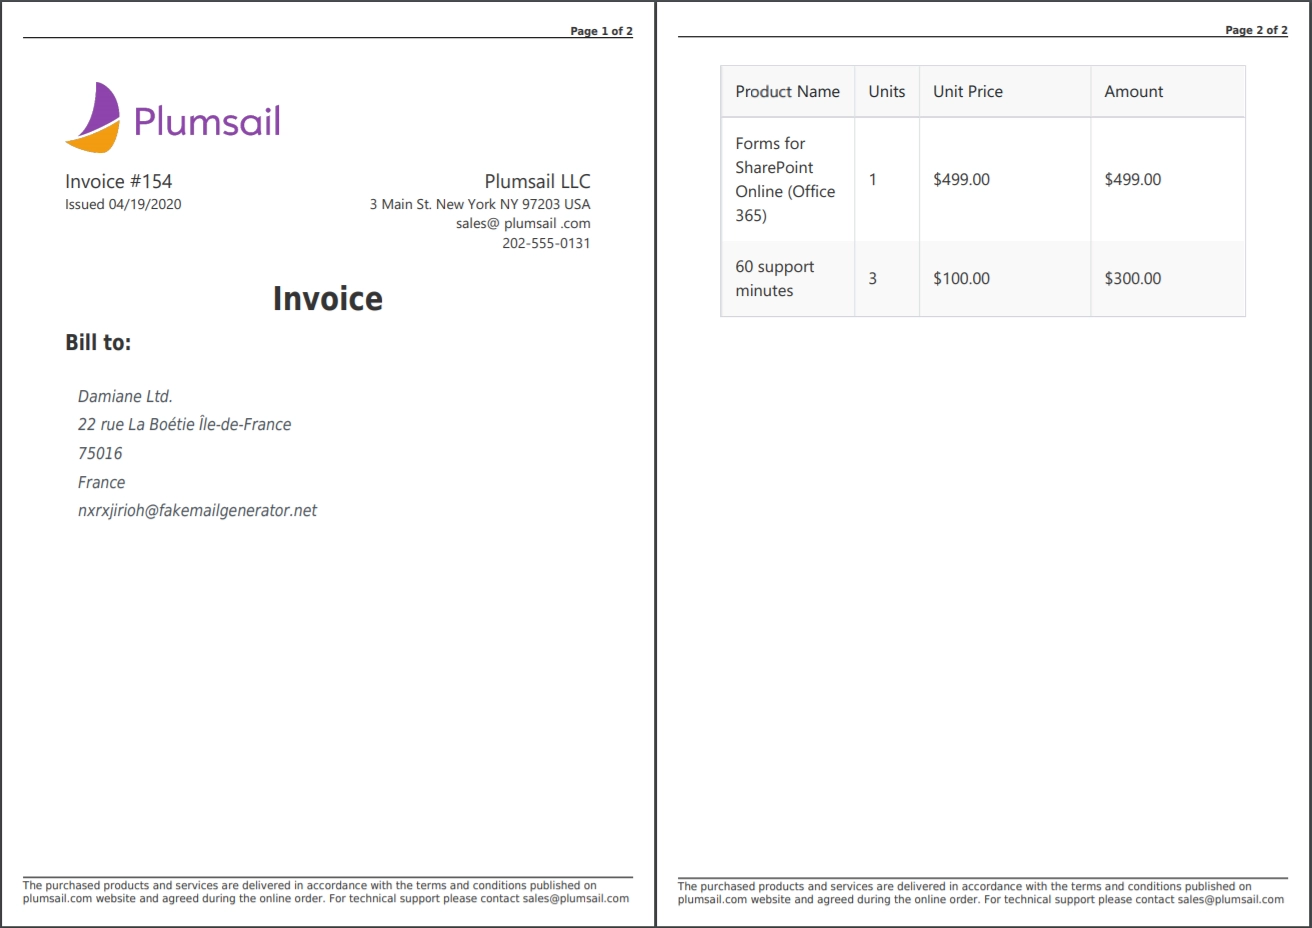
Header, footer, and page numbering
You can add a header, footer, and page numbering to the PDF. In this example, a page number is added to the header and a general message is added to the footer.
For this, add an HTML control with this code anywhere on the form.
<script type="x/kendo-template" id="page-template">
    <div class="page-template">
        <div class="header">
            <div style="float: right">Page #:pageNum# of #:totalPages#</div>
        </div>
        <div class="footer">
        The purchased products and services are delivered in accordance with the terms and conditions published on plumsail.com website and agreed during the online order. For technical support please contact sales@plumsail.com
        </div>
    </div>
</script>
You can also define any custom Javascript in the template, for this add it between hash tags:
<script type="x/kendo-template" id="page-template">
        #
            const title = fd.field('Title').value;
            const theDate = new Date();
        #
    <div class="page-template">
        <div class="header">
            <div style="float: left"></div>
            <div style="float: right">#=title#</div>
        </div>
        <div class="footer">
            <div style="float: left">#=theDate#</div>
            <div style="float: right">Page #:pageNum# of #:totalPages#</div>
        </div>
    </div>
</script>
Next, add the rules below to the CSS editor. These rules define the position and styling of the header and the footer:
.page-template > * {
    position: absolute;
    left: 20px;
    right: 20px;
    font-size: 90%;
}

.page-template .header {
    top: 20px;
    border-bottom: 1px solid #000;
}
.page-template .footer {
    bottom: 20px;
    border-top: 1px solid #000;
}
Finally, add the following code to the JavaScript editor:
// add this line to access fd in template
window.fd = fd;

fd.spRendered(() => {
    fd.pdfOptions = {
        paperSize: 'A4',
        margin: '10mm',
        forcePageBreak: '.page-break',
        template: $('#page-template').html()
    };
});
The code gets the content of the HTML element by its id, ‘page-template’, and assigns it to the template option.
And this is the resulting PDF file:
Conclusion
The above tips and tricks are good for exporting simple forms directly from the browser.
But if your form is more complex or large, we suggest you have a look at other options for creating PDF files: