Copy or move SharePoint documents cross-site in Power Automate
This article will show how to move documents using Power Automate (Microsoft Flow). As a proof of concept, I will implement the logic of the flow for archiving documents. It moves documents from one document library to another, but you can modify it a little and use to copy documents or folders cross-site.
It will show how to set up the periodical archival process that will start every day, query all documents older than 30 days and move them to the document library called “Archive” that is located on another site.
I will use ‘Get files (properties only)‘ from SharePoint Connector for getting properties of documents that have to be moved in the archive and Move SharePoint Document from Library from Plumsail SP connector, which is a part of Plumsail Actions. I will apply it to each document that will be found on the first step for moving it to “Archive” folder to a different site. This flow will be scheduled with “Recurrence” trigger from “Schedule” connector to run every day.
The complete flow is below. You can find step by step description next to the picture.
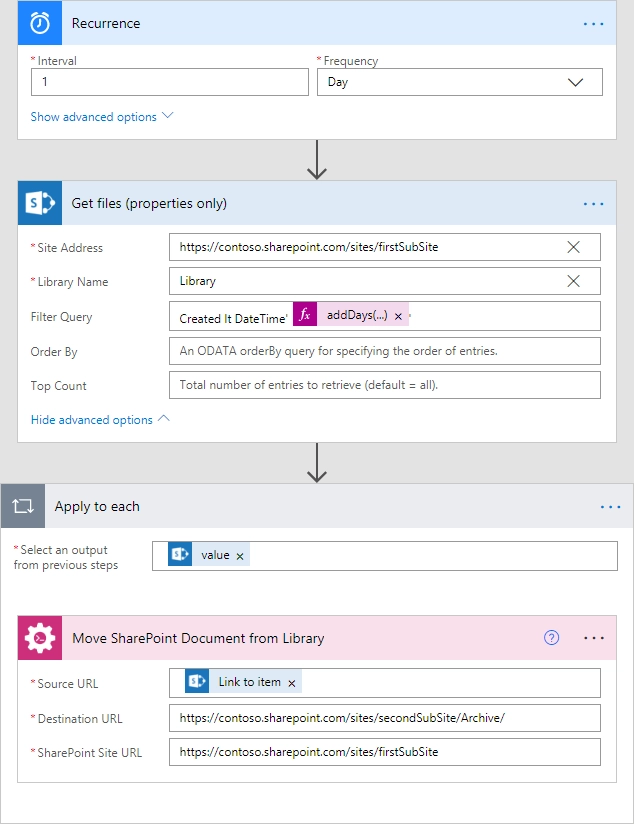
Recurrence
As mentioned above, I use this trigger to scheduling the flow to run every day. I specified following parameters for running every day:
‘Interval‘ - 1
‘Frequency‘ - picked “Days” value
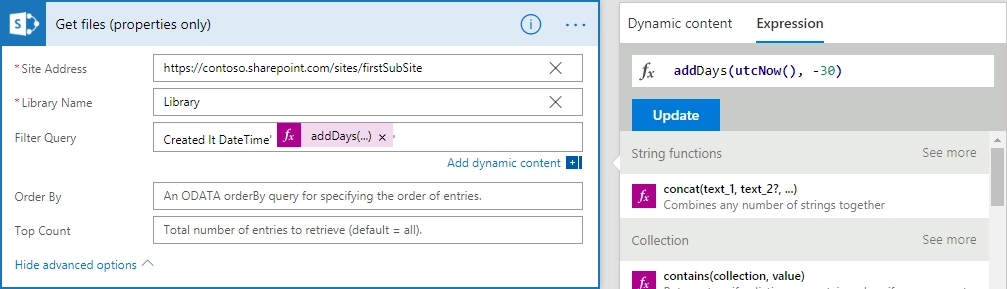
Get files (properties only)
On this step, I get all documents that are older than 30 days from the source folder.
I use following parameter values:
‘Site Address‘ as https://contoso.sharepoint.com/sites/firstSubSite - The URL of the site.
‘Library Name‘ as "Library" - The name of the source folder. In this case, it is root folder of the library.
The action uses OData filter as a value of ‘Filter Query‘ field. I compare “Created” field from document’s properties and the next expression:
DateTime'addDays(utcNow(), -30)'. As you can see, I use dynamic expression for getting 30-day offset for the current date. This allows me to query all documents older than 30 days.
Move SharePoint Document from Library
Adding the Plumsail action for the first time, you’ll be asked for a Connection name and Access Key.
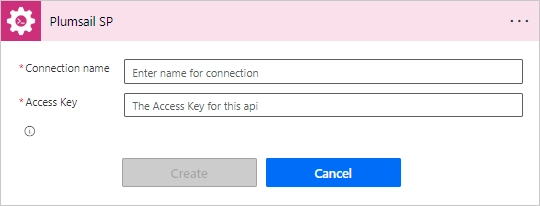
You can type any name for the connection. For example, “Plumsail Actions”. Next create an API key on your Plumsail account page, copy, and paste it to the “Access Key” field.
The Move SharePoint Document from Library action is used in “each” cycle. It is executed on results of Get files (properties only) action.
I use following parameters:
As value for ‘Source URL‘ I use the value of ‘Link to item‘ parameter from ‘Get files (properties only)‘ response:
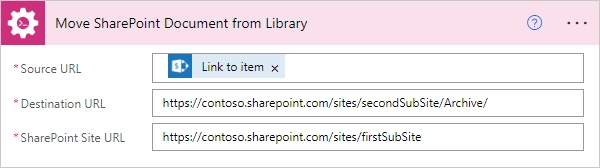
‘Destination URL‘ is specified as "https://contoso.sharepoint.com/sites/secondSubSite/Archive/" - The URL of ‘Archive‘ library on the ‘secondSubSite‘ site (it is a site with archive library)
Note
If ‘Destination URL‘ ends with slash ‘/’ the document will be placed in the folder or library without name changes. Otherwise, the document will be renamed.
And finally, ‘SharePoint Site URL‘ I specified as "https://contoso.sharepoint.com/sites/firstSubSite" - The URL of the site for the source folder.
Conclusion
That’s all! These few steps can help you to create a simple archive system that moves old documents from a source folder to your archive.
You may also extend this system by creating a specific folder for every run of this flow with Create SharePoint Folder by URL and Create SharePoint Folder in List actions.
It may be very useful if you need to archive your documents into the folder. For example, you may want to put a current date in the name.